
Embedded Web Server Administrator s Guide
Page 12
... whether to print on one side of a sheet of the document. - Lexmark Confidential until announced Scanning 12 Scanning Configuring the scan settings Configuring the copy settings 1 From the Embedded Web Server, click Settings > Copy. 2 Configure the settings. Middle Footer-Specify whether to insert text on each page of the document. - Left Header-Specify whether to insert text on the right header of the copy job. • Custom Overlay-Type a custom overlay...
... whether to print on one side of a sheet of the document. - Lexmark Confidential until announced Scanning 12 Scanning Configuring the scan settings Configuring the copy settings 1 From the Embedded Web Server, click Settings > Copy. 2 Configure the settings. Middle Footer-Specify whether to insert text on each page of the document. - Left Header-Specify whether to insert text on the right header of the copy job. • Custom Overlay-Type a custom overlay...
Embedded Web Server Administrator s Guide
Page 16
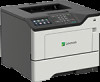
Web Link Setup • Server-Set the e‑mail server to use for the web link. • Login-Set the user name to use for the web link. • Password-Set the password to use for the web link. • Path-Set the printer network path to use for the web link. • File Name-Set the file name to use for optical character recognition (OCR). • PDF Settings-Set the PDF format of the scanned image. - PDF Version-Specify the PDF version of...
Web Link Setup • Server-Set the e‑mail server to use for the web link. • Login-Set the user name to use for the web link. • Password-Set the password to use for the web link. • Path-Set the printer network path to use for the web link. • File Name-Set the file name to use for optical character recognition (OCR). • PDF Settings-Set the PDF format of the scanned image. - PDF Version-Specify the PDF version of...
Embedded Web Server Administrator s Guide
Page 33
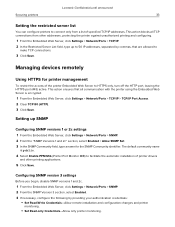
Lexmark Confidential until announced Securing printers 33 Setting the restricted server list You can configure printers to connect only from other printing applications. 5 Click Save. The default community name is encrypted. 1 From the Embedded Web Server, click Settings > Network/Ports > TCP/IP > TCP/IP Port Access. 2 Clear TCP 80 (HTTP). 3 Click Save. Configuring SNMP version 3 settings Before you begin, disable SNMP versions 1 and 2c. 1 From the Embedded Web Server, click Settings > Network/...
Lexmark Confidential until announced Securing printers 33 Setting the restricted server list You can configure printers to connect only from other printing applications. 5 Click Save. The default community name is encrypted. 1 From the Embedded Web Server, click Settings > Network/Ports > TCP/IP > TCP/IP Port Access. 2 Clear TCP 80 (HTTP). 3 Click Save. Configuring SNMP version 3 settings Before you begin, disable SNMP versions 1 and 2c. 1 From the Embedded Web Server, click Settings > Network/...
Embedded Web Server Administrator s Guide
Page 46
... printer. • Supplies Menu-Manage printer supplies. • Option Card Menu-Configure the option cards installed in color. • Network Folder ‑ Scan-Scan to the EWS requires login. Device Management The following access controls modify users' access to the menus in the Embedded Web Server that are used to use the IPP port. • Initiate Scans Remotely-Allow authenticated users to initiate remote scanning. • B/W Print-Allow authenticated users to print in black and white. • Color Print-Allow authenticated users...
... printer. • Supplies Menu-Manage printer supplies. • Option Card Menu-Configure the option cards installed in color. • Network Folder ‑ Scan-Scan to the EWS requires login. Device Management The following access controls modify users' access to the menus in the Embedded Web Server that are used to use the IPP port. • Initiate Scans Remotely-Allow authenticated users to initiate remote scanning. • B/W Print-Allow authenticated users to print in black and white. • Color Print-Allow authenticated users...

Embedded Web Server Administrator s Guide
Page 52
...screens. • Print Density-Adjust the toner density when printing documents. • Copy Density-Adjust the toner density when copying documents. Lexmark Confidential until announced Securing printers 52 Securing data Configuring printer settings 1 From the Embedded Web Server, click Settings > Device > Maintenance. 2 Depending on the printer model, click Config Menu or Configuration Menu. 3 Configure the settings. Tray Configuration • Show Tray Insert Message-Show a message about printer menu settings, status and event logs. • Menu Settings Page • Event...
...screens. • Print Density-Adjust the toner density when printing documents. • Copy Density-Adjust the toner density when copying documents. Lexmark Confidential until announced Securing printers 52 Securing data Configuring printer settings 1 From the Embedded Web Server, click Settings > Device > Maintenance. 2 Depending on the printer model, click Config Menu or Configuration Menu. 3 Configure the settings. Tray Configuration • Show Tray Insert Message-Show a message about printer menu settings, status and event logs. • Menu Settings Page • Event...
Printer Drivers for UNIX & Linux Systems
Page 46
... a user 15 changing the group name 15 removing user 15 administrator mode 32 B banner program using 27 writing 26 C collating copies 24 command line 31 creating print queues 17 creating virtual devices 16 printing from 22 CUPS 38 Customer Support, contacting 38 D default settings 32 Device Manager 16 duplex printing 24 H holding print jobs 26 hostname troubleshooting 37 I installing printer drivers before installing 6 finding space 11 on HP-UX 7 on Linpus Linux 8 on Red Flag Linux 8 on Red Hat Linux...
... a user 15 changing the group name 15 removing user 15 administrator mode 32 B banner program using 27 writing 26 C collating copies 24 command line 31 creating print queues 17 creating virtual devices 16 printing from 22 CUPS 38 Customer Support, contacting 38 D default settings 32 Device Manager 16 duplex printing 24 H holding print jobs 26 hostname troubleshooting 37 I installing printer drivers before installing 6 finding space 11 on HP-UX 7 on Linpus Linux 8 on Red Flag Linux 8 on Red Hat Linux...
Paper and Specialty Media Guide PDF
Page 24
... material, position the form in a paper jam. For integrated forms with missing labels could void the printer and cartridge service warranties. For more than once. Do not feed labels through the printer more information about printing on labels, see the documentation that requires special maintenance. Guidelines for coatings and cleaning are similar to vinyl labels. Backings for polyester labels can be required to install an oil fuser cleaner.
... material, position the form in a paper jam. For integrated forms with missing labels could void the printer and cartridge service warranties. For more than once. Do not feed labels through the printer more information about printing on labels, see the documentation that requires special maintenance. Guidelines for coatings and cleaning are similar to vinyl labels. Backings for polyester labels can be required to install an oil fuser cleaner.

Paper and Specialty Media Guide PDF
Page 81
... printer models and feeding different types of labels per sheet, the better the registration. It may contaminate your printer and cartridge warranties. During printing, the number of media, contact your Lexmark sales representative. When printing on card stock: • From the control panel, set the paper size, type, texture, and weight in the Paper menu to match the labels loaded in the tray. • Do not load labels together with paper or transparencies in the tray. • Do not use card...
... printer models and feeding different types of labels per sheet, the better the registration. It may contaminate your printer and cartridge warranties. During printing, the number of media, contact your Lexmark sales representative. When printing on card stock: • From the control panel, set the paper size, type, texture, and weight in the Paper menu to match the labels loaded in the tray. • Do not load labels together with paper or transparencies in the tray. • Do not use card...

Card for IPDS: IPDS Emulation Users Guide 5th ed.
Page 119
... support bin selection numbers 38 default mapping 38 IPDS MENU > MAP OUTPUT BINS MENU 37 bin mapping number 37 browser-based remote configuration 69 BSA (bar code) Bar Code Symbol Data .......... 93 C Cancel Job 62 Capture Data Objects (IPDS MENU > RESOURCE CAPTURE 44 captured fonts preparing fonts for capture general principles 63 mainframe host 65 captured resources how they work 63 Card for 2-D bar codes 102 BAR CODE > Bar Code Size (IPDS MENU > EMULATION 18 BAR CODE > Bar Code...
... support bin selection numbers 38 default mapping 38 IPDS MENU > MAP OUTPUT BINS MENU 37 bin mapping number 37 browser-based remote configuration 69 BSA (bar code) Bar Code Symbol Data .......... 93 C Cancel Job 62 Capture Data Objects (IPDS MENU > RESOURCE CAPTURE 44 captured fonts preparing fonts for capture general principles 63 mainframe host 65 captured resources how they work 63 Card for 2-D bar codes 102 BAR CODE > Bar Code Size (IPDS MENU > EMULATION 18 BAR CODE > Bar Code...

Card for IPDS: IPDS Emulation Users Guide 5th ed.
Page 122
... SIZE (IPDS MENU > PAPER HANDLING 32 output bin values 37 P PAPER HANDLING Menu Offset Stacking 31 option descriptions 31 OTHER ENV SIZE 32 UNIVERSAL SIZE 31 paper loading on printer's Paper Menu 47 PCL print jobs 10 PDF417 (2-D bar code 102, 104 physical page VPA 19 PLANET (bar code 98 port 5001 23 port 9600 23 port numbers overview of IPDS MENU 12 MP FEEDER ADJUST (IPDS MENU > MARGINS 43 MSI (bar code) MSI Data Corporation 93 MSI (modified Plessey code) (bar code).......... 93 N N-up printing...
... SIZE (IPDS MENU > PAPER HANDLING 32 output bin values 37 P PAPER HANDLING Menu Offset Stacking 31 option descriptions 31 OTHER ENV SIZE 32 UNIVERSAL SIZE 31 paper loading on printer's Paper Menu 47 PCL print jobs 10 PDF417 (2-D bar code 102, 104 physical page VPA 19 PLANET (bar code 98 port 5001 23 port 9600 23 port numbers overview of IPDS MENU 12 MP FEEDER ADJUST (IPDS MENU > MARGINS 43 MSI (bar code) MSI Data Corporation 93 MSI (modified Plessey code) (bar code).......... 93 N N-up printing...
Card for IPDS: IPDS Emulation Users Guide 5th ed.
Page 123
... printer problems 71 printer setup options 10 printers supported 7 product description 79 Product Identifier Self Defining Field (XOH OPC 73 Q QR Code (2-D bar code 102, 104 R remote configuration 69 Remove Data Objects (IPDS MENU > RESOURCE CAPTURE 45 Remove Fonts (IPDS MENU > RESOUCE CAPTURE 45 Remove Resources function 45 Remove User Files (IPDS MENU > Color Management>Remove User Files 30 RESOURCE CAPTURE Menu Capture Data Objects 44 Remove Data Objects 45 Remove Fonts 45 resources storage 23 RM4SCC (bar code) Royal Mail 4 State Customer Code...
... printer problems 71 printer setup options 10 printers supported 7 product description 79 Product Identifier Self Defining Field (XOH OPC 73 Q QR Code (2-D bar code 102, 104 R remote configuration 69 Remove Data Objects (IPDS MENU > RESOURCE CAPTURE 45 Remove Fonts (IPDS MENU > RESOUCE CAPTURE 45 Remove Resources function 45 Remove User Files (IPDS MENU > Color Management>Remove User Files 30 RESOURCE CAPTURE Menu Capture Data Objects 44 Remove Data Objects 45 Remove Fonts 45 resources storage 23 RM4SCC (bar code) Royal Mail 4 State Customer Code...
Card for IPDS: IPDS Printer and Host Setup Guide 9th ed.
Page 32
... the printer's MENU/Menus > Option Card Menu > IPDS MENU > EMULATION >IPDS Print Res menu item. You must use a unique name for the remote output queue for device IPDSPRT" • "Bind sense code ... Requirements vary greatly according to print the IPDS job with the Standard Network port or a MarkNet internal LAN print server (named IPDSPRT) from PostScript and PCL jobs to the printer. B. Requirements vary greatly according to Problem 5 A. Try reprinting the job after installing IPDS...
... the printer's MENU/Menus > Option Card Menu > IPDS MENU > EMULATION >IPDS Print Res menu item. You must use a unique name for the remote output queue for device IPDSPRT" • "Bind sense code ... Requirements vary greatly according to print the IPDS job with the Standard Network port or a MarkNet internal LAN print server (named IPDSPRT) from PostScript and PCL jobs to the printer. B. Requirements vary greatly according to Problem 5 A. Try reprinting the job after installing IPDS...

Card for IPDS: IPDS Printer and Host Setup Guide 9th ed.
Page 33
... Print Transform. MENU/Menus > Option Card Menu > IPDS MENU > EMULATION. Problem 8: Bad Memory System The message Bad Memory System displays and the printer stops. Problem 9: 1565 EMUL ERROR LOAD EMUL OPTION 1565 EMUL ERROR LOAD EMUL OPTION appears on the display Solution to Problem 11 The Standard Network port cannot be printed. Problem 11: Standard Network port not working . Solution to Problem 10 A. Power the printer OFF and then ON. This cannot be sure the correct size is installed. Load the correct paper size and/or check tray paper guides to Problem 8 The IPDS memory...
... Print Transform. MENU/Menus > Option Card Menu > IPDS MENU > EMULATION. Problem 8: Bad Memory System The message Bad Memory System displays and the printer stops. Problem 9: 1565 EMUL ERROR LOAD EMUL OPTION 1565 EMUL ERROR LOAD EMUL OPTION appears on the display Solution to Problem 11 The Standard Network port cannot be printed. Problem 11: Standard Network port not working . Solution to Problem 10 A. Power the printer OFF and then ON. This cannot be sure the correct size is installed. Load the correct paper size and/or check tray paper guides to Problem 8 The IPDS memory...

Users Guide PDF
Page 14
... in Hibernate mode. The printer requires user intervention. Learning about the printer 14 Use the To 3 Keypad Enter numbers or symbols in an input field. 4 Power button Turn on or turn off the printer, press and hold the power button for five seconds. 5 Stop or Cancel button Stop the current printer task. 6 Indicator light Check the printer status. 7 Volume buttons Adjust the volume of the power button and indicator light Indicator light Off Blue Red Printer status The printer is...
... in Hibernate mode. The printer requires user intervention. Learning about the printer 14 Use the To 3 Keypad Enter numbers or symbols in an input field. 4 Power button Turn on or turn off the printer, press and hold the power button for five seconds. 5 Stop or Cancel button Stop the current printer task. 6 Indicator light Check the printer status. 7 Volume buttons Adjust the volume of the power button and indicator light Indicator light Off Blue Red Printer status The printer is...

Users Guide PDF
Page 48
... next to operate in printers with a hard disk installed. Clear all settings and applications that were remotely installed. Note: Sanitize all remotely‑installed messages Erase messages that are used when printing font data. Note: Enabling this setting slows down the printer performance. Device Operations Clear Custom Status Erase user‑defined strings for a two‑sided print job. Device Operations Quiet Mode Off* On Set the printer to a value indicates the factory default setting. Device Operations Panel Menus Enable* Disable Enable access to the Screen...
... next to operate in printers with a hard disk installed. Clear all settings and applications that were remotely installed. Note: Sanitize all remotely‑installed messages Erase messages that are used when printing font data. Note: Enabling this setting slows down the printer performance. Device Operations Clear Custom Status Erase user‑defined strings for a two‑sided print job. Device Operations Quiet Mode Off* On Set the printer to a value indicates the factory default setting. Device Operations Panel Menus Enable* Disable Enable access to the Screen...

Users Guide PDF
Page 53
...errors, including XML markup errors. PDF Menu item Description Scale to Fit Off* On Scale the page content to a value indicates the factory default setting. Log File Prefix Specify the prefix for the log file name. Note: An asterisk (*) next to fit the selected paper size. Annotations Do Not Print* Print Specify whether to print annotations in the TCP/IP menu is used...the printer responds when disk usage reaches the maximum limit (100MB). E‑mail Address to Send Logs Specify the e‑mail address to Post Log Specify where the printer posts job ...
...errors, including XML markup errors. PDF Menu item Description Scale to Fit Off* On Scale the page content to a value indicates the factory default setting. Log File Prefix Specify the prefix for the log file name. Note: An asterisk (*) next to fit the selected paper size. Annotations Do Not Print* Print Specify whether to print annotations in the TCP/IP menu is used...the printer responds when disk usage reaches the maximum limit (100MB). E‑mail Address to Send Logs Specify the e‑mail address to Post Log Specify where the printer posts job ...

Users Guide PDF
Page 54
... PostScript Menu item Description Print PS Error Off* On Print a test page that the hard disk and flash option are displayed in 1200 dpi. Image Smoothing Off* On Enhance the contrast and sharpness of the fonts that are not password‑protected. Note: When set to wait for the requested font before canceling a print job. PCL Menu item Description Font Source Resident* Disk Download Flash All Specify the source of low‑resolution images. Note: Make...
... PostScript Menu item Description Print PS Error Off* On Print a test page that the hard disk and flash option are displayed in 1200 dpi. Image Smoothing Off* On Enhance the contrast and sharpness of the fonts that are not password‑protected. Note: When set to wait for the requested font before canceling a print job. PCL Menu item Description Font Source Resident* Disk Download Flash All Specify the source of low‑resolution images. Note: Make...
Users Guide PDF
Page 135
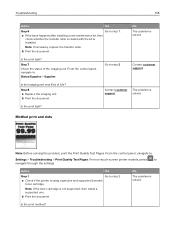
...through the settings. For non‑touch‑screen printer models, press to step 8. b Print the document. solved. From the control panel, navigate to Settings > Troubleshooting > Print Quality Test Pages. Note: If necessary, replace the transfer roller. a If the issue happens after installing a new maintenance kit, then check whether the transfer roller included with the kit is using a genuine and supported Lexmark toner cartridge. Is the print light? Contact customer support. Is the print light? a Check if the printer is installed. b Print the document...
...through the settings. For non‑touch‑screen printer models, press to step 8. b Print the document. solved. From the control panel, navigate to Settings > Troubleshooting > Print Quality Test Pages. Note: If necessary, replace the transfer roller. a If the issue happens after installing a new maintenance kit, then check whether the transfer roller included with the kit is using a genuine and supported Lexmark toner cartridge. Is the print light? Contact customer support. Is the print light? a Check if the printer is installed. b Print the document...

Users Guide PDF
Page 177
... the World Wide Web. Authorized use , free from new parts, or new and serviceable used parts, which perform like new parts -Is, during the warranty period, contact a Remarketer or Lexmark for repair or replacement (at Lexmark's option). Limited warranty service The warranty period starts on the date of all print cartridges, programs, data, and removable storage media (unless directed otherwise by a Lexmark warranty, technical support may be a new or repaired item. The replacement may update the firmware...
... the World Wide Web. Authorized use , free from new parts, or new and serviceable used parts, which perform like new parts -Is, during the warranty period, contact a Remarketer or Lexmark for repair or replacement (at Lexmark's option). Limited warranty service The warranty period starts on the date of all print cartridges, programs, data, and removable storage media (unless directed otherwise by a Lexmark warranty, technical support may be a new or repaired item. The replacement may update the firmware...

Users Guide PDF
Page 181
... rear door 111 trays 114 paper jams avoiding 105 paper jams, clearing in the standard bin 112 paper size setting 24 paper type setting 24 parallel interface card troubleshooting 119 parallel port 12 parts status checking 89 personal identification number method 87 personal identification numbers enabling 23 pick roller assembly replacing 98 pick tires replacing 96 power button light understanding the status 14 power save modes configuring 103 print driver hardware options, adding 167 print jobs not printed 151 Print Quality Test Pages 82 print quality troubleshooting blank or...
... rear door 111 trays 114 paper jams avoiding 105 paper jams, clearing in the standard bin 112 paper size setting 24 paper type setting 24 parallel interface card troubleshooting 119 parallel port 12 parts status checking 89 personal identification number method 87 personal identification numbers enabling 23 pick roller assembly replacing 98 pick tires replacing 96 power button light understanding the status 14 power save modes configuring 103 print driver hardware options, adding 167 print jobs not printed 151 Print Quality Test Pages 82 print quality troubleshooting blank or...


