
Setup Guide
Page 4
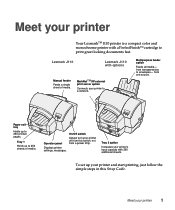
... your printer off from this Setup Guide. Tray 2 option Increases your printer to a network. from one source. Meet your printer 1 Lexmark J110 Lexmark J110 with a PerfectFinish™ cartridge to envelopes- Meet your printer Your LexmarkTM J110 printer is a compact color and monochrome printer with options Manual feeder Feeds a single sheet of media. from transparencies to print...
... your printer off from this Setup Guide. Tray 2 option Increases your printer to a network. from one source. Meet your printer 1 Lexmark J110 Lexmark J110 with a PerfectFinish™ cartridge to envelopes- Meet your printer Your LexmarkTM J110 printer is a compact color and monochrome printer with options Manual feeder Feeds a single sheet of media. from transparencies to print...
Setup Guide
Page 5
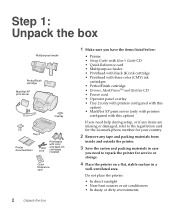
... Setup Guide with User's Guide CD • Quick Reference card • Multipurpose feeder • Printhead with black (K) ink cartridge • Printhead with three color (CMY) ink cartridges • PerfectFinish cartridge • Drivers, MarkVisionTM and Utilities CD • Power cord • Operator panel overlay • Tray 2 (only with...option) If you need help during setup, or if any items are missing or damaged, refer to the registration card for the Lexmark phone number for your country. 2 Remove any tape and packing materials from inside and outside the printer. 3 Save the carton ...
... Setup Guide with User's Guide CD • Quick Reference card • Multipurpose feeder • Printhead with black (K) ink cartridge • Printhead with three color (CMY) ink cartridges • PerfectFinish cartridge • Drivers, MarkVisionTM and Utilities CD • Power cord • Operator panel overlay • Tray 2 (only with...option) If you need help during setup, or if any items are missing or damaged, refer to the registration card for the Lexmark phone number for your country. 2 Remove any tape and packing materials from inside and outside the printer. 3 Save the carton ...
Setup Guide
Page 6
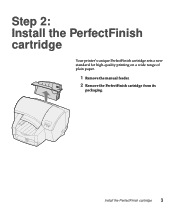
Install the PerfectFinish cartridge 3 Step 2: Install the PerfectFinish cartridge Your printer's unique PerfectFinish cartridge sets a new standard for high-quality printing on a wide range of plain paper. 1 Remove the manual feeder. 2 Remove the PerfectFinish cartridge from its packaging.
Install the PerfectFinish cartridge 3 Step 2: Install the PerfectFinish cartridge Your printer's unique PerfectFinish cartridge sets a new standard for high-quality printing on a wide range of plain paper. 1 Remove the manual feeder. 2 Remove the PerfectFinish cartridge from its packaging.

Setup Guide
Page 7
3 Remove the tape covering the valve. 4 Hold the PerfectFinish cartridge so the valve is on the left side. Valve 4 Install the PerfectFinish cartridge
3 Remove the tape covering the valve. 4 Hold the PerfectFinish cartridge so the valve is on the left side. Valve 4 Install the PerfectFinish cartridge
Setup Guide
Page 8
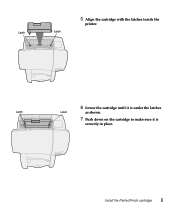
5 Align the cartridge with the latches inside the printer. Latch Latch 6 Lower the cartridge until it is under the latches Latch Latch as shown. 7 Push down on the cartridge to make sure it is securely in place. Install the PerfectFinish cartridge 5
5 Align the cartridge with the latches inside the printer. Latch Latch 6 Lower the cartridge until it is under the latches Latch Latch as shown. 7 Push down on the cartridge to make sure it is securely in place. Install the PerfectFinish cartridge 5
Setup Guide
Page 9
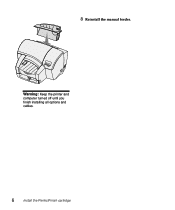
Warning: Keep the printer and computer turned off until you finish installing all options and cables. 6 Install the PerfectFinish cartridge 8 Reinstall the manual feeder.
Warning: Keep the printer and computer turned off until you finish installing all options and cables. 6 Install the PerfectFinish cartridge 8 Reinstall the manual feeder.
Setup Guide
Page 22
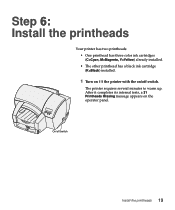
On/off switch. The printer requires several minutes to warm up. Step 6: Install the printheads Your printer has two printheads: • One printhead has three color ink cartridges (C=Cyan, M=Magenta, Y=Yellow) already installed. • The other printhead has a black ink cartridge (K=Black) installed. 1 Turn on (|) the printer with the on the operator panel. After it completes its internal tests, a 31 Printheads Missing message appears on /off switch Install the printheads 19
On/off switch. The printer requires several minutes to warm up. Step 6: Install the printheads Your printer has two printheads: • One printhead has three color ink cartridges (C=Cyan, M=Magenta, Y=Yellow) already installed. • The other printhead has a black ink cartridge (K=Black) installed. 1 Turn on (|) the printer with the on the operator panel. After it completes its internal tests, a 31 Printheads Missing message appears on /off switch Install the printheads 19
Setup Guide
Page 24
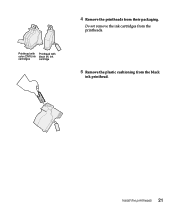
Install the printheads 21 Printhead with Printhead with color (CMY) ink black (K) ink cartridges cartridge 4 Remove the printheads from the black ink printhead. Do not remove the ink cartridges from the printheads. 5 Remove the plastic cushioning from their packaging.
Install the printheads 21 Printhead with Printhead with color (CMY) ink black (K) ink cartridges cartridge 4 Remove the printheads from the black ink printhead. Do not remove the ink cartridges from the printheads. 5 Remove the plastic cushioning from their packaging.
Setup Guide
Page 25
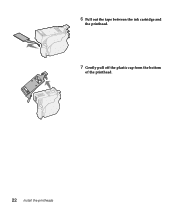
6 Pull out the tape between the ink cartridge and the printhead. 7 Gently pull off the plastic cap from the bottom of the printhead. 22 Install the printheads
6 Pull out the tape between the ink cartridge and the printhead. 7 Gently pull off the plastic cap from the bottom of the printhead. 22 Install the printheads
Setup Guide
Page 26
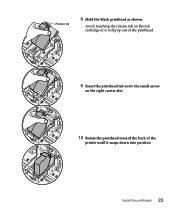
Avoid touching the release tab on the ink cartridge or it will pop out of the printhead. 9 Insert the printhead tab under the small arrow on the right carrier slot. 10 Rotate the printhead toward the back of the printer until it snaps down into position Install the printheads 23 Release tab 8 Hold the black printhead as shown.
Avoid touching the release tab on the ink cartridge or it will pop out of the printhead. 9 Insert the printhead tab under the small arrow on the right carrier slot. 10 Rotate the printhead toward the back of the printer until it snaps down into position Install the printheads 23 Release tab 8 Hold the black printhead as shown.

Setup Guide
Page 36
Congratulations! You are finished setting up your printer and are ready to print. Congratulations! 33 Use the User's Guide CD in the back of this book for: • Printing tips • Changing menu settings from the Windows driver, Macintosh driver, and the operator panel • Replacing ink cartridges, printheads and the PerfectFinish cartridge • Clearing paper jams • Troubleshooting Warning: If you move the printer, keep it level.
Congratulations! You are finished setting up your printer and are ready to print. Congratulations! 33 Use the User's Guide CD in the back of this book for: • Printing tips • Changing menu settings from the Windows driver, Macintosh driver, and the operator panel • Replacing ink cartridges, printheads and the PerfectFinish cartridge • Clearing paper jams • Troubleshooting Warning: If you move the printer, keep it level.
Setup Guide
Page 37
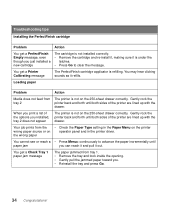
You get a Printer Calibrating message The PerfectFinish cartridge applicator is not on the 250-sheet drawer correctly. Your job prints from tray 1. • Remove the tray and look inside the opening. • Gently ... paper jam you can reach it and pull it refills. Troubleshooting tips Installing the PerfectFinish cartridge Problem Action You get a PerfectFinish Empty message, even though you just installed a new cartridge The cartridge is not installed correctly. • Remove the cartridge and re-install it, making sure it is not on the 250-sheet drawer...
You get a Printer Calibrating message The PerfectFinish cartridge applicator is not on the 250-sheet drawer correctly. Your job prints from tray 1. • Remove the tray and look inside the opening. • Gently ... paper jam you can reach it and pull it refills. Troubleshooting tips Installing the PerfectFinish cartridge Problem Action You get a PerfectFinish Empty message, even though you just installed a new cartridge The cartridge is not installed correctly. • Remove the cartridge and re-install it, making sure it is not on the 250-sheet drawer...
Setup Guide
Page 42
... have installed a maintenance kit as specified (if applicable) • Use of print media outside of Lexmark specifications • Use of other than Lexmark supplies (such as inkjet cartridges, ink, pre-coating fluid and printheads) • Use of other than Lexmark or a Lexmark authorized servicer • Operation of a product beyond the limit of its warranty period...
... have installed a maintenance kit as specified (if applicable) • Use of print media outside of Lexmark specifications • Use of other than Lexmark supplies (such as inkjet cartridges, ink, pre-coating fluid and printheads) • Use of other than Lexmark or a Lexmark authorized servicer • Operation of a product beyond the limit of its warranty period...
User's Guide
Page 6
... supplies 33 Operator panel 33 Audible alarm 33 Windows driver status window 33 MarkVision status window 34 Web page 34 Chapter 15: Replacing an ink cartridge 35 Chapter 16: Replacing PerfectFinish 38 Chapter 17: Replacing the printheads 42 Chapter 18: Aligning the printheads 47 Chapter 19: Cleaning the printheads 48 Chapter...
... supplies 33 Operator panel 33 Audible alarm 33 Windows driver status window 33 MarkVision status window 34 Web page 34 Chapter 15: Replacing an ink cartridge 35 Chapter 16: Replacing PerfectFinish 38 Chapter 17: Replacing the printheads 42 Chapter 18: Aligning the printheads 47 Chapter 19: Cleaning the printheads 48 Chapter...

User's Guide
Page 10
Manual feeder Feeds a single sheet of media. from a power strip. 1 Overview Your Lexmark™ J110 printer is a compact color and monochrome printer with options Paper exit tray Holds up to 250 sheets of media. Base printer Base printer with a PerfectFinish™ cartridge for printing great looking documents fast. MarkNet™ Pro external print server...
Manual feeder Feeds a single sheet of media. from a power strip. 1 Overview Your Lexmark™ J110 printer is a compact color and monochrome printer with options Paper exit tray Holds up to 250 sheets of media. Base printer Base printer with a PerfectFinish™ cartridge for printing great looking documents fast. MarkNet™ Pro external print server...
User's Guide
Page 27
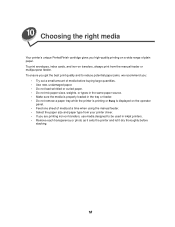
...; If you are printing iron-on transfers, always print from the manual feeder or multipurpose feeder. 10 Choosing the right media Your printer's unique PerfectFinish cartridge gives you high-quality printing on a wide range of media before stacking. 18
...; If you are printing iron-on transfers, always print from the manual feeder or multipurpose feeder. 10 Choosing the right media Your printer's unique PerfectFinish cartridge gives you high-quality printing on a wide range of media before stacking. 18
User's Guide
Page 42
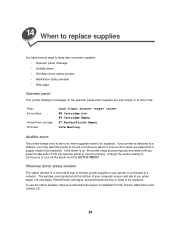
...CD. 33 To use the status window, make sure bidirectional support is connected to a network. Paper Ink cartridge PerfectFinish cartridge Printhead Load 88 Cartridge Low 89 Cartridge Empty 87 PerfectFinish Empty Life Warning Audible alarm The printer beeps once to alert you may want the printer to... The status window is a convenient way to monitor printer supplies if your computer screen and alerts you when paper, ink cartridges, PerfectFinish cartridges, and printheads are aware that a supply needs to be replaced. Change the printer setting to be replaced. 14 When to...
...CD. 33 To use the status window, make sure bidirectional support is connected to a network. Paper Ink cartridge PerfectFinish cartridge Printhead Load 88 Cartridge Low 89 Cartridge Empty 87 PerfectFinish Empty Life Warning Audible alarm The printer beeps once to alert you may want the printer to... The status window is a convenient way to monitor printer supplies if your computer screen and alerts you when paper, ink cartridges, PerfectFinish cartridges, and printheads are aware that a supply needs to be replaced. Change the printer setting to be replaced. 14 When to...
User's Guide
Page 44
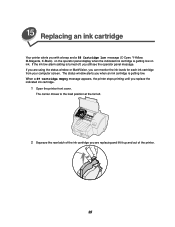
...operator panel message. If the ink low alarm setting is turned off, you replace the indicated ink cartridge. 1 Open the printer front cover. 15 Replacing an ink cartridge Your printer alerts you with a beep and a 88 Cartridge Low message (C-Cyan, Y-Yellow, M-Magenta, K-Black) on ink. If you can monitor the ink... levels for each ink cartridge from your computer screen. The carrier moves to the load position at the far left. 2 Squeeze the rear latch of the ink cartridge you are using the status window or MarkVision, you are replacing and lift it...
...operator panel message. If the ink low alarm setting is turned off, you replace the indicated ink cartridge. 1 Open the printer front cover. 15 Replacing an ink cartridge Your printer alerts you with a beep and a 88 Cartridge Low message (C-Cyan, Y-Yellow, M-Magenta, K-Black) on ink. If you can monitor the ink... levels for each ink cartridge from your computer screen. The carrier moves to the load position at the far left. 2 Squeeze the rear latch of the ink cartridge you are using the status window or MarkVision, you are replacing and lift it...
User's Guide
Page 45
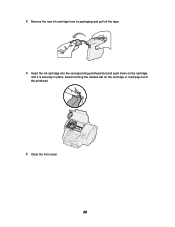
3 Remove the new ink cartridge from its packaging and pull off the tape. 4 Insert the ink cartridge into the corresponding printhead slot and push down on the cartridge or it is securely in place. Avoid touching the release tab on the cartridge until it will pop out of the printhead. 5 Close the front cover. 36
3 Remove the new ink cartridge from its packaging and pull off the tape. 4 Insert the ink cartridge into the corresponding printhead slot and push down on the cartridge or it is securely in place. Avoid touching the release tab on the cartridge until it will pop out of the printhead. 5 Close the front cover. 36

User's Guide
Page 46
To read more about ink cartridge messages, just click the message: MESSAGE: 31 DEFECTIVE INK CARTRIDGE MESSAGE: 31 MISSING CARTRIDGE XXXX MESSAGE: 32 UNSUPPORTED CARTRIDGE MESSAGE: 88 CARTRIDGE LOW MESSAGE: 89 CARTRIDGE EMPTY MESSAGE: CARTRIDGE LIFE EXPIRED MESSAGE: CARTRIDGE LIFE WARNING 37
To read more about ink cartridge messages, just click the message: MESSAGE: 31 DEFECTIVE INK CARTRIDGE MESSAGE: 31 MISSING CARTRIDGE XXXX MESSAGE: 32 UNSUPPORTED CARTRIDGE MESSAGE: 88 CARTRIDGE LOW MESSAGE: 89 CARTRIDGE EMPTY MESSAGE: CARTRIDGE LIFE EXPIRED MESSAGE: CARTRIDGE LIFE WARNING 37


