User's Guide
Page 8
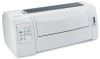
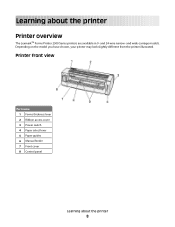
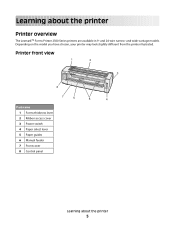
Printer front view Part name 1 Forms thickness lever 2 Ribbon access cover 3 Power switch 4 Paper select lever 5 Paper guides 6 Manual feeder 7 Front cover 8 Control panel Learning about the printer Printer overview The LexmarkTM Forms Printer 2500 Series printers are available in 9- Learning about the printer 8 Depending on the model you have chosen, your printer may look slightly different from the printer illustrated. and 24-wire narrow- and wide-carriage models.
Printer front view Part name 1 Forms thickness lever 2 Ribbon access cover 3 Power switch 4 Paper select lever 5 Paper guides 6 Manual feeder 7 Front cover 8 Control panel Learning about the printer Printer overview The LexmarkTM Forms Printer 2500 Series printers are available in 9- Learning about the printer 8 Depending on the model you have chosen, your printer may look slightly different from the printer illustrated. and 24-wire narrow- and wide-carriage models.
User's Guide
Page 9
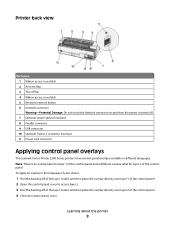
... place the overlay directly over layer 1 of the control panel. Learning about the printer 9 Printer back view Part name 1 Ribbon access cover latch 2 Acoustic flap 3 Tear off bar 4 Ribbon access cover latch 5 Recessed network button 6 Network connector Warning-Potential Damage: Do not... knockout 8 Parallel connector 9 USB connector 10 Optional Tractor 2 connector knockout 11 Power cord connector Applying control panel overlays The Lexmark Forms Printer 2500 Series printers have control panel overlays available in the language of your choice: 1 Peel the backing off of the layer 1 label, ...
... place the overlay directly over layer 1 of the control panel. Learning about the printer 9 Printer back view Part name 1 Ribbon access cover latch 2 Acoustic flap 3 Tear off bar 4 Ribbon access cover latch 5 Recessed network button 6 Network connector Warning-Potential Damage: Do not... knockout 8 Parallel connector 9 USB connector 10 Optional Tractor 2 connector knockout 11 Power cord connector Applying control panel overlays The Lexmark Forms Printer 2500 Series printers have control panel overlays available in the language of your choice: 1 Peel the backing off of the layer 1 label, ...
User's Guide
Page 57
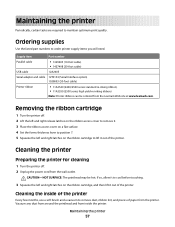
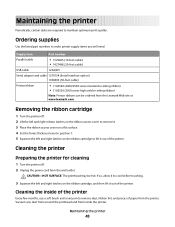
...printer Preparing the printer for cleaning 1 Turn the printer off . 2 Lift the left and right release latches on the ribbon access cover to remove it. 3 Place the ribbon access cover on a flat surface. 4 Set the forms ...lexmark.com. Supply item Part number Parallel cable • 1329605 (10-foot cable) • 1427498 (20-foot cable) USB cable 12A2405 Serial adapter and cable 12T0154 (Serial Interface option) 1038693 (50-foot cable) Printer ribbon • 11A3540 (2400/2500 series standard re-inking ribbon) • 11A3550 (2500 series high yield re-inking ribbon) Note: Printer ribbons...
...printer Preparing the printer for cleaning 1 Turn the printer off . 2 Lift the left and right release latches on the ribbon access cover to remove it. 3 Place the ribbon access cover on a flat surface. 4 Set the forms ...lexmark.com. Supply item Part number Parallel cable • 1329605 (10-foot cable) • 1427498 (20-foot cable) USB cable 12A2405 Serial adapter and cable 12T0154 (Serial Interface option) 1038693 (50-foot cable) Printer ribbon • 11A3540 (2400/2500 series standard re-inking ribbon) • 11A3550 (2500 series high yield re-inking ribbon) Note: Printer ribbons...
User's Guide
Page 67
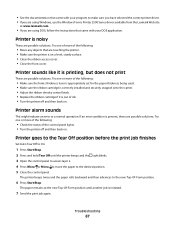
...; Close the ribbon access cover. • Close the front cover. • See the documentation that came with your program to make sure you have selected the correct printer driver. • If you are using Windows, use the Windows Forms Printer 2500 Series driver available from the Lexmark Web site at... the new Top-Of-Form position until the printer beeps and the light blinks. 3 Open the control ...
...; Close the ribbon access cover. • Close the front cover. • See the documentation that came with your program to make sure you have selected the correct printer driver. • If you are using Windows, use the Windows Forms Printer 2500 Series driver available from the Lexmark Web site at... the new Top-Of-Form position until the printer beeps and the light blinks. 3 Open the control ...
User's Guide
Page 69
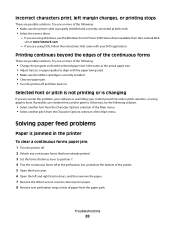
...lexmark.com. - Try one or more of the following : • Change the program so that have already printed. 3 Set the forms thickness lever to align with your control panel font and/or pitch selection, or using Windows, use resident fonts and/or pitches. If possible, use the Windows Forms Printer 2500 Series... driver available from the Character Options selection of the Main menu. Incorrect characters print, left and right tractor doors, and then remove the paper. 7 Remove the ribbon access cover to clear any torn paper...
...lexmark.com. - Try one or more of the following : • Change the program so that have already printed. 3 Set the forms thickness lever to align with your control panel font and/or pitch selection, or using Windows, use resident fonts and/or pitches. If possible, use the Windows Forms Printer 2500 Series... driver available from the Character Options selection of the Main menu. Incorrect characters print, left and right tractor doors, and then remove the paper. 7 Remove the ribbon access cover to clear any torn paper...
Quick Reference
Page 5
Printer front view 1 2 A 3 8 7 6 5 4 Part name 1 Forms thickness lever 2 Ribbon access cover 3 Power switch 4 Paper select lever 5 Paper guides 6 Manual feeder 7 Front cover 8 Control panel Learning about the printer Printer overview The LexmarkTM Forms Printer 2500 Series printers are available in 9- and 24-wire narrow- Learning about the printer 5 and wide-carriage models. Depending on the model you have chosen, your printer may look slightly different from the printer illustrated.
Printer front view 1 2 A 3 8 7 6 5 4 Part name 1 Forms thickness lever 2 Ribbon access cover 3 Power switch 4 Paper select lever 5 Paper guides 6 Manual feeder 7 Front cover 8 Control panel Learning about the printer Printer overview The LexmarkTM Forms Printer 2500 Series printers are available in 9- and 24-wire narrow- Learning about the printer 5 and wide-carriage models. Depending on the model you have chosen, your printer may look slightly different from the printer illustrated.
Quick Reference
Page 48
... cable) Printer ribbon • 11A3540 (2400/2500 series standard re-inking ribbon) • 11A3550 (2500 series high yield re-inking ribbon) Note: Printer ribbons can be hot. Cleaning the printer Preparing the printer for cleaning 1 Turn the printer off . 2 Lift the left and right release latches on the ribbon access cover to remove it. 3 Place the ribbon access cover on a flat surface. 4 Set the forms thickness...
... cable) Printer ribbon • 11A3540 (2400/2500 series standard re-inking ribbon) • 11A3550 (2500 series high yield re-inking ribbon) Note: Printer ribbons can be hot. Cleaning the printer Preparing the printer for cleaning 1 Turn the printer off . 2 Lift the left and right release latches on the ribbon access cover to remove it. 3 Place the ribbon access cover on a flat surface. 4 Set the forms thickness...


