User's Guide
Page 4
... optional Tractor 2 Feeder 71 Printer does not feed from the Auto Sheet Feeder ...71 The optional Tractor 2 Feeder positions paper at incorrect Top-Of-Form position 71 The Auto Sheet Feeder feeds paper at an incorrect rate 71 The Auto Sheet Feeder places paper at the wrong Top-Of-Form position 72 Paper fed from the Auto Sheet Feeder is skewed...72 The Auto Sheet Feeder feeds multiple sheets ...72 Solving...
... optional Tractor 2 Feeder 71 Printer does not feed from the Auto Sheet Feeder ...71 The optional Tractor 2 Feeder positions paper at incorrect Top-Of-Form position 71 The Auto Sheet Feeder feeds paper at an incorrect rate 71 The Auto Sheet Feeder places paper at the wrong Top-Of-Form position 72 Paper fed from the Auto Sheet Feeder is skewed...72 The Auto Sheet Feeder feeds multiple sheets ...72 Solving...
User's Guide
Page 13
... current default font light is on solid. 3 Open the manual feeder, and then move the paper select lever to the position. 4 Move the left paper guide to the right until it stops. 5 Insert a single sheet of paper into the front of the printer. 6 Adjust the right paper guide to fit the paper width... the Font button until the Paper Out light stops blinking. • If Auto Cut Sheet Load is set to On, the paper feeds automatically to the Top-Of-Form. • If Auto Cut Sheet Load is set to push the paper into the printer until all the control panel lights blink. 10 Release the Font button...
... current default font light is on solid. 3 Open the manual feeder, and then move the paper select lever to the position. 4 Move the left paper guide to the right until it stops. 5 Insert a single sheet of paper into the front of the printer. 6 Adjust the right paper guide to fit the paper width... the Font button until the Paper Out light stops blinking. • If Auto Cut Sheet Load is set to On, the paper feeds automatically to the Top-Of-Form. • If Auto Cut Sheet Load is set to push the paper into the printer until all the control panel lights blink. 10 Release the Font button...

User's Guide
Page 26
...when all of the following are true: • The printer has finished printing. • The paper has advanced to the Top-Of-Form on the next page. • No data, printer control codes, or escape codes have installed the optional Auto Sheet Feeder or Tractor 2, see the documentation that came with your ...Top-Of-Form and now want to change the Tear Off position, follow...
...when all of the following are true: • The printer has finished printing. • The paper has advanced to the Top-Of-Form on the next page. • No data, printer control codes, or escape codes have installed the optional Auto Sheet Feeder or Tractor 2, see the documentation that came with your ...Top-Of-Form and now want to change the Tear Off position, follow...
User's Guide
Page 29
... the pull tractor Make sure the tractor is set to On, the printer moves the paper to print continuous forms, line spacing within the first 1.5 inches of the first form may not be uniform. Note: If you have installed the optional Auto Sheet Feeder or Tractor 2, see the documentation that came with the paper thickness you...
... the pull tractor Make sure the tractor is set to On, the printer moves the paper to print continuous forms, line spacing within the first 1.5 inches of the first form may not be uniform. Note: If you have installed the optional Auto Sheet Feeder or Tractor 2, see the documentation that came with the paper thickness you...
User's Guide
Page 32
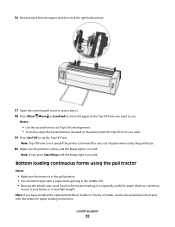
...paper when using the pull tractor. 20 Make sure the printer is online, and the Ready light is on the platen) with the option for bottom loading, it is very light weight. Note: If you have installed the optional Auto Sheet Feeder or Tractor 2 Feeder, see the documentation that has a tendency to curl, ...is very heavy, or is especially useful for paper that came with the Top-Of-Form you want . 19 Press Set TOF to set the Top-Of...
...paper when using the pull tractor. 20 Make sure the printer is online, and the Ready light is on the platen) with the option for bottom loading, it is very light weight. Note: If you have installed the optional Auto Sheet Feeder or Tractor 2 Feeder, see the documentation that has a tendency to curl, ...is very heavy, or is especially useful for paper that came with the Top-Of-Form you want . 19 Press Set TOF to set the Top-Of...
User's Guide
Page 37
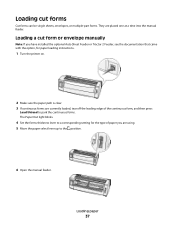
.... 5 Move the paper select lever up to the position. 6 Open the manual feeder. Loading cut form or envelope manually Note: If you have installed the optional Auto Sheet Feeder or Tractor 2 Feeder, see the documentation that came with the option, for paper loading instructions. 1 Turn the printer on. 2 Make sure the paper path is clear. 3 If continuous...
.... 5 Move the paper select lever up to the position. 6 Open the manual feeder. Loading cut form or envelope manually Note: If you have installed the optional Auto Sheet Feeder or Tractor 2 Feeder, see the documentation that came with the option, for paper loading instructions. 1 Turn the printer on. 2 Make sure the paper path is clear. 3 If continuous...
User's Guide
Page 43
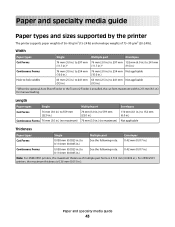
... in.) to 241 mm Not applicable (9.5 in.) (9.5 in.) * When the optional Auto Sheet Feeder or the Tractor 2 Feeder is installed, the cut form maximum width is 215 mm (8.5 in .) Multiple part See the following note. 0.42 mm (0.017 in.) Note: For 2580/2581 printers, the maximum thickness of 75-90 g/m2 (20-24 lb). Paper and...
... in.) to 241 mm Not applicable (9.5 in.) (9.5 in.) * When the optional Auto Sheet Feeder or the Tractor 2 Feeder is installed, the cut form maximum width is 215 mm (8.5 in .) Multiple part See the following note. 0.42 mm (0.017 in.) Note: For 2580/2581 printers, the maximum thickness of 75-90 g/m2 (20-24 lb). Paper and...
User's Guide
Page 52
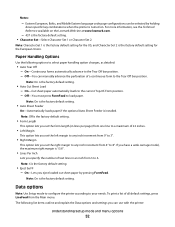
... the optional Auto Sheet Feeder is the factory default setting. Eastern European, Baltic, and Middle Eastern language code page configurations can be selected by holding down specific key combinations when the printer is turned on the Lexmark Web site at www.lexmark.com. - 437 is 13.6". • Lines Per Inch Lets you set the form length (in...
... the optional Auto Sheet Feeder is the factory default setting. Eastern European, Baltic, and Middle Eastern language code page configurations can be selected by holding down specific key combinations when the printer is turned on the Lexmark Web site at www.lexmark.com. - 437 is 13.6". • Lines Per Inch Lets you set the form length (in...

User's Guide
Page 70
... of the following : • Remove the Auto Sheet Feeder, remove any foreign objects. 3 Reinstall the Auto Sheet Feeder. Printer does not feed paper These are possible solutions. Paper jam in the printer. • Readjust the right tractor position. • Make sure the forms thickness lever is jammed in the Auto Sheet Feeder jams at the printer entrance These are possible solutions. Look for...
... of the following : • Remove the Auto Sheet Feeder, remove any foreign objects. 3 Reinstall the Auto Sheet Feeder. Printer does not feed paper These are possible solutions. Paper jam in the printer. • Readjust the right tractor position. • Make sure the forms thickness lever is jammed in the Auto Sheet Feeder jams at the printer entrance These are possible solutions. Look for...

User's Guide
Page 71
... the Auto Sheet Feeder, move the continuous forms to the park position using isopropyl alcohol and a clean cloth. Rotate one or more information, see "Main menu options" on the selected tractor feeder. • Plug the optional Tractor 2 Feeder into the back of the printer. For more of the following: • Remove all paper from the printer. 2 Turn the Auto Sheet Feeder...
... the Auto Sheet Feeder, move the continuous forms to the park position using isopropyl alcohol and a clean cloth. Rotate one or more information, see "Main menu options" on the selected tractor feeder. • Plug the optional Tractor 2 Feeder into the back of the printer. For more of the following: • Remove all paper from the printer. 2 Turn the Auto Sheet Feeder...

User's Guide
Page 72
...printer. 2 Turn the Auto Sheet Feeder upside down, and then place it on a flat surface. 3 Clean the two paper guide rollers located inside the bottom of the following: • Remove paper from the paper bin. • Fan the paper, and then reload it. • Remove all paper from the Auto Sheet Feeder is set correctly. The Auto Sheet Feeder... places paper at the wrong Top-Of-Form position These are possible solutions. Try one roller while applying the cleaning cloth...
...printer. 2 Turn the Auto Sheet Feeder upside down, and then place it on a flat surface. 3 Clean the two paper guide rollers located inside the bottom of the following: • Remove paper from the paper bin. • Fan the paper, and then reload it. • Remove all paper from the Auto Sheet Feeder is set correctly. The Auto Sheet Feeder... places paper at the wrong Top-Of-Form position These are possible solutions. Try one roller while applying the cleaning cloth...

User's Guide
Page 83
... 77, 78, 79, 80 O offline setting printer 20 Okidata MICROLINE emulation mode using 16 online setting printer 20 ordering supplies 57 P paper advancing 20 paper feed troubleshooting Auto Sheet Feeder feeds multiple sheets 72 Auto Sheet Feeder positions paper incorrectly 72 incorrect Top-Of-Form position 71, 72 jam in Tractor 2 Feeder 70 optional Tractor 2 Feeder does not feed 71 Index 83
... 77, 78, 79, 80 O offline setting printer 20 Okidata MICROLINE emulation mode using 16 online setting printer 20 ordering supplies 57 P paper advancing 20 paper feed troubleshooting Auto Sheet Feeder feeds multiple sheets 72 Auto Sheet Feeder positions paper incorrectly 72 incorrect Top-Of-Form position 71, 72 jam in Tractor 2 Feeder 70 optional Tractor 2 Feeder does not feed 71 Index 83
User's Guide
Page 84
...tractor converting 45 paper paths 25 R recycling Lexmark products 58 WEEE statement 79 ribbon cartridge removing 57 S safety information 7 security supporting IPSec 60 supporting SNMPv3 60 using 802.1x authentication 61 setting Top-Of-Form 40, 41, 42 Setup mode Control ... misfeeds paper is jammed in the printer 69 troubleshooting, paper feed Auto Sheet Feeder feeds at incorrect rate 71 Auto Sheet Feeder feeds multiple sheets 72 Auto Sheet Feeder positions paper incorrectly 72 incorrect Top-Of-Form position 71, 72 jam in Tractor 2 Feeder 70 optional Tractor 2 Feeder does not feed 71 Index 84
...tractor converting 45 paper paths 25 R recycling Lexmark products 58 WEEE statement 79 ribbon cartridge removing 57 S safety information 7 security supporting IPSec 60 supporting SNMPv3 60 using 802.1x authentication 61 setting Top-Of-Form 40, 41, 42 Setup mode Control ... misfeeds paper is jammed in the printer 69 troubleshooting, paper feed Auto Sheet Feeder feeds at incorrect rate 71 Auto Sheet Feeder feeds multiple sheets 72 Auto Sheet Feeder positions paper incorrectly 72 incorrect Top-Of-Form position 71, 72 jam in Tractor 2 Feeder 70 optional Tractor 2 Feeder does not feed 71 Index 84
User's Guide
Page 85
... paper incorrectly 71 paper fed from Auto Sheet Feeder is skewed 72 paper fed in Auto Sheet Feeder jams at printer entrance 70 paper jammed in Auto Sheet Feeder 70 printer does not feed from Auto Sheet Feeder 71 printer does not feed paper 70 troubleshooting, print buttons do not work 68 incorrect characters print, left margin changes, or printing ...of lines on a page 74 lines do not start at left margin 68 print is too light 73 printer goes to Tear Off position before job finishes 67 smudged forms or print too dark 74 specified font or pitch is not printing or is changing 69 U unlocking ...
... paper incorrectly 71 paper fed from Auto Sheet Feeder is skewed 72 paper fed in Auto Sheet Feeder jams at printer entrance 70 paper jammed in Auto Sheet Feeder 70 printer does not feed from Auto Sheet Feeder 71 printer does not feed paper 70 troubleshooting, print buttons do not work 68 incorrect characters print, left margin changes, or printing ...of lines on a page 74 lines do not start at left margin 68 print is too light 73 printer goes to Tear Off position before job finishes 67 smudged forms or print too dark 74 specified font or pitch is not printing or is changing 69 U unlocking ...
Quick Reference
Page 17
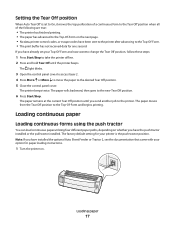
...factory default setting for your Top-Of-Form and now want to change the Tear Off position, follow these steps: 1 Press Start/Stop to take the printer offline. 2 Press and hold Tear Off until you have installed the optional Auto Sheet Feeder or Tractor 2, see the documentation that ...came with your option for one second. Loading continuous paper Loading continuous forms using the push tractor You can load continuous...
...factory default setting for your Top-Of-Form and now want to change the Tear Off position, follow these steps: 1 Press Start/Stop to take the printer offline. 2 Press and hold Tear Off until you have installed the optional Auto Sheet Feeder or Tractor 2, see the documentation that ...came with your option for one second. Loading continuous paper Loading continuous forms using the push tractor You can load continuous...

Quick Reference
Page 20
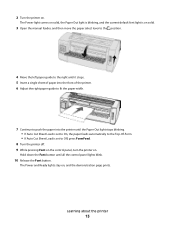
Loading paper 20 Front loading continuous forms using . 4 Remove the ribbon access cover. 5 Move the paper select lever down to a setting corresponding with the paper thickness you have installed the optional Auto Sheet Feeder or Tractor 2, see the documentation that came with your option for paper loading instructions. 1 Turn the printer on. 2 Make sure the paper...
Loading paper 20 Front loading continuous forms using . 4 Remove the ribbon access cover. 5 Move the paper select lever down to a setting corresponding with the paper thickness you have installed the optional Auto Sheet Feeder or Tractor 2, see the documentation that came with your option for paper loading instructions. 1 Turn the printer on. 2 Make sure the paper...

Quick Reference
Page 23
... for paper loading instructions. Loading paper 23 Note: If you have installed the optional Auto Sheet Feeder or Tractor 2 Feeder, see the documentation that has a tendency to curl, is very heavy, or is on solid. Bottom loading continuous forms using the pull tractor Notes: • Make sure the tractor is in the pull.... • Use a furniture type with the Top-Of-Form you want . 19 Press Set TOF to set the Top-Of-Form. Note: Top-Of-Form is not saved if the printer is turned off or runs out of it. • Because the printer uses a pull function for bottom loading, it is on ...
... for paper loading instructions. Loading paper 23 Note: If you have installed the optional Auto Sheet Feeder or Tractor 2 Feeder, see the documentation that has a tendency to curl, is very heavy, or is on solid. Bottom loading continuous forms using the pull tractor Notes: • Make sure the tractor is in the pull.... • Use a furniture type with the Top-Of-Form you want . 19 Press Set TOF to set the Top-Of-Form. Note: Top-Of-Form is not saved if the printer is turned off or runs out of it. • Because the printer uses a pull function for bottom loading, it is on ...

Quick Reference
Page 28
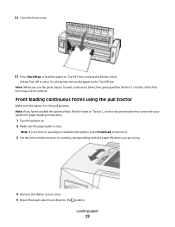
... the leading edge of the continuous form, and then press Load/Unload to park the continuous forms. The Paper Out light blinks. 4 Set the forms thickness lever to the position. 6 Open the manual feeder. Loading cut form or envelope manually Note: If you have installed the optional Auto Sheet Feeder or Tractor 2 Feeder, see the documentation that came with...
... the leading edge of the continuous form, and then press Load/Unload to park the continuous forms. The Paper Out light blinks. 4 Set the forms thickness lever to the position. 6 Open the manual feeder. Loading cut form or envelope manually Note: If you have installed the optional Auto Sheet Feeder or Tractor 2 Feeder, see the documentation that came with...
Quick Reference
Page 34
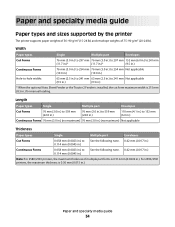
... in.) 0.114 mm (0.0045 in.) Note: For 2580/2581 printers, the maximum thickness of 75-90 g/m2 (20-24 lb). For 2590/2591 printers, the maximum thickness is 215 mm (8.5 in .). Length Paper types Single Multiple part Envelopes Cut Forms 76 mm (3.0 in.) to 559 mm (22.0 in.) 76... part Envelopes Cut Forms 0.058 mm (0.0023 in.) to See the following note. 0.42 mm (0.017 in.) 0.114 mm (0.0045 in.) Continuous Forms 0.058 mm (0.0023 in.) to 241 mm Not applicable (9.5 in.) (9.5 in.) * When the optional Auto Sheet Feeder or the Tractor 2 Feeder is installed, the cut form maximum width is ...
... in.) 0.114 mm (0.0045 in.) Note: For 2580/2581 printers, the maximum thickness of 75-90 g/m2 (20-24 lb). For 2590/2591 printers, the maximum thickness is 215 mm (8.5 in .). Length Paper types Single Multiple part Envelopes Cut Forms 76 mm (3.0 in.) to 559 mm (22.0 in.) 76... part Envelopes Cut Forms 0.058 mm (0.0023 in.) to See the following note. 0.42 mm (0.017 in.) 0.114 mm (0.0045 in.) Continuous Forms 0.058 mm (0.0023 in.) to 241 mm Not applicable (9.5 in.) (9.5 in.) * When the optional Auto Sheet Feeder or the Tractor 2 Feeder is installed, the cut form maximum width is ...

Quick Reference
Page 43
... the optional Auto Sheet Feeder is the factory default setting. • Eject by FF - Note: 6 is installed. If you have a wide carriage model, the maximum right margin is 13.6". • Lines Per Inch Lets you eject loaded cut sheet paper by holding down specific key combinations when the printer is turned on the Lexmark Web site...
... the optional Auto Sheet Feeder is the factory default setting. • Eject by FF - Note: 6 is installed. If you have a wide carriage model, the maximum right margin is 13.6". • Lines Per Inch Lets you eject loaded cut sheet paper by holding down specific key combinations when the printer is turned on the Lexmark Web site...


