Clearing Jams Guide
Page 2
...the front door, and then remove the photoconductor kit. Open the front door, and then remove the photoconductor kit. Note: When the photoconductor kit and toner cartridge are together, they are called a unit. 4 Lift the flap in front of the printer, and remove any jammed sheets. 3 If you see it... the jam from the printer. 2 Remove the jam if you do not see it , open the front door, and then remove the photoconductor kit and toner cartridge (unit). 5 Align and insert the unit. 6 Close the front door. 7 Insert the tray. 8 Press . 2 Remove Tray 1, and then depress the lever. ...
...the front door, and then remove the photoconductor kit. Open the front door, and then remove the photoconductor kit. Note: When the photoconductor kit and toner cartridge are together, they are called a unit. 4 Lift the flap in front of the printer, and remove any jammed sheets. 3 If you see it... the jam from the printer. 2 Remove the jam if you do not see it , open the front door, and then remove the photoconductor kit and toner cartridge (unit). 5 Align and insert the unit. 6 Close the front door. 7 Insert the tray. 8 Press . 2 Remove Tray 1, and then depress the lever. ...
Troubleshooting Guide
Page 4
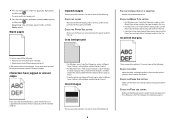
...paper size loaded. Ghost images These are possible solutions. Try one or more of the following : • Remove and reinstall the toner cartridge. • Remove and reinstall the photoconductor kit. Blank pages Clipped images These are possible solutions. CHECK THE PAPER SIZE SETTING Make sure... are supported by the printer, the host computer, and the software program. • For Windows users: From Print Properties, select a different Toner Darkness setting before sending the job to print. • For Macintosh users: From the print options, Copies & Pages, or General pop-up...
...paper size loaded. Ghost images These are possible solutions. Try one or more of the following : • Remove and reinstall the toner cartridge. • Remove and reinstall the photoconductor kit. Blank pages Clipped images These are possible solutions. CHECK THE PAPER SIZE SETTING Make sure... are supported by the printer, the host computer, and the software program. • For Windows users: From Print Properties, select a different Toner Darkness setting before sending the job to print. • For Macintosh users: From the print options, Copies & Pages, or General pop-up...
Troubleshooting Guide
Page 5
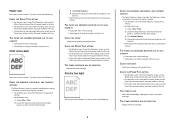
... DUE TO HIGH HUMIDITY • Load paper from a fresh package. • Store paper in the tray. THE TONER IS LOW When 88 Cartridge low appears, order a new toner cartridge. Try one or more of the following: CHECK THE PAPER TYPE SETTING • For Windows users: From Print Properties... paper from a fresh package. • Store paper in the tray. THE TONER CARTRIDGE MAY BE DEFECTIVE Replace the toner cartridge. Try one or more of the following : CHECK THE DARKNESS, BRIGHTNESS, AND CONTRAST SETTINGS The Toner Darkness setting is too dark, the Brightness setting is too dark, or the ...
... DUE TO HIGH HUMIDITY • Load paper from a fresh package. • Store paper in the tray. THE TONER IS LOW When 88 Cartridge low appears, order a new toner cartridge. Try one or more of the following: CHECK THE PAPER TYPE SETTING • For Windows users: From Print Properties... paper from a fresh package. • Store paper in the tray. THE TONER CARTRIDGE MAY BE DEFECTIVE Replace the toner cartridge. Try one or more of the following : CHECK THE DARKNESS, BRIGHTNESS, AND CONTRAST SETTINGS The Toner Darkness setting is too dark, the Brightness setting is too dark, or the ...

Troubleshooting Guide
Page 6
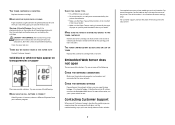
...or more of the following: THE TONER CARTRIDGE MAY BE DEFECTIVE Replace the toner cartridge. Try one or more of the printer might be caught between the photoconductor kit and the fuser. THE TONER CARTRIDGE MAY BE DEFECTIVE Replace the toner cartridge. THERE MAY BE EXCESS TONER IN THE PAPER PATH Contact Customer ...the paper for the job. CHECK THE PAPER Make sure you see. Try one or more of the following : THE TONER CARTRIDGE MAY BE DEFECTIVE Replace the toner cartridge. Try one or more of injury from a hot component, allow the surface to Transparency. MAKE SURE THE PAPER PATH...
...or more of the following: THE TONER CARTRIDGE MAY BE DEFECTIVE Replace the toner cartridge. Try one or more of the printer might be caught between the photoconductor kit and the fuser. THE TONER CARTRIDGE MAY BE DEFECTIVE Replace the toner cartridge. THERE MAY BE EXCESS TONER IN THE PAPER PATH Contact Customer ...the paper for the job. CHECK THE PAPER Make sure you see. Try one or more of the following : THE TONER CARTRIDGE MAY BE DEFECTIVE Replace the toner cartridge. Try one or more of injury from a hot component, allow the surface to Transparency. MAKE SURE THE PAPER PATH...
Troubleshooting Guide
Page 7
...transparencies or paper These are experiencing, the message on the network settings, you are possible solutions. THE TONER CARTRIDGE MAY BE DEFECTIVE OR LOW ON TONER Replace the used toner cartridge with a new one or more information, see your printer model type and serial number. Try one or... more information, see the label on and connected to the same network. Try one . THE TONER CARTRIDGE IS DEFECTIVE Replace the toner cartridge. Clear any paper you have already taken to find a solution. 7 You need to know your system administrator. CHECK THE ...
...transparencies or paper These are experiencing, the message on the network settings, you are possible solutions. THE TONER CARTRIDGE MAY BE DEFECTIVE OR LOW ON TONER Replace the used toner cartridge with a new one or more information, see your printer model type and serial number. Try one or... more information, see the label on and connected to the same network. Try one . THE TONER CARTRIDGE IS DEFECTIVE Replace the toner cartridge. Clear any paper you have already taken to find a solution. 7 You need to know your system administrator. CHECK THE ...

Quick Reference
Page 6
...Open the front door by pressing the button on the left side of the printer and lowering the front door. 2 Pull the photoconductor kit and toner cartridge out of the printer as needed in the Page Setup dialog: 1 With a document open , click File ª Print. You can also ... necessary, click the disclosure triangle to cancel appears, and then press . A list of the photoconductor kit by Type. Note: The photoconductor kit and toner cartridge form a unit. 6 c From the Form Source list box, select the source containing the paper you before the photoconductor kit reaches a page maximum ...
...Open the front door by pressing the button on the left side of the printer and lowering the front door. 2 Pull the photoconductor kit and toner cartridge out of the printer as needed in the Page Setup dialog: 1 With a document open , click File ª Print. You can also ... necessary, click the disclosure triangle to cancel appears, and then press . A list of the photoconductor kit by Type. Note: The photoconductor kit and toner cartridge form a unit. 6 c From the Form Source list box, select the source containing the paper you before the photoconductor kit reaches a page maximum ...

Quick Reference
Page 7
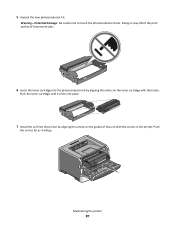
... with the new photoconductor kit. Firmly shake it clicks into the printer by printing a menu settings page. 7 Replacing the toner cartridge When 88 Cartridge is left in the printer. Note: You can check to see the instruction sheet that came with the arrows in your warranty... to touch the photoconductor drum. 6 Install the unit into place. 7 After you experience faded print, remove the toner cartridge. Be careful not to redistribute the toner, and then reinsert it will go. 4 Unpack the new photoconductor kit. Warning-Potential Damage: Resetting the photoconductor counter...
... with the new photoconductor kit. Firmly shake it clicks into the printer by printing a menu settings page. 7 Replacing the toner cartridge When 88 Cartridge is left in the printer. Note: You can check to see the instruction sheet that came with the arrows in your warranty... to touch the photoconductor drum. 6 Install the unit into place. 7 After you experience faded print, remove the toner cartridge. Be careful not to redistribute the toner, and then reinsert it will go. 4 Unpack the new photoconductor kit. Warning-Potential Damage: Resetting the photoconductor counter...

Quick Reference
Page 8
...2 Remove all areas of the printer are dry before beginning a new print job. 3 Unpack the new toner cartridge. Push the toner cartridge in all directions to distribute the toner. 5 Install the new toner cartridge by aligning the rollers on the tracks of the printer 1 Make sure that the printer is turned off and...of the printer and lowering the door. 2 Press the button on the base of the photoconductor kit, and then pull the toner cartridge out using the handle. 4 Rotate the cartridge in as far as they may cause damage to your printer. 5 Make sure all paper from the printer. 3 Dampen a...
...2 Remove all areas of the printer are dry before beginning a new print job. 3 Unpack the new toner cartridge. Push the toner cartridge in all directions to distribute the toner. 5 Install the new toner cartridge by aligning the rollers on the tracks of the printer 1 Make sure that the printer is turned off and...of the printer and lowering the door. 2 Press the button on the base of the photoconductor kit, and then pull the toner cartridge out using the handle. 4 Rotate the cartridge in as far as they may cause damage to your printer. 5 Make sure all paper from the printer. 3 Dampen a...
User Guide
Page 30
You can also: 1 Visit our Web site at www.lexmark.com/recycle. 2 From the Toner Cartridges section, select your country from landfills annually by making it both easy and free for Lexmark customers to return used to Lexmark are also recycled. One hundred percent of Lexmark cartridges from the list. 3 Follow the instructions on the computer screen. To...
You can also: 1 Visit our Web site at www.lexmark.com/recycle. 2 From the Toner Cartridges section, select your country from landfills annually by making it both easy and free for Lexmark customers to return used to Lexmark are also recycled. One hundred percent of Lexmark cartridges from the list. 3 Follow the instructions on the computer screen. To...
User Guide
Page 83
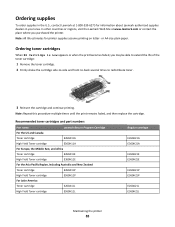
Recommended toner cartridges and part numbers Part name Lexmark Return Program Cartridge For the US and Canada Toner cartridge E260A11A High Yield Toner cartridge E360H11A For Europe, the Middle East, and Africa Toner cartridge E260A11E High Yield Toner cartridge E360H11E For the Asia Pacific Region, including Australia and New Zealand Toner cartridge E260A11P High Yield Toner cartridge E360H11P For Latin America Toner cartridge E260A11L High Yield Toner cartridge E360H11L Regular cartridge E260A21A...
Recommended toner cartridges and part numbers Part name Lexmark Return Program Cartridge For the US and Canada Toner cartridge E260A11A High Yield Toner cartridge E360H11A For Europe, the Middle East, and Africa Toner cartridge E260A11E High Yield Toner cartridge E360H11E For the Asia Pacific Region, including Australia and New Zealand Toner cartridge E260A11P High Yield Toner cartridge E360H11P For Latin America Toner cartridge E260A11L High Yield Toner cartridge E360H11L Regular cartridge E260A21A...
User Guide
Page 84
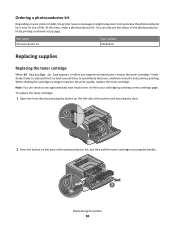
...photoconductor kit. To replace the toner cartridge: 1 Open the front door by printing a network setup page. When shaking the cartridge no longer improves the print quality, replace the toner cartridge. Maintaining the printer 84 You can check to redistribute the toner, and then reinsert it ...know the photoconductor kit is low appears, or when you experience faded print, remove the toner cartridge. Part name Photoconductor kit Part number E260X22G Replacing supplies Replacing the toner cartridge When 88 Cartridge is near its end of the photoconductor kit, and then pull the...
...photoconductor kit. To replace the toner cartridge: 1 Open the front door by printing a network setup page. When shaking the cartridge no longer improves the print quality, replace the toner cartridge. Maintaining the printer 84 You can check to redistribute the toner, and then reinsert it ...know the photoconductor kit is low appears, or when you experience faded print, remove the toner cartridge. Part name Photoconductor kit Part number E260X22G Replacing supplies Replacing the toner cartridge When 88 Cartridge is near its end of the photoconductor kit, and then pull the...

User Guide
Page 85
...the photoconductor kit by aligning the rollers on the toner cartridge with the arrows on the display. Warning-Potential Damage: When replacing a toner cartridge, do not leave the new cartridge exposed to distribute the toner. 5 Install the new toner cartridge by printing a menu settings page. Replacing the... photoconductor kit The printer automatically notifies you should immediately order a new photoconductor kit. 3 Unpack the new toner cartridge. Extended light exposure can also see the status of the photoconductor kit. Note: The photoconductor kit is one item ...
...the photoconductor kit by aligning the rollers on the toner cartridge with the arrows on the display. Warning-Potential Damage: When replacing a toner cartridge, do not leave the new cartridge exposed to distribute the toner. 5 Install the new toner cartridge by printing a menu settings page. Replacing the... photoconductor kit The printer automatically notifies you should immediately order a new photoconductor kit. 3 Unpack the new toner cartridge. Extended light exposure can also see the status of the photoconductor kit. Note: The photoconductor kit is one item ...
User Guide
Page 86
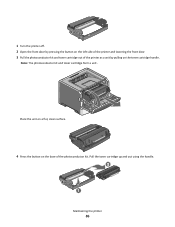
Maintaining the printer 86 Pull the toner cartridge up and out using the handle. 1 Turn the printer off. 2 Open the front door by pressing the button on the left side of the printer and lowering the front door. 3 Pull the photoconductor kit and toner cartridge out of the printer as a unit by pulling on the base of the photoconductor kit. Place the unit on a flat, clean surface. 4 Press the button on the toner cartridge handle. Note: The photoconductor kit and toner cartridge form a unit.
Maintaining the printer 86 Pull the toner cartridge up and out using the handle. 1 Turn the printer off. 2 Open the front door by pressing the button on the left side of the printer and lowering the front door. 3 Pull the photoconductor kit and toner cartridge out of the printer as a unit by pulling on the base of the photoconductor kit. Place the unit on a flat, clean surface. 4 Press the button on the toner cartridge handle. Note: The photoconductor kit and toner cartridge form a unit.
User Guide
Page 87
Maintaining the printer 87 Push the unit as far as it clicks into place. 7 Install the unit into the printer by aligning the arrows on the guides of future print jobs. 6 Insert the toner cartridge into the photoconductor kit by aligning the rollers on the toner cartridge with the arrows in the printer. Warning-Potential Damage: Be careful not to touch the photoconductor drum. Doing so may affect the print quality of the unit with the tracks. Push the toner cartridge until it will go. 5 Unpack the new photoconductor kit.
Maintaining the printer 87 Push the unit as far as it clicks into place. 7 Install the unit into the printer by aligning the arrows on the guides of future print jobs. 6 Insert the toner cartridge into the photoconductor kit by aligning the rollers on the toner cartridge with the arrows in the printer. Warning-Potential Damage: Be careful not to touch the photoconductor drum. Doing so may affect the print quality of the unit with the tracks. Push the toner cartridge until it will go. 5 Unpack the new photoconductor kit.
User Guide
Page 89
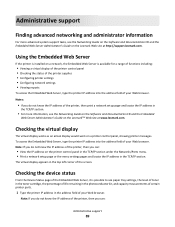
... IP address in the TCP/IP section. • For more advanced system support tasks, see paper tray settings, the level of toner in the toner cartridge, the percentage of life remaining in the photoconductor kit, and capacity measurements of certain printer parts. 1 Type the printer IP address ...you do not know the IP address of the printer, then you can : • View the IP address on the Lexmark Web site at www.lexmark.com. Administrative support Finding advanced networking and administrator information For more information, see the Networking Guide on the Software and Documentation CD...
... IP address in the TCP/IP section. • For more advanced system support tasks, see paper tray settings, the level of toner in the toner cartridge, the percentage of life remaining in the photoconductor kit, and capacity measurements of certain printer parts. 1 Type the printer IP address ...you do not know the IP address of the printer, then you can : • View the IP address on the Lexmark Web site at www.lexmark.com. Administrative support Finding advanced networking and administrator information For more information, see the Networking Guide on the Software and Documentation CD...
User Guide
Page 95
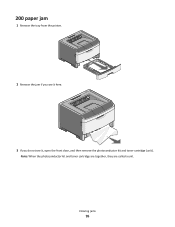
Clearing jams 95 200 paper jam 1 Remove the tray from the printer. 2 Remove the jam if you see it here. 3 If you do not see it, open the front door, and then remove the photoconductor kit and toner cartridge (unit). Note: When the photoconductor kit and toner cartridge are together, they are called a unit.
Clearing jams 95 200 paper jam 1 Remove the tray from the printer. 2 Remove the jam if you see it here. 3 If you do not see it, open the front door, and then remove the photoconductor kit and toner cartridge (unit). Note: When the photoconductor kit and toner cartridge are together, they are called a unit.
User Guide
Page 106
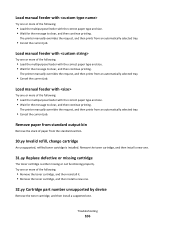
... or more of the following: • Remove the toner cartridge, and then reinstall it. • Remove the toner cartridge, and then install a new one. 32.yy Cartridge part number unsupported by device Remove the toner cartridge, and then install a supported one . 31.yy Replace defective or missing cartridge The toner cartridge is installed. Remove paper from standard output bin Remove...
... or more of the following: • Remove the toner cartridge, and then reinstall it. • Remove the toner cartridge, and then install a new one. 32.yy Cartridge part number unsupported by device Remove the toner cartridge, and then install a supported one . 31.yy Replace defective or missing cartridge The toner cartridge is installed. Remove paper from standard output bin Remove...

User Guide
Page 107
... job already stored 38 Memory full Try one or more of the print job. • Cancel the current print job. 32.yy Replace unsupported cartridge Remove the toner cartridge, and then install a supported one. 34 Short paper The paper in the tray. • For Windows users, check the Print Properties settings to make...
... job already stored 38 Memory full Try one or more of the print job. • Cancel the current print job. 32.yy Replace unsupported cartridge Remove the toner cartridge, and then install a supported one. 34 Short paper The paper in the tray. • For Windows users, check the Print Properties settings to make...

User Guide
Page 110
Troubleshooting 110 Once you have checked each of the following: • Replace the toner cartridge. • Press the arrow buttons until Continue appears, and then press to the printer and the host computer, print server, option, or other network device. &#..., turn the printer off , wait about 10 seconds, and then turn the printer back on . Install a new photoconductor kit. 88 Cartridge is low Press to clear the message. 88 Replace toner Try one or more of these possibilities, turn the printer off by any switch or breaker. • The printer is not...
Troubleshooting 110 Once you have checked each of the following: • Replace the toner cartridge. • Press the arrow buttons until Continue appears, and then press to the printer and the host computer, print server, option, or other network device. &#..., turn the printer off , wait about 10 seconds, and then turn the printer back on . Install a new photoconductor kit. 88 Cartridge is low Press to clear the message. 88 Replace toner Try one or more of these possibilities, turn the printer off by any switch or breaker. • The printer is not...
User Guide
Page 117
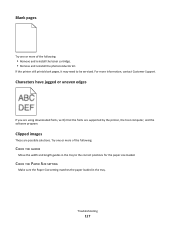
... supported by the printer, the host computer, and the software program. Troubleshooting 117 Try one or more of the following : • Remove and reinstall the toner cartridge. • Remove and reinstall the photoconductor kit. Characters have jagged or uneven edges If you are using downloaded fonts, verify that the fonts are possible...
... supported by the printer, the host computer, and the software program. Troubleshooting 117 Try one or more of the following : • Remove and reinstall the toner cartridge. • Remove and reinstall the photoconductor kit. Characters have jagged or uneven edges If you are using downloaded fonts, verify that the fonts are possible...


