
Setup Guide
Page 4
Step 4: Install the tray 2 option 15 Step 5: Attach cables 17 Local printing 17 Network printing 19 Attaching a power cord 20 Step 6: Load paper 21 Loading tray 1 21 Loading the manual feed 24 Loading the optional tray 2 27 Step 7: Verify printer setup 30 Step 8: Understanding the operator panel lights 31 Step 9: Install printer drivers 38 Local printing 38 Network printing 39 Statement of limited warranty 44 Index 47 iv Table of contents
Step 4: Install the tray 2 option 15 Step 5: Attach cables 17 Local printing 17 Network printing 19 Attaching a power cord 20 Step 6: Load paper 21 Loading tray 1 21 Loading the manual feed 24 Loading the optional tray 2 27 Step 7: Verify printer setup 30 Step 8: Understanding the operator panel lights 31 Step 9: Install printer drivers 38 Local printing 38 Network printing 39 Statement of limited warranty 44 Index 47 iv Table of contents

Setup Guide
Page 8
... is connected to a network, MarkNet Web Pages, to install printer drivers and utilities, and printing information from the Lexmark Publications CD. Use your printer driver or, if your printer. This Setup Guide provides detailed instructions for unpacking and setting up your printer is packaged with the Setup Guide, provides information about choosing media, understanding the operator panel...
... is connected to a network, MarkNet Web Pages, to install printer drivers and utilities, and printing information from the Lexmark Publications CD. Use your printer driver or, if your printer. This Setup Guide provides detailed instructions for unpacking and setting up your printer is packaged with the Setup Guide, provides information about choosing media, understanding the operator panel...
Setup Guide
Page 11
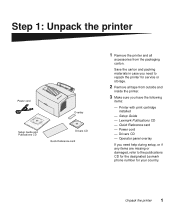
.... 2 Remove all accessories from outside and inside the printer. 3 Make sure you need to the publications CD for the designated Lexmark phone number for your country. Setup Guide - Power cord - Quick Reference card - Unpack the printer 1 Printer with print cartridge installed - Step 1: Unpack the printer Power cord Overlay Setup Guide and Publications CD Drivers CD Quick Reference...
.... 2 Remove all accessories from outside and inside the printer. 3 Make sure you need to the publications CD for the designated Lexmark phone number for your country. Setup Guide - Power cord - Quick Reference card - Unpack the printer 1 Printer with print cartridge installed - Step 1: Unpack the printer Power cord Overlay Setup Guide and Publications CD Drivers CD Quick Reference...

Setup Guide
Page 40
If you have a Lexmark E322n, your printer prints both a menu settings page and a setup page listing the IP address and other network settings. 1 Make sure the printer is on and briefly press the operator panel button to print the page. 2 If you installed the optional tray 2 or additional memory, make sure it is not listed, turn off the printer, unplug the power cord, and reinstall the option. 30 Verify printer setup Step 7: Verify printer setup Print a menu settings page for a list of the current printer settings. If the option is listed under Installed Features.
If you have a Lexmark E322n, your printer prints both a menu settings page and a setup page listing the IP address and other network settings. 1 Make sure the printer is on and briefly press the operator panel button to print the page. 2 If you installed the optional tray 2 or additional memory, make sure it is not listed, turn off the printer, unplug the power cord, and reinstall the option. 30 Verify printer setup Step 7: Verify printer setup Print a menu settings page for a list of the current printer settings. If the option is listed under Installed Features.

Setup Guide
Page 58
...loading 23, 25, 28 letterhead, loading 23, 25, 28 Lexmark Publications CD viii Lexmark Web site x loading card stock 23, 25 envelopes 23, ... 23, 25, 28 transparencies 23, 25 tray 1 21 tray 2 27 local printing, drivers 38 M Macintosh printer drivers 40 manual feed, loading 24 MarkNet internal print server 19 memory cards, installing 6 menu settings page, printing...2 replacing see Publications CD printer features vi lights 31 reset 32 unpacking 1 printer drivers Macintosh 40 Windows 39 printing from the correct tray 43 menu settings page 30 multiple copies 24 setup page 30 Publications CD viii ...
...loading 23, 25, 28 letterhead, loading 23, 25, 28 Lexmark Publications CD viii Lexmark Web site x loading card stock 23, 25 envelopes 23, ... 23, 25, 28 transparencies 23, 25 tray 1 21 tray 2 27 local printing, drivers 38 M Macintosh printer drivers 40 manual feed, loading 24 MarkNet internal print server 19 memory cards, installing 6 menu settings page, printing...2 replacing see Publications CD printer features vi lights 31 reset 32 unpacking 1 printer drivers Macintosh 40 Windows 39 printing from the correct tray 43 menu settings page 30 multiple copies 24 setup page 30 Publications CD viii ...

User's Guide
Page 5
...104 RPRINTER in NetWare 3.x 104 PSERVER in IntraNetWare NDS 104 RPRINTER vs. Chapter 22: Setting up the network printer 90 Environments we support 90 Connect the hardware 90 Print a network setup page 90 Configure and print 91 TCP/IP ...91 Step 1: Set the IP address, netmask and gateway 91... Troubleshooting 92 Step 2: Set up to print 93 Troubleshooting 101 Novell NetWare 102 Queue-based printing 102 Set up the printer using the Network Printer Utility 102 Choosing...
...104 RPRINTER in NetWare 3.x 104 PSERVER in IntraNetWare NDS 104 RPRINTER vs. Chapter 22: Setting up the network printer 90 Environments we support 90 Connect the hardware 90 Print a network setup page 90 Configure and print 91 TCP/IP ...91 Step 1: Set the IP address, netmask and gateway 91... Troubleshooting 92 Step 2: Set up to print 93 Troubleshooting 101 Novell NetWare 102 Queue-based printing 102 Set up the printer using the Network Printer Utility 102 Choosing...

User's Guide
Page 12
Do you want to print. 3 From the File menu, select Print (or Printer) Setup to open your printer driver. 4 Verify the correct printer is set up a print job Once your printer is selected in your printer driver and print your drivers are installed, you are ready to print. Printing from a Windows environment For ...click OK. 6 Click OK or Print to send the job to print. 10 Just choose the printer setting in the dialog box. 5 In the Print Setup dialog box, click Properties, Options, or Setup (depending on letterhead paper and an envelope. 1 Load letterhead with the top of the page pointing ...
Do you want to print. 3 From the File menu, select Print (or Printer) Setup to open your printer driver. 4 Verify the correct printer is set up a print job Once your printer is selected in your printer driver and print your drivers are installed, you are ready to print. Printing from a Windows environment For ...click OK. 6 Click OK or Print to send the job to print. 10 Just choose the printer setting in the dialog box. 5 In the Print Setup dialog box, click Properties, Options, or Setup (depending on letterhead paper and an envelope. 1 Load letterhead with the top of the page pointing ...
User's Guide
Page 13
... Print dialog box, click OK to send the job to print. If you want to print. 3 From the File menu, select Page Setup to open your printer driver. 4 Verify the correct printer is just a click away: • Click the Help box in the bottom right corner of any dialog box. • Move your... print the envelope: 1 Load an envelope vertically, flap side down facing you in tray 1. 2 From your software application, open the file you can download the Lexmark E320/E322 Setup Utility from the File menu to send the job to print. 11
... Print dialog box, click OK to send the job to print. If you want to print. 3 From the File menu, select Page Setup to open your printer driver. 4 Verify the correct printer is just a click away: • Click the Help box in the bottom right corner of any dialog box. • Move your... print the envelope: 1 Load an envelope vertically, flap side down facing you in tray 1. 2 From your software application, open the file you can download the Lexmark E320/E322 Setup Utility from the File menu to send the job to print. 11

User's Guide
Page 14
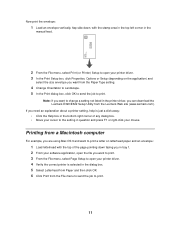
Now print the envelope: 1 Load an envelope vertically, flap side down, with the stamp area in the top left corner in the manual feed. 2 From the File menu, select Page Setup. 3 From the Paper Size setting, select the size envelope you want. 4 Change Orientation to Landscape. 5 Click OK to close the Page Setup dialog box. 6 Go back to the File menu and select Print. 7 From Paper Source select Envelope. 8 Click Print to send the job to print. 12
Now print the envelope: 1 Load an envelope vertically, flap side down, with the stamp area in the top left corner in the manual feed. 2 From the File menu, select Page Setup. 3 From the Paper Size setting, select the size envelope you want. 4 Change Orientation to Landscape. 5 Click OK to close the Page Setup dialog box. 6 Go back to the File menu and select Print. 7 From Paper Source select Envelope. 8 Click Print to send the job to print. 12

User's Guide
Page 75
.... • Choose a different fill pattern in the E320 printer. • Remove the print cartridge and shake it from the Lexmark Web site (www.lexmark.com). Paper designed for copiers give the best quality. • Replace the print cartridge. 73 To change these settings, download the Lexmark E320/E322 Setup Utility from side to side to redistribute the...
.... • Choose a different fill pattern in the E320 printer. • Remove the print cartridge and shake it from the Lexmark Web site (www.lexmark.com). Paper designed for copiers give the best quality. • Replace the print cartridge. 73 To change these settings, download the Lexmark E320/E322 Setup Utility from side to side to redistribute the...

User's Guide
Page 76
...software application. - Note: Download the Lexmark E320/E322 Setup Utility from the Lexmark Web site (www.lexmark.com) to determine if the problem is in at the wall outlet. is on and printing stops. • If the Toner Low alarm is enabled, the printer stops printing until you can print ... Toner Low Alarm setting. If you replace the print cartridge. What to do not come on when the printer is positioned correctly. parts. If you bought your printer. The printer has missing or damaged • Contact the place where you cannot print a menu settings page, call for...
...software application. - Note: Download the Lexmark E320/E322 Setup Utility from the Lexmark Web site (www.lexmark.com) to determine if the problem is in at the wall outlet. is on and printing stops. • If the Toner Low alarm is enabled, the printer stops printing until you can print ... Toner Low Alarm setting. If you replace the print cartridge. What to do not come on when the printer is positioned correctly. parts. If you bought your printer. The printer has missing or damaged • Contact the place where you cannot print a menu settings page, call for...
User's Guide
Page 83
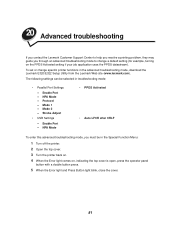
... in the advanced troubleshooting mode, download the Lexmark E320/E322 Setup Utility from the Lexmark Web site (www.lexmark.com). NPA Mode - Enable Port - NPA Mode • PPDS Activated • Auto LFCR after CRLF To enter this advanced troubleshooting mode, you through an advanced troubleshooting mode to change specific printer functions in troubleshooting mode: • Parallel...
... in the advanced troubleshooting mode, download the Lexmark E320/E322 Setup Utility from the Lexmark Web site (www.lexmark.com). NPA Mode - Enable Port - NPA Mode • PPDS Activated • Auto LFCR after CRLF To enter this advanced troubleshooting mode, you through an advanced troubleshooting mode to change specific printer functions in troubleshooting mode: • Parallel...

User's Guide
Page 92
... print jobs are processed on connecting the Ethernet cable to share powerful and expensive printers. To view the Setup Book from their own workstations, a very cost effective way to your Lexmark E320n Printer can be found in the printer Setup Book. Print a network setup page Push the operator panel button with a brief button press to an Ethernet...
... print jobs are processed on connecting the Ethernet cable to share powerful and expensive printers. To view the Setup Book from their own workstations, a very cost effective way to your Lexmark E320n Printer can be found in the printer Setup Book. Print a network setup page Push the operator panel button with a brief button press to an Ethernet...

User's Guide
Page 93
.... DHCP This method automatically sets the IP address, netmask, gateway, host name, and WINS server using this method with no need to physically visit the printers. You can use to manually assign the address, such as non-zero. • If you don't have DHCP, the proper addresses are using a WINS ... on the same physical subnet as the print server. Make sure the DHCP server has scope defined for other words, the Print Server Setup Utility cannot cross routers, bridges, and so forth. 91 The DHCP server or a forwarding agent must be on a Windows 95/98/Me, Windows NT 4.0, or...
.... DHCP This method automatically sets the IP address, netmask, gateway, host name, and WINS server using this method with no need to physically visit the printers. You can use to manually assign the address, such as non-zero. • If you don't have DHCP, the proper addresses are using a WINS ... on the same physical subnet as the print server. Make sure the DHCP server has scope defined for other words, the Print Server Setup Utility cannot cross routers, bridges, and so forth. 91 The DHCP server or a forwarding agent must be on a Windows 95/98/Me, Windows NT 4.0, or...

User's Guide
Page 94
... netmask, and gateway using this option. 4 Select Network Support, and then click Next. 5 On the Network tab, select Print Server TCP/IP Setup Utility, and then Finish Installation. Use the commands appropriate to the print server. Troubleshooting If you call the Customer Support Center. 1 Press the operator... server. (Source Route bridging is 9000. 4 Follow the instructions on the network setup page. ping 157.184.8.231 92 For Ethernet networks, use telnet. Use the hardware address from step 1. Select the printer and then select the TCP/IP task. Static ARP entry and telnet To set ...
... netmask, and gateway using this option. 4 Select Network Support, and then click Next. 5 On the Network tab, select Print Server TCP/IP Setup Utility, and then Finish Installation. Use the commands appropriate to the print server. Troubleshooting If you call the Customer Support Center. 1 Press the operator... server. (Source Route bridging is 9000. 4 Follow the instructions on the network setup page. ping 157.184.8.231 92 For Ethernet networks, use telnet. Use the hardware address from step 1. Select the printer and then select the TCP/IP task. Static ARP entry and telnet To set ...

User's Guide
Page 97
... TCP/IP address or Name of Print Server, and then type the address in the list of the printer such as "E322_lab4". If you of available ports. When a test page prints successfully, client setup is the method you must use if you just created. 3 Click File Properties. 4 Click Ports, and then... the list. d Click OK. This can view this protocol to be any name that is assigned to the printer. 7 Press the operator panel button with a brief button press to print a network setup page and look under the TCP/IP heading. If you don't know the IP address, press the operator panel...
... TCP/IP address or Name of Print Server, and then type the address in the list of the printer such as "E322_lab4". If you of available ports. When a test page prints successfully, client setup is the method you must use if you just created. 3 Click File Properties. 4 Click Ports, and then... the list. d Click OK. This can view this protocol to be any name that is assigned to the printer. 7 Press the operator panel button with a brief button press to print a network setup page and look under the TCP/IP heading. If you don't know the IP address, press the operator panel...
User's Guide
Page 98
... On the Network Support tab, select TCP/IP. If you of the printer such as "E322_lab4". A message appears when installation is offered, select all the options you do not want to print a network setup page and look under the TCP/IP heading. If the address is already installed and will ...be the default protocol. c Check the option to Set this protocol to be updated with a brief button press to install. b Select the IP address of your printer) - 6 When the ...
... On the Network Support tab, select TCP/IP. If you of the printer such as "E322_lab4". A message appears when installation is offered, select all the options you do not want to print a network setup page and look under the TCP/IP heading. If the address is already installed and will ...be the default protocol. c Check the option to Set this protocol to be updated with a brief button press to install. b Select the IP address of your printer) - 6 When the ...

User's Guide
Page 99
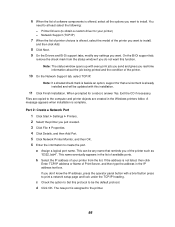
... Next. 6 When asked where you want the software installed, click Local Computer. 7 When the list of printing, you must install the printer on a Windows NT 4.0/2000 server You can view this function. If you want to install.You need to be shared with network clients... following : - When a test page prints successfully, client setup is already set it up . Note: If your printer) - Part 1: Installing printer drivers and TCP/IP network support 1 Launch the drivers CD. Printer Drivers (to centrally manage network printers. Note: The status window opens up this type of software...
... Next. 6 When asked where you want the software installed, click Local Computer. 7 When the list of printing, you must install the printer on a Windows NT 4.0/2000 server You can view this function. If you want to install.You need to be shared with network clients... following : - When a test page prints successfully, client setup is already set it up . Note: If your printer) - Part 1: Installing printer drivers and TCP/IP network support 1 Launch the drivers CD. Printer Drivers (to centrally manage network printers. Note: The status window opens up this type of software...

User's Guide
Page 100
... address is complete. 98 d Click OK. b Click File Properties. Exit the CD if necessary. c Check the option to print a network setup page and look under the TCP/IP heading. c On the General tab, click Print Test Page. 11 On the Network Support tab, select ... test page prints successfully, printer setup is not listed, then click Enter TCP/IP address or Name of the printer such as "E322_lab4". Part 2: Creating a Network Port 1 Click Start Settings Printers. 2 Select the printer you have closed the Printer Properties, do the following: a Click Start Settings Printers. This can be any name...
... address is complete. 98 d Click OK. b Click File Properties. Exit the CD if necessary. c Check the option to print a network setup page and look under the TCP/IP heading. c On the General tab, click Print Test Page. 11 On the Network Support tab, select ... test page prints successfully, printer setup is not listed, then click Enter TCP/IP address or Name of the printer such as "E322_lab4". Part 2: Creating a Network Port 1 Click Start Settings Printers. 2 Select the printer you have closed the Printer Properties, do the following: a Click Start Settings Printers. This can be any name...

User's Guide
Page 103
... then select the TCP/IP task. If the file prints, this confirms the TCP/IP protocol is turned on the network setup page to activate TCP/IP. 3 Verify that the protocol that requires a restart. 9 Try printing again. 101 For Windows NT Server 4.x or Windows 2000, ... Issue a ping command to activate it. Troubleshooting At the server, do these steps in PCL or PostScript emulations, PDF, HTML or any other language the printer understands. Look under the TCP/IP heading on (activated) in the MarkNet print server. Look for communications between the Windows server and the MarkNet print...
... then select the TCP/IP task. If the file prints, this confirms the TCP/IP protocol is turned on the network setup page to activate TCP/IP. 3 Verify that the protocol that requires a restart. 9 Try printing again. 101 For Windows NT Server 4.x or Windows 2000, ... Issue a ping command to activate it. Troubleshooting At the server, do these steps in PCL or PostScript emulations, PDF, HTML or any other language the printer understands. Look under the TCP/IP heading on (activated) in the MarkNet print server. Look for communications between the Windows server and the MarkNet print...

