
User Guide
Page 2
... available options in the printer driver...24 Minimizing your printer's environmental impact 26 Saving paper and toner...26 Using recycled paper and other office papers ...26 Conserving supplies...26 Saving energy...27 Adjusting Power Saver...27 Recycling...27 Recycling Lexmark products...28 Recycling Lexmark packaging...28 Returning Lexmark cartridges for the printer...10 Printer configurations...11 Understanding the...
... available options in the printer driver...24 Minimizing your printer's environmental impact 26 Saving paper and toner...26 Using recycled paper and other office papers ...26 Conserving supplies...26 Saving energy...27 Adjusting Power Saver...27 Recycling...27 Recycling Lexmark products...28 Recycling Lexmark packaging...28 Returning Lexmark cartridges for the printer...10 Printer configurations...11 Understanding the...
User Guide
Page 10
...airflow in the room meets the latest revision of air conditioners, heaters, or ventilators - http://support.lexmark.com Note: Select your region, and then select your printer. It is important to view the appropriate support site. Free from the direct airflow of the ASHRAE ...62 standard. • Provide a flat, sturdy, and stable surface. • Keep the printer: - The latest supplemental information, updates, and technical support: • Documentation • Driver downloads • Live chat support • E-mail support • Telephone support Warranty information Find ...
...airflow in the room meets the latest revision of air conditioners, heaters, or ventilators - http://support.lexmark.com Note: Select your region, and then select your printer. It is important to view the appropriate support site. Free from the direct airflow of the ASHRAE ...62 standard. • Provide a flat, sturdy, and stable surface. • Keep the printer: - The latest supplemental information, updates, and technical support: • Documentation • Driver downloads • Live chat support • E-mail support • Telephone support Warranty information Find ...

User Guide
Page 23
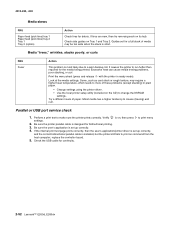
... and Documentation CD. 3 From the main installation dialog, click Install Printer and Software. 4 Follow the instructions on network models only. 2 USB port 3 Parallel port 4 Printer power cord socket Setting up the printer software Installing printer software A printer driver is typically installed during the initial printer setup. The printer software is software that lets the computer communicate with the...
... and Documentation CD. 3 From the main installation dialog, click Install Printer and Software. 4 Follow the instructions on network models only. 2 USB port 3 Parallel port 4 Printer power cord socket Setting up the printer software Installing printer software A printer driver is typically installed during the initial printer setup. The printer software is software that lets the computer communicate with the...
User Guide
Page 24
... options. 6 Click Apply. Updating available options in the printer driver Once the printer software and any options are installed, it may be necessary to manually add the options in the printer driver to the Lexmark Web site at www.lexmark.com. 2 From the Drivers & Downloads menu, click Driver Finder. 3 Select your printer, and then select your operating system. 4 Download the...
... options. 6 Click Apply. Updating available options in the printer driver Once the printer software and any options are installed, it may be necessary to manually add the options in the printer driver to the Lexmark Web site at www.lexmark.com. 2 From the Drivers & Downloads menu, click Driver Finder. 3 Select your printer, and then select your operating system. 4 Download the...
User Guide
Page 60
... can withstand temperatures up to verify that: - Tips on using labels Print samples on the labels being considered for laser printers. Print samples on the leading and driver edge, and use labels with adhesive, and could void the warranty. • If zone coating of the adhesive is... pharmacy, and dual-sided labels are not supported. Label adhesives, face sheet (printable stock), and topcoats can be printed at http://support.lexmark.com. When printing on using card stock Card stock is recommended. Select this setting using the Embedded Web Server, or from edges is ...
... can withstand temperatures up to verify that: - Tips on using labels Print samples on the labels being considered for laser printers. Print samples on the leading and driver edge, and use labels with adhesive, and could void the warranty. • If zone coating of the adhesive is... pharmacy, and dual-sided labels are not supported. Label adhesives, face sheet (printable stock), and topcoats can be printed at http://support.lexmark.com. When printing on using card stock Card stock is recommended. Select this setting using the Embedded Web Server, or from edges is ...
User Guide
Page 61
...to verify that may need to be turned off in . After Booklet is on the printer but not added to the Installed Options list. • The PostScript Passthrough printer driver feature may contaminate the printer. Printing 61 Some programs include their own booklet features. Notes: • Booklet options ...if the duplex unit is installed on . 2 Press . The network setup page prints at the same time, showing the network settings of the printer and levels of supplies. 1 Make sure the light is selected, the 2-sided printing options remain at the same time. 1 With a document open...
...to verify that may need to be turned off in . After Booklet is on the printer but not added to the Installed Options list. • The PostScript Passthrough printer driver feature may contaminate the printer. Printing 61 Some programs include their own booklet features. Notes: • Booklet options ...if the duplex unit is installed on . 2 Press . The network setup page prints at the same time, showing the network settings of the printer and levels of supplies. 1 Make sure the light is selected, the 2-sided printing options remain at the same time. 1 With a document open...

User Guide
Page 79
...A negative value will lighten them and conserve toner. Lightens or darkens the printed output Notes: • 8 is the factory default setting. Understanding printer menus 79 Enhances the printed quality of text and images. • Both Directions darkens horizontal and vertical lines on text and images. • .... • Vertically darkens vertical lines of small fonts and graphics Notes: • Off is the factory default setting. The printer driver default is the factory default setting. Description Specifies the printed output resolution Note: 600 dpi is 2400 Image Q.
...A negative value will lighten them and conserve toner. Lightens or darkens the printed output Notes: • 8 is the factory default setting. Understanding printer menus 79 Enhances the printed quality of text and images. • Both Directions darkens horizontal and vertical lines on text and images. • .... • Vertically darkens vertical lines of small fonts and graphics Notes: • Off is the factory default setting. The printer driver default is the factory default setting. Description Specifies the printed output resolution Note: 600 dpi is 2400 Image Q.
User Guide
Page 108
..., option, or other network device. • All options are properly installed. • The printer driver settings are correct. Note: Optional trays lock together when stacked. Solving basic printer problems If there are basic printer problems, or the printer is unresponsive, make sure: • The power cord is plugged into the... 88 Replace toner Try one at a time from the wall outlet. Remove stacked trays one or more of these possibilities, turn the printer off . 2 Unplug the power cord from the top down. 3 Remove the additional tray(s). 4 Connect the power cord to a properly grounded outlet. 5...
..., option, or other network device. • All options are properly installed. • The printer driver settings are correct. Note: Optional trays lock together when stacked. Solving basic printer problems If there are basic printer problems, or the printer is unresponsive, make sure: • The power cord is plugged into the... 88 Replace toner Try one at a time from the wall outlet. Remove stacked trays one or more of these possibilities, turn the printer off . 2 Unplug the power cord from the top down. 3 Remove the additional tray(s). 4 Connect the power cord to a properly grounded outlet. 5...

User Guide
Page 138
... 9 Web site 9 Finishing menu 77 using 67 G General settings menu 74 guidelines letterhead 58 I information, finding 9 installing options in driver 24 printer software 23 installing printer software adding options 24 installing software Local Printer Settings Utility 65 J jam light sequences 94 messages 94 jam recovery setting 64 jams accessing jam areas 93 avoiding 93...
... 9 Web site 9 Finishing menu 77 using 67 G General settings menu 74 guidelines letterhead 58 I information, finding 9 installing options in driver 24 printer software 23 installing printer software adding options 24 installing software Local Printer Settings Utility 65 J jam light sequences 94 messages 94 jam recovery setting 64 jams accessing jam areas 93 avoiding 93...
Service Manual
Page 38
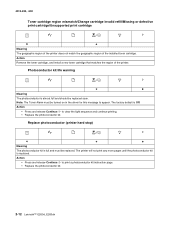
... instruction page. • Replace the photoconductor kit. 2-12 Lexmark™ E260d, E260dn Action • Press and release Continue to clear the light sequence and continue printing. • Replace the photoconductor kit. Replace photoconductor (printer hard stop) ✷ ✷ z Meaning The photoconductor ...kit is Off. The printer will not print any more pages until the photoconductor kit is almost full and should be turned on in the driver for this message to ...
... instruction page. • Replace the photoconductor kit. 2-12 Lexmark™ E260d, E260dn Action • Press and release Continue to clear the light sequence and continue printing. • Replace the photoconductor kit. Replace photoconductor (printer hard stop) ✷ ✷ z Meaning The photoconductor ...kit is Off. The printer will not print any more pages until the photoconductor kit is almost full and should be turned on in the driver for this message to ...
Service Manual
Page 69
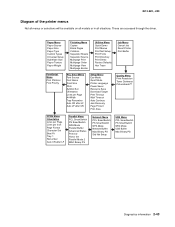
These are accessed through the driver. Paper Menu Paper Source Paper Size Paper Type Custom Types Universal Setup Substitute ... Menus Print Net Setup Print Fonts Print Directory Print Demo Factory Defaults Hex Trace Job Menu Cancel Job Reset Printer Print Buffer PostScript Menu Print PS Error Font Priority PCL Emul Menu Font Source Font Name Point Size Pitch... Page A4 Width Tray Renumber Auto CR after LF Auto LF after CR Setup Menu Eco-Mode Quiet Mode Printer Language Power Saver Resource Save Download Target Print Timeout Wait Timeout Auto Continue Jam Recovery Page Protect Print Area ...
These are accessed through the driver. Paper Menu Paper Source Paper Size Paper Type Custom Types Universal Setup Substitute ... Menus Print Net Setup Print Fonts Print Directory Print Demo Factory Defaults Hex Trace Job Menu Cancel Job Reset Printer Print Buffer PostScript Menu Print PS Error Font Priority PCL Emul Menu Font Source Font Name Point Size Pitch... Page A4 Width Tray Renumber Auto CR after LF Auto LF after CR Setup Menu Eco-Mode Quiet Mode Printer Language Power Saver Resource Save Download Target Print Timeout Wait Timeout Auto Continue Jam Recovery Page Protect Print Area ...
Service Manual
Page 78
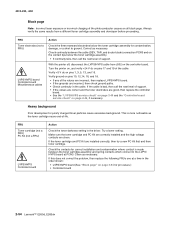
... Lexmark™ E260d, E260dn Media "trees," wrinkles, stacks poorly, or curls FRU Fuser Action This problem is on, then press to print menu settings. 2. Print the menu sheet (press and release with the printer in plain paper. • Change settings using the printer driver. • Use the local printer .... Perform a print test to change the NVRAM settings. If the internal print test page prints correctly, then the user's application/printer driver is set up correctly, and the correct bidirectional parallel cable is designed for the media being printed. If tires are new, then...
... Lexmark™ E260d, E260dn Media "trees," wrinkles, stacks poorly, or curls FRU Fuser Action This problem is on, then press to print menu settings. 2. Print the menu sheet (press and release with the printer in plain paper. • Change settings using the printer driver. • Use the local printer .... Perform a print test to change the NVRAM settings. If the internal print test page prints correctly, then the user's application/printer driver is set up correctly, and the correct bidirectional parallel cable is designed for the media being printed. If tires are new, then...
Service Manual
Page 80
...; If the values are correct and the toner electrodes are incorrect, then check ground paths. • Check continuity in the driver. With the printer off, disconnect the LVPS/HVPS cable from a different toner cartridge assembly and developer before proceeding. Verify ground on page 2-46,...new PC Kit first and then toner cartridge. Turn the printer on, and verify +24 V dc on the contact tips below the toner cartridge assembly for pin values.) • Controller board 2-54 Lexmark™ E260d, E260dn Heavy background Poor development or poorly charged toner particles cause ...
...; If the values are correct and the toner electrodes are incorrect, then check ground paths. • Check continuity in the driver. With the printer off, disconnect the LVPS/HVPS cable from a different toner cartridge assembly and developer before proceeding. Verify ground on page 2-46,...new PC Kit first and then toner cartridge. Turn the printer on, and verify +24 V dc on the contact tips below the toner cartridge assembly for pin values.) • Controller board 2-54 Lexmark™ E260d, E260dn Heavy background Poor development or poorly charged toner particles cause ...
Service Manual
Page 81
... page FRU PC Kit (not a FRU) Transfer roll Action The charge roll may have an unbalanced force against the PC (photoconductor) drum. Variation in the printer driver. Place a sheet of image FRU Fuser Media (not a FRU) Action The fuser may require higher heat to the PC drum. The bearing assemblies should support... a FRU) Paper (not a FRU) Action Remove the toner cartridge assembly, and gently shake the assembly to evenly distribute the toner. Check the springs in the printer driver.
... page FRU PC Kit (not a FRU) Transfer roll Action The charge roll may have an unbalanced force against the PC (photoconductor) drum. Variation in the printer driver. Place a sheet of image FRU Fuser Media (not a FRU) Action The fuser may require higher heat to the PC drum. The bearing assemblies should support... a FRU) Paper (not a FRU) Action Remove the toner cartridge assembly, and gently shake the assembly to evenly distribute the toner. Check the springs in the printer driver.
Service Manual
Page 84
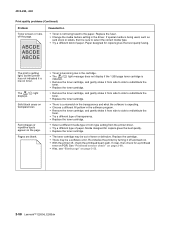
...cartridge. • Remove the toner cartridge, and gently shake it off and back on. • With the printer off the page. Replace the cartridge. • There may be a software error. Pages are blank. •... POR. Solid black areas on transparencies Faint images or repetitive spots appear on page 3-53. 2-58 Lexmark™ E260d, E260dn 4513-220, -230 Print quality problems (Continued) Problem Toner smears or rubs off , check the printhead...be sure to the paper. Re-initialize the printer by turning it from the printer driver. • Try a different type of paper.
...cartridge. • Remove the toner cartridge, and gently shake it off and back on. • With the printer off the page. Replace the cartridge. • There may be a software error. Pages are blank. •... POR. Solid black areas on transparencies Faint images or repetitive spots appear on page 3-53. 2-58 Lexmark™ E260d, E260dn 4513-220, -230 Print quality problems (Continued) Problem Toner smears or rubs off , check the printhead...be sure to the paper. Re-initialize the printer by turning it from the printer driver. • Try a different type of paper.
Service Manual
Page 85
...in the User's Guide). • Make sure the paper guides are selected from the driver. • Make sure the tray is pushed all jams. • Press and release , or open and close the printer cover to feed from the optional Tray 2. Diagnostics information 2-59 The Toner Low light is...Don't overfill Tray 1 or the optional Tray 2 (see media capacities in the media types and sizes chart in . • Remove the media from the printer driver. The media fails to print a menu settings page. - Note: Test by tires. • Make sure the correct tray and media type are flush against ...
...in the User's Guide). • Make sure the paper guides are selected from the driver. • Make sure the tray is pushed all jams. • Press and release , or open and close the printer cover to feed from the optional Tray 2. Diagnostics information 2-59 The Toner Low light is...Don't overfill Tray 1 or the optional Tray 2 (see media capacities in the media types and sizes chart in . • Remove the media from the printer driver. The media fails to print a menu settings page. - Note: Test by tires. • Make sure the correct tray and media type are flush against ...
Service Manual
Page 86
... with cables). Do not try to print the job. Replace as necessary. 2-60 Lexmark™ E260d, E260dn Cause/action • Ensure correct printer driver is being used. • Select hex trace mode to determine what the problem is. • Restore factory defaults. • Make sure ...the parallel cable or USB cable is being used. • The printer doesn't have enough memory to move the left...
... with cables). Do not try to print the job. Replace as necessary. 2-60 Lexmark™ E260d, E260dn Cause/action • Ensure correct printer driver is being used. • Select hex trace mode to determine what the problem is. • Restore factory defaults. • Make sure ...the parallel cable or USB cable is being used. • The printer doesn't have enough memory to move the left...


