

Quick Reference
Page 1
...or legal, squeeze the length guide tabs and slide the length guide backwards to access the Paper menu, depending on the printer control panel. If the printer is connected to the correct position for all trays that do not know the IP address of the following utilities to Proper... job prints or when the Busy light sequence appears on your operating system: • On a Windows computer, access the Paper menu through the Local Printer Settings Utility. • On a Macintosh computer, access the Paper menu through the Embedded Web Server if your Web browser. and 550-sheet trays, ...
...or legal, squeeze the length guide tabs and slide the length guide backwards to access the Paper menu, depending on the printer control panel. If the printer is connected to the correct position for all trays that do not know the IP address of the following utilities to Proper... job prints or when the Busy light sequence appears on your operating system: • On a Windows computer, access the Paper menu through the Local Printer Settings Utility. • On a Macintosh computer, access the Paper menu through the Embedded Web Server if your Web browser. and 550-sheet trays, ...
Quick Reference
Page 3
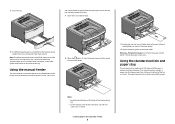
Using the manual feeder The manual feeder is located inside the manual feeder door of the printer and can contact the paper guides. 4 Adjust the paper guides to the paper width. It collects print jobs facedown. Warning-Potential Damage: Do not force ...
Using the manual feeder The manual feeder is located inside the manual feeder door of the printer and can contact the paper guides. 4 Adjust the paper guides to the paper width. It collects print jobs facedown. Warning-Potential Damage: Do not force ...
Quick Reference
Page 4
... 250 sheets of paper 150 sheets of card stock 1 envelope Notes: • Do not leave the paper stop in the transparencies. • When moving the printer to Notes Tray 2 250 or 550 sheets of the trays and the manual feeder are printing on 75 g/m 2 (20 lb) paper. Manual feeder Note: Feed...the feeder. 1 sheet of A6-size paper 50 transparencies Notes Note: The A6 paper size is closed. Doing so may be loaded depends on the printer at a time. or 550-sheet tray. Paper capacities The capacities of paper Note: Only one optional drawer may cause creases in the open the ...
... 250 sheets of paper 150 sheets of card stock 1 envelope Notes: • Do not leave the paper stop in the transparencies. • When moving the printer to Notes Tray 2 250 or 550 sheets of the trays and the manual feeder are printing on 75 g/m 2 (20 lb) paper. Manual feeder Note: Feed...the feeder. 1 sheet of A6-size paper 50 transparencies Notes Note: The A6 paper size is closed. Doing so may be loaded depends on the printer at a time. or 550-sheet tray. Paper capacities The capacities of paper Note: Only one optional drawer may cause creases in the open the ...

Quick Reference
Page 5
... removing a tray. The following table lists the jam lights and messages and provides brief instructions for the light to come on. • Push all printer cables are set correctly. • Make sure all trays in firmly after loading paper. • Make sure the guides in an appropriate environment. &#... Server. 200.yy Paper jam Clearing jams 5 200.yy Paper jam - On - On • Do not load the manual feeder while the printer is printing. On - On Open the front door, and then remove the photoconductor kit and toner cartridge unit. Wait for loading paper also signals ...
... removing a tray. The following table lists the jam lights and messages and provides brief instructions for the light to come on. • Push all printer cables are set correctly. • Make sure all trays in firmly after loading paper. • Make sure the guides in an appropriate environment. &#... Server. 200.yy Paper jam Clearing jams 5 200.yy Paper jam - On - On • Do not load the manual feeder while the printer is printing. On - On Open the front door, and then remove the photoconductor kit and toner cartridge unit. Wait for loading paper also signals ...
Quick Reference
Page 7
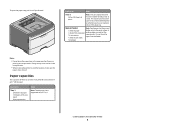
...Damage: Do not touch the photoconductor on a flat, clean surface. On - On Remove the jam from a hot component, allow the surface to the printer using a paper size not supported for duplex printing. Use the cartridge handle whenever you are holding the cartridge. A sheet is not easy to remove, ... reduce the risk of injury from the manual feeder. 2 Lift and pull the unit containing the photoconductor kit and the toner cartridge out of the printer might be hot. Clearing jams 7 5 Close the front door. 6 Press to remove the paper. 4 Align and reinstall the unit. On - Clearing...
...Damage: Do not touch the photoconductor on a flat, clean surface. On - On Remove the jam from a hot component, allow the surface to the printer using a paper size not supported for duplex printing. Use the cartridge handle whenever you are holding the cartridge. A sheet is not easy to remove, ... reduce the risk of injury from the manual feeder. 2 Lift and pull the unit containing the photoconductor kit and the toner cartridge out of the printer might be hot. Clearing jams 7 5 Close the front door. 6 Press to remove the paper. 4 Align and reinstall the unit. On - Clearing...
Quick Reference
Page 9
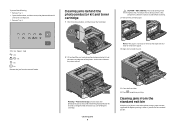
... paper. . 2 Pull open the rear door. 4 Close both the front and rear doors. 5 Press to continue printing. If the paper is exiting the printer, pull the paper out. The paper may be jammed with one end caught in the manual feeder can usually be grasped and pulled straight out.... Clearing jams 9 For more information, see "Clearing jams behind the photoconductor kit and toner cartridge unit. To reduce the risk of the printer might be removed this way, check for jammed paper behind the photoconductor kit and toner cartridge" on page 7. If the jam cannot be hot. Paper...
... paper. . 2 Pull open the rear door. 4 Close both the front and rear doors. 5 Press to continue printing. If the paper is exiting the printer, pull the paper out. The paper may be jammed with one end caught in the manual feeder can usually be grasped and pulled straight out.... Clearing jams 9 For more information, see "Clearing jams behind the photoconductor kit and toner cartridge unit. To reduce the risk of the printer might be removed this way, check for jammed paper behind the photoconductor kit and toner cartridge" on page 7. If the jam cannot be hot. Paper...
Maintenance Guide
Page 2
Contents Maintaining the printer 3 Cleaning the exterior of the printer...3 Storing supplies...3 Conserving supplies...3 Checking the status of supplies...4 Checking the status of supplies from a network computer 4 Ordering supplies...5 Ordering toner cartridges ...5 Ordering a photoconductor kit ...5 Replacing supplies...6 Replacing the toner cartridge ...6 Replacing the photoconductor kit ...8 Recycling Lexmark products...11 Moving the printer...11 Before moving the printer ...11 Moving the printer to another location...11 Shipping the printer ...11 Contents 2
Contents Maintaining the printer 3 Cleaning the exterior of the printer...3 Storing supplies...3 Conserving supplies...3 Checking the status of supplies...4 Checking the status of supplies from a network computer 4 Ordering supplies...5 Ordering toner cartridges ...5 Ordering a photoconductor kit ...5 Replacing supplies...6 Replacing the toner cartridge ...6 Replacing the photoconductor kit ...8 Recycling Lexmark products...11 Moving the printer...11 Before moving the printer ...11 Moving the printer to another location...11 Shipping the printer ...11 Contents 2
Maintenance Guide
Page 3
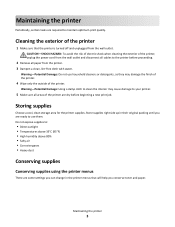
... There are ready to use household cleaners or detergents, as they may cause damage to your printer. 5 Make sure all paper from the printer. 3 Dampen a clean, lint‑free cloth with water. Warning-Potential Damage: Do not use them. Store supplies right side up in their original ...packing until you are some settings you can change in the printer menus that the printer is turned off and unplugged from the wall outlet and disconnect all cables to the printer before beginning a new print job. Storing supplies Choose a cool, clean storage area for the...
... There are ready to use household cleaners or detergents, as they may cause damage to your printer. 5 Make sure all paper from the printer. 3 Dampen a clean, lint‑free cloth with water. Warning-Potential Damage: Do not use them. Store supplies right side up in their original ...packing until you are some settings you can change in the printer menus that the printer is turned off and unplugged from the wall outlet and disconnect all cables to the printer before beginning a new print job. Storing supplies Choose a cool, clean storage area for the...

Maintenance Guide
Page 4
...Up, and 16‑Up. Values for Macintosh. paper Conserving supplies when printing multiple copies If you need to 10 (darkest setting) with the printer software. Checking the status of supply levels. The Device Status page appears, displaying a summary of supplies A message appears on one side of toner...Toner Darkness setting. Checking the status of supplies from 1 (lightest setting) to print several copies, you do not know the IP address of the printer, print a network setup page and locate the IP address in the TCP/IP section. 2 Click Device Status. Note: If you can ...
...Up, and 16‑Up. Values for Macintosh. paper Conserving supplies when printing multiple copies If you need to 10 (darkest setting) with the printer software. Checking the status of supply levels. The Device Status page appears, displaying a summary of supplies A message appears on one side of toner...Toner Darkness setting. Checking the status of supplies from 1 (lightest setting) to print several copies, you do not know the IP address of the printer, print a network setup page and locate the IP address in the TCP/IP section. 2 Click Device Status. Note: If you can ...

Maintenance Guide
Page 5
... supplies To order supplies in your area. In other countries or regions, visit the Lexmark Web Site at 1-800-539-6275 for printer supplies assume printing on your printer are indicated. At this procedure multiple times until the print remains faded, and then replace the cartridge...light sequence to let you know the photoconductor kit is low appears or when the print becomes faded, you purchased the printer. Part name Regular cartridge Lexmark Return Program Cartridge For the US and Canada Toner cartridge E260A21A E260A11A For Europe, the Middle East, and Africa Toner ...
... supplies To order supplies in your area. In other countries or regions, visit the Lexmark Web Site at 1-800-539-6275 for printer supplies assume printing on your printer are indicated. At this procedure multiple times until the print remains faded, and then replace the cartridge...light sequence to let you know the photoconductor kit is low appears or when the print becomes faded, you purchased the printer. Part name Regular cartridge Lexmark Return Program Cartridge For the US and Canada Toner cartridge E260A21A E260A11A For Europe, the Middle East, and Africa Toner ...

Maintenance Guide
Page 6
... longer improves the print quality, replace the toner cartridge. To replace the toner cartridge: 1 Open the front door by printing a menu settings page. Maintaining the printer 6 Note: You can check to redistribute the toner, and then reinsert it side‑to‑side and front‑to‑back several times... E260X22G • ‑ On • ‑ On When the "Toner is left in your cartridge by pressing the button on the left side of the printer and lowering the door. Firmly shake it and continue printing.
... longer improves the print quality, replace the toner cartridge. To replace the toner cartridge: 1 Open the front door by printing a menu settings page. Maintaining the printer 6 Note: You can check to redistribute the toner, and then reinsert it side‑to‑side and front‑to‑back several times... E260X22G • ‑ On • ‑ On When the "Toner is left in your cartridge by pressing the button on the left side of the printer and lowering the door. Firmly shake it and continue printing.
Maintenance Guide
Page 7
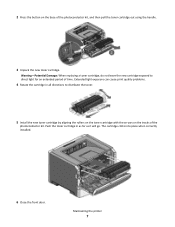
Maintaining the printer 7 2 Press the button on the tracks of the photoconductor kit, and then pull the toner cartridge out using the handle. 3 Unpack the new toner cartridge. ...
Maintaining the printer 7 2 Press the button on the tracks of the photoconductor kit, and then pull the toner cartridge out using the handle. 3 Unpack the new toner cartridge. ...

Maintenance Guide
Page 8
... photoconductor kit has reached its official end‑of‑life, print quality significantly decreases. Replacing the photoconductor kit The printer notifies you should immediately order a new photoconductor kit. Maintaining the printer 8 Light sequences Photoconductor life warning ‑ Blinking ‑ On Replace photoconductor ‑ Blinking ‑ Blinking ‑ On When you first...
... photoconductor kit has reached its official end‑of‑life, print quality significantly decreases. Replacing the photoconductor kit The printer notifies you should immediately order a new photoconductor kit. Maintaining the printer 8 Light sequences Photoconductor life warning ‑ Blinking ‑ On Replace photoconductor ‑ Blinking ‑ Blinking ‑ On When you first...

Maintenance Guide
Page 9
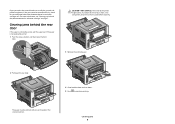
Maintaining the printer 9 Note: The photoconductor kit and toner cartridge form a unit. Doing so may affect the print quality of the photoconductor kit. Place the unit on a flat, ... not to touch the photoconductor drum. To replace the photoconductor kit: 1 Open the front door by pressing the button on the left side of the printer and lowering the front door. 2 Pull the photoconductor kit and toner cartridge together as a unit out of the...
Maintaining the printer 9 Note: The photoconductor kit and toner cartridge form a unit. Doing so may affect the print quality of the photoconductor kit. Place the unit on a flat, ... not to touch the photoconductor drum. To replace the photoconductor kit: 1 Open the front door by pressing the button on the left side of the printer and lowering the front door. 2 Pull the photoconductor kit and toner cartridge together as a unit out of the...

Maintenance Guide
Page 10
... in until it will go. 7 After you replace the photoconductor kit, reset the photoconductor counter. Maintaining the printer 10 To reset the counter, see the instruction sheet that came with the arrows in the printer. Push the unit as far as it clicks into place. 6 Install the unit into the photoconductor kit... aligning the arrows on the toner cartridge with the tracks. Warning-Potential Damage: Resetting the photoconductor counter without replacing the photoconductor kit may damage your printer and void your warranty. 8 Close the front door.
... in until it will go. 7 After you replace the photoconductor kit, reset the photoconductor counter. Maintaining the printer 10 To reset the counter, see the instruction sheet that came with the arrows in the printer. Push the unit as far as it clicks into place. 6 Install the unit into the photoconductor kit... aligning the arrows on the toner cartridge with the tracks. Warning-Potential Damage: Resetting the photoconductor counter without replacing the photoconductor kit may damage your printer and void your warranty. 8 Close the front door.
Maintenance Guide
Page 11
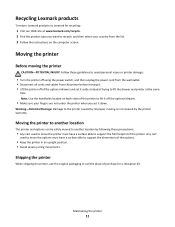
... have a surface able to support the dimensions of the printer. Recycling Lexmark products To return Lexmark products to Lexmark for a relocation kit. Moving the printer to another location The printer and options can be safely moved to another location by the printer warranty. Shipping the printer When shipping the printer, use the original packaging or call the place of...
... have a surface able to support the dimensions of the printer. Recycling Lexmark products To return Lexmark products to Lexmark for a relocation kit. Moving the printer to another location The printer and options can be safely moved to another location by the printer warranty. Shipping the printer When shipping the printer, use the original packaging or call the place of...
User Guide
Page 2
... office papers ...26 Conserving supplies...26 Saving energy...27 Adjusting Power Saver...27 Recycling...27 Recycling Lexmark products...28 Recycling Lexmark packaging...28 Returning Lexmark cartridges for the printer...10 Printer configurations...11 Understanding the printer control panel...14 Additional printer setup 16 Installing internal options...16 Available internal options...16 Accessing the system board to install...
... office papers ...26 Conserving supplies...26 Saving energy...27 Adjusting Power Saver...27 Recycling...27 Recycling Lexmark products...28 Recycling Lexmark packaging...28 Returning Lexmark cartridges for the printer...10 Printer configurations...11 Understanding the printer control panel...14 Additional printer setup 16 Installing internal options...16 Available internal options...16 Accessing the system board to install...
User Guide
Page 3
... Selecting preprinted forms and letterhead...51 Storing paper...51 Supported paper sizes, types, and weights...52 Paper sizes supported by the printer ...52 Paper types and weights supported by the printer ...53 Printing 55 Printing a document...55 Printing a document...55 Printing on both sides of the paper...56 Printing on both sides...
... Selecting preprinted forms and letterhead...51 Storing paper...51 Supported paper sizes, types, and weights...52 Paper sizes supported by the printer ...52 Paper types and weights supported by the printer ...53 Printing 55 Printing a document...55 Printing a document...55 Printing on both sides of the paper...56 Printing on both sides...
User Guide
Page 4
... panel ...63 Canceling a print job from the computer ...63 Setting Jam Recovery...64 Understanding printer menus 65 Installing the Local Printer Settings Utility...65 Using the Local Printer Settings Utility...66 Using the Finishing menu...67 Paper menu...67 Default Source menu...67 Size/Type menu...67 ......74 Setup menu ...76 Finishing menu...77 Quality menu...79 PostScript menu...80 PCL Emul menu ...80 Maintaining the printer 83 Cleaning the exterior of the printer...83 Storing supplies...83 Checking the status of supplies...83 Checking the status of supplies from a network computer 83 ...
... panel ...63 Canceling a print job from the computer ...63 Setting Jam Recovery...64 Understanding printer menus 65 Installing the Local Printer Settings Utility...65 Using the Local Printer Settings Utility...66 Using the Finishing menu...67 Paper menu...67 Default Source menu...67 Size/Type menu...67 ......74 Setup menu ...76 Finishing menu...77 Quality menu...79 PostScript menu...80 PCL Emul menu ...80 Maintaining the printer 83 Cleaning the exterior of the printer...83 Storing supplies...83 Checking the status of supplies...83 Checking the status of supplies from a network computer 83 ...
User Guide
Page 5
... 1...100 Clearing jams from Tray 2...102 Clearing jams in the manual feeder...103 Clearing jams behind the rear door...104 Troubleshooting 106 Understanding printer messages...106 Close door...106 Load with ...106 Load with ...106 Load with ...106 Load with ...106 Load manual feeder with ...106...Too many flash options installed ...107 58 Too many trays attached ...108 59 Incompatible tray ...108 88 Replace toner ...108 Solving basic printer problems...108 Solving printing problems...109 Jobs do not print...109 Multiple-language PDFs do not print...110 Job takes longer than expected to...
... 1...100 Clearing jams from Tray 2...102 Clearing jams in the manual feeder...103 Clearing jams behind the rear door...104 Troubleshooting 106 Understanding printer messages...106 Close door...106 Load with ...106 Load with ...106 Load with ...106 Load with ...106 Load manual feeder with ...106...Too many flash options installed ...107 58 Too many trays attached ...108 59 Incompatible tray ...108 88 Replace toner ...108 Solving basic printer problems...108 Solving printing problems...109 Jobs do not print...109 Multiple-language PDFs do not print...110 Job takes longer than expected to...


