
User Guide
Page 2
... location for reuse or recycling...28 Interpreting the printer control panel lights 29 Understanding the printer control panel light sequences 29 Understanding the primary light sequences...29 Understanding the secondary error light sequences...36 Contents 2 or 550-sheet drawer...19 Printing the printer... ...26 Conserving supplies...26 Saving energy...27 Adjusting Power Saver...27 Recycling...27 Recycling Lexmark products...28 Recycling Lexmark packaging...28 Returning Lexmark cartridges for the printer...10 Printer configurations...11 Understanding the printer control panel...14 Additional...
... location for reuse or recycling...28 Interpreting the printer control panel lights 29 Understanding the printer control panel light sequences 29 Understanding the primary light sequences...29 Understanding the secondary error light sequences...36 Contents 2 or 550-sheet drawer...19 Printing the printer... ...26 Conserving supplies...26 Saving energy...27 Adjusting Power Saver...27 Recycling...27 Recycling Lexmark products...28 Recycling Lexmark packaging...28 Returning Lexmark cartridges for the printer...10 Printer configurations...11 Understanding the printer control panel...14 Additional...
User Guide
Page 15
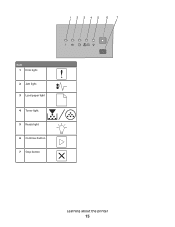
Item 1 Error light 2 Jam light 3 Load paper light 4 Toner light 5 Ready light 6 Continue button 7 Stop button Learning about the printer 15
Item 1 Error light 2 Jam light 3 Load paper light 4 Toner light 5 Ready light 6 Continue button 7 Stop button Learning about the printer 15
User Guide
Page 29
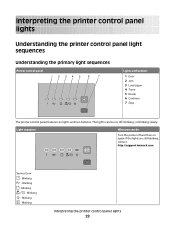
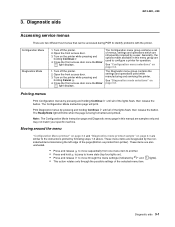
... the printer control panel lights Understanding the printer control panel light sequences Understanding the primary light sequences Printer control panel Lights and buttons 1 Error 2 Jam 3 Load paper 4 Toner 5 Ready 6 Continue 7 Stop The printer control panel features six lights and two buttons. Blinking - Blinking - If the lights are still blinking, contact http://support.lexmark.com. Light sequence What you can...
... the printer control panel lights Understanding the printer control panel light sequences Understanding the primary light sequences Printer control panel Lights and buttons 1 Error 2 Jam 3 Load paper 4 Toner 5 Ready 6 Continue 7 Stop The printer control panel features six lights and two buttons. Blinking - Blinking - If the lights are still blinking, contact http://support.lexmark.com. Light sequence What you can...
User Guide
Page 33
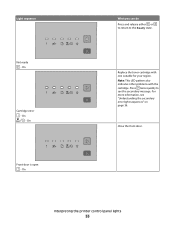
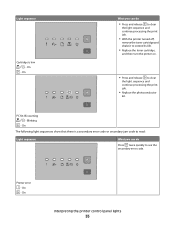
Interpreting the printer control panel lights 33 Close the front door. On Front door is open - Note: This LED pattern also indicates other problems with one suitable for your region. On - Press twice quickly to the Ready state. On Cartridge error - For more information, see the secondary message. Replace the toner cartridge with the cartridge. On What you can do Press and release either or to return to see "Understanding the secondary error light sequences" on page 36. Light sequence Not ready -
Interpreting the printer control panel lights 33 Close the front door. On Front door is open - Note: This LED pattern also indicates other problems with one suitable for your region. On - Press twice quickly to the Ready state. On Cartridge error - For more information, see the secondary message. Replace the toner cartridge with the cartridge. On What you can do Press and release either or to return to see "Understanding the secondary error light sequences" on page 36. Light sequence Not ready -
User Guide
Page 35
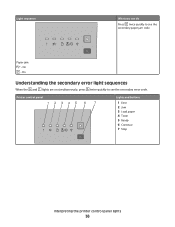
... is a secondary error code or secondary jam code to read: Light sequence What you can do • Press and release to clear the light sequence and continue processing the print job. • With the printer turned off, remove the toner cartridge and shake it to extend ... and then turn the printer on. • Press and release to see the secondary error code. On - On Interpreting the printer control panel lights 35 On What you can do Press twice quickly to clear the light sequence and continue processing the print job. • Replace the photoconductor kit. Blinking ...
... is a secondary error code or secondary jam code to read: Light sequence What you can do • Press and release to clear the light sequence and continue processing the print job. • With the printer turned off, remove the toner cartridge and shake it to extend ... and then turn the printer on. • Press and release to see the secondary error code. On - On Interpreting the printer control panel lights 35 On What you can do Press twice quickly to clear the light sequence and continue processing the print job. • Replace the photoconductor kit. Blinking ...
User Guide
Page 36
On Understanding the secondary error light sequences When the and lights are on simultaneously, press twice quickly to see the secondary error code. Printer control panel Lights and buttons 1 Error 2 Jam 3 Load paper 4 Toner 5 Ready 6 Continue 7 Stop Interpreting the printer control panel lights 36 On - Paper jam - Light sequence What you can do Press twice quickly to see the secondary paper jam code.
On Understanding the secondary error light sequences When the and lights are on simultaneously, press twice quickly to see the secondary error code. Printer control panel Lights and buttons 1 Error 2 Jam 3 Load paper 4 Toner 5 Ready 6 Continue 7 Stop Interpreting the printer control panel lights 36 On - Paper jam - Light sequence What you can do Press twice quickly to see the secondary paper jam code.
User Guide
Page 139
light sequences on printer control panel 29, 36 primary 29 secondary error 36 linking trays 47 Load with 106 Load with 106 Load with 106 Load ... 40 paper capacities manual feeder 49 trays 49 paper feed troubleshooting lights remain on after jam is cleared 113 page that jammed does not reprint 114 paper jam light sequences 94 messages 94 paper jams accessing jam areas 93 avoiding ...gray background 116 poor transparency quality 120 print is too dark 117 print is too light 118 skewed print 119 solid black streaks 122 solid white streaks 122 streaked horizontal lines 121 streaked vertical lines ...
light sequences on printer control panel 29, 36 primary 29 secondary error 36 linking trays 47 Load with 106 Load with 106 Load with 106 Load ... 40 paper capacities manual feeder 49 trays 49 paper feed troubleshooting lights remain on after jam is cleared 113 page that jammed does not reprint 114 paper jam light sequences 94 messages 94 paper jams accessing jam areas 93 avoiding ...gray background 116 poor transparency quality 120 print is too dark 117 print is too light 118 skewed print 119 solid black streaks 122 solid white streaks 122 streaked horizontal lines 121 streaked vertical lines ...
Service Manual
Page 3
... operator panel 2-2 Power-On Self Test (POST) sequence 2-2 Light patterns and error messages 2-3 Common primary light patterns 2-4 Primary codes 2-7 Common secondary light patterns 2-16 Secondary error codes 2-18 Service codes 2-28 Messages and error codes 2-36 User attendance messages 2-36 Paper jam error codes (200-series 2-36 Service error codes 2-40 Diagram of the printer menus 2-43 Symptom...
... operator panel 2-2 Power-On Self Test (POST) sequence 2-2 Light patterns and error messages 2-3 Common primary light patterns 2-4 Primary codes 2-7 Common secondary light patterns 2-16 Secondary error codes 2-18 Service codes 2-28 Messages and error codes 2-36 User attendance messages 2-36 Paper jam error codes (200-series 2-36 Service error codes 2-40 Diagram of the printer menus 2-43 Symptom...

Service Manual
Page 18
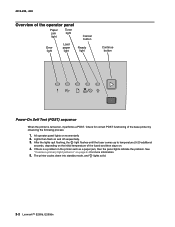
4513-220, -230 Overview of the operator panel The operator panel consists of these items: • LED operator panel • Two buttons: Cancel and Continue • Six lights: Error , Paper Jam , Load Paper , Toner Low , Ready , and Continue 1-2 Lexmark™ E260d, E260dn
4513-220, -230 Overview of the operator panel The operator panel consists of these items: • LED operator panel • Two buttons: Cancel and Continue • Six lights: Error , Paper Jam , Load Paper , Toner Low , Ready , and Continue 1-2 Lexmark™ E260d, E260dn
Service Manual
Page 28
...down into standby mode, and lights solid. 2-2 Lexmark™ E260d, E260dn After the lights quit flashing, the light flashes until the fuser comes up to temperature (5-20 additional seconds, depending on the initial temperature of the fuser) and then stays on and off sequentially. 3. Lights then flash on . 4....: 1. If there is turned on momentarily 2. 4513-220, -230 Overview of the operator panel Paper jam light Toner light Error light Load paper light Cancel button Ready light Continue button Power-On Self Test (POST) sequence When the printer is a problem in the printer such as...
...down into standby mode, and lights solid. 2-2 Lexmark™ E260d, E260dn After the lights quit flashing, the light flashes until the fuser comes up to temperature (5-20 additional seconds, depending on the initial temperature of the fuser) and then stays on and off sequentially. 3. Lights then flash on . 4....: 1. If there is turned on momentarily 2. 4513-220, -230 Overview of the operator panel Paper jam light Toner light Error light Load paper light Cancel button Ready light Continue button Power-On Self Test (POST) sequence When the printer is a problem in the printer such as...

Service Manual
Page 29
... code. If is sent to the printer and all initial level light patterns have secondary patterns. 4513-220, -230 Light patterns and error messages User attendance messages, paper jam errors, and service errors display a light pattern. This may appear with more detailed information. Not all lights flash immediately, and double-clicking does not change . See "Service codes...
... code. If is sent to the printer and all initial level light patterns have secondary patterns. 4513-220, -230 Light patterns and error messages User attendance messages, paper jam errors, and service errors display a light pattern. This may appear with more detailed information. Not all lights flash immediately, and double-clicking does not change . See "Service codes...
Service Manual
Page 30
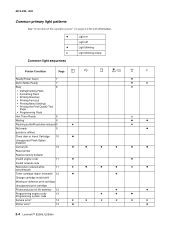
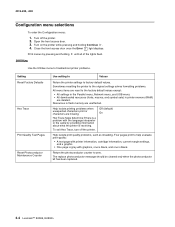
... 2-2 for icon information. 4513-220, -230 Common primary light patterns See "Overview of the operator panel" on Light off ✷ Light blinking x Light blinking slowly Common light sequences Printer Condition Page Ready/Power Saver 7 z Demo Mode Ready 7 z ✷ Busy 8 ✷ • Defragmenting Flash •... kit life warning¹ 12 Programming engine code/ 13 Programming system code ✷ z z z z Service error² 13 ✷ ✷ ✷ ✷ ✷ ✷ Printer error³ 13 z z 2-4 Lexmark™ E260d, E260dn
... 2-2 for icon information. 4513-220, -230 Common primary light patterns See "Overview of the operator panel" on Light off ✷ Light blinking x Light blinking slowly Common light sequences Printer Condition Page Ready/Power Saver 7 z Demo Mode Ready 7 z ✷ Busy 8 ✷ • Defragmenting Flash •... kit life warning¹ 12 Programming engine code/ 13 Programming system code ✷ z z z z Service error² 13 ✷ ✷ ✷ ✷ ✷ ✷ Printer error³ 13 z z 2-4 Lexmark™ E260d, E260dn

Service Manual
Page 31
... Waiting and Toner Low Not Ready and Toner Low Replace Photoconductor and Toner Low ¹ Toner low light will remain on with other primary light sequences. 4513-220, -230 Printer Condition Page Paper jam printer error (2xx) 14 z z Remove paper from output bin 14 ✷ Load media in Tray 1... or Tray 2 14 z z Load Media in Multi-purpose 15 z Feeder or Manual Feeder Load Tray 1 for side 2 of manual 15 z ✷ duplex printing ¹ Toner low light will follow ...
... Waiting and Toner Low Not Ready and Toner Low Replace Photoconductor and Toner Low ¹ Toner low light will remain on with other primary light sequences. 4513-220, -230 Printer Condition Page Paper jam printer error (2xx) 14 z z Remove paper from output bin 14 ✷ Load media in Tray 1... or Tray 2 14 z z Load Media in Multi-purpose 15 z Feeder or Manual Feeder Load Tray 1 for side 2 of manual 15 z ✷ duplex printing ¹ Toner low light will follow ...
Service Manual
Page 37
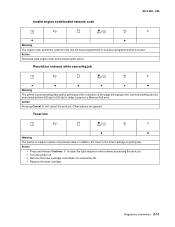
Action • Press and release Continue to clean the light sequence and continue processing the print job. • Turn the printer off. • Remove the toner cartridge, and shake it to the internal print server. ... to extend the life. • Replace the toner cartridge. Resolution reduced while canceling job ✷ z z z ✷ z Meaning The printer is ready to prevent a Memory Full error. In addition, the toner in order to receive and process data. Other buttons are ignored. Action Pressing Cancel will cancel the print job. Toner low...
Action • Press and release Continue to clean the light sequence and continue processing the print job. • Turn the printer off. • Remove the toner cartridge, and shake it to the internal print server. ... to extend the life. • Replace the toner cartridge. Resolution reduced while canceling job ✷ z z z ✷ z Meaning The printer is ready to prevent a Memory Full error. In addition, the toner in order to receive and process data. Other buttons are ignored. Action Pressing Cancel will cancel the print job. Toner low...
Service Manual
Page 60
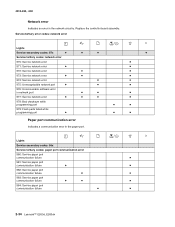
... communication failure ✷ ✷ 2-34 Lexmark™ E260d, E260dn Replace the controller board assembly. Service tertiary error codes: network error Lights Service secondary codes: 97x ✷ ✷ ✷ ✷ Service tertiary codes: network error 970: Service network error ✷ 971: Service network error ✷ ✷ 972: Service network error ✷ ✷ 973: Service network error ✷ ✷ ✷ 974: Service...
... communication failure ✷ ✷ 2-34 Lexmark™ E260d, E260dn Replace the controller board assembly. Service tertiary error codes: network error Lights Service secondary codes: 97x ✷ ✷ ✷ ✷ Service tertiary codes: network error 970: Service network error ✷ 971: Service network error ✷ ✷ 972: Service network error ✷ ✷ 973: Service network error ✷ ✷ ✷ 974: Service...
Service Manual
Page 85
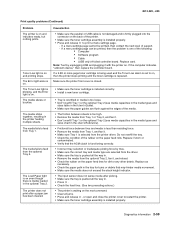
...not exceed the stack height indicator. • The input sensor does not sense media after a paper jam has been cleared. Diagnostics information 2-59 The Error light alone is installed properly. • Press and release to feed from the optional Tray 2. The media fails to print a menu settings page. - The.... • Make sure the toner cartridge assembly is too high. • Remove the media from the printer driver. The Toner Low light is blinking, and the Error light is pushed all jams. • Press and release , or open and close the printer cover to on the paper feed rolls.
...not exceed the stack height indicator. • The input sensor does not sense media after a paper jam has been cleared. Diagnostics information 2-59 The Error light alone is installed properly. • Press and release to feed from the optional Tray 2. The media fails to print a menu settings page. - The.... • Make sure the toner cartridge assembly is too high. • Remove the media from the printer driver. The Toner Low light is blinking, and the Error light is pushed all jams. • Press and release , or open and close the printer cover to on the paper feed rolls.
Service Manual
Page 86
... or USB cable is firmly plugged in the left spring. Jobs are not printing, and the error light is flushing data (Ready/Data and Error lights are incorrect, then check the controller board. Replace as necessary. 2-60 Lexmark™ E260d, E260dn Install more information. • If voltages are missing. Transfer roll service check FRU Transfer roll...
... or USB cable is firmly plugged in the left spring. Jobs are not printing, and the error light is flushing data (Ready/Data and Error lights are incorrect, then check the controller board. Replace as necessary. 2-60 Lexmark™ E260d, E260dn Install more information. • If voltages are missing. Transfer roll service check FRU Transfer roll...
Service Manual
Page 87
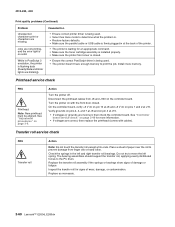
...• Press and hold to jump to home state (top four lights on the printer while pressing and holding Continue . 4. Open the front access door. 3. Close the front access door once the Error light displays. lights). The Configuration menu group contains a set of menus, settings and ...operations which are also unshaded. • Press and release to move through the possible settings of the lights flash, then release the button. Turn on )....
...• Press and hold to jump to home state (top four lights on the printer while pressing and holding Continue . 4. Open the front access door. 3. Close the front access door once the Error light displays. lights). The Configuration menu group contains a set of menus, settings and ...operations which are also unshaded. • Press and release to move through the possible settings of the lights flash, then release the button. Turn on )....
Service Manual
Page 90
...front access door. 3. The replace photoconductor message should be cleared only when the photoconductor kit has been replaced. 3-4 Lexmark™ E260d, E260dn Print menus by providing information about what the printer is receiving. Help isolate printing problems when unexpected characters print or...(RAM) are deleted. Off (default) On Help isolate print quality problems, such as streaking. Close the front access door once the Error light displays. To exit Hex Trace, turn off the printer. 2. Four pages print to factory default values. Sometimes resetting the printer to the...
...front access door. 3. The replace photoconductor message should be cleared only when the photoconductor kit has been replaced. 3-4 Lexmark™ E260d, E260dn Print menus by providing information about what the printer is receiving. Help isolate printing problems when unexpected characters print or...(RAM) are deleted. Off (default) On Help isolate print quality problems, such as streaking. Close the front access door once the Error light displays. To exit Hex Trace, turn off the printer. 2. Four pages print to factory default values. Sometimes resetting the printer to the...
Service Manual
Page 94
...margins (top, bottom, right, and left) to stop . Press and hold until the lights flash to begin . Turn off the printer. 2. Turn on None page 3-9 for more information. 3-8 Lexmark™ E260d, E260dn U.S. (default) Non-U.S. Press to stop . Press to stop . Press and hold until ...the lights flash to Value Prt Quality Pgs Print test pages by pressing and holding until all black, and the last one blank. Close the front access door once the Error light ...
...margins (top, bottom, right, and left) to stop . Press and hold until the lights flash to begin . Turn off the printer. 2. Turn on None page 3-9 for more information. 3-8 Lexmark™ E260d, E260dn U.S. (default) Non-U.S. Press to stop . Press to stop . Press and hold until ...the lights flash to Value Prt Quality Pgs Print test pages by pressing and holding until all black, and the last one blank. Close the front access door once the Error light ...


