
Service Manual
Page 5
...information vii Safety information xi Preface xiv Definitions xiv General information 1-1 Models 1-1 Maintenance approach 1-1 Overview of the operator panel 1-2 Models E250d and E250dn 1-2 Specifications 1-3 Memory 1-3 Print speed 1-3 Print quality 1-3 Media trays and supply capacity 1-4 Connectivity and compatibility 1-5 Types of ...37 POST symptom table 2-37 Printer symptom table 2-38 Service checks 2-39 Controller card service check 2-39 Cooling fan service check 2-40 Cover interlock switch service check 2-40 Dead machine service check 2-41 Fuser service check 2-41 LVPS/...
...information vii Safety information xi Preface xiv Definitions xiv General information 1-1 Models 1-1 Maintenance approach 1-1 Overview of the operator panel 1-2 Models E250d and E250dn 1-2 Specifications 1-3 Memory 1-3 Print speed 1-3 Print quality 1-3 Media trays and supply capacity 1-4 Connectivity and compatibility 1-5 Types of ...37 POST symptom table 2-37 Printer symptom table 2-38 Service checks 2-39 Controller card service check 2-39 Cooling fan service check 2-40 Cover interlock switch service check 2-40 Dead machine service check 2-41 Fuser service check 2-41 LVPS/...
Service Manual
Page 26
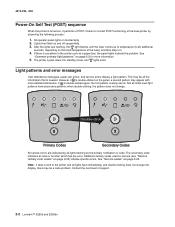
...double-clicking does not change . Note: If data is sent to temperature (5-20 additional seconds, depending on the initial temperature of the fuser) and then stays on and off sequentially. 3. Light patterns and error messages User attendance messages, paper jam errors, and service errors ... flash on . 4. If there is a problem in the printer such as the primary notification or code. If is needed. See "Service codes" on page 2-3 for correct POST functioning of support. 2-2 Lexmark™ E250d and E250dn The secondary code indicates an area or function which has the error...
...double-clicking does not change . Note: If data is sent to temperature (5-20 additional seconds, depending on the initial temperature of the fuser) and then stays on and off sequentially. 3. Light patterns and error messages User attendance messages, paper jam errors, and service errors ... flash on . 4. If there is a problem in the printer such as the primary notification or code. If is needed. See "Service codes" on page 2-3 for correct POST functioning of support. 2-2 Lexmark™ E250d and E250dn The secondary code indicates an area or function which has the error...

Service Manual
Page 38
The jammed media is exiting the printer. Action Clear the paper jam. 2-14 Lexmark™ E250d and E250dn Action Clear the paper jam. Paper jams between the input and exit sensors z z z Meaning A paper jam has occurred. Action Clear the paper jam. Action Clear ... input sensor z z z Meaning A paper jam has occurred at the input sensor, which can be either after the print media leaves the tray and enters the printer or in the manual feeder z z z z Meaning A paper jam has occurred at the manual feeder. Paper jams as a printed job exits the...
The jammed media is exiting the printer. Action Clear the paper jam. 2-14 Lexmark™ E250d and E250dn Action Clear the paper jam. Paper jams between the input and exit sensors z z z Meaning A paper jam has occurred. Action Clear the paper jam. Action Clear ... input sensor z z z Meaning A paper jam has occurred at the input sensor, which can be either after the print media leaves the tray and enters the printer or in the manual feeder z z z z Meaning A paper jam has occurred at the manual feeder. Paper jams as a printed job exits the...

Service Manual
Page 48
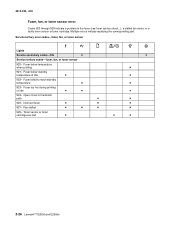
...; ✷ ✷ ✷ Service secondary error codes Service secondary codes Lights 900-Software 900-Software ✷ ✷ 91x-DC motor or transfer roll ✷ 92x-Fuser or toner sensor ✷ 93x-Printhead, drive motor ✷ ✷ 94x-LVPS service error ✷ 95x-Controller card (NCRAM, ROM, or NAND) ✷ ✷ 96...
...; ✷ ✷ ✷ Service secondary error codes Service secondary codes Lights 900-Software 900-Software ✷ ✷ 91x-DC motor or transfer roll ✷ 92x-Fuser or toner sensor ✷ 93x-Printhead, drive motor ✷ ✷ 94x-LVPS service error ✷ 95x-Controller card (NCRAM, ROM, or NAND) ✷ ✷ 96...
Service Manual
Page 50
... are bad ✷ ✷ ✷ 2-26 Lexmark™ E250d and E250dn Multiple errors indicate replacing the corresponding part. Service tertiary error codes-fuser, fan, or toner sensor Lights Service secondary codes-92x ✷ ✷ Service tertiary codes-fuser, fan, or toner sensor 920-Fuser below temperature when printing ✷ 921-Fuser below standby temperature at idle ✷...
... are bad ✷ ✷ ✷ 2-26 Lexmark™ E250d and E250dn Multiple errors indicate replacing the corresponding part. Service tertiary error codes-fuser, fan, or toner sensor Lights Service secondary codes-92x ✷ ✷ Service tertiary codes-fuser, fan, or toner sensor 920-Fuser below temperature when printing ✷ 921-Fuser below standby temperature at idle ✷...

Service Manual
Page 58
...error, check sweep accuracy state 935.24 Printhead sweep error, reserved 935.25 Printhead sweep error, detected resonant frequency out of expected range 2-34 Lexmark™ E250d and E250dn Printhead service errors 931.00 No first hsync 931.01 No first hsync 932.00 Lost hsyncs 932.01 'Lost hsyncs 933.00 Printhead...fan control adjustment state. 4512-220, -230 Service error codes (9xx) (Continued) Error Description 924.01 Open thermistor check failure. The ADC failed to the fuser and belt fusers. 924.02 Open thermistor check failure. Possible noisy thermistor signal. This applies to converge.
...error, check sweep accuracy state 935.24 Printhead sweep error, reserved 935.25 Printhead sweep error, detected resonant frequency out of expected range 2-34 Lexmark™ E250d and E250dn Printhead service errors 931.00 No first hsync 931.01 No first hsync 932.00 Lost hsyncs 932.01 'Lost hsyncs 933.00 Printhead...fan control adjustment state. 4512-220, -230 Service error codes (9xx) (Continued) Error Description 924.01 Open thermistor check failure. The ADC failed to the fuser and belt fusers. 924.02 Open thermistor check failure. Possible noisy thermistor signal. This applies to converge.

Service Manual
Page 62
...page 2-40. See "Operator panel service check" on page 2-47. See "Black page" on page 2-43. See "Toner on back of page. Fuser parts melted. Toner not fused to the media. Black page. White or black lines or bands. See "LVPS/HVPS service check" on page 2-49... 2-45. Operator panel button not responding. See "Media "trees," wrinkles, stacks poorly, or curls" on page 3-50. 2-38 Lexmark™ E250d and E250dn Media skew. Light print. Printer not communicating with host. See "Cover interlock switch service check" on page 2-45. See "Parallel or USB port service check" on...
...page 2-40. See "Operator panel service check" on page 2-47. See "Black page" on page 2-43. See "Toner on back of page. Fuser parts melted. Toner not fused to the media. Black page. White or black lines or bands. See "LVPS/HVPS service check" on page 2-49... 2-45. Operator panel button not responding. See "Media "trees," wrinkles, stacks poorly, or curls" on page 3-50. 2-38 Lexmark™ E250d and E250dn Media skew. Light print. Printer not communicating with host. See "Cover interlock switch service check" on page 2-45. See "Parallel or USB port service check" on...

Service Manual
Page 72
...laser light path is low, try a new one. Check to heavier paper or even card stock.1 Make sure recommended media is being used . Check the media settings in the left and right transfer roll bearings. Replace as necessary. Variation in the printer driver. 2-48 Lexmark™ E250d and E250dn...gently shake the assembly to the PC drum. Make sure recommended media is being used . Place a sheet of image FRU Fuser Media (not a FRU) Action The fuser may have an unbalanced force against the PC (photoconductor) drum. A heavier media may require higher heat to the paper....
...laser light path is low, try a new one. Check to heavier paper or even card stock.1 Make sure recommended media is being used . Check the media settings in the left and right transfer roll bearings. Replace as necessary. Variation in the printer driver. 2-48 Lexmark™ E250d and E250dn...gently shake the assembly to the PC drum. Make sure recommended media is being used . Place a sheet of image FRU Fuser Media (not a FRU) Action The fuser may have an unbalanced force against the PC (photoconductor) drum. A heavier media may require higher heat to the paper....

Service Manual
Page 74
...partially blocked. Vertical white lines may be caused by the laser beam, which may be defective. Inspect the fuser at the end of the manual for repeating defects. Vertical... the PC kit. 2-50 Lexmark™ E250d and E250dn Vertical streaks Something could be partially blocked. Try a different toner cartridge. Horizontal streaks The toner cartridge or the fuser may be incorrectly set. Vertical... the printer off , clear the path or clean the lens. The toner cartridge or fuser may be defective. See "Toner on back of the page. Inspect the fuser at ...
...partially blocked. Vertical white lines may be caused by the laser beam, which may be defective. Inspect the fuser at the end of the manual for repeating defects. Vertical... the PC kit. 2-50 Lexmark™ E250d and E250dn Vertical streaks Something could be partially blocked. Try a different toner cartridge. Horizontal streaks The toner cartridge or the fuser may be incorrectly set. Vertical... the printer off , clear the path or clean the lens. The toner cartridge or fuser may be defective. See "Toner on back of the page. Inspect the fuser at ...

Service Manual
Page 98
4512-220, -230 Rear cover removal 1. See "Left side cover removal" on page 4-5. 2. Remove the right side cover. Remove the left side cover. Note: In re-installation, check to make sure that the fuser ground cable is routed out of the way and is not pinched or damaged. 4-6 Lexmark™ E250d and E250dn Remove the two screws (A). 4. See "Right side cover removal" on page 4-4. 3. Lift the rear cover, unhooking it from the frame at the bottom, and remove. Open the rear cover. 5.
4512-220, -230 Rear cover removal 1. See "Left side cover removal" on page 4-5. 2. Remove the right side cover. Remove the left side cover. Note: In re-installation, check to make sure that the fuser ground cable is routed out of the way and is not pinched or damaged. 4-6 Lexmark™ E250d and E250dn Remove the two screws (A). 4. See "Right side cover removal" on page 4-4. 3. Lift the rear cover, unhooking it from the frame at the bottom, and remove. Open the rear cover. 5.

Service Manual
Page 114
... See "Rear cover removal" on page 4-37 for more information. 6. 4512-220, -230 Fuser removal 1. Remove the left side cover. Release the side latches, and lift the rear of the exit guide must clear... the fuser bracket without touching it. Remove the paper exit guide assembly. Remove the right side cover. ...the two screws (A) and the one rear screw above the fuser. 8. Remove the controller card cover. 9. Disconnect the fuser power cable above the fuser. 4-22 Lexmark™ E250d and E250dn
... See "Rear cover removal" on page 4-37 for more information. 6. 4512-220, -230 Fuser removal 1. Remove the left side cover. Release the side latches, and lift the rear of the exit guide must clear... the fuser bracket without touching it. Remove the paper exit guide assembly. Remove the right side cover. ...the two screws (A) and the one rear screw above the fuser. 8. Remove the controller card cover. 9. Disconnect the fuser power cable above the fuser. 4-22 Lexmark™ E250d and E250dn

Service Manual
Page 116
...page 4-37. 2. Place the printer on its top with the back and bottom in the side frame. 4. Note: The connector latch (D) is toward the side frame as shown. 4-24 Lexmark™ E250d and E250dn Note: Be careful not to disconnect the fuser power cable from the fuser, and pull the cable through... the opening in view. Remove the fuser. Use the hook end of a spring hook to mar the finish of the printer. 5. Remove the paper exit...
...page 4-37. 2. Place the printer on its top with the back and bottom in the side frame. 4. Note: The connector latch (D) is toward the side frame as shown. 4-24 Lexmark™ E250d and E250dn Note: Be careful not to disconnect the fuser power cable from the fuser, and pull the cable through... the opening in view. Remove the fuser. Use the hook end of a spring hook to mar the finish of the printer. 5. Remove the paper exit...

Service Manual
Page 151
... number 40X2804 40X2800 40X2801 40X2802 40X2833 40X2823 40X2813 40X2856 40X2828 40X2805 40X2851 40X2819 40X2820 40X2809 40X2824 40X2845 40X2826 40X2846 Units/ mach Units/ FRU Description 1 LSU, E250d/E250dn (printhead) 1 Fuser assembly, 110 V 1 Fuser assembly, 220 V 1 Fuser assembly, 100 V 1 Miscellaneous cable assemblies 1 Thermistor 1 LVPS/HVPS to controller card 1 Main drive gear assembly (motor to controller card...
... number 40X2804 40X2800 40X2801 40X2802 40X2833 40X2823 40X2813 40X2856 40X2828 40X2805 40X2851 40X2819 40X2820 40X2809 40X2824 40X2845 40X2826 40X2846 Units/ mach Units/ FRU Description 1 LSU, E250d/E250dn (printhead) 1 Fuser assembly, 110 V 1 Fuser assembly, 220 V 1 Fuser assembly, 100 V 1 Miscellaneous cable assemblies 1 Thermistor 1 LVPS/HVPS to controller card 1 Main drive gear assembly (motor to controller card...

Service Manual
Page 158
... 2-50 printer symptom table 2-38 printhead removal 4-40 service check 2-53 Protocol 3-5 R removals controller card 4-13 cover open sensor 4-15 covers front access cover 4-2 left side cover 4-4 right side cover 4-5 top cover 4-7 developer drive coupling assembly 4-16 fan 4-21 fuser 4-22 I-2 Lexmark™ E250d and E250dn fuser power cable... 6-1 sensors cover open 4-15 service checks 2-39 controller card 2-39 cooling fan 2-40 cover interlock switch 2-40 dead machine 2-41 fuser 2-41 LVPS/HVPS 2-42 main motor 2-42 operator panel 2-43 paper feed 2-43 paper jam during POST 2-43 paper never picks ...
... 2-50 printer symptom table 2-38 printhead removal 4-40 service check 2-53 Protocol 3-5 R removals controller card 4-13 cover open sensor 4-15 covers front access cover 4-2 left side cover 4-4 right side cover 4-5 top cover 4-7 developer drive coupling assembly 4-16 fan 4-21 fuser 4-22 I-2 Lexmark™ E250d and E250dn fuser power cable... 6-1 sensors cover open 4-15 service checks 2-39 controller card 2-39 cooling fan 2-40 cover interlock switch 2-40 dead machine 2-41 fuser 2-41 LVPS/HVPS 2-42 main motor 2-42 operator panel 2-43 paper feed 2-43 paper jam during POST 2-43 paper never picks ...

Service Manual
Page 161
...Traditional Chinese font card assembly 7-8 Korean font card assembly 7-8 Fuser assembly, 220 V 7-5 Fuser assembly, 100 V 7-5 LSU, E250d/E250dn (printhead 7-5 Controller card, E250dn 7-5 LED operator panel assembly, E250d/E250dn 7-5 Cover open sensor assembly 7-5 LED bezel cover, E250dn 7-3 Tray 2 paper feed tires 7-7 LVPS/HVPS card ... number index I-5 LVPS/HVPS to controller 7-5 Cable assembly, misc.- main drive motor 7-5 Cable assembly, misc.- fuser power 7-5 Cable assembly, misc - 4512-220, -230 Part number index P/N Description Page 40X0270 40X0271 40X0274 40X0275...
...Traditional Chinese font card assembly 7-8 Korean font card assembly 7-8 Fuser assembly, 220 V 7-5 Fuser assembly, 100 V 7-5 LSU, E250d/E250dn (printhead 7-5 Controller card, E250dn 7-5 LED operator panel assembly, E250d/E250dn 7-5 Cover open sensor assembly 7-5 LED bezel cover, E250dn 7-3 Tray 2 paper feed tires 7-7 LVPS/HVPS card ... number index I-5 LVPS/HVPS to controller 7-5 Cable assembly, misc.- main drive motor 7-5 Cable assembly, misc.- fuser power 7-5 Cable assembly, misc - 4512-220, -230 Part number index P/N Description Page 40X0270 40X0271 40X0274 40X0275...


