
Quick Reference
Page 4
Common light sequences (continued) = On = Blinking = Slow blink Empty = Off Printer Condition Complex page Continue Toner Low / Error Replace PC Kit Load Paper Paper Jam Ready Cancel job/ Reset printer Load print media Load manual feeder Toner low Toner cartridge region mismatch Photoconductor kit life warning Replace photoconductor (printer hard stop) Programming engine code/ Programming system code Understanding the control panel lights 4
Common light sequences (continued) = On = Blinking = Slow blink Empty = Off Printer Condition Complex page Continue Toner Low / Error Replace PC Kit Load Paper Paper Jam Ready Cancel job/ Reset printer Load print media Load manual feeder Toner low Toner cartridge region mismatch Photoconductor kit life warning Replace photoconductor (printer hard stop) Programming engine code/ Programming system code Understanding the control panel lights 4

User's Guide
Page 9
Understanding the control panel lights Common light sequences (continued) = On = Blinking = Slow blink Empty = Off Printer Condition Complex page Page Continue 14 Error Toner Low / Replace PC Kit Load Paper Paper Jam Ready Cancel job/ Reset printer 15 Load print media 15 Load manual feeder 16 Toner low 16 Toner cartridge region 17 mismatch Photoconductor kit life 17 warning Replace photoconductor 18 (printer hard stop) Programming engine 18 code/ Programming system code Invalid engine code / 19 Invalid network code 9
Understanding the control panel lights Common light sequences (continued) = On = Blinking = Slow blink Empty = Off Printer Condition Complex page Page Continue 14 Error Toner Low / Replace PC Kit Load Paper Paper Jam Ready Cancel job/ Reset printer 15 Load print media 15 Load manual feeder 16 Toner low 16 Toner cartridge region 17 mismatch Photoconductor kit life 17 warning Replace photoconductor 18 (printer hard stop) Programming engine 18 code/ Programming system code Invalid engine code / 19 Invalid network code 9
User's Guide
Page 17
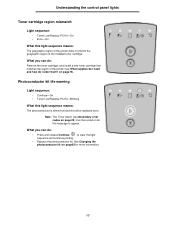
... and continue printing. • Replace the photoconductor kit. Photoconductor kit life warning Light sequence: • Continue-On • Toner Low/Replace PC Kit-Blinking What this light sequence means: The geographic region of the printer does not match the geographic region of the printer (see Secondary error codes on page25) must be replaced soon. What...
... and continue printing. • Replace the photoconductor kit. Photoconductor kit life warning Light sequence: • Continue-On • Toner Low/Replace PC Kit-Blinking What this light sequence means: The geographic region of the printer does not match the geographic region of the printer (see Secondary error codes on page25) must be replaced soon. What...
User's Guide
Page 78
...life. (See Replace photoconductor (printer hard stop .) The printer automatically notifies you before the photoconductor reaches this procedure multiple times . Ordering a maintenance kit Scheduled maintenance is time to order a new maintenance kit. If Maintenance is listed under the Warnings heading, it . The ...toner cartridge. For more information, see the instruction sheet that came with this stop ) on page9for the light sequence associated with your specific printer. To know when to order a maintenance kit, print your toner cartridge and how full the photoconductor is...
...life. (See Replace photoconductor (printer hard stop .) The printer automatically notifies you before the photoconductor reaches this procedure multiple times . Ordering a maintenance kit Scheduled maintenance is time to order a new maintenance kit. If Maintenance is listed under the Warnings heading, it . The ...toner cartridge. For more information, see the instruction sheet that came with this stop ) on page9for the light sequence associated with your specific printer. To know when to order a maintenance kit, print your toner cartridge and how full the photoconductor is...

User's Guide
Page 79
... low Page 16 Continue Error Toner Low / Replace PC Kit Load Paper Paper Jam Ready Photoconductor kit 17 life warning Replace 18 photoconductor (printer hard stop)* * If the control panel lights display this sequence, the printer will not print any more jobs until the photoconductor kit is replaced. Note: The control panel may also...
... low Page 16 Continue Error Toner Low / Replace PC Kit Load Paper Paper Jam Ready Photoconductor kit 17 life warning Replace 18 photoconductor (printer hard stop)* * If the control panel lights display this sequence, the printer will not print any more jobs until the photoconductor kit is replaced. Note: The control panel may also...
User's Guide
Page 82
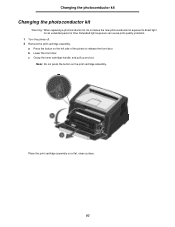
Extended light exposure can cause print quality problems. 1 Turn the printer off. 2 Remove the print cartridge assembly. Note: Do not press the button on a flat, clean surface. 82 Place the print cartridge assembly on the print ... pull up and out. b Lower the front door. a Press the button on the left side of the printer to direct light for an extended period of time. Changing the photoconductor kit Changing the photoconductor kit Warning: When replacing a photoconductor kit, do not leave the new photoconductor kit exposed to release the front door.
Extended light exposure can cause print quality problems. 1 Turn the printer off. 2 Remove the print cartridge assembly. Note: Do not press the button on a flat, clean surface. 82 Place the print cartridge assembly on the print ... pull up and out. b Lower the front door. a Press the button on the left side of the printer to direct light for an extended period of time. Changing the photoconductor kit Changing the photoconductor kit Warning: When replacing a photoconductor kit, do not leave the new photoconductor kit exposed to release the front door.

Service Manual
Page 25
... and diagnostic tools to aid in the paper path. Models E250d and E250dn have an operator panel containing lights and buttons. Always check for debris in providing corrective action for the following information: • A description of the printer. - Warning: Paper clips are commonly used near printers and can become lodged in the paper path. 2. This...
... and diagnostic tools to aid in the paper path. Models E250d and E250dn have an operator panel containing lights and buttons. Always check for debris in providing corrective action for the following information: • A description of the printer. - Warning: Paper clips are commonly used near printers and can become lodged in the paper path. 2. This...

Service Manual
Page 27
... Common light sequences 4512-220, -230 Printer Condition Page Ready / Power Saver 4 Busy 4 Hex Trace Ready 4 Waiting 5 Flushing / Resolution reduced 5 ✷ Not ready 5 (printer is offline) Close door 6 z Insufficient collation area/ 6 Insufficient memory Cancel job/ Reset printer 6 Load print media Tray 1 7 Load manual feeder 7 z z z z z Toner low¹ 7 Toner cartridge region mismatch 8 z Photoconductor kit life warning...
... Common light sequences 4512-220, -230 Printer Condition Page Ready / Power Saver 4 Busy 4 Hex Trace Ready 4 Waiting 5 Flushing / Resolution reduced 5 ✷ Not ready 5 (printer is offline) Close door 6 z Insufficient collation area/ 6 Insufficient memory Cancel job/ Reset printer 6 Load print media Tray 1 7 Load manual feeder 7 z z z z z Toner low¹ 7 Toner cartridge region mismatch 8 z Photoconductor kit life warning...
Service Manual
Page 32
...be replaced soon. Photoconductor kit life warning ✷ z Meaning The photoconductor is Off. Action • Press and release Continue to clear the light sequence and continue printing. •...; Replace the photoconductor kit. Action Remove the toner cartridge, and install a new toner cartridge that matches the region of the installed toner cartridge. Action • Press and release Continue to print a photoconductor kit instruction page. • Replace the photoconductor kit. 2-8 Lexmark™ E250d and E250dn The printer...
...be replaced soon. Photoconductor kit life warning ✷ z Meaning The photoconductor is Off. Action • Press and release Continue to clear the light sequence and continue printing. •...; Replace the photoconductor kit. Action Remove the toner cartridge, and install a new toner cartridge that matches the region of the installed toner cartridge. Action • Press and release Continue to print a photoconductor kit instruction page. • Replace the photoconductor kit. 2-8 Lexmark™ E250d and E250dn The printer...

Service Manual
Page 63
... in approximately 30 seconds. When either of these cards is good, check the connectors to display lights or activate the drive motor, fuser or fan, check the following order: 1. If the printer fails to the controller board. 6. Verify +24 V dc input from the LVPS/HVPS to ... both are grounded. 7. Controller card service check Controller card service check FRU Controller card assembly Warning: Do not replace the operator panel and controller card at J19. 3. Each card contains the printer settings. Power to the controller card 3. See "Operator panel service check" on its back ...
... in approximately 30 seconds. When either of these cards is good, check the connectors to display lights or activate the drive motor, fuser or fan, check the following order: 1. If the printer fails to the controller board. 6. Verify +24 V dc input from the LVPS/HVPS to ... both are grounded. 7. Controller card service check Controller card service check FRU Controller card assembly Warning: Do not replace the operator panel and controller card at J19. 3. Each card contains the printer settings. Power to the controller card 3. See "Operator panel service check" on its back ...

Service Manual
Page 67
...open the controller card cage and locate the operator panel connector at the same time. Action Lights If none of the fuser, is not functioning, replace the operator panel. Replace the ...Diagnostic information 2-43 LED Operator panel service check FRU Operator panel (LED) Controller card Warning: Do not replace the operator panel and controller card at J3. Paper feed service ... sure the cable is new, it . Each card contains the printer settings. Check the manual feed clutch for damage. With the printer on page 2-2. 4512-220, -230 Operator panel service check Inspect...
...open the controller card cage and locate the operator panel connector at the same time. Action Lights If none of the fuser, is not functioning, replace the operator panel. Replace the ...Diagnostic information 2-43 LED Operator panel service check FRU Operator panel (LED) Controller card Warning: Do not replace the operator panel and controller card at J3. Paper feed service ... sure the cable is new, it . Each card contains the printer settings. Check the manual feed clutch for damage. With the printer on page 2-2. 4512-220, -230 Operator panel service check Inspect...

Service Manual
Page 93
... part needs to be installed into its special bag. • Machine covers and metal tables are known to be protected from the printer to ESD-sensitive parts, follow the instructions below in your body through the ESD-sensitive part. (Large metal objects can be discharge paths... by its pins. Unless otherwise stated, reinstall the parts in working with several screws, start all external cables from light while out of removal. 4. Removal procedures Note: 1. 4512-220, -230 4. Repair information Warning: Read the following before removing other personnel. if the ESD-
... part needs to be installed into its special bag. • Machine covers and metal tables are known to be protected from the printer to ESD-sensitive parts, follow the instructions below in your body through the ESD-sensitive part. (Large metal objects can be discharge paths... by its pins. Unless otherwise stated, reinstall the parts in working with several screws, start all external cables from light while out of removal. 4. Removal procedures Note: 1. 4512-220, -230 4. Repair information Warning: Read the following before removing other personnel. if the ESD-


