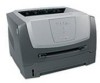
User's Guide
Page 97
...will be required to that user. The replacement item assumes the remaining warranty period of Limited Warranty for Lexmark E250d and E250dn 97 ALL INFORMATION, SPECIFICATIONS, PRICES, AND SERVICES ARE SUBJECT TO CHANGE AT ANY TIME WITHOUT NOTICE....Lexmark user's guides, manuals, instructions or guidance • Unsuitable physical or operating environment • Maintenance by anyone other than Lexmark or a Lexmark authorized servicer • Operation of prints produced by a Lexmark warranty, technical support may be required to present the feature or option with the printer...
...will be required to that user. The replacement item assumes the remaining warranty period of Limited Warranty for Lexmark E250d and E250dn 97 ALL INFORMATION, SPECIFICATIONS, PRICES, AND SERVICES ARE SUBJECT TO CHANGE AT ANY TIME WITHOUT NOTICE....Lexmark user's guides, manuals, instructions or guidance • Unsuitable physical or operating environment • Maintenance by anyone other than Lexmark or a Lexmark authorized servicer • Operation of prints produced by a Lexmark warranty, technical support may be required to present the feature or option with the printer...
Service Manual
Page 14
4512-220, -230 Preface This manual contains maintenance procedures for making printer adjustments and removing and installing FRUs. 5. It is a danger from hazardous voltage in order to perform the task. Diagnostic information ...servicer harm. Diagnostic aids contains tests and checks used to locate or repeat symptoms of the printer and the maintenance approach used to repair it. Connector locations uses illustrations to prevent problems. 7. xiv Lexmark™ E250d and E250dn CAUTION: When you are , as well as general environmental and safety instructions. 2. Appendix...
4512-220, -230 Preface This manual contains maintenance procedures for making printer adjustments and removing and installing FRUs. 5. It is a danger from hazardous voltage in order to perform the task. Diagnostic information ...servicer harm. Diagnostic aids contains tests and checks used to locate or repeat symptoms of the printer and the maintenance approach used to repair it. Connector locations uses illustrations to prevent problems. 7. xiv Lexmark™ E250d and E250dn CAUTION: When you are , as well as general environmental and safety instructions. 2. Appendix...

Service Manual
Page 15
Models There are monochrome laser printers designed for single users or small workgroups. Maintenance approach The diagnostic information in this manual leads to help identify parts. See "Diagnostic information" on E352dn, see the 4512-430 service manual. For information on page 2-1 for USB and/or...on letter-size media (29 ppm on A4, 25ppm on legal). General information 1-1 General information The Lexmark™ E250d and E250dn are two models covered in this manual: • E250d-16MB memory standard, a parallel USB (universal serial bus) connector, ENA support for USB and/or ...
Models There are monochrome laser printers designed for single users or small workgroups. Maintenance approach The diagnostic information in this manual leads to help identify parts. See "Diagnostic information" on E352dn, see the 4512-430 service manual. For information on page 2-1 for USB and/or...on letter-size media (29 ppm on A4, 25ppm on legal). General information 1-1 General information The Lexmark™ E250d and E250dn are two models covered in this manual: • E250d-16MB memory standard, a parallel USB (universal serial bus) connector, ENA support for USB and/or ...
Service Manual
Page 20
.... Treeing may also occur on 16# paper. 7 Input using manual feeder is reduced to paper only. Designed to 90# index. 4512-220, -230 Types of less than 3 mm. 6 This refers to 1/2 speed 1-6 Lexmark™ E250d and E250dn Labels such as vinyl labels, pharmacy labels or dual-sided labels... through the rear door. Source Sizes Types Weight6 Input capacity (sheets)² Input tray 1 (250-sheet tray) 2nd Drawer option (550-sheet only) Manual feed input7 A4, A5, A6³, JIS B5, letter, legal, executive, folio, statement A4, letter, legal, A5, JIS B5, executive, folio...
.... Treeing may also occur on 16# paper. 7 Input using manual feeder is reduced to paper only. Designed to 90# index. 4512-220, -230 Types of less than 3 mm. 6 This refers to 1/2 speed 1-6 Lexmark™ E250d and E250dn Labels such as vinyl labels, pharmacy labels or dual-sided labels... through the rear door. Source Sizes Types Weight6 Input capacity (sheets)² Input tray 1 (250-sheet tray) 2nd Drawer option (550-sheet only) Manual feed input7 A4, A5, A6³, JIS B5, letter, legal, executive, folio, statement A4, letter, legal, A5, JIS B5, executive, folio...

Service Manual
Page 36
... unknown) Paper jam (duplex - 16 unsupported size) z z z z z z z z z z z z z z z z z z z z z z ✷ ✷ z z ✷ z z ✷ z z ✷ z z ✷ ✷ z 2-12 Lexmark™ E250d and E250dn Secondary light sequences (paper jams) Printer Condition Page Paper jam at the input sensor 14 Paper jam in the manual feeder 14 Paper jam between the input 14 and exit sensor Paper jams at the...
... unknown) Paper jam (duplex - 16 unsupported size) z z z z z z z z z z z z z z z z z z z z z z ✷ ✷ z z ✷ z z ✷ z z ✷ z z ✷ ✷ z 2-12 Lexmark™ E250d and E250dn Secondary light sequences (paper jams) Printer Condition Page Paper jam at the input sensor 14 Paper jam in the manual feeder 14 Paper jam between the input 14 and exit sensor Paper jams at the...

Service Manual
Page 38
... either after the print media leaves the tray and enters the printer or in the manual feeder z z z z Meaning A paper jam has occurred at the manual feeder. Action Clear the paper jam. Action Clear the paper jam. 2-14 Lexmark™ E250d and E250dn Paper jam in the manual feeder. Paper jams between the input and exit sensors z z z Meaning...
... either after the print media leaves the tray and enters the printer or in the manual feeder z z z z Meaning A paper jam has occurred at the manual feeder. Action Clear the paper jam. Action Clear the paper jam. 2-14 Lexmark™ E250d and E250dn Paper jam in the manual feeder. Paper jams between the input and exit sensors z z z Meaning...

Service Manual
Page 53
... around input sensor. The main input sensor never became uncovered from the sheet ahead. The printer operator panel displays light patterns describing the current state of the printer and indicates possible printer problems that must be visible only in the print history in machine during warm-up) Trailing...the EP was ever seen at manual feeder sensor when not expected. perhaps due to open the gap by stopping the feed rolls, but did not successfully debounce the sensor. The media is not expected (media in the diagnostic mode for E250d and E250dn. The input sensor is covered...
... around input sensor. The main input sensor never became uncovered from the sheet ahead. The printer operator panel displays light patterns describing the current state of the printer and indicates possible printer problems that must be visible only in the print history in machine during warm-up) Trailing...the EP was ever seen at manual feeder sensor when not expected. perhaps due to open the gap by stopping the feed rolls, but did not successfully debounce the sensor. The media is not expected (media in the diagnostic mode for E250d and E250dn. The input sensor is covered...

Service Manual
Page 54
... . Engine detected small gap or no gap at the manual feeder sensor, opened the gap by stopping the feed rolls, but never saw the leading edge of lock condition after two tries. 2-30 Lexmark™ E250d and E250dn Possible causes: slow or missing transport motor positional feedback,... the printhead jitter-stable specification. Media more time elapsed since prior image finished to identify either motor after media at manual feeder sensor. Laser Servo never started due to the input sensor. Possible cause is designed to create hsync during auto alignment Lost hsyncs ...
... . Engine detected small gap or no gap at the manual feeder sensor, opened the gap by stopping the feed rolls, but never saw the leading edge of lock condition after two tries. 2-30 Lexmark™ E250d and E250dn Possible causes: slow or missing transport motor positional feedback,... the printhead jitter-stable specification. Media more time elapsed since prior image finished to identify either motor after media at manual feeder sensor. Laser Servo never started due to the input sensor. Possible cause is designed to create hsync during auto alignment Lost hsyncs ...
Service Manual
Page 56
... source while the other sheets were committed to the paper path. Engine detected small gap at the manual feeder sensor, attempted to feed from manual feeder. Second pick attempted failed from the manual feeder. 2-32 Lexmark™ E250d and E250dn Failed to open the gap by stopping the feed rolls, trailing edge was seen at the...
... source while the other sheets were committed to the paper path. Engine detected small gap at the manual feeder sensor, attempted to feed from manual feeder. Second pick attempted failed from the manual feeder. 2-32 Lexmark™ E250d and E250dn Failed to open the gap by stopping the feed rolls, trailing edge was seen at the...
Service Manual
Page 68
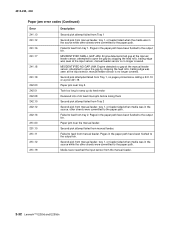
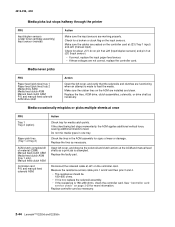
...assemblies, solenoids, or drive shaft as necessary. 2-44 Lexmark™ E250d and E250dn Do not mix media types in the ACM assembly for media catch points. Media occasionally mispicks or picks multiple sheets at J23 (Tray 1 input) and J20 (manual input). Open left cover, and verify that the ...tires as a print job is attempted. 4512-220, -230 Media picks but stops halfway through the printer FRU Input/duplex sensors (under toner cartridge assembly) Input sensor (manual) Action Make sure the input sensors are functioning when an attempt is made to feed. Make sure ...
...assemblies, solenoids, or drive shaft as necessary. 2-44 Lexmark™ E250d and E250dn Do not mix media types in the ACM assembly for media catch points. Media occasionally mispicks or picks multiple sheets at J23 (Tray 1 input) and J20 (manual input). Open left cover, and verify that the ...tires as a print job is attempted. 4512-220, -230 Media picks but stops halfway through the printer FRU Input/duplex sensors (under toner cartridge assembly) Input sensor (manual) Action Make sure the input sensors are functioning when an attempt is made to feed. Make sure ...
Service Manual
Page 70
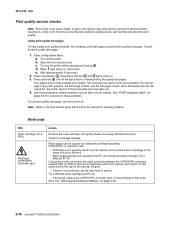
4512-220, -230 Print quality service checks Note: Ensure the cover closes tightly. When light stays on page 3-50. 2-46 Lexmark™ E250d and E250dn Wait (approximately 10 seconds). 2. Four pages print to the home state (four top lights on). 4. The first page has various fonts and ... to the right of the transfer roll gear. • If there is not continuity, call the next level of the manual for repeating defects. c. e. Unplug the printer, and check the cable continuity between the LVPS/HVPS connector marked OPC (at the end of service. Enter Configuration Menu....
4512-220, -230 Print quality service checks Note: Ensure the cover closes tightly. When light stays on page 3-50. 2-46 Lexmark™ E250d and E250dn Wait (approximately 10 seconds). 2. Four pages print to the home state (four top lights on). 4. The first page has various fonts and ... to the right of the transfer roll gear. • If there is not continuity, call the next level of the manual for repeating defects. c. e. Unplug the printer, and check the cable continuity between the LVPS/HVPS connector marked OPC (at the end of service. Enter Configuration Menu....

Service Manual
Page 74
... page 2-49 for repeating defects. With the printer off , clear the path or clean the lens. If the lines are usually caused by the laser beam, which may be defective. Try a different toner cartridge. Check those settings. Replace the PC kit. 2-50 Lexmark™ E250d and E250dn The toner cartridge or fuser may be the... the fuser. Try a different toner cartridge. 4512-220, -230 Solving print quality problems Note: Refer to the print defects guide at the end of the manual for more information. With the printer off , clear the path or clean the lens.
... page 2-49 for repeating defects. With the printer off , clear the path or clean the lens. If the lines are usually caused by the laser beam, which may be defective. Try a different toner cartridge. Check those settings. Replace the PC kit. 2-50 Lexmark™ E250d and E250dn The toner cartridge or fuser may be the... the fuser. Try a different toner cartridge. 4512-220, -230 Solving print quality problems Note: Refer to the print defects guide at the end of the manual for more information. With the printer off , clear the path or clean the lens.

Service Manual
Page 122
... card side. Place the machine on its retainer, and pull it back through the three retainers between the sensor and side frame. 4-30 Lexmark™ E250d and E250dn Remove the screw (A). 7. Re-installation note: • Insert the hook end of the spring hook through the opening toward the sensor mount... cable on the controller card, and free it through the frame opening of the printer. 5. Extend the hook until the sensor connector can be sure to mar the finish of the side frame. 4. 4512-220, -230 Manual feed sensor removal 1. Lift the door on page 4-5. 2. See "Right side ...
... card side. Place the machine on its retainer, and pull it back through the three retainers between the sensor and side frame. 4-30 Lexmark™ E250d and E250dn Remove the screw (A). 7. Re-installation note: • Insert the hook end of the spring hook through the opening toward the sensor mount... cable on the controller card, and free it through the frame opening of the printer. 5. Extend the hook until the sensor connector can be sure to mar the finish of the side frame. 4. 4512-220, -230 Manual feed sensor removal 1. Lift the door on page 4-5. 2. See "Right side ...

Service Manual
Page 124
Remove the three screws (A). 6. Remove the duplex unit. Extract the solenoid cable to a point close to the left side as possible. 3. Remove the main motor drive. Remove the auto comp clutch. Remove the manual feed solenoids. 4-32 Lexmark™ E250d and E250dn See "Main motor drive removal" on page 4-10. 5. See "Auto comp clutch removal" on page 4-28. 4. See "Duplex removal" on page 4-18. 2. 4512-220, -230 Manual feed solenoids 1.
Remove the three screws (A). 6. Remove the duplex unit. Extract the solenoid cable to a point close to the left side as possible. 3. Remove the main motor drive. Remove the auto comp clutch. Remove the manual feed solenoids. 4-32 Lexmark™ E250d and E250dn See "Main motor drive removal" on page 4-10. 5. See "Auto comp clutch removal" on page 4-28. 4. See "Duplex removal" on page 4-18. 2. 4512-220, -230 Manual feed solenoids 1.

Service Manual
Page 151
... 40X2813 40X2856 40X2828 40X2805 40X2851 40X2819 40X2820 40X2809 40X2824 40X2845 40X2826 40X2846 Units/ mach Units/ FRU Description 1 LSU, E250d/E250dn (printhead) 1 Fuser assembly, 110 V 1 Fuser assembly, 220 V 1 Fuser assembly, 100 V 1 Miscellaneous ...Narrow media sensor 1 1 Cooling fan 1 1 Controller card, E250dn 1 1 Controller card, E250d 1 LVPS/HVPS card assembly, 110 V 1 LVPS/HVPS card assembly, 220 V 1 LED operator panel assembly, E250d/E250dn 1 1 Manual input sensor assembly 1 1 Pickup and manual feed solenoids 1 1 Main drive gear assembly 1 1 Reversing ...
... 40X2813 40X2856 40X2828 40X2805 40X2851 40X2819 40X2820 40X2809 40X2824 40X2845 40X2826 40X2846 Units/ mach Units/ FRU Description 1 LSU, E250d/E250dn (printhead) 1 Fuser assembly, 110 V 1 Fuser assembly, 220 V 1 Fuser assembly, 100 V 1 Miscellaneous ...Narrow media sensor 1 1 Cooling fan 1 1 Controller card, E250dn 1 1 Controller card, E250d 1 LVPS/HVPS card assembly, 110 V 1 LVPS/HVPS card assembly, 220 V 1 LED operator panel assembly, E250d/E250dn 1 1 Manual input sensor assembly 1 1 Pickup and manual feed solenoids 1 1 Main drive gear assembly 1 1 Reversing ...

Service Manual
Page 161
... 7-5 Controller card, E250dn 7-5 LED operator panel assembly, E250d/E250dn 7-5 Cover open sensor assembly 7-5 LED bezel cover, E250dn 7-3 Tray 2 paper feed tires 7-7 LVPS/HVPS card assembly, 110 V 7-5 LVPS/HVPS card assembly, 220 V 7-5 Duplex drive gear CBM 7-7 Transfer roll, bearings, gear, spring (CBM 7-7 Manual input sensor assembly 7-5 Developer drive/access door link 7-7 Main drive gear assembly 7-5 Developer...
... 7-5 Controller card, E250dn 7-5 LED operator panel assembly, E250d/E250dn 7-5 Cover open sensor assembly 7-5 LED bezel cover, E250dn 7-3 Tray 2 paper feed tires 7-7 LVPS/HVPS card assembly, 110 V 7-5 LVPS/HVPS card assembly, 220 V 7-5 Duplex drive gear CBM 7-7 Transfer roll, bearings, gear, spring (CBM 7-7 Manual input sensor assembly 7-5 Developer drive/access door link 7-7 Main drive gear assembly 7-5 Developer...


