User's Guide
Page 18
...Toner Low/Replace PC Kit-On • Load Paper-On What this light sequence means: The photoconductor kit is replaced. When the printer has finished programming the code, it performs a soft reset. 18 The printer will not print any more pages until the photoconductor kit is full and ...8226; Replace the photoconductor kit. (See Changing the photoconductor kit on page82 for the message to clear. Understanding the control panel lights Replace photoconductor (printer hard stop) Light sequence: • Continue-On • Toner Low/Replace PC Kit-Blinking • Error-Blinking What this...
...Toner Low/Replace PC Kit-On • Load Paper-On What this light sequence means: The photoconductor kit is replaced. When the printer has finished programming the code, it performs a soft reset. 18 The printer will not print any more pages until the photoconductor kit is full and ...8226; Replace the photoconductor kit. (See Changing the photoconductor kit on page82 for the message to clear. Understanding the control panel lights Replace photoconductor (printer hard stop) Light sequence: • Continue-On • Toner Low/Replace PC Kit-Blinking • Error-Blinking What this...
User's Guide
Page 66
... overlays and watermarks and then download them directly to the printer, or you must have flash memory installed. Printing using the manual feeder, first send the job to print, then load the letterhead when the printer displays the Load Manual Feeder light sequence (see the printer driver Help. Using an overlay 1 From the computer software...
... overlays and watermarks and then download them directly to the printer, or you must have flash memory installed. Printing using the manual feeder, first send the job to print, then load the letterhead when the printer displays the Load Manual Feeder light sequence (see the printer driver Help. Using an overlay 1 From the computer software...
User's Guide
Page 99
... cleaning the printhead lens 91 clearing paper jams 56 configuration menus Parallel MAC Binary PS 39 Mode 2 39 NPA Mode 39 Protocol 39 printing the Printer Settings Configuration sheet 37 Setup Auto CR after LF 39 Auto LF after CR 39 USB MAC Binary PS 38, 40 NPA Mode 38, 40... Utilities Hex Trace 40 Print Quality Test Pages 40 Reset Factory Defaults 40 Reset Photoconductor Counter 40 control panel light sequences Busy 11 Canceling job 15 Close door 14, 17, 34 Defragment flash 11 Error 14, 15, 17, 18, 19, 20, 21, 25, 26, 27, 28, 34 Flushing data 13 Formatting...
... cleaning the printhead lens 91 clearing paper jams 56 configuration menus Parallel MAC Binary PS 39 Mode 2 39 NPA Mode 39 Protocol 39 printing the Printer Settings Configuration sheet 37 Setup Auto CR after LF 39 Auto LF after CR 39 USB MAC Binary PS 38, 40 NPA Mode 38, 40... Utilities Hex Trace 40 Print Quality Test Pages 40 Reset Factory Defaults 40 Reset Photoconductor Counter 40 control panel light sequences Busy 11 Canceling job 15 Close door 14, 17, 34 Defragment flash 11 Error 14, 15, 17, 18, 19, 20, 21, 25, 26, 27, 28, 34 Flushing data 13 Formatting...
Service Manual
Page 26
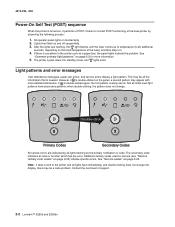
...lights quit flashing, the light flashes until the fuser comes up to the printer and all lights flashing as a paper jam, the panel lights indicate the problem. This may be a code problem. See "Service codes" on and off sequentially. 3. Contact the next level of the base printer by all lights flash... stays on momentarily 2. Check for correct POST functioning of support. 2-2 Lexmark™ E250d and E250dn The printer cycles down into standby mode, and lights solid. If is a problem in the printer such as the primary notification or code. All service errors are indicated ...
...lights quit flashing, the light flashes until the fuser comes up to the printer and all lights flashing as a paper jam, the panel lights indicate the problem. This may be a code problem. See "Service codes" on and off sequentially. 3. Contact the next level of the base printer by all lights flash... stays on momentarily 2. Check for correct POST functioning of support. 2-2 Lexmark™ E250d and E250dn The printer cycles down into standby mode, and lights solid. If is a problem in the printer such as the primary notification or code. All service errors are indicated ...

Service Manual
Page 27
... / Invalid 9 z network code Service error Printer error³ Paper jam printer error Short media 9 ✷ ✷ ✷ 10 z 10 z 10 z Output bin full 11 ✷ Load Tray 1 for side 2 of the operator panel" on with other primary light sequences. ² Toner low light will remain flashing with other primary light sequences. ³ Secondary codes will remain...
... / Invalid 9 z network code Service error Printer error³ Paper jam printer error Short media 9 ✷ ✷ ✷ 10 z 10 z 10 z Output bin full 11 ✷ Load Tray 1 for side 2 of the operator panel" on with other primary light sequences. ² Toner low light will remain flashing with other primary light sequences. ³ Secondary codes will remain...
Service Manual
Page 37
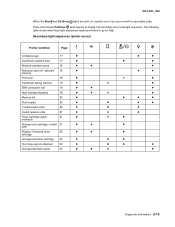
Secondary light sequences (printer errors) Printer Condition Page Complex page 17 z Insufficient collation area 17 z Network interface errors 18 z z Resource save off - ... Unsupported flash option 23 z z z z z z z ✷ z ✷ z ✷ z z ✷ z z z z z z z z z ✷ z ✷ z z z z z z z z z z Diagnostic information 2-13 The following table shows what these light sequences mean and where to display the secondary error code light sequence. 4512-220, -230 When the Error and Continue lights are both on, a printer error...
Secondary light sequences (printer errors) Printer Condition Page Complex page 17 z Insufficient collation area 17 z Network interface errors 18 z z Resource save off - ... Unsupported flash option 23 z z z z z z z ✷ z ✷ z ✷ z z ✷ z z z z z z z z z ✷ z ✷ z z z z z z z z z z Diagnostic information 2-13 The following table shows what these light sequences mean and where to display the secondary error code light sequence. 4512-220, -230 When the Error and Continue lights are both on, a printer error...
Service Manual
Page 46
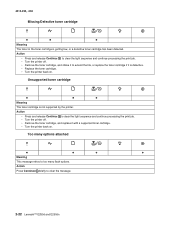
...detected. Action • Press and release Continue to clear the message. 2-22 Lexmark™ E250d and E250dn Action Press Continue briefly to clear the light sequence and continue processing the print job. • Turn the printer off . • Remove the toner cartridge, and shake it is defective. ...extend the life, or replace the toner cartridge if it to too many flash options. Action • Press and release Continue to clear the light sequence and continue processing the print job. • Turn the printer off . • Remove the toner cartridge, and replace it with a ...
...detected. Action • Press and release Continue to clear the message. 2-22 Lexmark™ E250d and E250dn Action Press Continue briefly to clear the light sequence and continue processing the print job. • Turn the printer off . • Remove the toner cartridge, and shake it is defective. ...extend the life, or replace the toner cartridge if it to too many flash options. Action • Press and release Continue to clear the light sequence and continue processing the print job. • Turn the printer off . • Remove the toner cartridge, and replace it with a ...

Service Manual
Page 47
.... • If data is sent to see the secondary code. Diagnostic information 2-23 Double-click again to the printer and all lights flash, double-click to the primary light pattern. Double-click for more information. • The secondary light pattern indicates a fuser, toner sensor, or fan error. Double-click for more information. • The tertiary...
.... • If data is sent to see the secondary code. Diagnostic information 2-23 Double-click again to the printer and all lights flash, double-click to the primary light pattern. Double-click for more information. • The secondary light pattern indicates a fuser, toner sensor, or fan error. Double-click for more information. • The tertiary...

Service Manual
Page 49
... secondary codes-90x ✷ Service tertiary codes 902-General engine software error ✷ ✷ 905-Interface violation by all lights flashing which is the primary indication or code. Replace the drawer. See "Controller card removal" on the controller card, replace the controller..., or use caution if the product must receive power in an intermittent condition when POR (power-on reset) is performed which allows the printer to temporarily recover from the cable connection on . For brevity, this symbol appears, there is a danger from hazardous voltage in tray 2...
... secondary codes-90x ✷ Service tertiary codes 902-General engine software error ✷ ✷ 905-Interface violation by all lights flashing which is the primary indication or code. Replace the drawer. See "Controller card removal" on the controller card, replace the controller..., or use caution if the product must receive power in an intermittent condition when POR (power-on reset) is performed which allows the printer to temporarily recover from the cable connection on . For brevity, this symbol appears, there is a danger from hazardous voltage in tray 2...

Service Manual
Page 52
.... Replace the controller card assembly. Service tertiary error codes-NVRAM failure Lights Service secondary codes-95x ✷ ✷ ✷ Service tertiary ...Lights Service secondary codes-97x ✷ ✷ ✷ ✷ Service tertiary codes-network error 975-Unrecognizable network port ✷ ✷ ✷ 976-Unrecoverable software error in network port ✷ ✷ ✷ 978-Bad checksum while programming port ✷ ✷ 979-Flash parts failed while programming port ✷ ✷ ✷ 2-28 Lexmark™ E250d...
.... Replace the controller card assembly. Service tertiary error codes-NVRAM failure Lights Service secondary codes-95x ✷ ✷ ✷ Service tertiary ...Lights Service secondary codes-97x ✷ ✷ ✷ ✷ Service tertiary codes-network error 975-Unrecognizable network port ✷ ✷ ✷ 976-Unrecoverable software error in network port ✷ ✷ ✷ 978-Bad checksum while programming port ✷ ✷ 979-Flash parts failed while programming port ✷ ✷ ✷ 2-28 Lexmark™ E250d...
Service Manual
Page 70
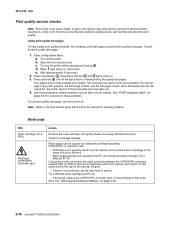
... . 3. e. Press and release three times until all the lights flash to help isolate print quality problems, like streaking, print test pages using the print quality test pages. Press and hold until the and lights come on the printer while pressing and holding . Four pages print to initiate printing the... gently shake it to isolate problems such as light or toner streaks. Unplug the printer, and check the cable continuity between the LVPS/HVPS connector marked OPC (at the end of the beam or dust on page 3-50. 2-46 Lexmark™ E250d and E250dn Try a different toner cartridge and PC...
... . 3. e. Press and release three times until all the lights flash to help isolate print quality problems, like streaking, print test pages using the print quality test pages. Press and hold until the and lights come on the printer while pressing and holding . Four pages print to initiate printing the... gently shake it to isolate problems such as light or toner streaks. Unplug the printer, and check the cable continuity between the LVPS/HVPS connector marked OPC (at the end of the beam or dust on page 3-50. 2-46 Lexmark™ E250d and E250dn Try a different toner cartridge and PC...

Service Manual
Page 79
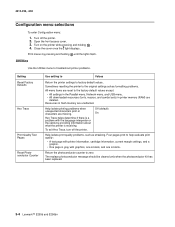
...Menu Diagnostics mode 1. Turn off the printer. 2. Generally, the options made available in this menu group are samples only and may not match your specific machine. Printing menus Print Configuration menus by pressing and holding until the lights flash, then release the button. Print ...Diagnostic menus by pressing and holding until the lights flash, then release the button. These menu items are infrequently required by the non-indented items listed along the left edge of the printer. Diagnostic aids 3-1 The Configuration menu group contains a set of...
...Menu Diagnostics mode 1. Turn off the printer. 2. Generally, the options made available in this menu group are samples only and may not match your specific machine. Printing menus Print Configuration menus by pressing and holding until the lights flash, then release the button. Print ...Diagnostic menus by pressing and holding until the lights flash, then release the button. These menu items are infrequently required by the non-indented items listed along the left edge of the printer. Diagnostic aids 3-1 The Configuration menu group contains a set of...
Service Manual
Page 82
... deleted. Open the front access cover. 3. Turn on the printer while pressing and holding until the lights flash. The replace photoconductor message should be cleared only when the photoconductor kit has been replaced. 3-4 Lexmark™ E250d and E250dn Print menus by providing information about what the printer is blank. To exit Hex Trace, turn off the...
... deleted. Open the front access cover. 3. Turn on the printer while pressing and holding until the lights flash. The replace photoconductor message should be cleared only when the photoconductor kit has been replaced. 3-4 Lexmark™ E250d and E250dn Print menus by providing information about what the printer is blank. To exit Hex Trace, turn off the...

Service Manual
Page 86
... designations to stop . U.S. (default) Non-U.S. Press and hold until the lights flash to begin . Press to metric. Press to align a new printhead. None Configuration ID Allow the printer ID to match the label ID after the controller card is disabled. None 3-8 Lexmark™ E250d and E250dn Follow the instructions on the menu page to the...
... designations to stop . U.S. (default) Non-U.S. Press and hold until the lights flash to begin . Press to metric. Press to align a new printhead. None Configuration ID Allow the printer ID to match the label ID after the controller card is disabled. None 3-8 Lexmark™ E250d and E250dn Follow the instructions on the menu page to the...

Service Manual
Page 87
...to move to each other. Press and release to print the menu sheet and Step 1 test page. See note See note z z Note: Lights (on, off, or flashing) represent current settings that must be changed for on page 3-13. 1. Press and hold until all of the Step 1 test page. Press ...and release to change the light sequence for the new printhead. Step 1 printout (sample only; See note See note z 3. 4512-220, -230 Adjustment ...
...to move to each other. Press and release to print the menu sheet and Step 1 test page. See note See note z z Note: Lights (on, off, or flashing) represent current settings that must be changed for on page 3-13. 1. Press and hold until all of the Step 1 test page. Press ...and release to change the light sequence for the new printhead. Step 1 printout (sample only; See note See note z 3. 4512-220, -230 Adjustment ...


