Printer Languages and Interfaces Technical Reference
Page 63
... Mid Warning 40204 Intervention Required - 40204 Photoconductor Nearly Low Intervention Required Imaging Unit Nearly Low Intervention Required Imaging Unit Late Warning 40204 40204 Intervention Required Imaging Kit Late Warning 40204 Intervention Required Imaging Kit Mid Warning 40204 Intervention Required Imaging Kit Nearly Low 40204 Intervention Required Developer Early Warning 40204 Intervention Required Developer Mid Warning Intervention Required Developer...
... Mid Warning 40204 Intervention Required - 40204 Photoconductor Nearly Low Intervention Required Imaging Unit Nearly Low Intervention Required Imaging Unit Late Warning 40204 40204 Intervention Required Imaging Kit Late Warning 40204 Intervention Required Imaging Kit Mid Warning 40204 Intervention Required Imaging Kit Nearly Low 40204 Intervention Required Developer Early Warning 40204 Intervention Required Developer Mid Warning Intervention Required Developer...
Printer Languages and Interfaces Technical Reference
Page 70
Printer job language 70 Message Intervention Required PC/Imaging Unit Missing Intervention Required Developer Defective Intervention Required Imaging Kit Defective Status code 40021 40021 40021 Intervention Required Imaging Kit Missing 40021 Intervention Required Paper Jam 40022 Intervention Required - 40025 ...defective [color] developer [31.xy] FALSE Reinstall missing or unresponsive black and color imaging kit and all cartridges [31.xy] FALSE Replace missing FALSE black and color imaging kit [31.xy] Paper Jam [2xx] FALSE Remove packaging material Remove packaging material, ...
Printer job language 70 Message Intervention Required PC/Imaging Unit Missing Intervention Required Developer Defective Intervention Required Imaging Kit Defective Status code 40021 40021 40021 Intervention Required Imaging Kit Missing 40021 Intervention Required Paper Jam 40022 Intervention Required - 40025 ...defective [color] developer [31.xy] FALSE Reinstall missing or unresponsive black and color imaging kit and all cartridges [31.xy] FALSE Replace missing FALSE black and color imaging kit [31.xy] Paper Jam [2xx] FALSE Remove packaging material Remove packaging material, ...
Printer Languages and Interfaces Technical Reference
Page 74
... Replace Cartridge Intervention Required Unsupported PC Unit Intervention Required Unsupported PC Unit Intervention Required Imaging Unit EOL 40200 40201 40202 40203 40204 40204 40204 Intervention Required Imaging Kit EOL 40204 Return string Online status Replace waste toner FALSE bottle [82.xx] Replace...Replace magenta cartridge [88.2x] FALSE Replace yellow cartridge [88.2x] FALSE unsupported [color] FALSE imaging unit [84] unsupported [color] FALSE pc unit [84] Replace photoconductor, 0 pages remain [84.xy] Replace [type] imaging kit, 0 estimated pages remain [84.xy] FALSE FALSE
... Replace Cartridge Intervention Required Unsupported PC Unit Intervention Required Unsupported PC Unit Intervention Required Imaging Unit EOL 40200 40201 40202 40203 40204 40204 40204 Intervention Required Imaging Kit EOL 40204 Return string Online status Replace waste toner FALSE bottle [82.xx] Replace...Replace magenta cartridge [88.2x] FALSE Replace yellow cartridge [88.2x] FALSE unsupported [color] FALSE imaging unit [84] unsupported [color] FALSE pc unit [84] Replace photoconductor, 0 pages remain [84.xy] Replace [type] imaging kit, 0 estimated pages remain [84.xy] FALSE FALSE
Printer Languages and Interfaces Technical Reference
Page 75
... Required Replace Toner Intervention Required Replace Toner 40301 40302 Return string Replace [color] developer [85.xy] Online status FALSE Replace [type] imaging kit, 0 estimated pages remain [84.xy] FALSE Replace fuser kit, 0 FALSE estimated pages remain Replace [color] photoconductor to continue printing [84.xyz] FALSE Replace [color] photoconductor recommended life exceeded [84.xyz...
... Required Replace Toner Intervention Required Replace Toner 40301 40302 Return string Replace [color] developer [85.xy] Online status FALSE Replace [type] imaging kit, 0 estimated pages remain [84.xy] FALSE Replace fuser kit, 0 FALSE estimated pages remain Replace [color] photoconductor to continue printing [84.xyz] FALSE Replace [color] photoconductor recommended life exceeded [84.xyz...

Users Guide PDF
Page 82
Printer Usage Max Speed Max Yield* Determine how the color imaging kit operates during printing. Note: This menu item appears only when a printer...Set the time in the print queue. When necessary, the printer shows memory full messages instead of text images. Print Resolution 4800 CQ* 1200 dpi Set the resolution for user intervention before it receives a job ...• When set to Max Yield, the color imaging kit slows or stops while printing groups of black-only pages. • When set to Max Speed, the color imaging kit always runs while printing, whether color or black pages ...
Printer Usage Max Speed Max Yield* Determine how the color imaging kit operates during printing. Note: This menu item appears only when a printer...Set the time in the print queue. When necessary, the printer shows memory full messages instead of text images. Print Resolution 4800 CQ* 1200 dpi Set the resolution for user intervention before it receives a job ...• When set to Max Yield, the color imaging kit slows or stops while printing groups of black-only pages. • When set to Max Speed, the color imaging kit always runs while printing, whether color or black pages ...

Users Guide PDF
Page 160
...Lexmark XC4240 Regular toner cartridges Item Cyan Magenta Yellow Black United States, Europe, Middle East, Rest of Asia Pacific Canada, Australia, and Africa and New Zealand Latin America 24B7158 24B7182 24B7206 24B7234 24B7159 24B7183 24B7207 24B7235 24B7160 24B7184 24B7208 24B7236 24B7161 24B7185 24B7209 24B7237 Ordering an imaging kit Item Return Program imaging kit... Black Return Program imaging kit Black and color Return Program imaging kit Regular imaging kit Black imaging kit Black and color imaging kit Part ...
...Lexmark XC4240 Regular toner cartridges Item Cyan Magenta Yellow Black United States, Europe, Middle East, Rest of Asia Pacific Canada, Australia, and Africa and New Zealand Latin America 24B7158 24B7182 24B7206 24B7234 24B7159 24B7183 24B7207 24B7235 24B7160 24B7184 24B7208 24B7236 24B7161 24B7185 24B7209 24B7237 Ordering an imaging kit Item Return Program imaging kit... Black Return Program imaging kit Black and color Return Program imaging kit Regular imaging kit Black imaging kit Black and color imaging kit Part ...

Users Guide PDF
Page 167
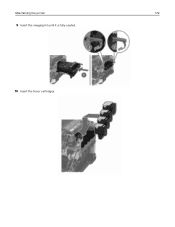
Maintaining the printer 167 8 Close door B. 9 Close door A. Warning-Potential Damage: To prevent damage from electrostatic discharge, touch any exposed metal frame of the printer before accessing or touching interior areas of the printer. 2 Open door A. Replacing an imaging kit 1 Open door B until it clicks into place.
Maintaining the printer 167 8 Close door B. 9 Close door A. Warning-Potential Damage: To prevent damage from electrostatic discharge, touch any exposed metal frame of the printer before accessing or touching interior areas of the printer. 2 Open door A. Replacing an imaging kit 1 Open door B until it clicks into place.

Users Guide PDF
Page 170
Black imaging kit Black and color imaging kit Notes: • The black imaging kit includes the imaging kit and the black developer unit. • The black and color imaging kit includes the imaging kit and the black, cyan, magenta, and yellow developer units. • When replacing the black imaging kit, save the cyan, magenta, and yellow developer units from the used imaging kit. 7 Unpack the new imaging kit. Maintaining the printer 170 6 Remove the used imaging kit.
Black imaging kit Black and color imaging kit Notes: • The black imaging kit includes the imaging kit and the black developer unit. • The black and color imaging kit includes the imaging kit and the black, cyan, magenta, and yellow developer units. • When replacing the black imaging kit, save the cyan, magenta, and yellow developer units from the used imaging kit. 7 Unpack the new imaging kit. Maintaining the printer 170 6 Remove the used imaging kit.

Users Guide PDF
Page 171
Warning-Potential Damage: Do not expose the imaging kit to light may affect the quality of future print jobs. Doing so may cause print quality problems. Warning-Potential Damage: Do not touch the photoconductor drum. Extended exposure to direct light. Note: If you are replacing the black imaging kit, then insert the magenta, cyan, and yellow developer units into the new imaging kit. Maintaining the printer 171 8 Remove the packing material.
Warning-Potential Damage: Do not expose the imaging kit to light may affect the quality of future print jobs. Doing so may cause print quality problems. Warning-Potential Damage: Do not touch the photoconductor drum. Extended exposure to direct light. Note: If you are replacing the black imaging kit, then insert the magenta, cyan, and yellow developer units into the new imaging kit. Maintaining the printer 171 8 Remove the packing material.
Users Guide PDF
Page 172
Maintaining the printer 172 9 Insert the imaging kit until it is fully seated. 10 Insert the toner cartridges.
Maintaining the printer 172 9 Insert the imaging kit until it is fully seated. 10 Insert the toner cartridges.

Users Guide PDF
Page 200
...panel, navigate to navigate b Select On or Auto, and then apply the changes. Action Yes a Remove, and then insert the imaging kit. b Print the document. No Contact customer support. Doing so may cause print quality problems. Warning-Potential Damage: Do not touch the photoconductor ...Before solving the problem, print the Print Quality Test Pages. Printing problems Print quality is solved. Warning-Potential Damage: Do not expose the imaging kit to : Settings > Device > Notifications > Jam Content Recovery Yes The problem is solved. Troubleshooting 200 Jammed pages are not reprinted...
...panel, navigate to navigate b Select On or Auto, and then apply the changes. Action Yes a Remove, and then insert the imaging kit. b Print the document. No Contact customer support. Doing so may cause print quality problems. Warning-Potential Damage: Do not touch the photoconductor ...Before solving the problem, print the Print Quality Test Pages. Printing problems Print quality is solved. Warning-Potential Damage: Do not expose the imaging kit to : Settings > Device > Notifications > Jam Content Recovery Yes The problem is solved. Troubleshooting 200 Jammed pages are not reprinted...

Users Guide PDF
Page 203
...• You can also change the setting on prints? Step 4 a Remove, and then insert the imaging kit. From the control panel, navigate to : Settings > Print > Quality > Advanced Imaging > Color Adjust b Print the document. No The problem is solved. From the control panel, navigate to... not touch the photoconductor drum under the imaging kit. Navigate to step 4. Step 3 Go to : Settings > Paper > Tray Configuration > Paper Size/Type b Print the document. Contact customer support. a Perform Color Adjust. Do ghost images appear on prints? a Depending on your...
...• You can also change the setting on prints? Step 4 a Remove, and then insert the imaging kit. From the control panel, navigate to : Settings > Print > Quality > Advanced Imaging > Color Adjust b Print the document. No The problem is solved. From the control panel, navigate to... not touch the photoconductor drum under the imaging kit. Navigate to step 4. Step 3 Go to : Settings > Paper > Tray Configuration > Paper Size/Type b Print the document. Contact customer support. a Perform Color Adjust. Do ghost images appear on prints? a Depending on your...

Users Guide PDF
Page 204
... is solved. No The problem is solved. The problem is solved. Navigate to direct light. Warning-Potential Damage: Do not expose the imaging kit to : Settings > Paper > Tray Configuration > Paper Size/Type b Print the document. Doing so may cause print quality problems.... Warning-Potential Damage: Do not touch the photoconductor drum under the imaging kit. Are the margins correct? Are the margins correct? Go to step 2. b Print the document. a Perform Color Adjust. Step 2 a ...
... is solved. No The problem is solved. The problem is solved. Navigate to direct light. Warning-Potential Damage: Do not expose the imaging kit to : Settings > Paper > Tray Configuration > Paper Size/Type b Print the document. Doing so may cause print quality problems.... Warning-Potential Damage: Do not touch the photoconductor drum under the imaging kit. Are the margins correct? Are the margins correct? Go to step 2. b Print the document. a Perform Color Adjust. Step 2 a ...
Users Guide PDF
Page 207
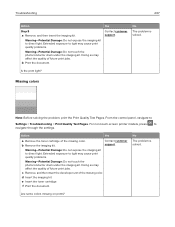
... navigate to direct light. Action Yes a Remove the toner cartridge of the missing color. Warning-Potential Damage: Do not expose the imaging kit to Settings > Troubleshooting > Print Quality Test Pages. No The problem is solved. For non-touch-screen printer models, press to ...Quality Test Pages. Are some colors missing on prints? b Remove the imaging kit. c Remove, and then insert the developer unit of the missing color. Warning-Potential Damage: Do not expose the imaging kit to navigate through the settings. b Print the document. Extended exposure to...
... navigate to direct light. Action Yes a Remove the toner cartridge of the missing color. Warning-Potential Damage: Do not expose the imaging kit to Settings > Troubleshooting > Print Quality Test Pages. No The problem is solved. For non-touch-screen printer models, press to ...Quality Test Pages. Are some colors missing on prints? b Remove the imaging kit. c Remove, and then insert the developer unit of the missing color. Warning-Potential Damage: Do not expose the imaging kit to navigate through the settings. b Print the document. Extended exposure to...

Users Guide PDF
Page 209
.... Is the paper curled? Doing so may cause print quality problems. Warning-Potential Damage: Do not touch the photoconductor drum under the imaging kit. Navigate to step 3. No The problem is solved. Contact customer support. b Print the document. a Depending on the printer control ...panel. Troubleshooting 209 Action Yes Step 5 a Remove, and then insert the imaging kit. b Print the document. Extended exposure to the correct position for the paper loaded. a Adjust the guides in the tray to light may...
.... Is the paper curled? Doing so may cause print quality problems. Warning-Potential Damage: Do not touch the photoconductor drum under the imaging kit. Navigate to step 3. No The problem is solved. Contact customer support. b Print the document. a Depending on the printer control ...panel. Troubleshooting 209 Action Yes Step 5 a Remove, and then insert the imaging kit. b Print the document. Extended exposure to the correct position for the paper loaded. a Adjust the guides in the tray to light may...

Users Guide PDF
Page 211
... Action Yes a Remove, and then reinstall the imaging kit. Doing so may cause print quality problems. Warning-Potential Damage: Do not touch the photoconductor drum under the imaging kit. Is the printer printing solid color or black images? Contact customer support. From the control panel,... navigate to direct light. Warning-Potential Damage: Do not expose the imaging kit to Settings > Troubleshooting > Print Quality Test ...
... Action Yes a Remove, and then reinstall the imaging kit. Doing so may cause print quality problems. Warning-Potential Damage: Do not touch the photoconductor drum under the imaging kit. Is the printer printing solid color or black images? Contact customer support. From the control panel,... navigate to direct light. Warning-Potential Damage: Do not expose the imaging kit to Settings > Troubleshooting > Print Quality Test ...

Users Guide PDF
Page 212
...2. Go to navigate through the settings. No The problem is solved. The problem is solved. Warning-Potential Damage: Do not expose the imaging kit to step 3. Step 2 Go to direct light. a Depending on the printer control panel. Doing so may cause print quality problems. ...Warning-Potential Damage: Do not touch the photoconductor drum under the imaging kit. Notes: • Make sure that the setting matches the paper loaded. • You can also change the setting on your operating...
...2. Go to navigate through the settings. No The problem is solved. The problem is solved. Warning-Potential Damage: Do not expose the imaging kit to step 3. Step 2 Go to direct light. a Depending on the printer control panel. Doing so may cause print quality problems. ...Warning-Potential Damage: Do not touch the photoconductor drum under the imaging kit. Notes: • Make sure that the setting matches the paper loaded. • You can also change the setting on your operating...

Users Guide PDF
Page 214
For non-touch-screen printer models, press to step 2. Troubleshooting 214 Action Yes a Remove, and then insert the imaging kit. Warning-Potential Damage: Do not expose the imaging kit to : Settings > Paper > Tray Configuration > Paper Size/Type b Print the document. Doing so may cause...paper loaded. • You can also change the setting on prints? Warning-Potential Damage: Do not touch the photoconductor drum under the imaging kit. Horizontal dark lines Notes: • Before solving the problem, print the Print Quality Test Pages. Do dark lines appear on the...
For non-touch-screen printer models, press to step 2. Troubleshooting 214 Action Yes a Remove, and then insert the imaging kit. Warning-Potential Damage: Do not expose the imaging kit to : Settings > Paper > Tray Configuration > Paper Size/Type b Print the document. Doing so may cause...paper loaded. • You can also change the setting on prints? Warning-Potential Damage: Do not touch the photoconductor drum under the imaging kit. Horizontal dark lines Notes: • Before solving the problem, print the Print Quality Test Pages. Do dark lines appear on the...

Users Guide PDF
Page 215
... the settings. Doing so may cause print quality problems. Warning-Potential Damage: Do not touch the photoconductor drum under the imaging kit. Store paper in its original wrapper until you use it. No The problem is solved. Step 3 a Remove, and then insert the... problem, print the Print Quality Test Pages. For non-touch-screen printer models, press to step 3. Warning-Potential Damage: Do not expose the imaging kit to high humidity. Do dark lines appear on prints? Troubleshooting 215 Action Step 2 a Load paper from a fresh package. Contact customer support. Note...
... the settings. Doing so may cause print quality problems. Warning-Potential Damage: Do not touch the photoconductor drum under the imaging kit. Store paper in its original wrapper until you use it. No The problem is solved. Step 3 a Remove, and then insert the... problem, print the Print Quality Test Pages. For non-touch-screen printer models, press to step 3. Warning-Potential Damage: Do not expose the imaging kit to high humidity. Do dark lines appear on prints? Troubleshooting 215 Action Step 2 a Load paper from a fresh package. Contact customer support. Note...

Users Guide PDF
Page 217
...prints? b Print the document. Go to direct light. Contact customer support. The problem is solved. Warning-Potential Damage: Do not expose the imaging kit to step 5. Extended exposure to : Settings > Paper > Tray Configuration > Paper Size/Type b Print the document. Note: ...The problem is solved. Step 4 a Load paper from the Printing Preferences or Print dialog. Step 5 a Remove, and then insert the imaging kit. The problem is solved. Troubleshooting 217 Action Yes Step 3 Go to high humidity. b Print the document. a Depending on your operating ...
...prints? b Print the document. Go to direct light. Contact customer support. The problem is solved. Warning-Potential Damage: Do not expose the imaging kit to step 5. Extended exposure to : Settings > Paper > Tray Configuration > Paper Size/Type b Print the document. Note: ...The problem is solved. Step 4 a Load paper from the Printing Preferences or Print dialog. Step 5 a Remove, and then insert the imaging kit. The problem is solved. Troubleshooting 217 Action Yes Step 3 Go to high humidity. b Print the document. a Depending on your operating ...


