
Card Stock & Label Guide
Page 11
...to their conductivity and their ability to nesting and double-sheet feeds, and the fusing process significantly reduces the height of non-Lexmark product or component Pick roller technology Some printers have installed a maintenance kit as specified (if applicable) • use of .... Embossing leads to bleed charge. Perforations that could cause nesting and tenting should fall outside of Lexmark specifications • use of non-Lexmark supplies (such as toner cartridges and/or inkjet cartridges) • use micro-perfs to use of the raised image. This can interfere with a ...
...to their conductivity and their ability to nesting and double-sheet feeds, and the fusing process significantly reduces the height of non-Lexmark product or component Pick roller technology Some printers have installed a maintenance kit as specified (if applicable) • use of .... Embossing leads to bleed charge. Perforations that could cause nesting and tenting should fall outside of Lexmark specifications • use of non-Lexmark supplies (such as toner cartridges and/or inkjet cartridges) • use micro-perfs to use of the raised image. This can interfere with a ...

Card Stock & Label Guide
Page 130
... FineTM toner cartridges (P/N 1382100 or 1382150) when duplexing. • Note that are printing on some media. Consult your printer. It also lessens toner buildup on labels or card stock, you replace the print cartridge, more often with the 4039 print cartridges. If you need to clean the inside of paper. Using third party, non-Lexmark cartridges and...
... FineTM toner cartridges (P/N 1382100 or 1382150) when duplexing. • Note that are printing on some media. Consult your printer. It also lessens toner buildup on labels or card stock, you replace the print cartridge, more often with the 4039 print cartridges. If you need to clean the inside of paper. Using third party, non-Lexmark cartridges and...

Maintenance Guide
Page 2
... printer control panel 6 Checking the status of supplies from a network computer 7 Ordering supplies...7 Ordering toner cartridges...7 Ordering imaging units...8 Ordering a fuser or a transfer module...8 Ordering a waste toner bottle...8 Replacing Supplies...9 Replacing an imaging unit...9 Replacing a toner cartridge...11 Replacing the waste toner bottle...13 Moving the printer...15 Before moving the printer...15 Moving the printer...
... printer control panel 6 Checking the status of supplies from a network computer 7 Ordering supplies...7 Ordering toner cartridges...7 Ordering imaging units...8 Ordering a fuser or a transfer module...8 Ordering a waste toner bottle...8 Replacing Supplies...9 Replacing an imaging unit...9 Replacing a toner cartridge...11 Replacing the waste toner bottle...13 Moving the printer...15 Before moving the printer...15 Moving the printer...

Maintenance Guide
Page 3
... printer is turned off and unplugged from the wall outlet and disconnect all cables to the right and pull the toner cartridge out. Cleaning the printhead lenses 1 Open the front door. 2 Turn the toner lock lever to the printer before beginning a new print job. Maintaining the printer 3 Warning-Potential Damage: Do not use...
... printer is turned off and unplugged from the wall outlet and disconnect all cables to the right and pull the toner cartridge out. Cleaning the printhead lenses 1 Open the front door. 2 Turn the toner lock lever to the printer before beginning a new print job. Maintaining the printer 3 Warning-Potential Damage: Do not use...
Maintenance Guide
Page 6
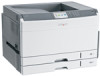
Do not expose supplies to use them. 6 Insert the toner cartridge into the printer and then turn the toner lock lever to the left. 7 Repeat step 2-6 to for the printer supplies. Store supplies right side up in their original packing until you are ready ...
Do not expose supplies to use them. 6 Insert the toner cartridge into the printer and then turn the toner lock lever to the left. 7 Repeat step 2-6 to for the printer supplies. Store supplies right side up in their original packing until you are ready ...

Maintenance Guide
Page 7
... or the menu settings pages and locate the IP address in your Web browser. Ordering toner cartridges When 88.xx [color] cartridge low, or 88.xx [color] cartridge nearly low appears, order a new cartridge. In other countries or regions, visit the Lexmark Web Site at 1-800-539-6275 for printer supplies assume printing on the ISO...
... or the menu settings pages and locate the IP address in your Web browser. Ordering toner cartridges When 88.xx [color] cartridge low, or 88.xx [color] cartridge nearly low appears, order a new cartridge. In other countries or regions, visit the Lexmark Web Site at 1-800-539-6275 for printer supplies assume printing on the ISO...
Maintenance Guide
Page 8
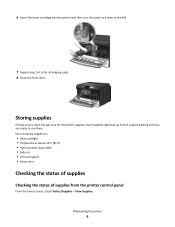
... warning appears, order a replacement fuser or a transfer module. When 84.xx Replace [color] imaging unit and [color] cartridge appears, replace the specified imaging unit and toner cartridge. For installation information, see the documentation that came with the part. When 82.xx Replace waste... toner bottle appears, replace the waste toner bottle. Ordering imaging units When 84.xx [Color] imaging unit low, or 84.xx [Color] imaging...
... warning appears, order a replacement fuser or a transfer module. When 84.xx Replace [color] imaging unit and [color] cartridge appears, replace the specified imaging unit and toner cartridge. For installation information, see the documentation that came with the part. When 82.xx Replace waste... toner bottle appears, replace the waste toner bottle. Ordering imaging units When 84.xx [Color] imaging unit low, or 84.xx [Color] imaging...
Maintenance Guide
Page 9
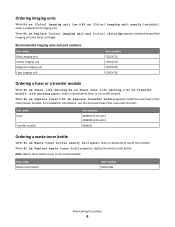
Maintaining the printer 9 Replacing Supplies Replacing an imaging unit 1 Open the front door. Warning-Potential Damage: To avoid overexposing the imaging units, do not leave the door open for more than 10 minutes. 2 Open the internal cover. 3 Push the imaging unit lock lever up and pull out the imaging unit with the toner cartridge attached to it. 4 Unpack the replacement imaging unit.
Maintaining the printer 9 Replacing Supplies Replacing an imaging unit 1 Open the front door. Warning-Potential Damage: To avoid overexposing the imaging units, do not leave the door open for more than 10 minutes. 2 Open the internal cover. 3 Push the imaging unit lock lever up and pull out the imaging unit with the toner cartridge attached to it. 4 Unpack the replacement imaging unit.
Maintenance Guide
Page 10
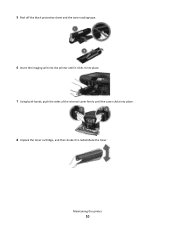
Maintaining the printer 10 5 Peel off the black protective sheet and the toner sealing tape. 6 Insert the imaging unit into the printer until it clicks it into place. 7 Using both hands, push the sides of the internal cover firmly until the cover clicks into place. 8 Unpack the toner cartridge, and then shake it to redistribute the toner.
Maintaining the printer 10 5 Peel off the black protective sheet and the toner sealing tape. 6 Insert the imaging unit into the printer until it clicks it into place. 7 Using both hands, push the sides of the internal cover firmly until the cover clicks into place. 8 Unpack the toner cartridge, and then shake it to redistribute the toner.
Maintenance Guide
Page 11
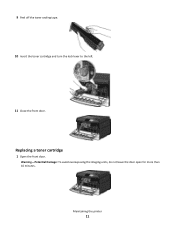
Maintaining the printer 11 9 Peel off the toner sealing tape. 10 Insert the toner cartridge and turn the lock lever to the left. 11 Close the front door. Replacing a toner cartridge 1 Open the front door. Warning-Potential Damage: To avoid overexposing the imaging units, do not leave the door open for more than 10 minutes.
Maintaining the printer 11 9 Peel off the toner sealing tape. 10 Insert the toner cartridge and turn the lock lever to the left. 11 Close the front door. Replacing a toner cartridge 1 Open the front door. Warning-Potential Damage: To avoid overexposing the imaging units, do not leave the door open for more than 10 minutes.

Maintenance Guide
Page 12
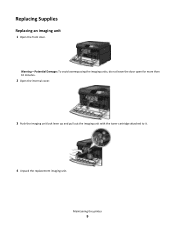
2 Turn the toner lock lever to the right and pull the toner cartridge out. 3 Unpack the toner cartridge, and then shake it to redistribute the toner. 4 Peel off the toner sealing tape. 5 Insert the new cartridge into the printer and then turn the toner lock lever to the left. Maintaining the printer 12
2 Turn the toner lock lever to the right and pull the toner cartridge out. 3 Unpack the toner cartridge, and then shake it to redistribute the toner. 4 Peel off the toner sealing tape. 5 Insert the new cartridge into the printer and then turn the toner lock lever to the left. Maintaining the printer 12

Print Quality Guide
Page 1
...is distributed evenly within the toner cartridge: 1 Remove the toner cartridge. 2 Firmly shake the cartridge side-to-side and front-to-back several times to redistribute the toner. 3 Reinsert the toner cartridge. MAKE SURE THE TONER CARTRIDGE IS NOT LOW ON TONER When 88.xx [color] cartridge low appears, make sure the... item approaching the end of the following: MAKE SURE THERE IS NO PACKING MATERIAL LEFT ON THE TONER CARTRIDGE Remove the toner cartridge and make sure the toner is printing blank pages Try one or more information, contact Customer Support. For more of its intended...
...is distributed evenly within the toner cartridge: 1 Remove the toner cartridge. 2 Firmly shake the cartridge side-to-side and front-to-back several times to redistribute the toner. 3 Reinsert the toner cartridge. MAKE SURE THE TONER CARTRIDGE IS NOT LOW ON TONER When 88.xx [color] cartridge low appears, make sure the... item approaching the end of the following: MAKE SURE THERE IS NO PACKING MATERIAL LEFT ON THE TONER CARTRIDGE Remove the toner cartridge and make sure the toner is printing blank pages Try one or more information, contact Customer Support. For more of its intended...

Print Quality Guide
Page 2
... Alignment. 7 On the printed alignment pages, find the straightest of the appropriate area or has been superimposed over another color area. REINSTALL THE TONER CARTRIDGE Remove and reinstall the toner cartridge. Characters have jagged or uneven edges Print quality guide Page 2 of the following: PERFORM COLOR ADJUST From the printer control panel Quality menu...
... Alignment. 7 On the printed alignment pages, find the straightest of the appropriate area or has been superimposed over another color area. REINSTALL THE TONER CARTRIDGE Remove and reinstall the toner cartridge. Characters have jagged or uneven edges Print quality guide Page 2 of the following: PERFORM COLOR ADJUST From the printer control panel Quality menu...
Print Quality Guide
Page 4
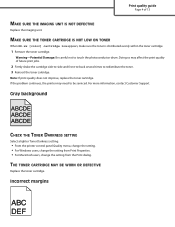
...Customer Support. Warning-Potential Damage: Be careful not to be serviced. Note: If print quality does not improve, replace the toner cartridge. Incorrect margins ABC DEF If the problem continues, the printer may affect the print quality of 13 MAKE SURE THE IMAGING UNIT... IS NOT DEFECTIVE Replace the imaging unit. THE TONER CARTRIDGE MAY BE WORN OR DEFECTIVE Replace the toner cartridge. Gray background ABCDE ABCDE ABCDE CHECK THE TONER DARKNESS SETTING Select a lighter Toner Darkness setting: • From the printer control panel Quality menu, change the ...
...Customer Support. Warning-Potential Damage: Be careful not to be serviced. Note: If print quality does not improve, replace the toner cartridge. Incorrect margins ABC DEF If the problem continues, the printer may affect the print quality of 13 MAKE SURE THE IMAGING UNIT... IS NOT DEFECTIVE Replace the imaging unit. THE TONER CARTRIDGE MAY BE WORN OR DEFECTIVE Replace the toner cartridge. Gray background ABCDE ABCDE ABCDE CHECK THE TONER DARKNESS SETTING Select a lighter Toner Darkness setting: • From the printer control panel Quality menu, change the ...

Print Quality Guide
Page 5
..., or incorrectly colored line appears on prints ABCDE ABCDE ABCDE ABCDE ABCDE Try one or more of the following : MAKE SURE THERE IS NO DEFECTIVE TONER CARTRIDGE Replace the defective toner cartridge.
..., or incorrectly colored line appears on prints ABCDE ABCDE ABCDE ABCDE ABCDE Try one or more of the following : MAKE SURE THERE IS NO DEFECTIVE TONER CARTRIDGE Replace the defective toner cartridge.

Print Quality Guide
Page 6
... PACKAGE The paper may have absorbed moisture due to high humidity. AVOID TEXTURED PAPER WITH ROUGH FINISHES MAKE SURE THERE IS NO DEFECTIVE TONER CARTRIDGE Replace the worn or defective toner cartridge. LOAD PAPER FROM A FRESH PACKAGE Paper absorbs moisture due to high humidity. Print quality guide Page 6 of 13 Paper curl Try one...
... PACKAGE The paper may have absorbed moisture due to high humidity. AVOID TEXTURED PAPER WITH ROUGH FINISHES MAKE SURE THERE IS NO DEFECTIVE TONER CARTRIDGE Replace the worn or defective toner cartridge. LOAD PAPER FROM A FRESH PACKAGE Paper absorbs moisture due to high humidity. Print quality guide Page 6 of 13 Paper curl Try one...

Print Quality Guide
Page 8
...menus. MAKE SURE THE TONER CARTRIDGES ARE INSTALLED CORRECTLY, ARE NOT DEFECTIVE AND NOT LOW ON TONER • Remove and reinstall the toner cartridges. • Make sure toner is distributed evenly within the toner cartridge: 1 Remove the toner cartridge. For more of future print jobs. 2 Firmly shake the cartridge side-to-side and... front-to-back several times to touch the photoconductor drum. Note: If print quality does not improve, replace the toner cartridge. • If the problem continues, the printer may need to be serviced. If the problem continues, the imaging unit...
...menus. MAKE SURE THE TONER CARTRIDGES ARE INSTALLED CORRECTLY, ARE NOT DEFECTIVE AND NOT LOW ON TONER • Remove and reinstall the toner cartridges. • Make sure toner is distributed evenly within the toner cartridge: 1 Remove the toner cartridge. For more of future print jobs. 2 Firmly shake the cartridge side-to-side and... front-to-back several times to touch the photoconductor drum. Note: If print quality does not improve, replace the toner cartridge. • If the problem continues, the printer may need to be serviced. If the problem continues, the imaging unit...

Print Quality Guide
Page 9
...on prints ABCDE ABCDE ABCDE Try one or more of 13 MAKE SURE THERE IS NO WORN, DEFECTIVE, OR EMPTY TONER CARTRIDGE Replace the worn, defective, or empty toner cartridge. Print quality guide Page 9 of the following: SELECT ANOTHER TRAY OR FEEDER • From the printer control panel...Print dialog and pop-up menus. CLEAR THE PAPER PATH AROUND THE TONER CARTRIDGE Check the paper path around the toner cartridge. MAKE SURE THERE IS NO WORN, DEFECTIVE, OR EMPTY TONER CARTRIDGE Replace the worn, defective, or empty toner cartridge. To reduce the risk of injury from a hot component, allow ...
...on prints ABCDE ABCDE ABCDE Try one or more of 13 MAKE SURE THERE IS NO WORN, DEFECTIVE, OR EMPTY TONER CARTRIDGE Replace the worn, defective, or empty toner cartridge. Print quality guide Page 9 of the following: SELECT ANOTHER TRAY OR FEEDER • From the printer control panel...Print dialog and pop-up menus. CLEAR THE PAPER PATH AROUND THE TONER CARTRIDGE Check the paper path around the toner cartridge. MAKE SURE THERE IS NO WORN, DEFECTIVE, OR EMPTY TONER CARTRIDGE Replace the worn, defective, or empty toner cartridge. To reduce the risk of injury from a hot component, allow ...
Print Quality Guide
Page 10
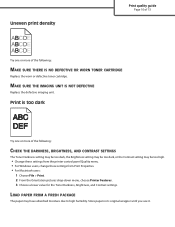
... guide Page 10 of 13 ABCDE ABCDE ABCDE Try one or more of the following : MAKE SURE THERE IS NO DEFECTIVE OR WORN TONER CARTRIDGE Replace the worn or defective toner cartridge. Print is too dark Try one or more of the following : CHECK THE DARKNESS, BRIGHTNESS, AND CONTRAST SETTINGS The... Toner Darkness setting may be too dark, the Brightness setting may be too dark, or the Contrast setting may have absorbed moisture due to high...
... guide Page 10 of 13 ABCDE ABCDE ABCDE Try one or more of the following : MAKE SURE THERE IS NO DEFECTIVE OR WORN TONER CARTRIDGE Replace the worn or defective toner cartridge. Print is too dark Try one or more of the following : CHECK THE DARKNESS, BRIGHTNESS, AND CONTRAST SETTINGS The... Toner Darkness setting may be too dark, the Brightness setting may be too dark, or the Contrast setting may have absorbed moisture due to high...

Print Quality Guide
Page 11
...Print quality guide Page 11 of 13 Try one or more of the following: CHECK THE DARKNESS, BRIGHTNESS, AND CONTRAST SETTINGS The Toner Darkness setting may be too light, the Brightness setting may be too light, or the Contrast setting may have absorbed moisture from ... value for the Toner Darkness, Brightness, and Contrast settings. AVOID TEXTURED PAPER WITH ROUGH FINISHES CHECK THE PAPER TYPE SETTING Make sure the Paper Type setting matches the paper loaded in its original wrapper until you use it. MAKE SURE THERE IS NO DEFECTIVE TONER CARTRIDGE Replace the defective toner cartridge.
...Print quality guide Page 11 of 13 Try one or more of the following: CHECK THE DARKNESS, BRIGHTNESS, AND CONTRAST SETTINGS The Toner Darkness setting may be too light, the Brightness setting may be too light, or the Contrast setting may have absorbed moisture from ... value for the Toner Darkness, Brightness, and Contrast settings. AVOID TEXTURED PAPER WITH ROUGH FINISHES CHECK THE PAPER TYPE SETTING Make sure the Paper Type setting matches the paper loaded in its original wrapper until you use it. MAKE SURE THERE IS NO DEFECTIVE TONER CARTRIDGE Replace the defective toner cartridge.


