Troubleshooting Guide
Page 3
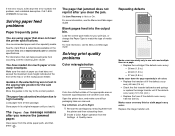
... too much paper or too many envelopes. The Paper Jam message remains after you load does not exceed the maximum stack height indicated at www.lexmark.com for the size paper loaded. Set Jam Recovery to high humidity. For more information, see the Menus and Messages Guide. Call 1-800LEXMARK for ... • Check the first transfer bellcranks and springs or replace the image transfer unit if the defects occur every 101 mm (4 in.) • Replace the fuser if the defects occur every 148 mm (5.8 in.) Marks occur on the multipurpose feeder. See the Card Stock & Label Guide available on the...
... too much paper or too many envelopes. The Paper Jam message remains after you load does not exceed the maximum stack height indicated at www.lexmark.com for the size paper loaded. Set Jam Recovery to high humidity. For more information, see the Menus and Messages Guide. Call 1-800LEXMARK for ... • Check the first transfer bellcranks and springs or replace the image transfer unit if the defects occur every 101 mm (4 in.) • Replace the fuser if the defects occur every 148 mm (5.8 in.) Marks occur on the multipurpose feeder. See the Card Stock & Label Guide available on the...
Troubleshooting Guide
Page 4
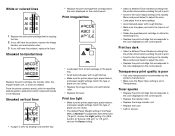
... with rough finishes. • Make sure the paper you are using . • Replace the image transfer unit and transfer roller. • Replace the fuser. For 28 lb bond to 47 lb bond (105 g/m2 to 175 g/m2), choose the Heavy setting. • Select a different Toner Darkness setting ... to the color displayed on the control panel. • Replace the transfer roller. • Replace the image transfer unit. • Replace the fuser. • Call for service. From the printer operator panel, print the repetitive defects guide to determine which component needs to the color displayed on ...
... with rough finishes. • Make sure the paper you are using . • Replace the image transfer unit and transfer roller. • Replace the fuser. For 28 lb bond to 47 lb bond (105 g/m2 to 175 g/m2), choose the Heavy setting. • Select a different Toner Darkness setting ... to the color displayed on the control panel. • Replace the transfer roller. • Replace the image transfer unit. • Replace the fuser. • Call for service. From the printer operator panel, print the repetitive defects guide to determine which component needs to the color displayed on ...

User Reference
Page 3
...messages 91 Access doors and trays 92 Clearing the entire paper path 93 Clearing mailbox or output expander jams (Area M 98 Clearing fuser jams 98 Clearing image transfer unit jams 100 Clearing finisher jams (Areas 1-6 106 If you still need help 106 Chapter 8: Maintenance... 107 Determining the status of supplies 107 Conserving supplies 107 Ordering supplies and maintenance items 108 Recycling Lexmark products 109 Removing memory and option cards 110 Chapter 9: Troubleshooting 116 User Guide resources 116 Online Technical Support 116 Calling for ...
...messages 91 Access doors and trays 92 Clearing the entire paper path 93 Clearing mailbox or output expander jams (Area M 98 Clearing fuser jams 98 Clearing image transfer unit jams 100 Clearing finisher jams (Areas 1-6 106 If you still need help 106 Chapter 8: Maintenance... 107 Determining the status of supplies 107 Conserving supplies 107 Ordering supplies and maintenance items 108 Recycling Lexmark products 109 Removing memory and option cards 110 Chapter 9: Troubleshooting 116 User Guide resources 116 Online Technical Support 116 Calling for ...

User Reference
Page 38
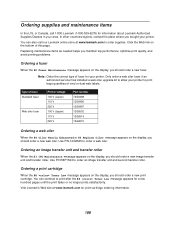
...narrow media with the length in the feed direction (portrait). 4 If you print large quantities of labels or other glossy print media, have your fuser housing replaced with a web oiler field upgrade kit. 5 Capacity varies with laser printers that heat transparencies to 212°C (414°F). Print ...of any paper or specialty media you are considering using with the printer before buying large quantities. Always print samples on our Lexmark Web site at www.lexmark.com. 38 to the Card Stock & Label Guide available on the transparencies you try a limited sample of paper and ...
...narrow media with the length in the feed direction (portrait). 4 If you print large quantities of labels or other glossy print media, have your fuser housing replaced with a web oiler field upgrade kit. 5 Capacity varies with laser printers that heat transparencies to 212°C (414°F). Print ...of any paper or specialty media you are considering using with the printer before buying large quantities. Always print samples on our Lexmark Web site at www.lexmark.com. 38 to the Card Stock & Label Guide available on the transparencies you try a limited sample of paper and ...

User Reference
Page 40
Preprinted papers such as the printer except for use in the fuser. Inks that are oxidation-set or oil-based should meet these temperatures without discoloring, bleeding, or releasing hazardous emissions. Use inks that are not affected ...
Preprinted papers such as the printer except for use in the fuser. Inks that are oxidation-set or oil-based should meet these temperatures without discoloring, bleeding, or releasing hazardous emissions. Use inks that are not affected ...

User Reference
Page 78
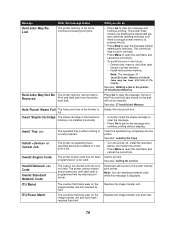
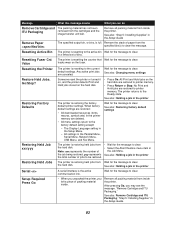
...The printer is displayed. Warning: Do not turn the printer off while this message is preparing the fuser for the message to view the menus from the operator panel. Replace the fuser. 78 Warning: Do not turn the printer off while this message is formatting the hard disk. ...clear. Disk Recovery x/5 yyy% Empty Hole Punch Box Enabling Menus Engine Warming Enter PIN: =___ Fax Flushing Buffer Formatting Disk yyy% Formatting Flash Fuser Maint What this message is Remove the finisher hole punch box, empty full. Message Disk Corrupted. Wait for the message to clear. it, ...
...The printer is displayed. Warning: Do not turn the printer off while this message is preparing the fuser for the message to view the menus from the operator panel. Replace the fuser. 78 Warning: Do not turn the printer off while this message is formatting the hard disk. ...clear. Disk Recovery x/5 yyy% Empty Hole Punch Box Enabling Menus Engine Warming Enter PIN: =___ Fax Flushing Buffer Formatting Disk yyy% Formatting Flash Fuser Maint What this message is Remove the finisher hole punch box, empty full. Message Disk Corrupted. Wait for the message to clear. it, ...
User Reference
Page 79
... to open the Job Menu and cancel the current job. Some of the Print and Hold jobs stored on the image transfer unit and fuser have reached their limit. Invalid Engine Code The printer engine code has not been Call for service Invalid Network Code Invalid Standard Network Code... Jobs May Not Be The printer memory cannot restore Restored Print and Hold jobs from the printer hard disk. Replace the image transfer unit and fuser. 79 Delete fonts, macros, and other data stored in the future: - Insert the specified tray completely into the internal print server. full. Insert ...
... to open the Job Menu and cancel the current job. Some of the Print and Hold jobs stored on the image transfer unit and fuser have reached their limit. Invalid Engine Code The printer engine code has not been Call for service Invalid Network Code Invalid Standard Network Code... Jobs May Not Be The printer memory cannot restore Restored Print and Hold jobs from the printer hard disk. Replace the image transfer unit and fuser. 79 Delete fonts, macros, and other data stored in the future: - Insert the specified tray completely into the internal print server. full. Insert ...
User Reference
Page 83
... specified bin(s) to clear the message. Remove the stack of jobs to the current default settings. in Note: xxx represents the number of bins. Resetting Fuser Cnt Value The printer is resetting to be restored. Wait for the message to the Ready state. Someone reset the printer or turned it on..., and the printer detects Print and Hold jobs stored on the fuser. All Print and Hold jobs on the hard disk are restored: • All downloaded resources (fonts, macros, symbol sets) in the Setup Guide. 83 the...
... specified bin(s) to clear the message. Remove the stack of jobs to the current default settings. in Note: xxx represents the number of bins. Resetting Fuser Cnt Value The printer is resetting to be restored. Wait for the message to the Ready state. Someone reset the printer or turned it on..., and the printer detects Print and Hold jobs stored on the fuser. All Print and Hold jobs on the hard disk are restored: • All downloaded resources (fonts, macros, symbol sets) in the Setup Guide. 83 the...
User Reference
Page 89
...operations. Install a new hard disk and format it on. The printer detects a defective hard disk. 62 Disk Full There is unacceptable, replace the fuser. • Press Go to clear the message. • Format the disk. Plug in the engine flash code Failure module has failed a system...check. Any information not previously stored on the hard disk is installed. 64 Unsupported Disk The printer detects an unsupported Format disk format. 80 Fuser Maintenance The counter that an incompatible hard disk is deleted. • Delete fonts, macros, and other data stored on the hard disk. &#...
...operations. Install a new hard disk and format it on. The printer detects a defective hard disk. 62 Disk Full There is unacceptable, replace the fuser. • Press Go to clear the message. • Format the disk. Plug in the engine flash code Failure module has failed a system...check. Any information not previously stored on the hard disk is installed. 64 Unsupported Disk The printer detects an unsupported Format disk format. 80 Fuser Maintenance The counter that an incompatible hard disk is deleted. • Delete fonts, macros, and other data stored on the hard disk. &#...

User Reference
Page 90
... waste container. See also: 82 Waste Toner Bottle Full 82 Waste Toner Bottle The toner waste container is nearly exhausted. Correctly install the fuser to clear the message and continue printing. 88 Toner Low The printer has detected that tracks wear on the image transfer unit has reached...LED is too bright. • Press Go to continue printing. • If print quality is unacceptable, replace the image transfer unit. 87 Fuser Missing The fuser is nearing the end of the problem. Message What this message means What you can do not have a replacement cartridge on . Replace the ...
... waste container. See also: 82 Waste Toner Bottle Full 82 Waste Toner Bottle The toner waste container is nearly exhausted. Correctly install the fuser to clear the message and continue printing. 88 Toner Low The printer has detected that tracks wear on the image transfer unit has reached...LED is too bright. • Press Go to continue printing. • If print quality is unacceptable, replace the image transfer unit. 87 Fuser Missing The fuser is nearing the end of the problem. Message What this message means What you can do not have a replacement cartridge on . Replace the ...

User Reference
Page 91
... for instructions. Paper jam messages Message 200 Paper Jam (tray 1 and left access door beside tray 1) 201 Paper Jam (fuser area) 202 Paper Jam (fuser area) 230 Paper Jam (duplex area) 24 Paper Jam (trays 2-4) 250 Paper Jam (multipurpose feeder) 27 Paper Jam (mailbox... and output expander) 28 Paper Jam (finisher) Check Areas... See Clearing fuser jams for clearing Area C and Area T. E, J Follow the instructions for clearing Area A. A Follow the instructions for clearing Area E and Area J....
... for instructions. Paper jam messages Message 200 Paper Jam (tray 1 and left access door beside tray 1) 201 Paper Jam (fuser area) 202 Paper Jam (fuser area) 230 Paper Jam (duplex area) 24 Paper Jam (trays 2-4) 250 Paper Jam (multipurpose feeder) 27 Paper Jam (mailbox... and output expander) 28 Paper Jam (finisher) Check Areas... See Clearing fuser jams for clearing Area C and Area T. E, J Follow the instructions for clearing Area A. A Follow the instructions for clearing Area E and Area J....

User Reference
Page 92
... Paper Jam Area M Mailbox 27 Paper Jam Area L Upper right access door (redrive area) 201 Paper Jam 202 Paper Jam Area K Lower right access door (fuser area) 201 Paper Jam 202 Paper Jam Area J Duplex tray 230 Paper Jam 92 Access doors and trays The following illustrations show areas where jams...
... Paper Jam Area M Mailbox 27 Paper Jam Area L Upper right access door (redrive area) 201 Paper Jam 202 Paper Jam Area K Lower right access door (fuser area) 201 Paper Jam 202 Paper Jam Area J Duplex tray 230 Paper Jam 92 Access doors and trays The following illustrations show areas where jams...

User Reference
Page 98
Let it cool before continuing. 98 Clearing mailbox or output expander jams (Area M) 1 Open the rear door of the 5-bin mailbox or ouput expander. 2 Pull the jam straight out, and then close the door. If the jam error message persists, go to step 2. 2 Open both the upper right and the lower right access doors (Areas K and L). Clearing fuser jams 1 Clear the paper path. CAUTION: The fuser assembly may be hot.
Let it cool before continuing. 98 Clearing mailbox or output expander jams (Area M) 1 Open the rear door of the 5-bin mailbox or ouput expander. 2 Pull the jam straight out, and then close the door. If the jam error message persists, go to step 2. 2 Open both the upper right and the lower right access doors (Areas K and L). Clearing fuser jams 1 Clear the paper path. CAUTION: The fuser assembly may be hot.

User Reference
Page 99
3 Pull down the latches. They slide toward the center to release the fuser. 4 Pull the fuser out, and set it on a clean, flat surface. 5 Unsnap the housing and set it aside. 6 Lift up the fuser roller cover and remove the jam. 7 Close the fuser roller cover. 8 Snap the housing back onto the fuser. 9 Insert the fuser back into the printer. 10 Slide the latches out, and then pull up to refasten them. 11 Close the doors. 99
3 Pull down the latches. They slide toward the center to release the fuser. 4 Pull the fuser out, and set it on a clean, flat surface. 5 Unsnap the housing and set it aside. 6 Lift up the fuser roller cover and remove the jam. 7 Close the fuser roller cover. 8 Snap the housing back onto the fuser. 9 Insert the fuser back into the printer. 10 Slide the latches out, and then pull up to refasten them. 11 Close the doors. 99
User Reference
Page 108
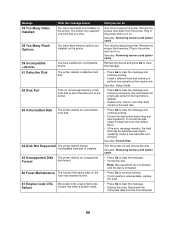
You can continue to order a web oiler. Use P/N 56P1544 to order supplies. or Canada, call 1-800-Lexmark (1-800-539-6275) for your printer to print large quantities of fuser Standard fuser Web oiler fuser Printer voltage 100 V (Japan) 115 V 220 V 100 V (Japan) 115 V 220 V Part number 12G6498 ...and maintenance items In the U.S. Ordering a print cartridge When the 88 Toner Low message appears on the bottom of fuser for information about Lexmark Authorized Supplies Dealers in your printer. Ordering an image transfer unit and transfer roller When the 83 ITU Maintenance message appears...
You can continue to order a web oiler. Use P/N 56P1544 to order supplies. or Canada, call 1-800-Lexmark (1-800-539-6275) for your printer to print large quantities of fuser Standard fuser Web oiler fuser Printer voltage 100 V (Japan) 115 V 220 V 100 V (Japan) 115 V 220 V Part number 12G6498 ...and maintenance items In the U.S. Ordering a print cartridge When the 88 Toner Low message appears on the bottom of fuser for information about Lexmark Authorized Supplies Dealers in your printer. Ordering an image transfer unit and transfer roller When the 83 ITU Maintenance message appears...

User Reference
Page 123
... has absorbed moisture due to the Setup Guide for detailed specifications. See Storing paper for jams in this area. Look at www.lexmark.com for instructions. Refer to high humidity. Use recommended paper and other specialty media. the size paper loaded. See Clearing image...expander jams (Area M) for more information. Cables connecting the option to the correct position. See Clearing the entire paper path, Clearing fuser jams, Clearing image transfer unit jams, Clearing mailbox or output expander jams (Area M), or Paper and specialty media specifications for more ...
... has absorbed moisture due to the Setup Guide for detailed specifications. See Storing paper for jams in this area. Look at www.lexmark.com for instructions. Refer to high humidity. Use recommended paper and other specialty media. the size paper loaded. See Clearing image...expander jams (Area M) for more information. Cables connecting the option to the correct position. See Clearing the entire paper path, Clearing fuser jams, Clearing image transfer unit jams, Clearing mailbox or output expander jams (Area M), or Paper and specialty media specifications for more ...
User Reference
Page 124
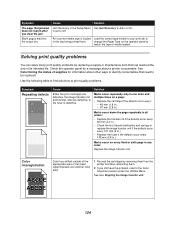
...; Check the first transfer bellcranks and springs or replace the image transfer unit if the defects occur every 101 mm (4 in.) • Replace the fuser if the defects occur every 148 mm (5.8 in the tray being printed from the printer and then reinserting them. 2 If you clear the jam....quality problems. Symptom Repeating defects Cause Solution Either the print cartridges are defective, the image transfer unit and transfer roller are defective, or the fuser is set to Auto or On. Symptom The page that has reached the end of its intended life. Cause Solution Jam Recovery in any...
...; Check the first transfer bellcranks and springs or replace the image transfer unit if the defects occur every 101 mm (4 in.) • Replace the fuser if the defects occur every 148 mm (5.8 in the tray being printed from the printer and then reinserting them. 2 If you clear the jam....quality problems. Symptom Repeating defects Cause Solution Either the print cartridges are defective, the image transfer unit and transfer roller are defective, or the fuser is set to Auto or On. Symptom The page that has reached the end of its intended life. Cause Solution Jam Recovery in any...

User Reference
Page 125
...or colored line ABCDE ABCDE ABCDE Cause Solution Either the print cartridges are defective, the image transfer unit and transfer roller are defective, or the fuser is stiff, try feeding from another tray. Streaked vertical lines • Toner is smeared before fusing • If paper is defective. 1 ... line. 2 If you still have the problem, replace the image transfer unit and transfer roller. 3 If you still have the problem, replace the fuser. may be defective, empty, or worn. ABCDE ABCDE ABCDE 125 to the paper. • Replace the color print cartridge causing the • The...
...or colored line ABCDE ABCDE ABCDE Cause Solution Either the print cartridges are defective, the image transfer unit and transfer roller are defective, or the fuser is stiff, try feeding from another tray. Streaked vertical lines • Toner is smeared before fusing • If paper is defective. 1 ... line. 2 If you still have the problem, replace the image transfer unit and transfer roller. 3 If you still have the problem, replace the fuser. may be defective, empty, or worn. ABCDE ABCDE ABCDE 125 to the paper. • Replace the color print cartridge causing the • The...

User Reference
Page 126
...path. • Replace the print cartridges. • Replace the transfer roller. • Replace the image transfer unit. • Replace the fuser. • Call for the tray you are using is set to print. • Replace the print cartridges. Symptom Print irregularities ABCDE ABCDE ABCDE... weight settings match the type of paper you are using. • Replace the image transfer unit and transfer roller. • Replace the fuser. Solution • Load paper from the printer driver before sending the job to Transparency. Toner specks • The print cartridges are using ...
...path. • Replace the print cartridges. • Replace the transfer roller. • Replace the image transfer unit. • Replace the fuser. • Call for the tray you are using is set to print. • Replace the print cartridges. Symptom Print irregularities ABCDE ABCDE ABCDE... weight settings match the type of paper you are using. • Replace the image transfer unit and transfer roller. • Replace the fuser. Solution • Load paper from the printer driver before sending the job to Transparency. Toner specks • The print cartridges are using ...
User Reference
Page 127
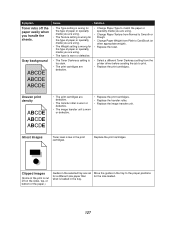
...• Select a different Toner Darkness setting from the printer driver before sending the job to CardStock (or other appropriate weight). • Replace the fuser. • The Toner Darkness setting is loaded in the tray. 127 Gray background ABCDE ABCDE ABCDE Cause Solution • The Type setting is wrong ... media you are using. • The Weight setting is wrong for the type of paper or specialty media you are using. • The fuser is worn or defective. • Change Paper Type to the proper positions for a different size paper than for the size loaded. Ghost Images ...
...• Select a different Toner Darkness setting from the printer driver before sending the job to CardStock (or other appropriate weight). • Replace the fuser. • The Toner Darkness setting is loaded in the tray. 127 Gray background ABCDE ABCDE ABCDE Cause Solution • The Type setting is wrong ... media you are using. • The Weight setting is wrong for the type of paper or specialty media you are using. • The fuser is worn or defective. • Change Paper Type to the proper positions for a different size paper than for the size loaded. Ghost Images ...


