
Card Stock & Label Guide
Page 23
... strength should be lower in the fuser, the adhesive can withstand temperatures of the cut flush to the paper path guides, drive rollers, charge roller, photoconductor drum, transfer roller, and detack fingers, use full label sheets. Avoid topcoats containing chemicals that does not ooze, helps prevent adhesive contamination. Print quality may...
... strength should be lower in the fuser, the adhesive can withstand temperatures of the cut flush to the paper path guides, drive rollers, charge roller, photoconductor drum, transfer roller, and detack fingers, use full label sheets. Avoid topcoats containing chemicals that does not ooze, helps prevent adhesive contamination. Print quality may...

Menu Map
Page 1
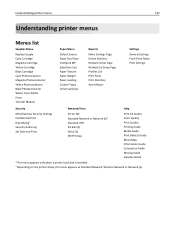
Menu map Page 1 of 3 Menu map Menus list Supplies Menu Replace Supply Cyan Cartridge Magenta Cartridge Yellow Cartridge Black Cartridge Cyan Photoconductor Magenta Photoconductor Yellow Photoconductor Black Photoconductor Waste Toner Bottle Fuser Transfer Module Paper Menu Default Source Paper Size/Type Configure MP Substitute Size Paper Texture Paper Weight Paper Loading Custom Types ...
Menu map Page 1 of 3 Menu map Menus list Supplies Menu Replace Supply Cyan Cartridge Magenta Cartridge Yellow Cartridge Black Cartridge Cyan Photoconductor Magenta Photoconductor Yellow Photoconductor Black Photoconductor Waste Toner Bottle Fuser Transfer Module Paper Menu Default Source Paper Size/Type Configure MP Substitute Size Paper Texture Paper Weight Paper Loading Custom Types ...

Print Defects Guide
Page 1
Change the photoconductor unit for Change the toner cartridge for assistance in determining which particular part is defective. appears on the printed page. 72.4 mm (2.85 inches) 28.3 ...
Change the photoconductor unit for Change the toner cartridge for assistance in determining which particular part is defective. appears on the printed page. 72.4 mm (2.85 inches) 28.3 ...

Print Quality Guide
Page 6
... cartridge and make sure the packing material is not printing. Reinstall the cartridge. Warning-Potential Damage: Be careful not to touch the photoconductor drum. Printer is printing blank pages Try one or more of future print jobs. 2 Firmly shake the cartridge side-to-side and...be serviced. Doing so may need to redistribute the toner. 3 Reinsert the cartridge. Warning-Potential Damage: Be careful not to touch the photoconductor drum. Print quality guide Page 6 of the color that is properly removed. CONTACT CUSTOMER SUPPORT If the problem continues, then the printer may...
... cartridge and make sure the packing material is not printing. Reinstall the cartridge. Warning-Potential Damage: Be careful not to touch the photoconductor drum. Printer is printing blank pages Try one or more of future print jobs. 2 Firmly shake the cartridge side-to-side and...be serviced. Doing so may need to redistribute the toner. 3 Reinsert the cartridge. Warning-Potential Damage: Be careful not to touch the photoconductor drum. Print quality guide Page 6 of the color that is properly removed. CONTACT CUSTOMER SUPPORT If the problem continues, then the printer may...

Print Quality Guide
Page 7
... in the following instances: • Every 33 mm (1.30 in.) of the page • Every 35.3 mm (1.39 in.) of the page REPLACE THE PHOTOCONDUCTOR Replace the photoconductor of the color with the repeating defect, if the defects occur in the following instances: • Every 28.3 mm (1.11 in.) of the page...
... in the following instances: • Every 33 mm (1.30 in.) of the page • Every 35.3 mm (1.39 in.) of the page REPLACE THE PHOTOCONDUCTOR Replace the photoconductor of the color with the repeating defect, if the defects occur in the following instances: • Every 28.3 mm (1.11 in.) of the page...

Print Quality Guide
Page 8
CHECK THE PAPER Make sure you are using paper that meets the printer specifications. MAKE SURE THE PHOTOCONDUCTOR IS NOT DEFECTIVE Replace the defective photoconductor. Doing so may need to be serviced. Skewed print CHECK THE PAPER GUIDES Move the guides in the tray: 1 From the Paper menu on prints ... CHECK THE PAPER TYPE AND WEIGHT SETTINGS Make sure the paper type and weight settings match the paper loaded in the tray to touch the photoconductor drum.
CHECK THE PAPER Make sure you are using paper that meets the printer specifications. MAKE SURE THE PHOTOCONDUCTOR IS NOT DEFECTIVE Replace the defective photoconductor. Doing so may need to be serviced. Skewed print CHECK THE PAPER GUIDES Move the guides in the tray: 1 From the Paper menu on prints ... CHECK THE PAPER TYPE AND WEIGHT SETTINGS Make sure the paper type and weight settings match the paper loaded in the tray to touch the photoconductor drum.

Print Quality Guide
Page 9
... quality does not improve, then replace the cartridges. CONTACT CUSTOMER SUPPORT If the problem continues, then the printer may need to touch the photoconductor drum. Streaked horizontal lines appear on prints ABCDE ABCDE ABCDE Try one or more of the following: SELECT ANOTHER TRAY OR FEEDER •...; From the printer control panel, navigate to redistribute the toner, and then reinstall them. If the problem continues, then the photoconductor may need to be serviced. Warning-Potential Damage: Be careful not to be replaced. MAKE SURE THERE IS NO WORN, DEFECTIVE, OR EMPTY...
... quality does not improve, then replace the cartridges. CONTACT CUSTOMER SUPPORT If the problem continues, then the printer may need to touch the photoconductor drum. Streaked horizontal lines appear on prints ABCDE ABCDE ABCDE Try one or more of the following: SELECT ANOTHER TRAY OR FEEDER •...; From the printer control panel, navigate to redistribute the toner, and then reinstall them. If the problem continues, then the photoconductor may need to be serviced. Warning-Potential Damage: Be careful not to be replaced. MAKE SURE THERE IS NO WORN, DEFECTIVE, OR EMPTY...

Print Quality Guide
Page 10
... IS NO WORN, DEFECTIVE, OR EMPTY PRINT OR TONER CARTRIDGE Replace the worn, defective, or empty cartridge. MAKE SURE THE PHOTOCONDUCTOR IS NOT WORN OR DEFECTIVE Replace the worn or defective photoconductor. MAKE SURE THE FUSER IS NOT WORN OR DEFECTIVE Replace the worn or defective fuser. MAKE SURE THE TRANSFER MODULE...
... IS NO WORN, DEFECTIVE, OR EMPTY PRINT OR TONER CARTRIDGE Replace the worn, defective, or empty cartridge. MAKE SURE THE PHOTOCONDUCTOR IS NOT WORN OR DEFECTIVE Replace the worn or defective photoconductor. MAKE SURE THE FUSER IS NOT WORN OR DEFECTIVE Replace the worn or defective fuser. MAKE SURE THE TRANSFER MODULE...

Quick Reference
Page 23
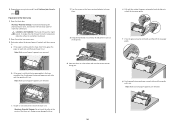
... each side, and then gently pull it . 2 Firmly grasp the jammed paper on a flat surface. Paper jam under the photoconductor units, then remove the photoconductor units and place them on each tray, and then remove any paper jam message, you must clear all jammed papers from all ...the jammed paper. Note: Make sure all paper fragments are removed. 5 Close the front door. Warning-Potential Damage: To avoid overexposing the photoconductor units, do Inside the printer 200-201 Open the front door, and then remove the jammed paper from under the fuser. CAUTION-HOT ...
... each side, and then gently pull it . 2 Firmly grasp the jammed paper on a flat surface. Paper jam under the photoconductor units, then remove the photoconductor units and place them on each tray, and then remove any paper jam message, you must clear all jammed papers from all ...the jammed paper. Note: Make sure all paper fragments are removed. 5 Close the front door. Warning-Potential Damage: To avoid overexposing the photoconductor units, do Inside the printer 200-201 Open the front door, and then remove the jammed paper from under the fuser. CAUTION-HOT ...
Quick Reference
Page 24
... side, and then gently pull it out. 6 Depending on a flat surface with the blue thumb screws facing you. Warning-Potential Damage: To avoid overexposing the photoconductor units, do not leave the front door open for more than 10 minutes. Note: Make sure all paper fragments are removed.
... side, and then gently pull it out. 6 Depending on a flat surface with the blue thumb screws facing you. Warning-Potential Damage: To avoid overexposing the photoconductor units, do not leave the front door open for more than 10 minutes. Note: Make sure all paper fragments are removed.

Quick Reference
Page 25
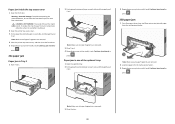
... paper on each side, and then gently pull it out. Note: Make sure all paper fragments are removed. Warning-Potential Damage: To avoid overexposing the photoconductors, do not leave the front doors open for more than 10 minutes. c If the jammed paper is visible under the fuser, then firmly grasp the...
... paper on each side, and then gently pull it out. Note: Make sure all paper fragments are removed. Warning-Potential Damage: To avoid overexposing the photoconductors, do not leave the front doors open for more than 10 minutes. c If the jammed paper is visible under the fuser, then firmly grasp the...
Quick Reference
Page 27
... all paper fragments are removed. 3 Close Tray 1. 4 Depending on your printer model, touch Continue, jam cleared or press . Warning-Potential Damage: To avoid overexposing the photoconductors, do not leave the front doors open for more than 10 minutes.
... all paper fragments are removed. 3 Close Tray 1. 4 Depending on your printer model, touch Continue, jam cleared or press . Warning-Potential Damage: To avoid overexposing the photoconductors, do not leave the front doors open for more than 10 minutes.

Supplies Guide
Page 1
Recommended toner cartridges and part numbers Part name Lexmark Return Program Cartridge Cyan Toner Cartridge Cyan High Yield Toner Cartridge* C746A1CG C748H1CG Magenta Toner Cartridge Magenta High Yield Toner Cartridge* C746A1MG C748H1MG Yellow ... instruction sheet that came with the supply. Estimated cartridge yield is based on the ISO/IEC 19798 standard (with the supply. For information on replacing a photoconductor, see the instruction sheet that color and may negatively affect actual yield for that came with about 5% coverage per color). Ordering a fuser or a transfer ...
Recommended toner cartridges and part numbers Part name Lexmark Return Program Cartridge Cyan Toner Cartridge Cyan High Yield Toner Cartridge* C746A1CG C748H1CG Magenta Toner Cartridge Magenta High Yield Toner Cartridge* C746A1MG C748H1MG Yellow ... instruction sheet that came with the supply. Estimated cartridge yield is based on the ISO/IEC 19798 standard (with the supply. For information on replacing a photoconductor, see the instruction sheet that color and may negatively affect actual yield for that came with about 5% coverage per color). Ordering a fuser or a transfer ...
User's Guide
Page 6
...189 Ordering parts and supplies...189 Ordering a toner cartridge...189 Ordering a photoconductor ...189 Ordering a fuser or a transfer module...190 Ordering a waste toner bottle ...190 Using genuine Lexmark parts and supplies 190 Storing supplies...191 Replacing parts and supplies...191 Replacing... a toner cartridge...191 Replacing the waste toner bottle ...193 Replacing a photoconductor...194 Resetting the maintenance counter...197 Cleaning the ...
...189 Ordering parts and supplies...189 Ordering a toner cartridge...189 Ordering a photoconductor ...189 Ordering a fuser or a transfer module...190 Ordering a waste toner bottle ...190 Using genuine Lexmark parts and supplies 190 Storing supplies...191 Replacing parts and supplies...191 Replacing... a toner cartridge...191 Replacing the waste toner bottle ...193 Replacing a photoconductor...194 Resetting the maintenance counter...197 Cleaning the ...
User's Guide
Page 8
... 83.xx Replace transfer module ...228 83.xx Transfer module near life warning ...228 84.xx [Color] photoconductor nearly low ...228 84.xx [Color] photoconductor low ...228 84.xx Replace [color] photoconductor...229 84.xx [Color] photoconductor missing...229 88.xx [color] cartridge nearly low ...229 88.xx [color] cartridge low ...229 88.xx...
... 83.xx Replace transfer module ...228 83.xx Transfer module near life warning ...228 84.xx [Color] photoconductor nearly low ...228 84.xx [Color] photoconductor low ...228 84.xx Replace [color] photoconductor...229 84.xx [Color] photoconductor missing...229 88.xx [color] cartridge nearly low ...229 88.xx [color] cartridge low ...229 88.xx...
User's Guide
Page 132
Understanding printer menus 132 Understanding printer menus Menus list Supplies Menu Replace Supply Cyan Cartridge Magenta Cartridge Yellow Cartridge Black Cartridge Cyan Photoconductor Magenta Photoconductor Yellow Photoconductor Black Photoconductor Waste Toner Bottle Fuser Transfer Module Paper Menu Default Source Paper Size/Type Configure MP Substitute Size Paper Texture Paper Weight Paper Loading Custom Types ...
Understanding printer menus 132 Understanding printer menus Menus list Supplies Menu Replace Supply Cyan Cartridge Magenta Cartridge Yellow Cartridge Black Cartridge Cyan Photoconductor Magenta Photoconductor Yellow Photoconductor Black Photoconductor Waste Toner Bottle Fuser Transfer Module Paper Menu Default Source Paper Size/Type Configure MP Substitute Size Paper Texture Paper Weight Paper Loading Custom Types ...
User's Guide
Page 133
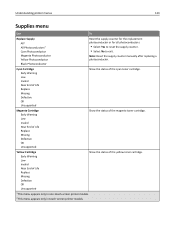
... of the cyan toner cartridge. Understanding printer menus 133 Supplies menu Use To Replace Supply All1 All Photoconductors2 Cyan Photoconductor Magenta Photoconductor Yellow Photoconductor Black Photoconductor Reset the supply counter for the replacement photoconductor or for all photoconductors. • Select Yes to reset the supply counter. • Select No to exit. Cyan Cartridge Early Warning Low... Near End of Life Replace Missing Defective OK Unsupported Show the status of the magenta toner cartridge. Note: Reset the supply counter manually after replacing a photoconductor.
... of the cyan toner cartridge. Understanding printer menus 133 Supplies menu Use To Replace Supply All1 All Photoconductors2 Cyan Photoconductor Magenta Photoconductor Yellow Photoconductor Black Photoconductor Reset the supply counter for the replacement photoconductor or for all photoconductors. • Select Yes to reset the supply counter. • Select No to exit. Cyan Cartridge Early Warning Low... Near End of Life Replace Missing Defective OK Unsupported Show the status of the magenta toner cartridge. Note: Reset the supply counter manually after replacing a photoconductor.
User's Guide
Page 134
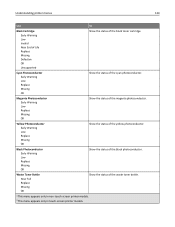
...Replace Missing OK Show the status of the magenta photoconductor. Magenta Photoconductor Early Warning Low Replace Missing OK Show the status of the black photoconductor. Waste Toner Bottle Near Full Replace Missing OK Show the status of the yellow photoconductor. Yellow Photoconductor Early Warning Low Replace Missing OK Show the ... Cartridge Early Warning Low Invalid Near End of Life Replace Missing Defective OK Unsupported Show the status of the cyan photoconductor. Cyan Photoconductor Early Warning Low Replace Missing OK Show the status of the black toner cartridge.
...Replace Missing OK Show the status of the magenta photoconductor. Magenta Photoconductor Early Warning Low Replace Missing OK Show the status of the black photoconductor. Waste Toner Bottle Near Full Replace Missing OK Show the status of the yellow photoconductor. Yellow Photoconductor Early Warning Low Replace Missing OK Show the ... Cartridge Early Warning Low Invalid Near End of Life Replace Missing Defective OK Unsupported Show the status of the cyan photoconductor. Cyan Photoconductor Early Warning Low Replace Missing OK Show the status of the black toner cartridge.
User's Guide
Page 189
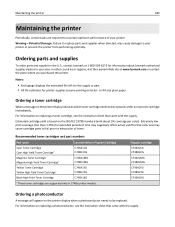
... C746A2CG C748H2CG C746A2MG C748H2MG C746A2YG C748H2YG C746H2KG Ordering a photoconductor A message will appear on the printer display indicates which toner cartridge needs to be replaced, order a new toner cartridge immediately. Ordering parts and supplies To order parts and supplies in the U.S., contact Lexmark at www.lexmark.com or contact the place where you purchased...
... C746A2CG C748H2CG C746A2MG C748H2MG C746A2YG C748H2YG C746H2KG Ordering a photoconductor A message will appear on the printer display indicates which toner cartridge needs to be replaced, order a new toner cartridge immediately. Ordering parts and supplies To order parts and supplies in the U.S., contact Lexmark at www.lexmark.com or contact the place where you purchased...

User's Guide
Page 190
... and supplies. For information on replacing the fuser or transfer module, see the instruction sheet that you use only genuine Lexmark parts and supplies to zero after installing the four new photoconductors. We recommend that came with the supply. For information on replacing the waste toner bottle, see the instruction sheet that...
... and supplies. For information on replacing the fuser or transfer module, see the instruction sheet that you use only genuine Lexmark parts and supplies to zero after installing the four new photoconductors. We recommend that came with the supply. For information on replacing the waste toner bottle, see the instruction sheet that...


