
User's Guide
Page 5
... 141 Chapter 26: Clearing paper jams 174 Paper jam messages 174 Clearing paper jams in the duplex unit 185 Chapter 27: Cleaning the photo developer charger 190 v
... 141 Chapter 26: Clearing paper jams 174 Paper jam messages 174 Clearing paper jams in the duplex unit 185 Chapter 27: Cleaning the photo developer charger 190 v

User's Guide
Page 56
...the new cartridge. The average yield is determined by the number of the photo developer cartridge is time for you selected. The developer charger needs to be placed on the second line of the operator panel to remind you need to install a new toner cartridge, see ...Dev Cart Exhausted in each print job. Photo developer cartridge The photo developer cartridge receives toner from your photo developer cartridge has a developer charger. For more information on the photo developer media. When you replace the waste toner bottle. The toner image is applied. We recommend cleaning...
...the new cartridge. The average yield is determined by the number of the photo developer cartridge is time for you selected. The developer charger needs to be placed on the second line of the operator panel to remind you need to install a new toner cartridge, see ...Dev Cart Exhausted in each print job. Photo developer cartridge The photo developer cartridge receives toner from your photo developer cartridge has a developer charger. For more information on the photo developer media. When you replace the waste toner bottle. The toner image is applied. We recommend cleaning...

User's Guide
Page 58
...coverage on each printed page, and the size of your printed image. Your printer monitors the life of the paper you clean the developer charger on the photo developer. If you need to accept the toner that come with the new cleaning roll. For more information on the ... You must replace the cleaning roll to be cleaned periodically. Press Go to replace or empty your next image. We recommend cleaning the developer charger when you replace the cleaning roll or until it cannot contaminate your waste toner bottle. The Supplies message appears on the transfer drum. A wiper...
...coverage on each printed page, and the size of your printed image. Your printer monitors the life of the paper you clean the developer charger on the photo developer. If you need to accept the toner that come with the new cleaning roll. For more information on the ... You must replace the cleaning roll to be cleaned periodically. Press Go to replace or empty your next image. We recommend cleaning the developer charger when you replace the cleaning roll or until it cannot contaminate your waste toner bottle. The Supplies message appears on the transfer drum. A wiper...

User's Guide
Page 84
e Press Menu> or or
e Press Menu> or or

User's Guide
Page 85
... replace the waste toner bottle. this permanently adheres the toner to remove toner that has soiled clothing. 85 For more information, see Cleaning the developer charger. Use cold water to the clothing. To replace the waste toner bottle, use the following steps or the instruction sheet supplied with toner in hot... toward the front of the printer. 2 Open the front door. Front door release latch Note: The toner inside the waste toner bottle can soil clothing. charger needs to be cleaned periodically to prevent streaks and voids.
... replace the waste toner bottle. this permanently adheres the toner to remove toner that has soiled clothing. 85 For more information, see Cleaning the developer charger. Use cold water to the clothing. To replace the waste toner bottle, use the following steps or the instruction sheet supplied with toner in hot... toward the front of the printer. 2 Open the front door. Front door release latch Note: The toner inside the waste toner bottle can soil clothing. charger needs to be cleaned periodically to prevent streaks and voids.

User's Guide
Page 87
Cleaning the developer charger 1 Slide the top door release latch toward the front of the printer. 2 Lift the top door. Note: The developer charger needs to be cleaned to prevent streaks and voids. 10 Use the following instructions to remove and clean the discharger. Top door release latch 87 9 Close the front door.
Cleaning the developer charger 1 Slide the top door release latch toward the front of the printer. 2 Lift the top door. Note: The developer charger needs to be cleaned to prevent streaks and voids. 10 Use the following instructions to remove and clean the discharger. Top door release latch 87 9 Close the front door.

User's Guide
Page 133
Output tray Photo developer cartridge Fuser Toner cartridges Transfer roller Laser emitter Transfer drum Photo developer charger Paper trays The green film inside your printer. As the photo developer media rotates, it . As the transfer drum rotates toward the toner .... This signal is pulled from the media onto the transfer drum. The paper or other media (such as your printer operates. The photo developer charger (the thin wire on the bottom of the photo devleoper), places a uniform negative charge on the photo developer media pull negatively charged toner particles ...
Output tray Photo developer cartridge Fuser Toner cartridges Transfer roller Laser emitter Transfer drum Photo developer charger Paper trays The green film inside your printer. As the photo developer media rotates, it . As the transfer drum rotates toward the toner .... This signal is pulled from the media onto the transfer drum. The paper or other media (such as your printer operates. The photo developer charger (the thin wire on the bottom of the photo devleoper), places a uniform negative charge on the photo developer media pull negatively charged toner particles ...

User's Guide
Page 136
... cartridge may need to distribute the toner evenly. Use media from the photo developer cartridge discharger. (See Cleaning the photo developer charger.) Reinsert the photo developer cartridge and try printing the job again. See Replace the drum cleaner. Make sure the the drum ...Replace the toner cartridge that matches the color on toner, remove the appropriate cartridge and gently shake it . See Cleaning the photo developer charger. See one color. Replace the photo developer cartridge. Remove the photo developer cartridge and clean the dust from a new package. Replacing...
... cartridge may need to distribute the toner evenly. Use media from the photo developer cartridge discharger. (See Cleaning the photo developer charger.) Reinsert the photo developer cartridge and try printing the job again. See Replace the drum cleaner. Make sure the the drum ...Replace the toner cartridge that matches the color on toner, remove the appropriate cartridge and gently shake it . See Cleaning the photo developer charger. See one color. Replace the photo developer cartridge. Remove the photo developer cartridge and clean the dust from a new package. Replacing...

User's Guide
Page 190
... it prepares the photo developer to accept the toner that makes up your printed image. Allow the printer to clear the photo developer charger of this problem. 1 Slide the top door release latch toward the front of the printer and lift the top door. Top door release latch CAUTION: ...The internal components of stray toner when printing, toner dust may accumulate in one or more locations on the photo developer cartridge charger. Use the following steps to cool before touching any internal components. 190 This toner may be hot.
... it prepares the photo developer to accept the toner that makes up your printed image. Allow the printer to clear the photo developer charger of this problem. 1 Slide the top door release latch toward the front of the printer and lift the top door. Top door release latch CAUTION: ...The internal components of stray toner when printing, toner dust may accumulate in one or more locations on the photo developer cartridge charger. Use the following steps to cool before touching any internal components. 190 This toner may be hot.

User's Guide
Page 192
Pad Slide lever 7 Move the green slide to the left side of the slide should make contact with the slots in the green locking levers. 192 5 Lift the green slide lever. The pad on the end of the photo developer cartridge. 8 Place the green slide lever against the photo developer cartridge. 9 Align the photo developer cartridge with the charger wire. 6 Move the green slide completely across the photo developer cartridge and back again five times.
Pad Slide lever 7 Move the green slide to the left side of the slide should make contact with the slots in the green locking levers. 192 5 Lift the green slide lever. The pad on the end of the photo developer cartridge. 8 Place the green slide lever against the photo developer cartridge. 9 Align the photo developer cartridge with the charger wire. 6 Move the green slide completely across the photo developer cartridge and back again five times.

User's Guide
Page 293
..., 21 Copies (Finishing Menu) 210 copies, specifying number 210 Custom Types (Paper Menu) 228 D Data Bits (Serial Menu) 244 Defragment Flash (Utilities Menu) 263 developer charger, cleaning 87 disable menu locking 16 discharger, paper 60 disk, See hard disk Display Language (Setup Menu) 250 Download Target (Setup Menu) 250 downloaded resources...
..., 21 Copies (Finishing Menu) 210 copies, specifying number 210 Custom Types (Paper Menu) 228 D Data Bits (Serial Menu) 244 Defragment Flash (Utilities Menu) 263 developer charger, cleaning 87 disable menu locking 16 discharger, paper 60 disk, See hard disk Display Language (Setup Menu) 250 Download Target (Setup Menu) 250 downloaded resources...

User's Guide
Page 296
... port 226 parallel port 234 serial port 245 USB port 261 Photo Dev Cart (Supplies Menu) 256 photo developer cartridge replacing 69 cartridge supplies 256 charger, cleaning 190 Photo Enhance (Color Menu) 207 PIN 20 Pitch (PCL Emul Menu) 238 Point Size (PCL Emul Menu) 239 ports infrared 214 LocalTalk 220...
... port 226 parallel port 234 serial port 245 USB port 261 Photo Dev Cart (Supplies Menu) 256 photo developer cartridge replacing 69 cartridge supplies 256 charger, cleaning 190 Photo Enhance (Color Menu) 207 PIN 20 Pitch (PCL Emul Menu) 238 Point Size (PCL Emul Menu) 239 ports infrared 214 LocalTalk 220...
Update Sheet
Page 1
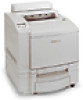
... are rated at 50 percent maximum life and yields up to 20,000 images. All rights reserved. LexmarkTM C720 Product Update Keep this information with your Lexmark C720 Publications CD. For information about replacing the charger is in the package with your printed images. When the photo developer has printed 20,000 images, 89...
... are rated at 50 percent maximum life and yields up to 20,000 images. All rights reserved. LexmarkTM C720 Product Update Keep this information with your Lexmark C720 Publications CD. For information about replacing the charger is in the package with your printed images. When the photo developer has printed 20,000 images, 89...

Service Manual
Page 39
... • Duplex unit - 21 lbs • Optional 500 drawer - 19 lbs • Complete system - 126 lbs Pickup roller + separation pad Belt cartridge Organic photoconductor (OPC) Charger unit / corona wire Laser diode + polygon mirror scanning General Information 1-9 D 605 mm (23.8 in .) - W 500 mm (19.7 in .) - H 410 mm (16.1 in .) - D 520 mm (20...
... • Duplex unit - 21 lbs • Optional 500 drawer - 19 lbs • Complete system - 126 lbs Pickup roller + separation pad Belt cartridge Organic photoconductor (OPC) Charger unit / corona wire Laser diode + polygon mirror scanning General Information 1-9 D 605 mm (23.8 in .) - W 500 mm (19.7 in .) - H 410 mm (16.1 in .) - D 520 mm (20...

Service Manual
Page 51
Negative high voltage is applied to the charger unit by the power supply CHV, and the corona is biased to the voltage -CBV(V) by the power supply DBV. b. The print system process consists of the Print System 1. The developer roller on the toner cartridge is generated as a result. Frame potential of the transfer drum is biased to -DBV(V) by the power supply CBV. The OPC belt is GND. c. d. General Information 1-21 5024-001 Basic Structure of the following: a.
Negative high voltage is applied to the charger unit by the power supply CHV, and the corona is biased to the voltage -CBV(V) by the power supply DBV. b. The print system process consists of the Print System 1. The developer roller on the toner cartridge is generated as a result. Frame potential of the transfer drum is biased to -DBV(V) by the power supply CBV. The OPC belt is GND. c. d. General Information 1-21 5024-001 Basic Structure of the following: a.

Service Manual
Page 53
General Information 1-23 The charger unit consists of the Print System Charging Process In the charging process, the OPC belt is evenly charged by the charger. 5024-001 Details of a case, corona wire, and grid. 1. The charger unit controls the grid to the potential -Vo(V) with the corona charge. The charger charges the OPC belt surface to a constant voltage of Operation" on page 1-14 for even charging. See "Printer Theory of ZD(V) for charger unit location.
General Information 1-23 The charger unit consists of the Print System Charging Process In the charging process, the OPC belt is evenly charged by the charger. 5024-001 Details of a case, corona wire, and grid. 1. The charger unit controls the grid to the potential -Vo(V) with the corona charge. The charger charges the OPC belt surface to a constant voltage of Operation" on page 1-14 for even charging. See "Printer Theory of ZD(V) for charger unit location.

Service Manual
Page 54
5024-001 2. Before charging, the OPC belt surface is -CBV(V). The charger unit evenly charges the OPC belt surface to -Vo(V) by generating a negative charge. 1-24 Service Manual
5024-001 2. Before charging, the OPC belt surface is -CBV(V). The charger unit evenly charges the OPC belt surface to -Vo(V) by generating a negative charge. 1-24 Service Manual

Service Manual
Page 63
... applying an AC charge to the transfer drum. General Information 1-33 The paper is then separated from the transfer drum by the discharger. The AC charger unit, consisting of Operation" on page 1-14 for paper discharge location. See "Printer Theory of a case and...
... applying an AC charge to the transfer drum. General Information 1-33 The paper is then separated from the transfer drum by the discharger. The AC charger unit, consisting of Operation" on page 1-14 for paper discharge location. See "Printer Theory of a case and...
Service Manual
Page 88
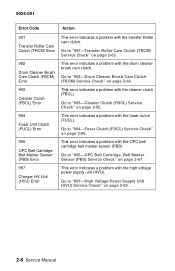
...) Error This error indicates a problem with the high voltage power supply unit (HVU). Go to "993-Cleaner Clutch (FBCL) Service Check" on page 2-67. 997 Charger HV Unit (HVU) Error This error indicates a problem with the fuser clutch (FUCL). Go to "994-Fuser Clutch (FUCL) Service Check" on page 2-64. 993...
...) Error This error indicates a problem with the high voltage power supply unit (HVU). Go to "993-Cleaner Clutch (FBCL) Service Check" on page 2-67. 997 Charger HV Unit (HVU) Error This error indicates a problem with the fuser clutch (FUCL). Go to "994-Fuser Clutch (FUCL) Service Check" on page 2-64. 993...

Service Manual
Page 166
... is damaged. Foreign particles (paper dust, and so on) are stuck in the printer image. Remove the OPC belt cartridge. • Clean the charger unit • Replace the OPC belt cartridge Debris adhering to the base of the toner cartridge's developer roller is making contact with the OPC belt ...
... is damaged. Foreign particles (paper dust, and so on) are stuck in the printer image. Remove the OPC belt cartridge. • Clean the charger unit • Replace the OPC belt cartridge Debris adhering to the base of the toner cartridge's developer roller is making contact with the OPC belt ...

