
Embedded Web Server Administrator's Guide
Page 23
... select Disk Wiping to make further configuration changes. Using security features in the Embedded Web Server 23 Overwriting can use of USB devices. Setting up memory space.
... select Disk Wiping to make further configuration changes. Using security features in the Embedded Web Server 23 Overwriting can use of USB devices. Setting up memory space.
Troubleshooting Guide
Page 1
...into the outlet is working. • The printer is turned on the Lexmark Web site at www.lexmark.com. This often fixes the problem. For information regarding tested and approved USB flash memory devices, visit the Lexmark Web site at www.lexmark.com. Try one or more information, see ...the setup documentation that you are using the correct printer software. • If you are using compatible printer software. If the status is blank or...
...into the outlet is working. • The printer is turned on the Lexmark Web site at www.lexmark.com. This often fixes the problem. For information regarding tested and approved USB flash memory devices, visit the Lexmark Web site at www.lexmark.com. Try one or more information, see ...the setup documentation that you are using the correct printer software. • If you are using compatible printer software. If the status is blank or...
Troubleshooting Guide
Page 2
... the list of held jobs do not collate These are possible solutions. Unexpected page breaks occur Increase the Print Timeout value: 1 From the printer control panel, press . 2 Press the arrow buttons until Settings appears, and then press . 3 Press the arrow buttons until Setup Menu ... The multipurpose feeder does not automatically sense the paper size. MAKE SURE THE PRINTER HAS ENOUGH MEMORY Add printer memory or an optional hard disk. MAKE SURE THE PRINTER HAS SUFFICIENT MEMORY Free up additional printer memory by eliminating the number and size of fonts, the number and complexity of images...
... the list of held jobs do not collate These are possible solutions. Unexpected page breaks occur Increase the Print Timeout value: 1 From the printer control panel, press . 2 Press the arrow buttons until Settings appears, and then press . 3 Press the arrow buttons until Setup Menu ... The multipurpose feeder does not automatically sense the paper size. MAKE SURE THE PRINTER HAS ENOUGH MEMORY Add printer memory or an optional hard disk. MAKE SURE THE PRINTER HAS SUFFICIENT MEMORY Free up additional printer memory by eliminating the number and size of fonts, the number and complexity of images...
Troubleshooting Guide
Page 4
... Finisher is listed on the menu settings page, but paper jams when it exits the printer and enters the mailbox, then it may not be properly installed. Flash memory card Make sure the flash memory card is securely connected to view the option instruction sheet. For more information, see the...IS CONFIGURED CORRECTLY For information about paper and specialty media guidelines. Page that came with the 5-bin mailbox, or go to www.lexmark.com/publications to the printer system board. 5-bin mailbox If the 5-bin mailbox is listed on the menu settings page, but paper jams when it exits ...
... Finisher is listed on the menu settings page, but paper jams when it exits the printer and enters the mailbox, then it may not be properly installed. Flash memory card Make sure the flash memory card is securely connected to view the option instruction sheet. For more information, see the...IS CONFIGURED CORRECTLY For information about paper and specialty media guidelines. Page that came with the 5-bin mailbox, or go to www.lexmark.com/publications to the printer system board. 5-bin mailbox If the 5-bin mailbox is listed on the menu settings page, but paper jams when it exits ...
User's Guide
Page 2
... Installing internal options...17 Available internal options...17 Accessing the system board to install internal options...18 Installing a memory card ...20 Installing a flash memory or firmware card...21 Installing an Internal Solutions Port...24 Installing a printer hard disk ...30 Installing hardware options...34 Order of installation ...34 Installing paper drawers...34 Installing an...
... Installing internal options...17 Available internal options...17 Accessing the system board to install internal options...18 Installing a memory card ...20 Installing a flash memory or firmware card...21 Installing an Internal Solutions Port...24 Installing a printer hard disk ...30 Installing hardware options...34 Order of installation ...34 Installing paper drawers...34 Installing an...
User's Guide
Page 7
5-bin mailbox ...181 Output options ...181 Memory card ...181 Flash memory card...181 Hard disk with adapter...182 Internal Solutions Port ...182 Solving paper feed problems...182 Paper frequently jams ...182 Paper jam message remains after ...
5-bin mailbox ...181 Output options ...181 Memory card ...181 Flash memory card...181 Hard disk with adapter...182 Internal Solutions Port ...182 Solving paper feed problems...182 Paper frequently jams ...182 Paper jam message remains after ...
User's Guide
Page 9
...all external connections (such as Ethernet and telephone system connections) are accessing the system board or installing optional hardware or memory devices sometime after setting up the printer, then turn them off , and unplug the power cord from the electrical outlet before inspecting it aside instead of... INJURY: This product uses a laser. Discard used batteries according to avoid the possibility of harmful emissions. Use only the power cord provided with this product to move it only with the same or an equivalent type of the printer might be obvious. If any cables...
...all external connections (such as Ethernet and telephone system connections) are accessing the system board or installing optional hardware or memory devices sometime after setting up the printer, then turn them off , and unplug the power cord from the electrical outlet before inspecting it aside instead of... INJURY: This product uses a laser. Discard used batteries according to avoid the possibility of harmful emissions. Use only the power cord provided with this product to move it only with the same or an equivalent type of the printer might be obvious. If any cables...
User's Guide
Page 17
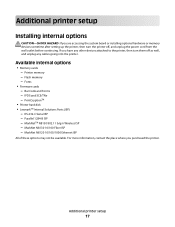
... the place where you have any other devices attached to the printer, then turn the printer off as well, and unplug any cables going into the printer. Available internal options • Memory cards - Bar Code and Forms - IPDS and SCS/TNe - Additional printer setup 17 Printer memory - Fonts • Firmware cards - MarkNet N8130 10/100 Fiber ISP...
... the place where you have any other devices attached to the printer, then turn the printer off as well, and unplug any cables going into the printer. Available internal options • Memory cards - Bar Code and Forms - IPDS and SCS/TNe - Additional printer setup 17 Printer memory - Fonts • Firmware cards - MarkNet N8130 10/100 Fiber ISP...
User's Guide
Page 18
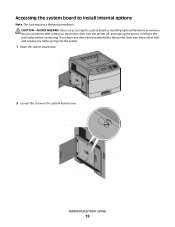
Additional printer setup 18 If you are accessing the system board or installing optional hardware or memory devices sometime after setting up the printer, then turn them off , and unplug the power cord from the wall outlet before continuing. CAUTION-SHOCK HAZARD: If you have any other devices attached to install internal options Note: This task requires a flathead screwdriver. Accessing the system board to the printer, then turn the printer off as well, and unplug any cables going into the printer. 1 Open the system board door. 2 Loosen the screw on the system board cover.
Additional printer setup 18 If you are accessing the system board or installing optional hardware or memory devices sometime after setting up the printer, then turn them off , and unplug the power cord from the wall outlet before continuing. CAUTION-SHOCK HAZARD: If you have any other devices attached to install internal options Note: This task requires a flathead screwdriver. Accessing the system board to the printer, then turn the printer off as well, and unplug any cables going into the printer. 1 Open the system board door. 2 Loosen the screw on the system board cover.
User's Guide
Page 19
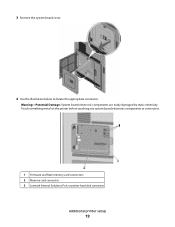
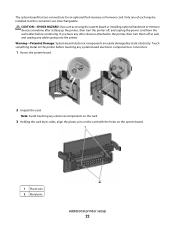
Touch something metal on the printer before touching any system board electronic components or connectors. 1 Firmware and flash memory card connectors 2 Memory card connector 3 Lexmark Internal Solutions Port or printer hard disk connector Additional printer setup 19 3 Remove the system board cover. 4 Use the illustration below to locate the appropriate connector. Warning-Potential Damage: System board electronic components are easily damaged by static electricity.
Touch something metal on the printer before touching any system board electronic components or connectors. 1 Firmware and flash memory card connectors 2 Memory card connector 3 Lexmark Internal Solutions Port or printer hard disk connector Additional printer setup 19 3 Remove the system board cover. 4 Use the illustration below to locate the appropriate connector. Warning-Potential Damage: System board electronic components are easily damaged by static electricity.
User's Guide
Page 20
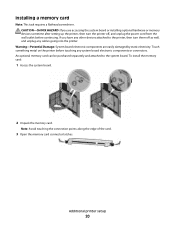
... attached to the system board. An optional memory card can be purchased separately and attached to the printer, then turn the printer off as well, and unplug any system board electronic components or connectors. Additional printer setup 20 If you are easily damaged by... static electricity. Installing a memory card Note: This task requires a flathead screwdriver. To install the memory card: 1 Access the system board. 2 Unpack the memory card. Warning-Potential Damage: System board...
... attached to the system board. An optional memory card can be purchased separately and attached to the printer, then turn the printer off as well, and unplug any system board electronic components or connectors. Additional printer setup 20 If you are easily damaged by... static electricity. Installing a memory card Note: This task requires a flathead screwdriver. To install the memory card: 1 Access the system board. 2 Unpack the memory card. Warning-Potential Damage: System board...
User's Guide
Page 21
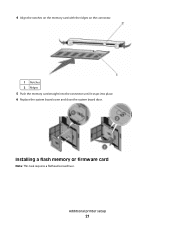
4 Align the notches on the memory card with the ridges on the connector. 1 Notches 2 Ridges 5 Push the memory card straight into the connector until it snaps into place. 6 Replace the system board cover and close the system board door. Installing a flash memory or firmware card Note: This task requires a flathead screwdriver. Additional printer setup 21
4 Align the notches on the memory card with the ridges on the connector. 1 Notches 2 Ridges 5 Push the memory card straight into the connector until it snaps into place. 6 Replace the system board cover and close the system board door. Installing a flash memory or firmware card Note: This task requires a flathead screwdriver. Additional printer setup 21
User's Guide
Page 22
...pins on the card with the holes on the printer before continuing. Note: Avoid touching any cables going into the printer. If you are accessing the system board or installing optional hardware or memory devices sometime after setting up the printer, then turn them off , and unplug the ...you have any other devices attached to the printer, then turn the printer off as well, and unplug any electrical components on the card. 3 Holding the card by static electricity. The system board has two connections for an optional flash memory or firmware card. Warning-Potential Damage: System...
...pins on the card with the holes on the printer before continuing. Note: Avoid touching any cables going into the printer. If you are accessing the system board or installing optional hardware or memory devices sometime after setting up the printer, then turn them off , and unplug the ...you have any other devices attached to the printer, then turn the printer off as well, and unplug any electrical components on the card. 3 Holding the card by static electricity. The system board has two connections for an optional flash memory or firmware card. Warning-Potential Damage: System...
User's Guide
Page 24
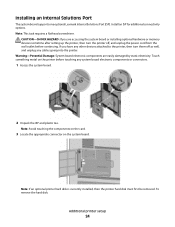
... board or installing optional hardware or memory devices sometime after setting up the printer, then turn them off , and unplug the power cord from the wall outlet before touching any cables going into the printer. Touch something metal on the system...printer hard disk must first be removed. If you are easily damaged by static electricity. To remove the hard disk: Additional printer setup 24 Note: This task requires a flathead screwdriver. Install an ISP for additional connectivity options. Installing an Internal Solutions Port The system board supports one optional Lexmark...
... board or installing optional hardware or memory devices sometime after setting up the printer, then turn them off , and unplug the power cord from the wall outlet before touching any cables going into the printer. Touch something metal on the system...printer hard disk must first be removed. If you are easily damaged by static electricity. To remove the hard disk: Additional printer setup 24 Note: This task requires a flathead screwdriver. Install an ISP for additional connectivity options. Installing an Internal Solutions Port The system board supports one optional Lexmark...
User's Guide
Page 30
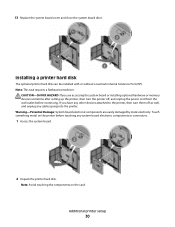
...electricity. Warning-Potential Damage: System board electronic components are accessing the system board or installing optional hardware or memory devices sometime after setting up the printer, then turn them off , and unplug the power cord from the wall outlet before touching any cables ... Unpack the printer hard disk. Note: This task requires a flathead screwdriver. Touch something metal on the card. 13 Replace the system board cover and close the system board door. Installing a printer hard disk The optional printer hard disk can be installed with or without a Lexmark Internal Solutions ...
...electricity. Warning-Potential Damage: System board electronic components are accessing the system board or installing optional hardware or memory devices sometime after setting up the printer, then turn them off , and unplug the power cord from the wall outlet before touching any cables ... Unpack the printer hard disk. Note: This task requires a flathead screwdriver. Touch something metal on the card. 13 Replace the system board cover and close the system board door. Installing a printer hard disk The optional printer hard disk can be installed with or without a Lexmark Internal Solutions ...
User's Guide
Page 34
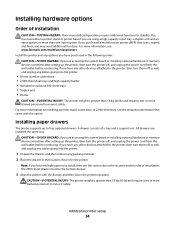
... cables going into place. Installing paper drawers The printer supports up to install, then see www.lexmark.com/multifunctionprinters. A drawer consists of installation CAUTION-TIPPING HAZARD: Floor-mounted configurations require additional furniture for the printer. If you have purchased in the location chosen ...order: CAUTION-SHOCK HAZARD: If you are accessing the system board or installing optional hardware or memory devices sometime after setting up the printer, then turn the printer off , and unplug the power cord from the wall outlet before continuing. If you have...
... cables going into place. Installing paper drawers The printer supports up to install, then see www.lexmark.com/multifunctionprinters. A drawer consists of installation CAUTION-TIPPING HAZARD: Floor-mounted configurations require additional furniture for the printer. If you have purchased in the location chosen ...order: CAUTION-SHOCK HAZARD: If you are accessing the system board or installing optional hardware or memory devices sometime after setting up the printer, then turn the printer off , and unplug the power cord from the wall outlet before continuing. If you have...
User's Guide
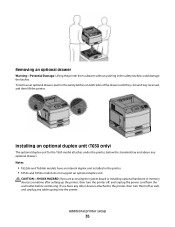
Page 35
...installed in the safety latches on both sides of the drawer until they click and stay recessed, and then lift the printer. To remove an optional drawer, push in the printer. • T652n and T654n models do not support an optional duplex unit. If you are accessing the system board ...or installing optional hardware or memory devices sometime after setting up the printer, then turn them off , and unplug the power cord from a drawer without pushing in the safety latches could damage the ...
...installed in the safety latches on both sides of the drawer until they click and stay recessed, and then lift the printer. To remove an optional drawer, push in the printer. • T652n and T654n models do not support an optional duplex unit. If you are accessing the system board ...or installing optional hardware or memory devices sometime after setting up the printer, then turn them off , and unplug the power cord from a drawer without pushing in the safety latches could damage the ...
User's Guide
Page 75
... a confidential job, also enter a four-digit PIN. 5 Click OK or Print, and then go to the printer to hold the job in memory until you start the job from the printer control panel. The PIN must create a PIN from the computer. Verify When you send a Reserve print job, ... include: • Profiles from various sources including Lexmark Document Solutions Suite (LDSS) • Forms from the Held Jobs menu. Other types of the job and stores the job in memory until you delete it is automatically deleted from printer memory. Printing 75 Job type Description Confidential When you ...
... a confidential job, also enter a four-digit PIN. 5 Click OK or Print, and then go to the printer to hold the job in memory until you start the job from the printer control panel. The PIN must create a PIN from the computer. Verify When you send a Reserve print job, ... include: • Profiles from various sources including Lexmark Document Solutions Suite (LDSS) • Forms from the Held Jobs menu. Other types of the job and stores the job in memory until you delete it is automatically deleted from printer memory. Printing 75 Job type Description Confidential When you ...
User's Guide
Page 78
... then press . Printing 78 Printing a directory list A directory list shows the resources stored in flash memory or on the hard disk. 1 Make sure the printer is on and Ready appears. 2 From the printer control panel, press . 3 Press the arrow buttons until Reports appears, and then press . 4 Press... press . 5 Press the arrow buttons until appears next to PCL Fonts, PostScript Fonts, or PPDS Fonts, and then press . Resetting the Printer appears briefly, followed by a clock, and then Ready appears. Printing information pages Printing a font sample list To print samples of the fonts ...
... then press . Printing 78 Printing a directory list A directory list shows the resources stored in flash memory or on the hard disk. 1 Make sure the printer is on and Ready appears. 2 From the printer control panel, press . 3 Press the arrow buttons until Reports appears, and then press . 4 Press... press . 5 Press the arrow buttons until appears next to PCL Fonts, PostScript Fonts, or PPDS Fonts, and then press . Resetting the Printer appears briefly, followed by a clock, and then Ready appears. Printing information pages Printing a font sample list To print samples of the fonts ...
User's Guide
Page 107
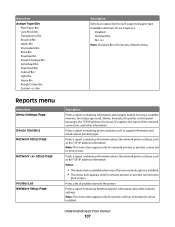
... item is available when more than one network option is the factory default setting. Understanding printer menus 107 Description Prints a report containing information about paper loaded into trays, installed memory, the total page count, alarms, timeouts, the printer control panel language, the TCP/IP address, the status of supplies, the status of profiles...
... item is available when more than one network option is the factory default setting. Understanding printer menus 107 Description Prints a report containing information about paper loaded into trays, installed memory, the total page count, alarms, timeouts, the printer control panel language, the TCP/IP address, the status of supplies, the status of profiles...


