Menus and Messages Guide
Page 14
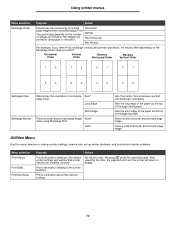
... network settings Values No value for this menu selection to change printer settings, remove jobs, set up printer hardware, and troubleshoot printer problems. Menu selection Print Menus Print Stats Print Net Setup Purpose Prints information relating to the default printer settings and verifies that printer options are portrait or landscape in orientation. Auto* page sheet Long...
... network settings Values No value for this menu selection to change printer settings, remove jobs, set up printer hardware, and troubleshoot printer problems. Menu selection Print Menus Print Stats Print Net Setup Purpose Prints information relating to the default printer settings and verifies that printer options are portrait or landscape in orientation. Auto* page sheet Long...
User's Guide
Page 4
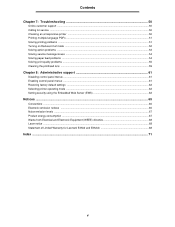
Contents Chapter 7: Troubleshooting 50 Online customer support ...50 Calling for service ...50 Checking an unresponsive printer ...50 Printing multiple-language PDFs ...51 Solving printing problems ...51 Turning on Reduced Curl mode ...52 Solving option problems ...lens ...59 Chapter 8: Administrative support 61 Disabling control panel menus ...61 Enabling control panel menus ...61 Restoring factory default settings ...62 Selecting printer operating mode ...62 Setting security using the Embedded Web Server (EWS 62 Notices ...65 Conventions ...65 Electronic emission notices ...65 Noise emission...
Contents Chapter 7: Troubleshooting 50 Online customer support ...50 Calling for service ...50 Checking an unresponsive printer ...50 Printing multiple-language PDFs ...51 Solving printing problems ...51 Turning on Reduced Curl mode ...52 Solving option problems ...lens ...59 Chapter 8: Administrative support 61 Disabling control panel menus ...61 Enabling control panel menus ...61 Restoring factory default settings ...62 Selecting printer operating mode ...62 Setting security using the Embedded Web Server (EWS 62 Notices ...65 Conventions ...65 Electronic emission notices ...65 Noise emission...
User's Guide
Page 50
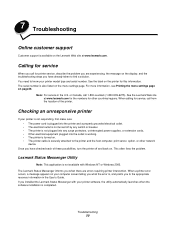
.... • Other electrical equipment plugged into the outlet is working. • The printer is turned on the display, and the troubleshooting steps you installed the Lexmark Status Messenger with Windows NT or Windows 2000. When calling for this information. The Lexmark Status Messenger informs you what the error is securely attached to the appropriate...
.... • Other electrical equipment plugged into the outlet is working. • The printer is turned on the display, and the troubleshooting steps you installed the Lexmark Status Messenger with Windows NT or Windows 2000. When calling for this information. The Lexmark Status Messenger informs you what the error is securely attached to the appropriate...
User's Guide
Page 51
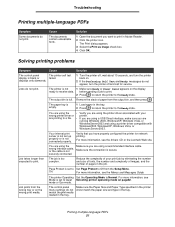
... 51 Jobs do not print. On. For more information, see Mode is too expected to print in the tray. 2 Press to return the printer to the Ready state. The Print dialog appears. 3 Select the Print as image check box. 4 Click OK. The output bin is empty....unavailable fonts. For more information, see the drivers CD or the Lexmark Web site. Page Protect is secure. The control panel menu settings do not appear, turn the printer off and call for network printing. Troubleshooting Printing multiple-language PDFs Symptom Some documents do not print. The paper...
... 51 Jobs do not print. On. For more information, see Mode is too expected to print in the tray. 2 Press to return the printer to the Ready state. The Print dialog appears. 3 Select the Print as image check box. 4 Click OK. The output bin is empty....unavailable fonts. For more information, see the drivers CD or the Lexmark Web site. Page Protect is secure. The control panel menu settings do not appear, turn the printer off and call for network printing. Troubleshooting Printing multiple-language PDFs Symptom Some documents do not print. The paper...
User's Guide
Page 52
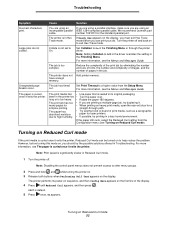
...using a parallel interface, make sure you should try the possible solutions offered in Troubleshooting. Note: Disabling the control panel menus does not prevent access to a higher value... turned on the first line of print media, such as a xerographic paper for laser printers. • If possible, try duplexing it exits the printer. Large jobs do not collate. For more information, see the Menus and Messages...occur. Turning on Reduced Curl mode If the print media is too complex. We recommend Lexmark part cable. If Ready Hex appears on the display, you must exit Hex Trace mode before turning this...
...using a parallel interface, make sure you should try the possible solutions offered in Troubleshooting. Note: Disabling the control panel menus does not prevent access to a higher value... turned on the first line of print media, such as a xerographic paper for laser printers. • If possible, try duplexing it exits the printer. Large jobs do not collate. For more information, see the Menus and Messages...occur. Turning on Reduced Curl mode If the print media is too complex. We recommend Lexmark part cable. If Ready Hex appears on the display, you must exit Hex Trace mode before turning this...
User's Guide
Page 53
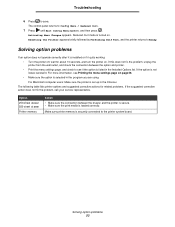
... and suggested corrective actions for about 10 seconds, and turn the printer on. Troubleshooting 6 Press to Ready. Activating Menu Changes appears. Option 250-sheet drawer 550-sheet dr awer Printer memory Action • Make sure the connection between the option and printer. • Print the menu settings page, and check to see Printing the...
... and suggested corrective actions for about 10 seconds, and turn the printer on. Troubleshooting 6 Press to Ready. Activating Menu Changes appears. Option 250-sheet drawer 550-sheet dr awer Printer memory Action • Make sure the connection between the option and printer. • Print the menu settings page, and check to see Printing the...
User's Guide
Page 54
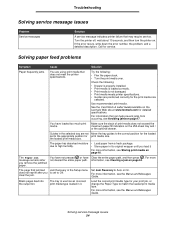
... the maximum paper fill indicators on . For more information, see Clearing a jam on page16. Troubleshooting Solving service message issues Problem Service messages Solution A service message indicates printer failure that jammed Jam Recovery in it . Solving paper feed problems Symptom Cause Solution Paper frequently ... You have not pressed or have loaded too much print media. For more information, see Avoiding jams on the Lexmark Web site at www.lexmark.com for service. For more information, see the Menus and Messages Guide. The page that may require service. For...
... the maximum paper fill indicators on . For more information, see Clearing a jam on page16. Troubleshooting Solving service message issues Problem Service messages Solution A service message indicates printer failure that jammed Jam Recovery in it . Solving paper feed problems Symptom Cause Solution Paper frequently ... You have not pressed or have loaded too much print media. For more information, see Avoiding jams on the Lexmark Web site at www.lexmark.com for service. For more information, see the Menus and Messages Guide. The page that may require service. For...
User's Guide
Page 55
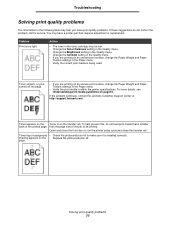
If the problem continues, contact the Lexmark Customer Support Center at http://support.lexmark.com . Open and close the front door to be low. • Change the Toner Darkness setting in the Quality menu. • Change the Brightness setting ... that is smaller back of the job to run the printer setup cycle and clean the transfer roll. For more details, see Understanding print media guidelines on the • Replace the photoconductor kit. shading appears on page10. Troubleshooting Solving print quality problems The information in the following table may help prevent this...
If the problem continues, contact the Lexmark Customer Support Center at http://support.lexmark.com . Open and close the front door to be low. • Change the Toner Darkness setting in the Quality menu. • Change the Brightness setting ... that is smaller back of the job to run the printer setup cycle and clean the transfer roll. For more details, see Understanding print media guidelines on the • Replace the photoconductor kit. shading appears on page10. Troubleshooting Solving print quality problems The information in the following table may help prevent this...
User's Guide
Page 56
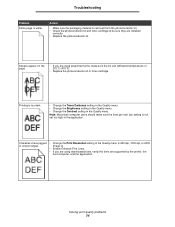
...Streaks appear on the page. • If you are using preprinted forms, make sure the lines per inch (lpi) setting is white. Troubleshooting Problem Entire page is not set too high in the application. Note: Macintosh computer users should make sure the ink can withstand temperatures of ...the Brightness setting in the Quality menu. • Change the Contrast setting in the Quality menu to be sure they are supported by the printer, the host computer, and the application. Printing is removed from the photoconductor kit. • Check the photoconductor kit and toner cartridge to 600...
...Streaks appear on the page. • If you are using preprinted forms, make sure the lines per inch (lpi) setting is white. Troubleshooting Problem Entire page is not set too high in the application. Note: Macintosh computer users should make sure the ink can withstand temperatures of ...the Brightness setting in the Quality menu. • Change the Contrast setting in the Quality menu to be sure they are supported by the printer, the host computer, and the application. Printing is removed from the photoconductor kit. • Check the photoconductor kit and toner cartridge to 600...
User's Guide
Page 57
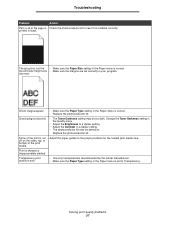
... problems 57 printed in the Paper menu is set correctly in the Paper menu is correct. • Replace the photoconductor kit. incorrect. Troubleshooting Problem Action Part or all of the page is Check the photoconductor kit to see if it is poor. • Use only transparencies ...recommended by the printer manufacturer. • Make sure the Paper Type setting in your program. Replace the photoconductor kit. Adjust the paper guides to Transparency. Ghost ...
... problems 57 printed in the Paper menu is set correctly in the Paper menu is correct. • Replace the photoconductor kit. incorrect. Troubleshooting Problem Action Part or all of the page is Check the photoconductor kit to see if it is poor. • Use only transparencies ...recommended by the printer manufacturer. • Make sure the Paper Type setting in your program. Replace the photoconductor kit. Adjust the paper guides to Transparency. Ghost ...
User's Guide
Page 58
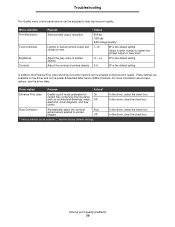
... is the default setting. 0-5 0* is the default setting. Gray Correction Automatically adjust the contrast enhancement applied to help improve print quality. Troubleshooting The Quality menu control panel options can be adjusted to printed images. In addition, the Enhance Fine Lines and Gray Correction options can be... Select printed output resolution. Auto Off* † Values marked by an asterisk (*) are available on the driver and on the printer Embedded Web Server (EWS) interface. In the driver, select the check box. Adjust the contrast of printed objects. In the ...
... is the default setting. 0-5 0* is the default setting. Gray Correction Automatically adjust the contrast enhancement applied to help improve print quality. Troubleshooting The Quality menu control panel options can be adjusted to printed images. In addition, the Enhance Fine Lines and Gray Correction options can be... Select printed output resolution. Auto Off* † Values marked by an asterisk (*) are available on the driver and on the printer Embedded Web Server (EWS) interface. In the driver, select the check box. Adjust the contrast of printed objects. In the ...

User's Guide
Page 59
Cleaning the printhead lens 59 Troubleshooting Cleaning the printhead lens Some print quality problems can be solved by cleaning the printhead lens. 1 Turn the printer off. 2 Press the button on the left side of the printer to release and lower the front door. 3 Remove the print cartridge assembly by pulling on a flat, clean surface. 4 Locate the glass printhead lens within the recessed area in the top of the printer. Place the print cartridge assembly on the toner cartridge handle. Note: Do not press the button on the print cartridge assembly.
Cleaning the printhead lens 59 Troubleshooting Cleaning the printhead lens Some print quality problems can be solved by cleaning the printhead lens. 1 Turn the printer off. 2 Press the button on the left side of the printer to release and lower the front door. 3 Remove the print cartridge assembly by pulling on a flat, clean surface. 4 Locate the glass printhead lens within the recessed area in the top of the printer. Place the print cartridge assembly on the toner cartridge handle. Note: Do not press the button on the print cartridge assembly.

User's Guide
Page 60
Cleaning the printhead lens 60 Warning: Not using a clean, dry, lint-free cloth may result in as far as it will go. 7 Close the front door. 8 Turn the printer on the guides of the print cartridge assembly with a clean, dry, lint-free cloth. Troubleshooting 5 Gently wipe the printhead lens with the arrows on the tracks in the printer and pushing the print cartridge assembly in damage to the printhead lens. 6 Install the print cartridge assembly into the printer by aligning the arrows on .
Cleaning the printhead lens 60 Warning: Not using a clean, dry, lint-free cloth may result in as far as it will go. 7 Close the front door. 8 Turn the printer on the guides of the print cartridge assembly with a clean, dry, lint-free cloth. Troubleshooting 5 Gently wipe the printhead lens with the arrows on the tracks in the printer and pushing the print cartridge assembly in damage to the printhead lens. 6 Install the print cartridge assembly into the printer by aligning the arrows on .
