
User's Guide
Page 3
...37 How to print using an overlay or a watermark 37 Using an overlay 38 Using a watermark 38 How to cancel a print job 39 From the printer operator panel 39 From a Windows computer 39 From a Macintosh computer 39 Chapter 4: How to install options 40 How to access the system board 41 How...cover 44 How to add a memory card 45 How to add a flash card 46 How to install a 550-sheet drawer 48 How to get the printer driver to recognize installed options 49 Chapter 5: Using the operator panel 50 Overview of the operator panel 51 Understanding the operator panel lights 52 Secondary errors...
...37 How to print using an overlay or a watermark 37 Using an overlay 38 Using a watermark 38 How to cancel a print job 39 From the printer operator panel 39 From a Windows computer 39 From a Macintosh computer 39 Chapter 4: How to install options 40 How to access the system board 41 How...cover 44 How to add a memory card 45 How to add a flash card 46 How to install a 550-sheet drawer 48 How to get the printer driver to recognize installed options 49 Chapter 5: Using the operator panel 50 Overview of the operator panel 51 Understanding the operator panel lights 52 Secondary errors...

User's Guide
Page 30
... Setup, depending on the application) to print. on the Print window to send the job to view the printer driver settings. 3 Click the Paper tab. 4 Select Manual paper from the Paper tray drop-down list. 5 Select the appropriate Paper size and type. 6 Click OK. 7 Click ... point you should load the media. For information on acceptable print media to the printer before loading the print media. The printer displays the Load Manual Feeder light sequence. When the printer is located at the front of your printer and can only feed one sheet of print media can be loaded?" Printing tasks...
... Setup, depending on the application) to print. on the Print window to send the job to view the printer driver settings. 3 Click the Paper tab. 4 Select Manual paper from the Paper tray drop-down list. 5 Select the appropriate Paper size and type. 6 Click OK. 7 Click ... point you should load the media. For information on acceptable print media to the printer before loading the print media. The printer displays the Load Manual Feeder light sequence. When the printer is located at the front of your printer and can only feed one sheet of print media can be loaded?" Printing tasks...
User's Guide
Page 32
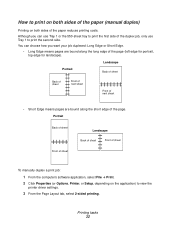
... duplex a print job: 1 From the computer's software application, select File Æ Print. 2 Click Properties (or Options, Printer, or Setup, depending on both sides of the paper (manual duplex) Printing on the application) to view the printer driver settings. 3 From the Page Layout tab, select 2-sided printing. How to print on both sides of...
... duplex a print job: 1 From the computer's software application, select File Æ Print. 2 Click Properties (or Options, Printer, or Setup, depending on both sides of the paper (manual duplex) Printing on the application) to view the printer driver settings. 3 From the Page Layout tab, select 2-sided printing. How to print on both sides of...

User's Guide
Page 34
... page images on one page (N-up printing) The Multipage Printing (N-up means four page images are portrait or landscape in orientation. The printer uses the Multipage Order, Multipage View, and Multipage Border settings to determine the order and orientation of images per sheet (from the Multipage... 2 1 3 3 4 2 4 4 To print a visible border around each page image, select Print page borders. 5 Click OK. 6 Click OK on the application) to view the printer driver settings. 3 From the Page Layout tab, select the number of the page images, and whether a border is used to have.
... page images on one page (N-up printing) The Multipage Printing (N-up means four page images are portrait or landscape in orientation. The printer uses the Multipage Order, Multipage View, and Multipage Border settings to determine the order and orientation of images per sheet (from the Multipage... 2 1 3 3 4 2 4 4 To print a visible border around each page image, select Print page borders. 5 Click OK. 6 Click OK on the application) to view the printer driver settings. 3 From the Page Layout tab, select the number of the page images, and whether a border is used to have.
User's Guide
Page 35
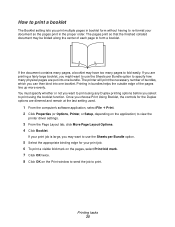
... To print a visible fold mark on the pages, select Print fold mark. 7 Click OK twice. 8 Click OK on the application) to view the printer driver settings. 3 From the Page Layout tab, click More Page Layout Options. 4 Click Booklet. Printing tasks 35 The pages print so that the finished collated ...are dimmed and remain at the last setting used. 1 From the computer's software application, select File Æ Print. 2 Click Properties (or Options, Printer, or Setup, depending on the Print window to send the job to print. How to print a booklet The Booklet setting lets you select to print...
... To print a visible fold mark on the pages, select Print fold mark. 7 Click OK twice. 8 Click OK on the application) to view the printer driver settings. 3 From the Page Layout tab, click More Page Layout Options. 4 Click Booklet. Printing tasks 35 The pages print so that the finished collated ...are dimmed and remain at the last setting used. 1 From the computer's software application, select File Æ Print. 2 Click Properties (or Options, Printer, or Setup, depending on the Print window to send the job to print. How to print a booklet The Booklet setting lets you select to print...
User's Guide
Page 36
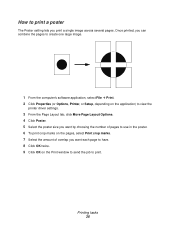
... Click OK on the Print window to send the job to use in the poster. 6 To print crop marks on the application) to view the printer driver settings. 3 From the Page Layout tab, click More Page Layout Options. 4 Click Poster. 5 Select the poster size you want by choosing the ...you can combine the pages to create one large image. 1 From the computer's software application, select File Æ Print. 2 Click Properties (or Options, Printer, or Setup, depending on the pages, select Print crop marks. 7 Select the amount of overlap you print a single image across several pages. Printing tasks 36...
... Click OK on the Print window to send the job to use in the poster. 6 To print crop marks on the application) to view the printer driver settings. 3 From the Page Layout tab, click More Page Layout Options. 4 Click Poster. 5 Select the poster size you want by choosing the ...you can combine the pages to create one large image. 1 From the computer's software application, select File Æ Print. 2 Click Properties (or Options, Printer, or Setup, depending on the pages, select Print crop marks. 7 Select the amount of overlap you print a single image across several pages. Printing tasks 36...
User's Guide
Page 37
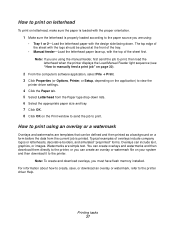
...on page 30). 2 From the computer's software application, select File Æ Print. 3 Click Properties (or Options, Printer, or Setup, depending on the application) to view the printer driver settings. 4 Click the Paper tab. 5 Select Letterhead from the current job is properly loaded according to the paper source...Make sure the letterhead is printed. For information about how to create, save, or download an overlay or watermark, refer to the printer driver Help. Printing tasks 37 Typical examples of the sheet first. How to print using an overlay or a watermark Overlays and watermarks are ...
...on page 30). 2 From the computer's software application, select File Æ Print. 3 Click Properties (or Options, Printer, or Setup, depending on the application) to view the printer driver settings. 4 Click the Paper tab. 5 Select Letterhead from the current job is properly loaded according to the paper source...Make sure the letterhead is printed. For information about how to create, save, or download an overlay or watermark, refer to the printer driver Help. Printing tasks 37 Typical examples of the sheet first. How to print using an overlay or a watermark Overlays and watermarks are ...
User's Guide
Page 38
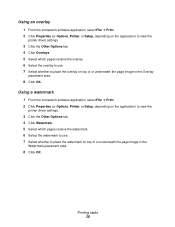
... overlay 1 From the computer's software application, select File Æ Print. 2 Click Properties (or Options, Printer, or Setup, depending on the application) to view the printer driver settings. 3 Click the Other Options tab. 4 Click Overlays. 5 Select which pages receive the watermark. 6...Using a watermark 1 From the computer's software application, select File Æ Print. 2 Click Properties (or Options, Printer, or Setup, depending on the application) to view the printer driver settings. 3 Click the Other Options tab. 4 Click Watermark. 5 Select which pages receive the overlay. 6 Select...
... overlay 1 From the computer's software application, select File Æ Print. 2 Click Properties (or Options, Printer, or Setup, depending on the application) to view the printer driver settings. 3 Click the Other Options tab. 4 Click Overlays. 5 Select which pages receive the watermark. 6...Using a watermark 1 From the computer's software application, select File Æ Print. 2 Click Properties (or Options, Printer, or Setup, depending on the application) to view the printer driver settings. 3 Click the Other Options tab. 4 Click Watermark. 5 Select which pages receive the overlay. 6 Select...
User's Guide
Page 40
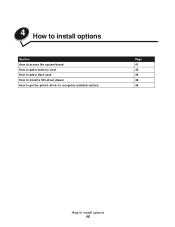
4 How to install options Section How to access the system board How to add a memory card How to add a flash card How to install a 550-sheet drawer How to get the printer driver to recognize installed options Page 41 45 46 48 49 How to install options 40
4 How to install options Section How to access the system board How to add a memory card How to add a flash card How to install a 550-sheet drawer How to get the printer driver to recognize installed options Page 41 45 46 48 49 How to install options 40
User's Guide
Page 45
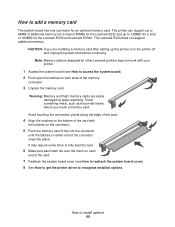
... memory card The system board has one connector for the Lexmark E330 and Lexmark E332n. The Lexmark E230 does not support additional memory. It may not work with the notches on the connector. 5 Push the memory card firmly into place. The printer can support up to 64MB of additional memory (for a... the system board (see How to reattach the system board cover). 8 See How to get the printer driver to recognize installed options. Note: Memory options designed for other Lexmark printers may require some force to install options 45 How to fully seat the card. 6 Make sure each latch ...
... memory card The system board has one connector for the Lexmark E330 and Lexmark E332n. The Lexmark E230 does not support additional memory. It may not work with the notches on the connector. 5 Push the memory card firmly into place. The printer can support up to 64MB of additional memory (for a... the system board (see How to reattach the system board cover). 8 See How to get the printer driver to recognize installed options. Note: Memory options designed for other Lexmark printers may require some force to install options 45 How to fully seat the card. 6 Make sure each latch ...
User's Guide
Page 47
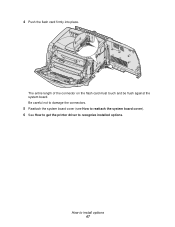
4 Push the flash card firmly into place. How to recognize installed options. The entire length of the connector on the flash card must touch and be flush against the system board. Be careful not to damage the connectors. 5 Reattach the system board cover (see How to reattach the system board cover). 6 See How to get the printer driver to install options 47
4 Push the flash card firmly into place. How to recognize installed options. The entire length of the connector on the flash card must touch and be flush against the system board. Be careful not to damage the connectors. 5 Reattach the system board cover (see How to reattach the system board cover). 6 See How to get the printer driver to install options 47
User's Guide
Page 48
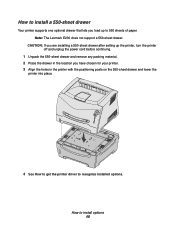
... and remove any packing material. 2 Place the drawer in the printer with the positioning posts on the 550-sheet drawer and lower the printer into place. 4 See How to get the printer driver to recognize installed options. Note: The Lexmark E230 does not support a 550-sheet drawer. How to install ...a 550-sheet drawer Your printer supports one optional drawer that lets you have chosen for your printer. 3 Align the ...
... and remove any packing material. 2 Place the drawer in the printer with the positioning posts on the 550-sheet drawer and lower the printer into place. 4 See How to get the printer driver to recognize installed options. Note: The Lexmark E230 does not support a 550-sheet drawer. How to install ...a 550-sheet drawer Your printer supports one optional drawer that lets you have chosen for your printer. 3 Align the ...
User's Guide
Page 49
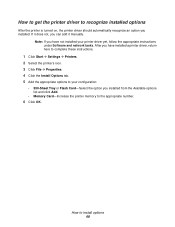
... not, you have installed a printer driver, return here to complete these instructions. 1 Click Start Æ Settings Æ Printers. 2 Select the printer's icon. 3 Click File Æ Properties. 4 Click the Install Options tab. 5 Add the appropriate options to your printer driver yet, follow the appropriate instructions...-Select the option you installed. How to install options 49 How to get the printer driver to recognize installed options After the printer is turned on, the printer driver should automatically recognize an option you installed from the Available options list and click Add...
... not, you have installed a printer driver, return here to complete these instructions. 1 Click Start Æ Settings Æ Printers. 2 Select the printer's icon. 3 Click File Æ Properties. 4 Click the Install Options tab. 5 Add the appropriate options to your printer driver yet, follow the appropriate instructions...-Select the option you installed. How to install options 49 How to get the printer driver to recognize installed options After the printer is turned on, the printer driver should automatically recognize an option you installed from the Available options list and click Add...
User's Guide
Page 89
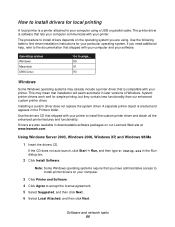
... our enhanced custom printer driver. If the CD does not auto launch, click Start Æ Run, and then type D:\Setup.exe in downloadable software packages on the operating system you are also available in the Run dialog box. 2 Click Install Software. Use the following table to install drivers depends on our Lexmark Web site...
... our enhanced custom printer driver. If the CD does not auto launch, click Start Æ Run, and then type D:\Setup.exe in downloadable software packages on the operating system you are also available in the Run dialog box. 2 Click Install Software. Use the following table to install drivers depends on our Lexmark Web site...
User's Guide
Page 90
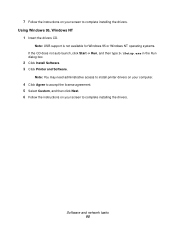
Note: You may need administrative access to install printer drivers on your computer. 4 Click Agree to accept the license agreement. 5 Select Custom, and then click Next. 6 Follow the instructions on your screen to complete installing the drivers. Note: USB support is not available for Windows 95 or ..., click Start Æ Run, and then type D:\Setup.exe in the Run dialog box. 2 Click Install Software. 3 Click Printer and Software. Software and network tasks 90 7 Follow the instructions on your screen to complete installing the drivers. Using Windows 95, Windows NT 1 Insert the...
Note: You may need administrative access to install printer drivers on your computer. 4 Click Agree to accept the license agreement. 5 Select Custom, and then click Next. 6 Follow the instructions on your screen to complete installing the drivers. Note: USB support is not available for Windows 95 or ..., click Start Æ Run, and then type D:\Setup.exe in the Run dialog box. 2 Click Install Software. 3 Click Printer and Software. Software and network tasks 90 7 Follow the instructions on your screen to complete installing the drivers. Using Windows 95, Windows NT 1 Insert the...

User's Guide
Page 93
All the printer driver packages support local printing using Lexmark printers in UNIX and Linux environments. The driver package for a complete list of supported UNIX and Linux platforms. Software and network tasks 93 Visit our Lexmark Web site at www.lexmark.com. UNIX/Linux Local printing is supported on our Lexmark Web site at www.lexmark.com for Sun Solaris...
All the printer driver packages support local printing using Lexmark printers in UNIX and Linux environments. The driver package for a complete list of supported UNIX and Linux platforms. Software and network tasks 93 Visit our Lexmark Web site at www.lexmark.com. UNIX/Linux Local printing is supported on our Lexmark Web site at www.lexmark.com for Sun Solaris...
User's Guide
Page 96
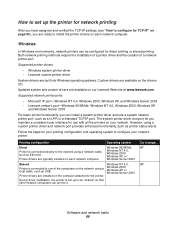
... TCP/IP port. Both network printing methods require the installation of a printer driver and the creation of the computers on our Lexmark Web site at www.lexmark.com. Supported printer drivers • Windows system printer driver • Lexmark custom printer driver System drivers are built into Windows operating systems. Custom drivers are installed on page 95), you are ready to one of a network...
... TCP/IP port. Both network printing methods require the installation of a printer driver and the creation of the computers on our Lexmark Web site at www.lexmark.com. Supported printer drivers • Windows system printer driver • Lexmark custom printer driver System drivers are built into Windows operating systems. Custom drivers are installed on page 95), you are ready to one of a network...
User's Guide
Page 97
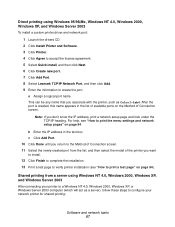
...Add Port. 10 Click Done until you want to install. 12 Click Finish to complete the installation. 13 Print a test page to verify printer installation (see "How to print the menu settings and network setup pages" on page 94). b Enter the IP address in the list...Windows Server 2003 To install a custom printer driver and network port: 1 Launch the drivers CD. 2 Click Install Printer and Software. 3 Click Printer. 4 Click Agree to accept the license agreement. 5 Select Quick install, and then click Next. 6 Click Create new port. 7 Click Add Port. 8 Select Lexmark TCP/IP Network Port, and then ...
...Add Port. 10 Click Done until you want to install. 12 Click Finish to complete the installation. 13 Print a test page to verify printer installation (see "How to print the menu settings and network setup pages" on page 94). b Enter the IP address in the list...Windows Server 2003 To install a custom printer driver and network port: 1 Launch the drivers CD. 2 Click Install Printer and Software. 3 Click Printer. 4 Click Agree to accept the license agreement. 5 Select Quick install, and then click Next. 6 Click Create new port. 7 Click Add Port. 8 Select Lexmark TCP/IP Network Port, and then ...

User's Guide
Page 98
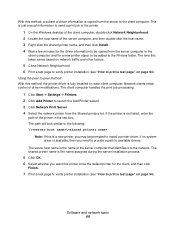
... created. 3 Click File Æ Sharing. 4 Check the Shared check box, and then enter a name in the Printers folder now has a shared indicator. Step 3: Install the printer driver (or subset) on page 94). Software and network tasks 98 Find the host name of system resources. The server handles... driver modifications and the print job processing. Step 1: Install a custom printer driver 1 Insert the drivers CD. If the CD does not auto launch, click Start Æ Run, and then type D:\Setup...
... created. 3 Click File Æ Sharing. 4 Check the Shared check box, and then enter a name in the Printers folder now has a shared indicator. Step 3: Install the printer driver (or subset) on page 94). Software and network tasks 98 Find the host name of system resources. The server handles... driver modifications and the print job processing. Step 1: Install a custom printer driver 1 Insert the drivers CD. If the CD does not auto launch, click Start Æ Run, and then type D:\Setup...
User's Guide
Page 99
... method With this method, the printer driver is not listed, enter the path of the printer in the text box. The client computer handles the print job processing. 1 Click Start Æ Settings Æ Printers. 2 Click Add Printer to launch the Add Printer wizard. 3 Click Network Print Server. 4 Select the network printer from the server to the client...
... method With this method, the printer driver is not listed, enter the path of the printer in the text box. The client computer handles the print job processing. 1 Click Start Æ Settings Æ Printers. 2 Click Add Printer to launch the Add Printer wizard. 3 Click Network Print Server. 4 Select the network printer from the server to the client...

