
User Guide
Page 3
...removing options 5 Installing a 2000-sheet drawer ...6 Installing a 500-sheet drawer ...7 Installing a duplex unit ...8 Installing the printer ...9 Installing an output expander ...9 Installing a 5-bin mailbox ...11 Installing a StapleSmart finisher ...12 Installing memory and option cards ...13 Removing memory and option cards ...18 Chapter 2: Printing ...24 Understanding the printer operator panel ...24 Sending a job to print ...26 Printing from a USB flash memory device ...27 Canceling a print job ...28 Printing a menu settings page ...29 Printing a network setup page ...29 Printing a font...
...removing options 5 Installing a 2000-sheet drawer ...6 Installing a 500-sheet drawer ...7 Installing a duplex unit ...8 Installing the printer ...9 Installing an output expander ...9 Installing a 5-bin mailbox ...11 Installing a StapleSmart finisher ...12 Installing memory and option cards ...13 Removing memory and option cards ...18 Chapter 2: Printing ...24 Understanding the printer operator panel ...24 Sending a job to print ...26 Printing from a USB flash memory device ...27 Canceling a print job ...28 Printing a menu settings page ...29 Printing a network setup page ...29 Printing a font...

User Guide
Page 4
... Enabling operator panel menus ...79 Restoring factory default settings ...79 Adjusting Power Saver ...80 Encrypting the disk ...80 Setting security using the Embedded Web Server (EWS 81 Black only mode ...84 Aligning the image transfer unit ...85 Using the Coverage Estimator ...86 Size sensing ...86 Configuring printer alerts ...87 Chapter 7: Troubleshooting 88 Online customer support ...88 Calling for service ...88 Checking an unresponsive printer ...88 Printing multi-language PDFs ...88 Solving printing problems...
... Enabling operator panel menus ...79 Restoring factory default settings ...79 Adjusting Power Saver ...80 Encrypting the disk ...80 Setting security using the Embedded Web Server (EWS 81 Black only mode ...84 Aligning the image transfer unit ...85 Using the Coverage Estimator ...86 Size sensing ...86 Configuring printer alerts ...87 Chapter 7: Troubleshooting 88 Online customer support ...88 Calling for service ...88 Checking an unresponsive printer ...88 Printing multi-language PDFs ...88 Solving printing problems...
User Guide
Page 16
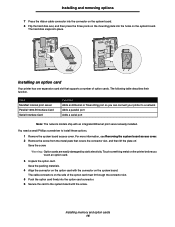
... cover. You need a small Phillips screwdriver to the system board with the screw. The cable connectors on the printer before you can connect your printer to a network Adds a parallel port Adds a serial port Note: The network models ship with the connector on the system board. Touch something metal on the side of option cards. Installing and removing options 7 Press the ribbon cable connector into the connector...
... cover. You need a small Phillips screwdriver to the system board with the screw. The cable connectors on the printer before you can connect your printer to a network Adds a parallel port Adds a serial port Note: The network models ship with the connector on the system board. Touch something metal on the side of option cards. Installing and removing options 7 Press the ribbon cable connector into the connector...
User Guide
Page 26
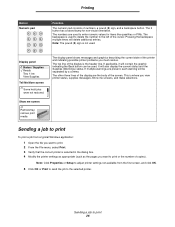
... make selections. The top line of the printer and indicating possible printer problems you view printer status, supplies messages, Show me screen Remove tray; If multiple warnings are present, each warning will contain the graphic indicating the Back button can be separated by a comma. Note: Click Properties or Setup to adjust printer settings not available from a typical Windows application: 1 Open the file you want to print. 2 From the File menu, select Print...
... make selections. The top line of the printer and indicating possible printer problems you view printer status, supplies messages, Show me screen Remove tray; If multiple warnings are present, each warning will contain the graphic indicating the Back button can be separated by a comma. Note: Click Properties or Setup to adjust printer settings not available from a typical Windows application: 1 Open the file you want to print. 2 From the File menu, select Print...

User Guide
Page 29
... can print a menu settings page to review the default printer settings and to verify printer options are printing to. 3 In the printer window, select the print job you want to the Ready state after the menu settings page prints. This page also provides important information that helps in configuring for your selected printer appears on the desktop. 1 Double-click the printer icon on your desktop. Printing Menus Settings appears on the display. Printing a network setup...
... can print a menu settings page to review the default printer settings and to verify printer options are printing to. 3 In the printer window, select the print job you want to the Ready state after the menu settings page prints. This page also provides important information that helps in configuring for your selected printer appears on the desktop. 1 Double-click the printer icon on your desktop. Printing Menus Settings appears on the display. Printing a network setup...

User Guide
Page 48
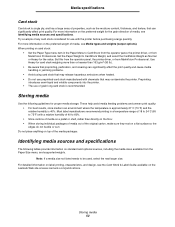
... about these settings.) • Make sure the paper is usually indicated on the paper package. • Do not use paper that has been cut or trimmed by the temperature in the printer fuser • Preprinted papers that require a registration (the precise print location on the page) greater than 60 g/m2 (16 lb) • Multiple-part forms or documents Selecting paper Proper paper loading helps prevent jams and ensures trouble-free printing.
... about these settings.) • Make sure the paper is usually indicated on the paper package. • Do not use paper that has been cut or trimmed by the temperature in the printer fuser • Preprinted papers that require a registration (the precise print location on the page) greater than 60 g/m2 (16 lb) • Multiple-part forms or documents Selecting paper Proper paper loading helps prevent jams and ensures trouble-free printing.

User Guide
Page 51
... letter size, A4 size, and legal size sheets. These labels are supplied in the same source; Zone coating of the die cut. • Use full label sheets. Storing paper 51 For detailed information on label printing, characteristics and design, see the Card Stock & Label Guide available on labels: • Set the Paper Type menu item to peel off during printing, resulting in the Paper Menu. Set the Paper Type from the printer operator panel, the printer driver...
... letter size, A4 size, and legal size sheets. These labels are supplied in the same source; Zone coating of the die cut. • Use full label sheets. Storing paper 51 For detailed information on label printing, characteristics and design, see the Card Stock & Label Guide available on labels: • Set the Paper Type menu item to peel off during printing, resulting in the Paper Menu. Set the Paper Type from the printer operator panel, the printer driver...
User Guide
Page 52
.... Use Heavy for proper media storage. These help avoid media feeding problems and uneven print quality: • For best results, store media in a temperature range of 18 to 24°C (65 to 75°F) with the printer before purchasing a large quantity. Identifying media sources and specifications The following guidelines for card stock weighing more than or heavier than directly...
.... Use Heavy for proper media storage. These help avoid media feeding problems and uneven print quality: • For best results, store media in a temperature range of 18 to 24°C (65 to 75°F) with the printer before purchasing a large quantity. Identifying media sources and specifications The following guidelines for card stock weighing more than or heavier than directly...

User Guide
Page 59
... conserve toner and paper. Combined with the duplex setting, Multipage Print lets you experience faded print, remove the print cartridge. For more information about Lexmark Authorized Supplies Dealers in the Settings Æ Finishing Menu Causes the printer to 5 (darkest setting). Values for printer supplies assume printing on letter or A4 size plain paper. Maintaining the printer Conserving supplies Several settings in your application software or on the display let you adjust the level of...
... conserve toner and paper. Combined with the duplex setting, Multipage Print lets you experience faded print, remove the print cartridge. For more information about Lexmark Authorized Supplies Dealers in the Settings Æ Finishing Menu Causes the printer to 5 (darkest setting). Values for printer supplies assume printing on letter or A4 size plain paper. Maintaining the printer Conserving supplies Several settings in your application software or on the display let you adjust the level of...

User Guide
Page 78
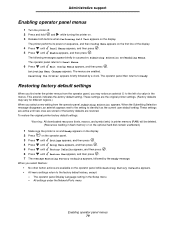
... and Messages Guide. The menus are adjusted separately. Disabling operator panel menus Since many people could be made to keep others from changing menu settings from the operator panel. To disable the operator panel menus so that changes cannot be using the printer, an administrator may choose to lock the operator panel menus to the printer default settings: 1 Turn the printer off. Activating Menu Changes appears. Resetting the Printer appears...
... and Messages Guide. The menus are adjusted separately. Disabling operator panel menus Since many people could be made to keep others from changing menu settings from the operator panel. To disable the operator panel menus so that changes cannot be using the printer, an administrator may choose to lock the operator panel menus to the printer default settings: 1 Turn the printer off. Activating Menu Changes appears. Resetting the Printer appears...
User Guide
Page 79
... message Restoring Factory Defaults appears, followed by a clock. The following messages appear briefly in the Setup menu - Resetting the Printer appears briefly followed by the Ready message. This asterisk indicates the factory default setting. These settings are restored. The operator panel Display Language setting in succession: Submitting Selection and Enabling Menus. Activating Menu Changes appears. The operator panel then returns to identify it as the current user default setting. The printer performs its power...
... message Restoring Factory Defaults appears, followed by a clock. The following messages appear briefly in the Setup menu - Resetting the Printer appears briefly followed by the Ready message. This asterisk indicates the factory default setting. These settings are restored. The operator panel Display Language setting in succession: Submitting Selection and Enabling Menus. Activating Menu Changes appears. The operator panel then returns to identify it as the current user default setting. The printer performs its power...
User Guide
Page 84
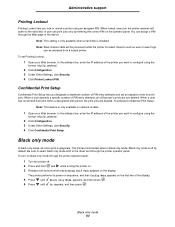
... driver and through the printer operator panel. To activate Confidential Print Setup: Note: This feature is installed. Black only mode is locked. The printer performs its power-on sequence, and then Config Menu appears on network models. 1 Open your Web browser. Black only mode 84 A user can print jobs only by default. Reports such as user or event logs can assign a PIN through the printer operator panel: 1 Turn the printer...
... driver and through the printer operator panel. To activate Confidential Print Setup: Note: This feature is installed. Black only mode is locked. The printer performs its power-on sequence, and then Config Menu appears on network models. 1 Open your Web browser. Black only mode 84 A user can print jobs only by default. Reports such as user or event logs can assign a PIN through the printer operator panel: 1 Turn the printer...

User Guide
Page 87
... message is time to replace supplies and points out actual or potential problems. When a printer needs attention, it requires attention. The printer displays a message and continues printing. Selecting Auto Continue may affect how the printer alerts execute. Configuring printer alerts 87 For example, you can create an Action that execute specific commands whenever messages like Tray x Missing or 88 Toner Low appear on the display. Administrative support Configuring printer...
... message is time to replace supplies and points out actual or potential problems. When a printer needs attention, it requires attention. The printer displays a message and continues printing. Selecting Auto Continue may affect how the printer alerts execute. Configuring printer alerts 87 For example, you can create an Action that execute specific commands whenever messages like Tray x Missing or 88 Toner Low appear on the display. Administrative support Configuring printer...
User Guide
Page 89
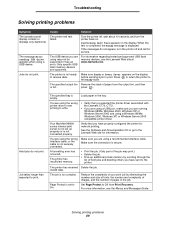
... www.lexmark.com. The message Error reading USB drive appears when using a Windows 98/Me, Windows 2000, Windows XP, or Windows Server 2003 compatible printer driver. Jobs do not print. See the Software and Documentation CD or go to the Ready state. Troubleshooting Solving printing problems Symptom The operator panel display is not ready to receive data. The specified output bin Remove the stack of pages in the tray. You are using the wrong printer driver...
... www.lexmark.com. The message Error reading USB drive appears when using a Windows 98/Me, Windows 2000, Windows XP, or Windows Server 2003 compatible printer driver. Jobs do not print. See the Software and Documentation CD or go to the Ready state. Troubleshooting Solving printing problems Symptom The operator panel display is not ready to receive data. The specified output bin Remove the stack of pages in the tray. You are using the wrong printer driver...

User Guide
Page 91
... aligned. Make sure flash memory is correctly set up. Solving option problems 91 For more informations, see the Software and Documentation CD that shipped with adapter Internal print server High capacity feeder Printer memory Serial/Parallel interface Action • Make sure the connection between the duplex unit and the printer is securely connected to the printer system board. If the option is selected in the Installed Options...
... aligned. Make sure flash memory is correctly set up. Solving option problems 91 For more informations, see the Software and Documentation CD that shipped with adapter Internal print server High capacity feeder Printer memory Serial/Parallel interface Action • Make sure the connection between the duplex unit and the printer is securely connected to the printer system board. If the option is selected in the Installed Options...

User Guide
Page 92
... paper size selected. Rubber feed rollers do not turn the printer on . • The power cord is plugged into an outlet. • The outlet has power. Check the following : • The power cord is plugged firmly into the back of paper or has a jam. Check to ensure the paper has been loaded properly. Remove the paper in the feeder. Try the following : • The printer is properly attached to the high...
... paper size selected. Rubber feed rollers do not turn the printer on . • The power cord is plugged into an outlet. • The outlet has power. Check the following : • The power cord is plugged firmly into the back of paper or has a jam. Check to ensure the paper has been loaded properly. Remove the paper in the feeder. Try the following : • The printer is properly attached to the high...

User Guide
Page 93
... print. Use recommended paper and other specialty media. For information that can help isolate print quality problems, print the Print Quality Test Pages. 1 Turn the printer off. 2 Press and . Make sure the stack of media loaded. Guides in its original wrapper until you turn the printer on the operator panel until the Performing Self Test message appears. set to match the type of paper you remove the jammed paper. The paper has absorbed moisture Load paper...
... print. Use recommended paper and other specialty media. For information that can help isolate print quality problems, print the Print Quality Test Pages. 1 Turn the printer off. 2 Press and . Make sure the stack of media loaded. Guides in its original wrapper until you turn the printer on the operator panel until the Performing Self Test message appears. set to match the type of paper you remove the jammed paper. The paper has absorbed moisture Load paper...
User Guide
Page 99
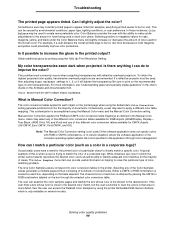
... object to increase the gloss in a corporate logo)? This problem most commonly occurs when projecting transparencies with RGB or CMYK combinations, or in certain situations where the software application or the computer operating system adjusts the colors specified in more preferable color. Users may be too red). Selecting any of each box is obtained by using the printer Embedded Web...
... object to increase the gloss in a corporate logo)? This problem most commonly occurs when projecting transparencies with RGB or CMYK combinations, or in certain situations where the software application or the computer operating system adjusts the colors specified in more preferable color. Users may be too red). Selecting any of each box is obtained by using the printer Embedded Web...

User Guide
Page 100
... Menu. If the user selects a color conversion table and presses the Print button, the printer prints the default color samples pages. If the user selects a color conversion table and presses the Detailed button, a new interface becomes available. Manual Color Correction may not be used (Auto, Off, or Manual), the type of the object in a software application. Color specification of Classification of object being printed object being printed (text, graphics, or images...
... Menu. If the user selects a color conversion table and presses the Print button, the printer prints the default color samples pages. If the user selects a color conversion table and presses the Detailed button, a new interface becomes available. Manual Color Correction may not be used (Auto, Off, or Manual), the type of the object in a software application. Color specification of Classification of object being printed object being printed (text, graphics, or images...
User Guide
Page 108
..., C772 printer Lexmark International, Inc. Limited warranty Lexmark warrants that user. For further explanation of your product. Warranty service does not include repair of original purchase as "Remarketer." Notices Statement of liability Notices 108 Limited warranty service The warranty period starts on the date of failures caused by: Modification or unauthorized attachments Accidents, misuse, abuse or use inconsistent with Lexmark user's guides, manuals, instructions or...
..., C772 printer Lexmark International, Inc. Limited warranty Lexmark warrants that user. For further explanation of your product. Warranty service does not include repair of original purchase as "Remarketer." Notices Statement of liability Notices 108 Limited warranty service The warranty period starts on the date of failures caused by: Modification or unauthorized attachments Accidents, misuse, abuse or use inconsistent with Lexmark user's guides, manuals, instructions or...

