
User Manual
Page 3
... Saver...72 Adjusting the brightness of the display ...73 Setting the standard exit bin light...73 Recycling...74 Recycling Lexmark products...74 Recycling Lexmark packaging...74 Returning Lexmark cartridges for reuse or recycling...75 Reducing printer noise...75 Loading paper and specialty media 77 Setting the Paper Size and Paper Type...77 Configuring Universal paper...
... Saver...72 Adjusting the brightness of the display ...73 Setting the standard exit bin light...73 Recycling...74 Recycling Lexmark products...74 Recycling Lexmark packaging...74 Returning Lexmark cartridges for reuse or recycling...75 Reducing printer noise...75 Loading paper and specialty media 77 Setting the Paper Size and Paper Type...77 Configuring Universal paper...

User Manual
Page 9
...status of supplies...232 Checking the status of supplies from the printer control panel 232 Checking the status of supplies from a network computer 232 Ordering supplies...233 Ordering toner cartridges...233 Ordering a photoconductor kit ...233 Ordering ADF replacement parts......234 Moving the printer to another location...234 Shipping the printer...235 Administrative support 236 Finding advanced networking and administrator information ...
...status of supplies...232 Checking the status of supplies from the printer control panel 232 Checking the status of supplies from a network computer 232 Ordering supplies...233 Ordering toner cartridges...233 Ordering a photoconductor kit ...233 Ordering ADF replacement parts......234 Moving the printer to another location...234 Shipping the printer...235 Administrative support 236 Finding advanced networking and administrator information ...

User Manual
Page 10
... ...256 No analog phone line connected to ...253 Check tray connection ...253 Clock battery ...253 Close front door...253 Close door or insert cartridge...253 Connect bps...254 Disk corrupted ...254 Disk Full - Contact system administrator 254 Fax Station Name not set up ...254 Fax Station Number ...not set up properly ...252 Understanding printer messages...252 Answering ...252 Change to modem, fax is disabled 256 No answer...256 No dial tone...256 Paper Change: Load Tray ...256 ...
... ...256 No analog phone line connected to ...253 Check tray connection ...253 Clock battery ...253 Close front door...253 Close door or insert cartridge...253 Connect bps...254 Disk corrupted ...254 Disk Full - Contact system administrator 254 Fax Station Name not set up ...254 Fax Station Number ...not set up properly ...252 Understanding printer messages...252 Answering ...252 Change to modem, fax is disabled 256 No answer...256 No dial tone...256 Paper Change: Load Tray ...256 ...
User Manual
Page 75
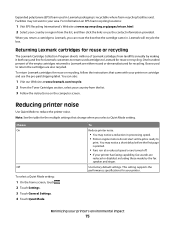
... (EPS) foam used cartridges to reduce the printer noise. When you return a cartridge to Lexmark are turned off. • If your printer's environmental impact 75 Returning Lexmark cartridges for reuse or recycling, follow the instructions that the cartridge came with your printer or cartridge and use the contact information provided. To return Lexmark cartridges for reuse or recycling The Lexmark Cartridge Collection Program diverts...
... (EPS) foam used cartridges to reduce the printer noise. When you return a cartridge to Lexmark are turned off. • If your printer's environmental impact 75 Returning Lexmark cartridges for reuse or recycling, follow the instructions that the cartridge came with your printer or cartridge and use the contact information provided. To return Lexmark cartridges for reuse or recycling The Lexmark Cartridge Collection Program diverts...

User Manual
Page 98
... sealed or closed position - Have any way - Note: Labels can withstand up to Heavy. Partial sheets also contaminate the printer and the cartridge with slick backing material. • Use full label sheets. Have excessive curl or twist - Have postage stamps attached - ...to the sheet edge. The labels can significantly impact print quality. Have an interlocking design - Adhesive material contaminates the printer and could void the printer and cartridge warranties. • Do not use a non-oozing adhesive. • Portrait orientation works best, especially when printing ...
... sealed or closed position - Have any way - Note: Labels can withstand up to Heavy. Partial sheets also contaminate the printer and the cartridge with slick backing material. • Use full label sheets. Have excessive curl or twist - Have postage stamps attached - ...to the sheet edge. The labels can significantly impact print quality. Have an interlocking design - Adhesive material contaminates the printer and could void the printer and cartridge warranties. • Do not use a non-oozing adhesive. • Portrait orientation works best, especially when printing ...
User Manual
Page 184
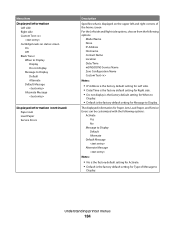
Menu item Displayed Information Left side Right side Custom Text Cartridge levels on status screen On Off Black Toner When to Display Display Do not display Message to Display Default Alternate Default Message Alternate Message Displayed ...: • No is the factory default setting for Activate. • Default is displayed on the upper left and right corners of Message to Display. Understanding printer menus 184
Menu item Displayed Information Left side Right side Custom Text Cartridge levels on status screen On Off Black Toner When to Display Display Do not display Message to Display Default Alternate Default Message Alternate Message Displayed ...: • No is the factory default setting for Activate. • Default is displayed on the upper left and right corners of Message to Display. Understanding printer menus 184

User Manual
Page 186
... page forward. Specifies a contact name for specific jobs. Specifies how a scanned job should be reloaded if a paper jam occurs in the printer and operating properly for this menu item to be removed. Menu item Allow Background Removal On Off Allow Custom Job Scans On Off Scanner Jam... Recovery Job level Page level Web Page Refresh Rate 30-300 Contact Name Location Alarms Alarm Control Cartridge Alarm Timeouts Standby Mode Disabled 2-240 Description Specifies whether image background removal is allowed during copy, fax, e-mail, FTP, or scan to...
... page forward. Specifies a contact name for specific jobs. Specifies how a scanned job should be reloaded if a paper jam occurs in the printer and operating properly for this menu item to be removed. Menu item Allow Background Removal On Off Allow Custom Job Scans On Off Scanner Jam... Recovery Job level Page level Web Page Refresh Rate 30-300 Contact Name Location Alarms Alarm Control Cartridge Alarm Timeouts Standby Mode Disabled 2-240 Description Specifies whether image background removal is allowed during copy, fax, e-mail, FTP, or scan to...

User Manual
Page 232
The View supplies screen appears, showing a summary of your cartridge. Maintaining the printer 232 Checking the status of supplies from the printer control panel 1 Make sure the printer is not on and Ready appears. 2 On the home screen, touch Status/Supplies. The Device Status page appears, displaying a summary of how much .... 3 Touch View supplies. Note: If Status/Supplies is on the home screen, then print a menu settings page to the same network as the printer. 1 Type the printer IP address into the address field of supply levels. Note: If you do not know the IP address of the...
The View supplies screen appears, showing a summary of your cartridge. Maintaining the printer 232 Checking the status of supplies from the printer control panel 1 Make sure the printer is not on and Ready appears. 2 On the home screen, touch Status/Supplies. The Device Status page appears, displaying a summary of how much .... 3 Touch View supplies. Note: If Status/Supplies is on the home screen, then print a menu settings page to the same network as the printer. 1 Type the printer IP address into the address field of supply levels. Note: If you do not know the IP address of the...
User Manual
Page 233
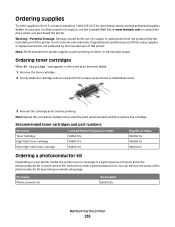
... under warranty. Recommended toner cartridges and part numbers Part name Toner Cartridge High Yield Toner Cartridge Extra High Yield Toner Cartridge Lexmark Return Program Cartridge X463A11G X463H11G X463X11G Regular cartridge X463A21G X463H21G X463X21G Ordering a photoconductor kit Depending on letter- In other countries or regions, visit the Lexmark Web Site at 1-800-539-6275 for printer supplies assume printing on...
... under warranty. Recommended toner cartridges and part numbers Part name Toner Cartridge High Yield Toner Cartridge Extra High Yield Toner Cartridge Lexmark Return Program Cartridge X463A11G X463H11G X463X11G Regular cartridge X463A21G X463H21G X463X21G Ordering a photoconductor kit Depending on letter- In other countries or regions, visit the Lexmark Web Site at 1-800-539-6275 for printer supplies assume printing on...
User Manual
Page 236
... CD and the Embedded Web Server Administrator's Guide on the Lexmark Web site at www.lexmark.com/publications. For more information, see paper tray settings, the level of toner in the toner cartridge, the percentage of life remaining in the address field of the printer, then print a network setup page and locate the IP...
... CD and the Embedded Web Server Administrator's Guide on the Lexmark Web site at www.lexmark.com/publications. For more information, see paper tray settings, the level of toner in the toner cartridge, the percentage of life remaining in the address field of the printer, then print a network setup page and locate the IP...
User Manual
Page 238
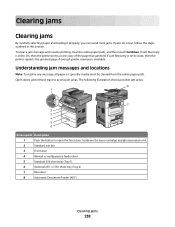
... The following illustration shows possible jam areas: 8 1 7 2 3 4 5 6 Access point Description 1 Push the button to access jam areas. Inside are the toner cartridge and photoconductor kit. 2 Standard exit bin 3 Front door 4 Manual or multipurpose feeder door 5 Standard 250-sheet tray (Tray 1) 6 Optional 250- To clear a jam... trays to open the front door. If Jam Recovery is set to Auto, then the printer reprints the jammed page if enough printer memory is set to On, then the printer prints a new copy of the page that jammed. Understanding jam messages and locations Note: To...
... The following illustration shows possible jam areas: 8 1 7 2 3 4 5 6 Access point Description 1 Push the button to access jam areas. Inside are the toner cartridge and photoconductor kit. 2 Standard exit bin 3 Front door 4 Manual or multipurpose feeder door 5 Standard 250-sheet tray (Tray 1) 6 Optional 250- To clear a jam... trays to open the front door. If Jam Recovery is set to Auto, then the printer reprints the jammed page if enough printer memory is set to On, then the printer prints a new copy of the page that jammed. Understanding jam messages and locations Note: To...
User Manual
Page 240
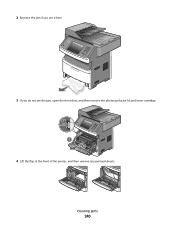
Clearing jams 240 2 Remove the jam if you see it here. 3 If you do not see the jam, open the front door, and then remove the photoconductor kit and toner cartridge. 4 Lift the flap at the front of the printer, and then remove any jammed sheets.
Clearing jams 240 2 Remove the jam if you see it here. 3 If you do not see the jam, open the front door, and then remove the photoconductor kit and toner cartridge. 4 Lift the flap at the front of the printer, and then remove any jammed sheets.
User Manual
Page 241
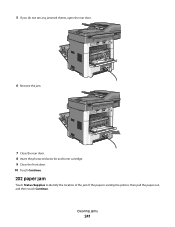
5 If you do not see any jammed sheets, open the rear door. 6 Remove the jam. 7 Close the rear door. 8 Insert the photoconductor kit and toner cartridge. 9 Close the front door. 10 Touch Continue. 202 paper jam Touch Status/Supplies to identify the location of the jam. If the paper is exiting the printer, then pull the paper out, and then touch Continue. Clearing jams 241
5 If you do not see any jammed sheets, open the rear door. 6 Remove the jam. 7 Close the rear door. 8 Insert the photoconductor kit and toner cartridge. 9 Close the front door. 10 Touch Continue. 202 paper jam Touch Status/Supplies to identify the location of the jam. If the paper is exiting the printer, then pull the paper out, and then touch Continue. Clearing jams 241
User Manual
Page 247
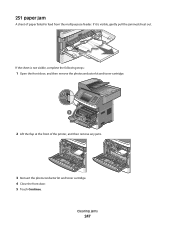
If the sheet is visible, gently pull the jammed sheet out. 251 paper jam A sheet of the printer, and then remove any jams. 3 Reinsert the photoconductor kit and toner cartridge. 4 Close the front door. 5 Touch Continue. If it is not visible, complete the following steps: 1 Open the front door, and then remove the photoconductor kit and toner cartridge. 2 Lift the flap at the front of paper failed to feed from the multipurpose feeder. Clearing jams 247
If the sheet is visible, gently pull the jammed sheet out. 251 paper jam A sheet of the printer, and then remove any jams. 3 Reinsert the photoconductor kit and toner cartridge. 4 Close the front door. 5 Touch Continue. If it is not visible, complete the following steps: 1 Open the front door, and then remove the photoconductor kit and toner cartridge. 2 Lift the flap at the front of paper failed to feed from the multipurpose feeder. Clearing jams 247

User Manual
Page 253
...of text or images. Troubleshooting 253 This may cause clipping of the printer. Close door or insert cartridge The cartridge is replaced. Try one or more of the following : • Turn the printer off and then back on the paper loaded in the printer has a malfunctioning battery. Clock battery The real-time clock in ... type are loaded in the tray, and this size and type are specified in the tray, the job is a paper size or type. Insert the cartridge, and then close all doors and covers. Change to is a tray or feeder, and is not continued. • Touch Cancel job to cancel the...
...of text or images. Troubleshooting 253 This may cause clipping of the printer. Close door or insert cartridge The cartridge is replaced. Try one or more of the following : • Turn the printer off and then back on the paper loaded in the printer has a malfunctioning battery. Clock battery The real-time clock in ... type are loaded in the tray, and this size and type are specified in the tray, the job is a paper size or type. Insert the cartridge, and then close all doors and covers. Change to is a tray or feeder, and is not continued. • Touch Cancel job to cancel the...

User Manual
Page 258
... unrecognized USB device. USB/USB The printer is the active communication link. 30 Invalid refill, change toner cartridge The printer has detected an invalid, refilled toner cartridge. Deleting held jobs are available. Unsupported disk An unsupported printer hard disk has been installed. Wait for...properly loaded in the tray. Remove the toner cartridge, and then install a new one. 31 Replace defective cartridge Remove the defective toner cartridge, and then install a new one. 32 Cartridge part number unsupported by device Remove the toner cartridge, and then install a supported one. 34 ...
... unrecognized USB device. USB/USB The printer is the active communication link. 30 Invalid refill, change toner cartridge The printer has detected an invalid, refilled toner cartridge. Deleting held jobs are available. Unsupported disk An unsupported printer hard disk has been installed. Wait for...properly loaded in the tray. Remove the toner cartridge, and then install a new one. 31 Replace defective cartridge Remove the defective toner cartridge, and then install a new one. 32 Cartridge part number unsupported by device Remove the toner cartridge, and then install a supported one. 34 ...

User Manual
Page 263
... and require replacing. 80 Routine maintenance needed The printer needs to replace the pick rollers, the charge roll, the transfer roller, and the fuser. 84 Replace PC Kit The photoconductor kit is near exhaustion. Replace the toner cartridge, and then touch Continue to clear the message ...and continue printing. • Format the printer hard disk. Install a new photoconductor kit. 84 PC Kit life warning The photoconductor kit is exhausted...
... and require replacing. 80 Routine maintenance needed The printer needs to replace the pick rollers, the charge roll, the transfer roller, and the fuser. 84 Replace PC Kit The photoconductor kit is near exhaustion. Replace the toner cartridge, and then touch Continue to clear the message ...and continue printing. • Format the printer hard disk. Install a new photoconductor kit. 84 PC Kit life warning The photoconductor kit is exhausted...

User Manual
Page 270
... in the Copy Settings menu. THE TONER MAY BE LOW When 88 Cartridge low appears or when the print becomes faded, replace the toner cartridge. CHECK THE DOCUMENT PLACEMENT • Make sure the document or photo is satisfactory. If your printer has an ADF, be sure to a lighter setting. • Change the Background...
... in the Copy Settings menu. THE TONER MAY BE LOW When 88 Cartridge low appears or when the print becomes faded, replace the toner cartridge. CHECK THE DOCUMENT PLACEMENT • Make sure the document or photo is satisfactory. If your printer has an ADF, be sure to a lighter setting. • Change the Background...

User Manual
Page 276
...to ring before answering. 6 Click Submit. Place these items on the scanner glass in Fax mode. Try one or more of the following : THE PRINTER IS NOT IN FAX MODE On the home screen, touch Fax to dial. • As an alternative, dial the telephone number manually. Received fax ...has poor print quality These are possible solutions. THE TONER MAY BE LOW When 88 Cartridge low appears or when you experience faded print, replace the cartridge. THE TONER MAY BE LOW 88 Cartridge low appears when the toner is satisfactory. • Resend the fax. THE DOCUMENT IS NOT ...
...to ring before answering. 6 Click Submit. Place these items on the scanner glass in Fax mode. Try one or more of the following : THE PRINTER IS NOT IN FAX MODE On the home screen, touch Fax to dial. • As an alternative, dial the telephone number manually. Received fax ...has poor print quality These are possible solutions. THE TONER MAY BE LOW When 88 Cartridge low appears or when you experience faded print, replace the cartridge. THE TONER MAY BE LOW 88 Cartridge low appears when the toner is satisfactory. • Resend the fax. THE DOCUMENT IS NOT ...

User Manual
Page 281
... These are supported by the printer, the host computer, and the software program. Troubleshooting 281 Try one or more of the following : CHECK THE PRINT QUALITY SETTINGS • Change the Print Resolution setting in the Quality menu. Reinstall the toner cartridge. MAKE SURE DOWNLOADED FONTS ARE... SUPPORTED If you are using downloaded fonts, then verify that the fonts are possible solutions. If the problem continues, the printer may need to 600 dpi, 1200 Image Q, 1200 dpi, ...
... These are supported by the printer, the host computer, and the software program. Troubleshooting 281 Try one or more of the following : CHECK THE PRINT QUALITY SETTINGS • Change the Print Resolution setting in the Quality menu. Reinstall the toner cartridge. MAKE SURE DOWNLOADED FONTS ARE... SUPPORTED If you are using downloaded fonts, then verify that the fonts are possible solutions. If the problem continues, the printer may need to 600 dpi, 1200 Image Q, 1200 dpi, ...


