
Getting Started
Page 2
... the Mac Help installed with this product or make any electrical or cabling connections, such as the power supply cord or telephone, during a lightning storm. The safety features of specific Lexmark components. Connect the power supply cord to a properly grounded electrical outlet that is designed, tested, and approved to meet strict global safety standards with the use of other than those described in the user documentation, to a professional service person...
... the Mac Help installed with this product or make any electrical or cabling connections, such as the power supply cord or telephone, during a lightning storm. The safety features of specific Lexmark components. Connect the power supply cord to a properly grounded electrical outlet that is designed, tested, and approved to meet strict global safety standards with the use of other than those described in the user documentation, to a professional service person...
Getting Started
Page 3
...26 Opening Print Properties ...26 Using the Save Settings menu ...27 Using the I Want To menu...27 Using the Options menu ...27 Using the Print Properties tabs...27 Using the Toolbar...28 Resetting printer software settings to defaults 29 Maintaining the printer 30 Changing print cartridges...30 Removing a used print cartridge...30 Installing print cartridges...31 Ordering Supplies...32 Ordering print cartridges...32 Ordering paper and other supplies ...32 Troubleshooting...34 Setup troubleshooting...34 Power button is not lit ...34 Software does not install ...34 Page does not print ...35...
...26 Opening Print Properties ...26 Using the Save Settings menu ...27 Using the I Want To menu...27 Using the Options menu ...27 Using the Print Properties tabs...27 Using the Toolbar...28 Resetting printer software settings to defaults 29 Maintaining the printer 30 Changing print cartridges...30 Removing a used print cartridge...30 Installing print cartridges...31 Ordering Supplies...32 Ordering print cartridges...32 Ordering paper and other supplies ...32 Troubleshooting...34 Setup troubleshooting...34 Power button is not lit ...34 Software does not install ...34 Page does not print ...35...
Getting Started
Page 5
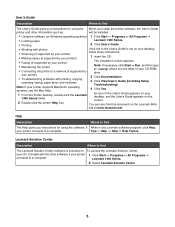
... the Mac Help: 1 From the Finder desktop, double-click the Lexmark 1400 Series folder. 2 Double-click the printer Help icon. Finding information about the printer Quick Setup sheet Description The Quick Setup sheet gives you instructions for setting up hardware and software (on Windows operating systems) and some basic instructions for setting up hardware and software. Where to find You can find The Getting Started booklet gives you instructions for using the printer. The Setup Solutions booklet...
... the Mac Help: 1 From the Finder desktop, double-click the Lexmark 1400 Series folder. 2 Double-click the printer Help icon. Finding information about the printer Quick Setup sheet Description The Quick Setup sheet gives you instructions for setting up hardware and software (on Windows operating systems) and some basic instructions for setting up hardware and software. Where to find You can find The Getting Started booklet gives you instructions for using the printer. The Setup Solutions booklet...
Getting Started
Page 6
... installed. • Using the software (on Windows operating systems) 1 Click Start Œ Programs or All Programs Œ • Loading paper Lexmark 1400 Series. • Printing 2 Click User's Guide. • Working with printing, copying, scanning, faxing, paper jams, and misfeeds 3 Click View User's Guide (including Setup Troubleshooting). Note: If your printer) 2 Click Documentation. • Troubleshooting problems with photos If the link to the User's Guide is the letter of the User's Guide appears on your desktop, and the User's Guide appears on the screen. 2 Double...
... installed. • Using the software (on Windows operating systems) 1 Click Start Œ Programs or All Programs Œ • Loading paper Lexmark 1400 Series. • Printing 2 Click User's Guide. • Working with printing, copying, scanning, faxing, paper jams, and misfeeds 3 Click View User's Guide (including Setup Troubleshooting). Note: If your printer) 2 Click Documentation. • Troubleshooting problems with photos If the link to the User's Guide is the letter of the User's Guide appears on your desktop, and the User's Guide appears on the screen. 2 Double...

Getting Started
Page 20
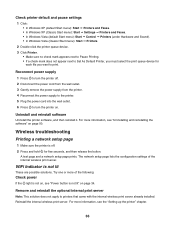
... an IP address. Printing a network setup page A network setup page lists your computer can be included in the MAC filter list. appears. c Under Network Card, check that the printer has an IP address. d Check that start with your printer on the network. If the printer does not respond: a Print a setup page. To print a network setup page: 1 Make sure the printer is called the Media Access Control (MAC) address. If a customer has a MAC filter enabled in the network address field. e For additional information, refer to the "Wireless troubleshooting" section of...
... an IP address. Printing a network setup page A network setup page lists your computer can be included in the MAC filter list. appears. c Under Network Card, check that the printer has an IP address. d Check that start with your printer on the network. If the printer does not respond: a Print a setup page. To print a network setup page: 1 Make sure the printer is called the Media Access Control (MAC) address. If a customer has a MAC filter enabled in the network address field. e For additional information, refer to the "Wireless troubleshooting" section of...

Getting Started
Page 21
... slower Requirements for wireless networking. A simple type of two modes: infrastructure or ad hoc. In addition, they must have a valid IP address and be configured with a printer equipped for all devices must share the same SSID as Connected. If the printer does not respond: a Print a setup page. b Check that the computer has an IP address. Lexmark recommends setting up in one where a PC with a wireless print server communicates directly...
... slower Requirements for wireless networking. A simple type of two modes: infrastructure or ad hoc. In addition, they must have a valid IP address and be configured with a printer equipped for all devices must share the same SSID as Connected. If the printer does not respond: a Print a setup page. b Check that the computer has an IP address. Lexmark recommends setting up in one where a PC with a wireless print server communicates directly...
Getting Started
Page 22
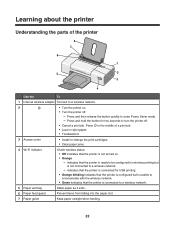
... guide Keep paper straight when feeding. 22 Press and then release the button quickly to a wireless network - Press in the middle of the printer 8 7 6 1 5 2 3 4 Use the To 1 Internal wireless adapter Connect to turn the printer off . - indicates that the printer is connected for two seconds to a wireless network. 2 • Turn the printer on . • Orange - Learning about the printer Understanding the parts of a print job. • Load or eject paper. • Troubleshoot. 3 Access cover • Install or change the print cartridges. • Clear paper jams...
... guide Keep paper straight when feeding. 22 Press and then release the button quickly to a wireless network - Press in the middle of the printer 8 7 6 1 5 2 3 4 Use the To 1 Internal wireless adapter Connect to turn the printer off . - indicates that the printer is connected for two seconds to a wireless network. 2 • Turn the printer on . • Orange - Learning about the printer Understanding the parts of a print job. • Load or eject paper. • Troubleshoot. 3 Access cover • Install or change the print cartridges. • Clear paper jams...
Getting Started
Page 24
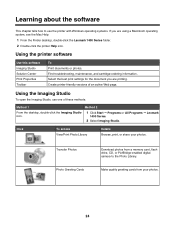
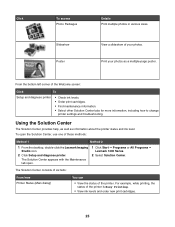
... troubleshooting, maintenance, and cartridge-ordering information. Select the best print settings for the document you are printing. Create printer-friendly versions of these methods: Method 1 Method 2 From the desktop, double-click the Imaging Studio icon. 1 Click Start ΠPrograms or All Programs ΠLexmark 1400 Series. 2 Select Imaging Studio. Make quality greeting cards from a memory card, flash drive, CD, or PictBridge-enabled digital camera to use one of an active Web page. Using the Imaging...
... troubleshooting, maintenance, and cartridge-ordering information. Select the best print settings for the document you are printing. Create printer-friendly versions of these methods: Method 1 Method 2 From the desktop, double-click the Imaging Studio icon. 1 Click Start ΠPrograms or All Programs ΠLexmark 1400 Series. 2 Select Imaging Studio. Make quality greeting cards from a memory card, flash drive, CD, or PictBridge-enabled digital camera to use one of an active Web page. Using the Imaging...
Getting Started
Page 25
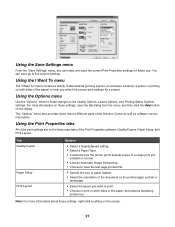
..., use one of the printer. For example, while printing, the status of the Welcome screen: Click To Setup and diagnose printer • Check ink levels. • Order print cartridges. • Find maintenance information. • Select other Solution Center tabs for more information, including how to change printer settings and troubleshooting. Print your photos. From the bottom left corner of the printer is Busy Printing. • View ink levels and order new print cartridges. 25 To open . 1 Click Start...
..., use one of the printer. For example, while printing, the status of the Welcome screen: Click To Setup and diagnose printer • Check ink levels. • Order print cartridges. • Find maintenance information. • Select other Solution Center tabs for more information, including how to change printer settings and troubleshooting. Print your photos. From the bottom left corner of the printer is Busy Printing. • View ink levels and order new print cartridges. 25 To open . 1 Click Start...
Getting Started
Page 26
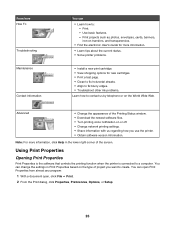
...; Change network printing settings. • Share information with us by telephone or on the World Wide Web. Note: For more information, click Help in Print Properties based on transfers, and transparencies. • Find the electronic User's Guide for more information. • Learn tips about the current status. • Solve printer problems. • Install a new print cartridge. • View shopping options for new cartridges. • Print a test page. • Clean to fix horizontal...
...; Change network printing settings. • Share information with us by telephone or on the World Wide Web. Note: For more information, click Help in Print Properties based on transfers, and transparencies. • Find the electronic User's Guide for more information. • Learn tips about the current status. • Solve printer problems. • Install a new print cartridge. • View shopping options for new cartridges. • Print a test page. • Clean to fix horizontal...
Getting Started
Page 27
... from the menu, and then click the Help button on both sides of the paper) to help you select the correct print settings for future use. Tab Quality/Copies Paper Setup Print Layout Options • Select a Quality/Speed setting. • Select a Paper Type. • Customize how the printer prints several copies of a single print job: collated or normal. • Choose Automatic Image Sharpening. • Choose to have the last page printed first. • Specify the size of paper loaded. •...
... from the menu, and then click the Help button on both sides of the paper) to help you select the correct print settings for future use. Tab Quality/Copies Paper Setup Print Layout Options • Select a Quality/Speed setting. • Select a Paper Type. • Customize how the printer prints several copies of a single print job: collated or normal. • Choose Automatic Image Sharpening. • Choose to have the last page printed first. • Specify the size of paper loaded. •...
Getting Started
Page 34
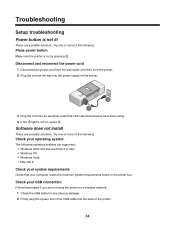
... the power supply on the printer. 2 1 3 Plug the cord into an electrical outlet that your operating system The following : Press power button Make sure the printer is on a wireless network: 1 Check the USB cable for any obvious damage. 2 Firmly plug the square end of the USB cable into the back of the following operating systems are not using . 4 If the light is not on the printer box. Troubleshooting Setup troubleshooting Power button is...
... the power supply on the printer. 2 1 3 Plug the cord into an electrical outlet that your operating system The following : Press power button Make sure the printer is on a wireless network: 1 Check the USB cable for any obvious damage. 2 Firmly plug the square end of the USB cable into the back of the following operating systems are not using . 4 If the light is not on the printer box. Troubleshooting Setup troubleshooting Power button is...
Getting Started
Page 36
... wireless print server already installed. Remove and reinstall the optional internal print server Note: This solution does not apply to turn the printer off . 2 Press and hold for each file you must select the print queue device for five seconds, and then release the button. Reconnect power supply 1 Press to turn the printer on. Uninstall and reinstall software Uninstall the printer software, and then reinstall it. The network setup page lists the configuration settings...
... wireless print server already installed. Remove and reinstall the optional internal print server Note: This solution does not apply to turn the printer off . 2 Press and hold for each file you must select the print queue device for five seconds, and then release the button. Reconnect power supply 1 Press to turn the printer on. Uninstall and reinstall software Uninstall the printer software, and then reinstall it. The network setup page lists the configuration settings...
Getting Started
Page 39
... the MAC address for your MAC address" on the network setup page. The printer may be connecting to your printer was already set a new network name, you need help finding the MAC address, see "Printing a network setup page" on . 39 These are not using a unique network name, consult the documentation for the printer to your computer and/or printer Move the computer and/or printer closer to the wireless access point (wireless router). For more of the following : Check cable Make sure the installation cable...
... the MAC address for your MAC address" on the network setup page. The printer may be connecting to your printer was already set a new network name, you need help finding the MAC address, see "Printing a network setup page" on . 39 These are not using a unique network name, consult the documentation for the printer to your computer and/or printer Move the computer and/or printer closer to the wireless access point (wireless router). For more of the following : Check cable Make sure the installation cable...
Getting Started
Page 42
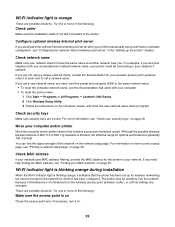
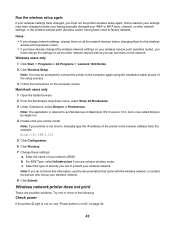
... changing them for the wireless access point (wireless router). • If you have already changed the wireless network settings on your wireless access point (wireless router), you can see "Power button is not shown, manually type the IP address of the setup process. 3 Follow the instructions on the computer screen. Windows users only 1 Click Start Œ Programs or All Programs Œ Lexmark 1400 Series. 2 Click Wireless Setup. Notes: • If you change network settings, change the settings on all the other network settings...
... changing them for the wireless access point (wireless router). • If you have already changed the wireless network settings on your wireless access point (wireless router), you can see "Power button is not shown, manually type the IP address of the setup process. 3 Follow the instructions on the computer screen. Windows users only 1 Click Start Œ Programs or All Programs Œ Lexmark 1400 Series. 2 Click Wireless Setup. Notes: • If you change network settings, change the settings on all the other network settings...
Getting Started
Page 43
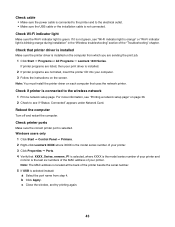
... the wireless network 1 Print a network setup page. Check if printer is green. Note: The MAC address is located at the back of the "Troubleshooting" chapter. Check cable • Make sure the power cable is connected to the printer and to the electrical outlet. • Make sure the USB cable or the installation cable is selected instead: a Select the port name from which you are sending the print job. 1 Click Start Œ Programs or All Programs Œ Lexmark 1400 Series. Windows users...
... the wireless network 1 Print a network setup page. Check if printer is green. Note: The MAC address is located at the back of the "Troubleshooting" chapter. Check cable • Make sure the power cable is connected to the printer and to the electrical outlet. • Make sure the USB cable or the installation cable is selected instead: a Select the port name from which you are sending the print job. 1 Click Start Œ Programs or All Programs Œ Lexmark 1400 Series. Windows users...

Getting Started
Page 49
... Configuration. 6 Click Wireless. 7 Change these settings: a Enter the name of the printer, print the network setup page to as part of security you use to reinstall the software, and make the changes you do not know the IP address of your printer model. for example: http://10.168.0.101 Note: If you want. Note: If you are using the installation cable as Rendezvous in the browser address field. b For BSS Type, select...
... Configuration. 6 Click Wireless. 7 Change these settings: a Enter the name of the printer, print the network setup page to as part of security you use to reinstall the software, and make the changes you do not know the IP address of your printer model. for example: http://10.168.0.101 Note: If you want. Note: If you are using the installation cable as Rendezvous in the browser address field. b For BSS Type, select...
Getting Started
Page 50
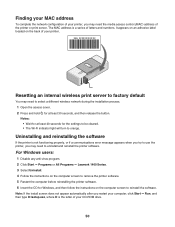
... XX Resetting an internal wireless print server to factory default You may need to select a different wireless network during the installation process. 1 Open the access cover. 2 Press and hold for at least 40 seconds for Windows, and then follow the instructions on the computer screen to use the printer, you may need the media access control (MAC) address of your printer. For Windows users: 1 Disable any anti-virus program. 2 Click Start ΠPrograms or All Programs ΠLexmark 1400 Series. 3 Select...
... XX Resetting an internal wireless print server to factory default You may need to select a different wireless network during the installation process. 1 Open the access cover. 2 Press and hold for at least 40 seconds for Windows, and then follow the instructions on the computer screen to use the printer, you may need the media access control (MAC) address of your printer. For Windows users: 1 Disable any anti-virus program. 2 Click Start ΠPrograms or All Programs ΠLexmark 1400 Series. 3 Select...
Getting Started
Page 52
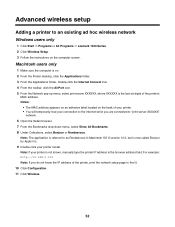
... the printer, print the network setup page to find it. 10 Click Configuration. 11 Click Wireless. 52 Note: The application is referred to as Rendezvous in the browser address field. For example: http://10.168.0.101 Note: If you are connected to an existing ad hoc wireless network Windows users only 1 Click Start ΠPrograms or All Programs ΠLexmark 1400 Series. 2 Click Wireless Setup. 3 Follow the instructions on...
... the printer, print the network setup page to find it. 10 Click Configuration. 11 Click Wireless. 52 Note: The application is referred to as Rendezvous in the browser address field. For example: http://10.168.0.101 Note: If you are connected to an existing ad hoc wireless network Windows users only 1 Click Start ΠPrograms or All Programs ΠLexmark 1400 Series. 2 Click Wireless Setup. 3 Follow the instructions on...
Getting Started
Page 58
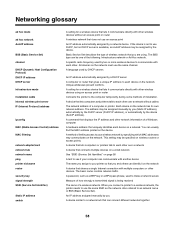
... on a wired network See "SSID (Service Set Identifier)" on a network. Networking glossary ad hoc mode ad hoc network AutoIP address BSS (Basic Service Set) channel DHCP (Dynamic Host Configuration Protocol) DHCP IP address DHCP server infrastructure mode installation cable internal wireless print server IP (Internet Protocol) address ipconfig MAC (Media Access Control) address MAC filtering network adapter/card network hub network name ping printer nickname router security key signal strength SSID (Service Set Identifier) Static IP address switch A setting for a wireless device that lets...
... on a wired network See "SSID (Service Set Identifier)" on a network. Networking glossary ad hoc mode ad hoc network AutoIP address BSS (Basic Service Set) channel DHCP (Dynamic Host Configuration Protocol) DHCP IP address DHCP server infrastructure mode installation cable internal wireless print server IP (Internet Protocol) address ipconfig MAC (Media Access Control) address MAC filtering network adapter/card network hub network name ping printer nickname router security key signal strength SSID (Service Set Identifier) Static IP address switch A setting for a wireless device that lets...


