
Setup Guide
Page 6
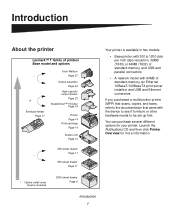
Introduction About the printer Lexmark™ T family of printers Base model and options * or Envelope feeder Page 17 5-bin Mailbox Page 27 Output expander Page 24 High-capacity output stacker Page 22 StapleSmart™ Finisher Page 19 Printer Page 14 Print cartridge Page 14 Duplex unit Page 13 250-sheet drawer... Page 11 * 500-sheet drawer Page 11 Your printer is available in two models: • Base printer, with 300 to 1200 dots per inch (dpi) ...
Introduction About the printer Lexmark™ T family of printers Base model and options * or Envelope feeder Page 17 5-bin Mailbox Page 27 Output expander Page 24 High-capacity output stacker Page 22 StapleSmart™ Finisher Page 19 Printer Page 14 Print cartridge Page 14 Duplex unit Page 13 250-sheet drawer... Page 11 * 500-sheet drawer Page 11 Your printer is available in two models: • Base printer, with 300 to 1200 dots per inch (dpi) ...
Setup Guide
Page 19
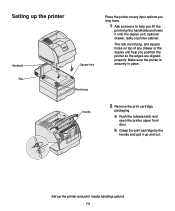
a Push the release latch and open the printer upper front door. b Grasp the print cartridge by the handholds and lower it up and out. Set up the printer and print media handling options 14 Setting up the printer Handhold Square hole Place the printer on top of any input options you may have.... 1 Ask someone to help you lift the printer by the handle and pull it onto the duplex unit, optional drawer, table or printer cabinet. Tab Round peg Handle 2 Remove the print cartridge packaging. Make sure the printer is securely in place. The tab, round peg, and square...
a Push the release latch and open the printer upper front door. b Grasp the print cartridge by the handholds and lower it up and out. Set up the printer and print media handling options 14 Setting up the printer Handhold Square hole Place the printer on top of any input options you may have.... 1 Ask someone to help you lift the printer by the handle and pull it onto the duplex unit, optional drawer, table or printer cabinet. Tab Round peg Handle 2 Remove the print cartridge packaging. Make sure the printer is securely in place. The tab, round peg, and square...
Setup Guide
Page 20
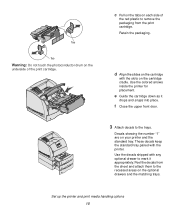
... the upper front door. 1 1 2 3 2 3 3 Attach decals to the recessed areas on the cartridge with the printer. Peel the decals from the print cartridge. Retain the packaging. e Guide the cartridge down as it appropriately. Use the decals shipped with any optional drawer to remove the packaging from the sheet ... Tab Warning: Do not touch the photoconductor drum on your printer and the standard tray. These decals keep the standard tray paired with the slots on each side of the print cartridge. Set up the printer and print media handling options 15 c Pull on the tabs...
... the upper front door. 1 1 2 3 2 3 3 Attach decals to the recessed areas on the cartridge with the printer. Peel the decals from the print cartridge. Retain the packaging. e Guide the cartridge down as it appropriately. Use the decals shipped with any optional drawer to remove the packaging from the sheet ... Tab Warning: Do not touch the photoconductor drum on your printer and the standard tray. These decals keep the standard tray paired with the slots on each side of the print cartridge. Set up the printer and print media handling options 15 c Pull on the tabs...
Setup Guide
Page 24
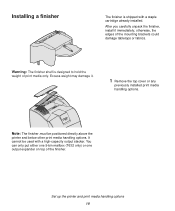
...mounting brackets could damage tabletops or fabrics. It cannot be positioned directly above the printer and below other print media handling options. otherwise, the edges of the finisher. Set up the printer and print media handling options 19 Warning: The finisher shelf is shipped with ...a high-capacity output stacker. Excess weight may damage it immediately; Note: The finisher must be used with a staple cartridge already installed. After you carefully unpack ...
...mounting brackets could damage tabletops or fabrics. It cannot be positioned directly above the printer and below other print media handling options. otherwise, the edges of the finisher. Set up the printer and print media handling options 19 Warning: The finisher shelf is shipped with ...a high-capacity output stacker. Excess weight may damage it immediately; Note: The finisher must be used with a staple cartridge already installed. After you carefully unpack ...


