
Setup Guide
Page 2
... the printer. ImageQuick, PrintCryption and StapleSmart are the user's responsibility. Operation is not intended to meet strict global safety standards with the limits for a Class B digital device (without a network card installed) and for selecting print media to you. The safety features of some parts may not always be incorporated in the areas near the product and easily accessible. • Refer service or repairs...
... the printer. ImageQuick, PrintCryption and StapleSmart are the user's responsibility. Operation is not intended to meet strict global safety standards with the limits for a Class B digital device (without a network card installed) and for selecting print media to you. The safety features of some parts may not always be incorporated in the areas near the product and easily accessible. • Refer service or repairs...

Setup Guide
Page 3
... 2000-sheet drawer 6 Installing the 2000-sheet drawer 8 Changing the 2000-sheet drawer paper size 10 Installing a 250-sheet or 500-sheet drawer 11 Installing a duplex unit 13 Setting up the printer 14 Installing an envelope feeder 17 Installing a finisher 19 Installing a high-capacity output stacker 22 Installing an output expander 24 Installing a 5-bin mailbox 27 Attaching labels to print media handling options 29 Step 3: Install memory and option cards 30 Accessing the printer system board 30 Installing printer memory 32 Installing an optional flash memory or firmware card 33...
... 2000-sheet drawer 6 Installing the 2000-sheet drawer 8 Changing the 2000-sheet drawer paper size 10 Installing a 250-sheet or 500-sheet drawer 11 Installing a duplex unit 13 Setting up the printer 14 Installing an envelope feeder 17 Installing a finisher 19 Installing a high-capacity output stacker 22 Installing an output expander 24 Installing a 5-bin mailbox 27 Attaching labels to print media handling options 29 Step 3: Install memory and option cards 30 Accessing the printer system board 30 Installing printer memory 32 Installing an optional flash memory or firmware card 33...
Setup Guide
Page 6
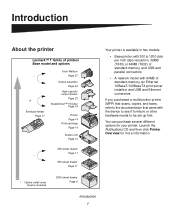
... options for more information. * Option install order may be set up first. Launch the Publications CD and then click Printer Overview for your printer. Introduction About the printer Lexmark™ T family of printers Base model and options * or Envelope feeder Page 17 5-bin Mailbox Page 27 Output expander Page 24 High-capacity output stacker Page 22 StapleSmart™ Finisher Page 19 Printer Page 14 Print cartridge Page 14 Duplex unit Page 13 250-sheet drawer Page 11 * 500-sheet drawer Page 11 Your printer...
... options for more information. * Option install order may be set up first. Launch the Publications CD and then click Printer Overview for your printer. Introduction About the printer Lexmark™ T family of printers Base model and options * or Envelope feeder Page 17 5-bin Mailbox Page 27 Output expander Page 24 High-capacity output stacker Page 22 StapleSmart™ Finisher Page 19 Printer Page 14 Print cartridge Page 14 Duplex unit Page 13 250-sheet drawer Page 11 * 500-sheet drawer Page 11 Your printer...
Setup Guide
Page 7
... printer. They provide information about loading print media, clearing error messages, ordering and replacing supplies, installing maintenance kits, and troubleshooting. The drivers CD contains the necessary printer drivers to the other printer documentation. It also provides general information for more information after you print the Quick Reference pages and store them near the printer. It may also contain printer utilities, screen fonts, and additional documentation. We strongly recommend that you have completed setup...
... printer. They provide information about loading print media, clearing error messages, ordering and replacing supplies, installing maintenance kits, and troubleshooting. The drivers CD contains the necessary printer drivers to the other printer documentation. It also provides general information for more information after you print the Quick Reference pages and store them near the printer. It may also contain printer utilities, screen fonts, and additional documentation. We strongly recommend that you have completed setup...
Setup Guide
Page 11
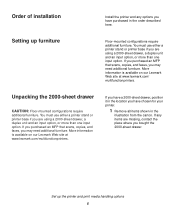
... are missing, contact the place where you are using a 2000-sheet drawer, a duplex unit and an input option, or more than one input option. If you purchased an MFP that scans, copies, and faxes, you have a 2000-sheet drawer, position it in the illustration from the carton. Set up furniture Floor-mounted configurations require additional furniture. Setting up the printer and print media handling options 6 Unpacking...
... are missing, contact the place where you are using a 2000-sheet drawer, a duplex unit and an input option, or more than one input option. If you purchased an MFP that scans, copies, and faxes, you have a 2000-sheet drawer, position it in the illustration from the carton. Set up furniture Floor-mounted configurations require additional furniture. Setting up the printer and print media handling options 6 Unpacking...
Setup Guide
Page 13
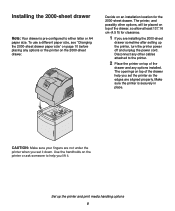
... the 2000-sheet drawer. Make sure the printer is pre-configured to the printer. 2 Place the printer on top of the drawer and any options installed. The openings on an installation location for clearance. 1 If you are installing the 2000-sheet drawer sometime after setting up the printer and print media handling options 8 Use the handholds on the 2000-sheet drawer. To use a different paper size, see "Changing the 2000-sheet drawer paper size" on page 10 before...
... the 2000-sheet drawer. Make sure the printer is pre-configured to the printer. 2 Place the printer on top of the drawer and any options installed. The openings on an installation location for clearance. 1 If you are installing the 2000-sheet drawer sometime after setting up the printer and print media handling options 8 Use the handholds on the 2000-sheet drawer. To use a different paper size, see "Changing the 2000-sheet drawer paper size" on page 10 before...
Setup Guide
Page 15
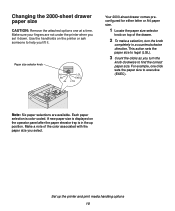
... to help you set it . Paper size selector knob A5 B5 A4 LGL EXEC LTR Your 2000-sheet drawer comes preconfigured for either letter or A4 paper size. 1 Locate the paper size selector knob on the operator panel after the paper elevator tray is in a counterclockwise direction. Make a note of the drawer. 2 To make a selection, turn the knob clockwise to find the correct paper size. A new paper size is color-coded. Make sure your...
... to help you set it . Paper size selector knob A5 B5 A4 LGL EXEC LTR Your 2000-sheet drawer comes preconfigured for either letter or A4 paper size. 1 Locate the paper size selector knob on the operator panel after the paper elevator tray is in a counterclockwise direction. Make a note of the drawer. 2 To make a selection, turn the knob clockwise to find the correct paper size. A new paper size is color-coded. Make sure your...
Setup Guide
Page 16
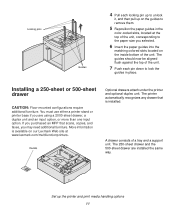
... print media handling options 11 Set up on the inside bottom of a tray and a support unit. Installing a 250-sheet or 500-sheet drawer CAUTION: Floor-mounted configurations require additional furniture. Decals Optional drawers attach under the printer and optional duplex unit. Locking pins Guides 4 Pull each pin down to lock the guides in the color-coded slots, located at www.lexmark.com/multifunctionprinters. The 250-sheet drawer and the 500-sheet drawer are using a 2000-sheet...
... print media handling options 11 Set up on the inside bottom of a tray and a support unit. Installing a 250-sheet or 500-sheet drawer CAUTION: Floor-mounted configurations require additional furniture. Decals Optional drawers attach under the printer and optional duplex unit. Locking pins Guides 4 Pull each pin down to lock the guides in the color-coded slots, located at www.lexmark.com/multifunctionprinters. The 250-sheet drawer and the 500-sheet drawer are using a 2000-sheet...
Setup Guide
Page 19
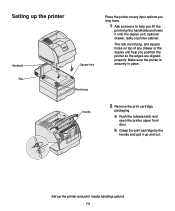
Tab Round peg Handle 2 Remove the print cartridge packaging. a Push the release latch and open the printer upper front door. Set up and out. b Grasp the print cartridge by the handholds and lower it up the printer and print media handling options 14 The tab, round peg, and square holes on any drawer or the duplex unit help you position the printer so the edges are aligned...
Tab Round peg Handle 2 Remove the print cartridge packaging. a Push the release latch and open the printer upper front door. Set up and out. b Grasp the print cartridge by the handholds and lower it up the printer and print media handling options 14 The tab, round peg, and square holes on any drawer or the duplex unit help you position the printer so the edges are aligned...

Setup Guide
Page 22
... be removed when you are not using the envelope feeder. Refer to the front of the wire bail into the groove as shown. Set up the printer and print media handling options 17 b Place the tips of your printer behind the lower front door. The envelope feeder attaches to the Publications CD for details about using it is centered over the area where print media exits. c Replace...
... be removed when you are not using the envelope feeder. Refer to the front of the wire bail into the groove as shown. Set up the printer and print media handling options 17 b Place the tips of your printer behind the lower front door. The envelope feeder attaches to the Publications CD for details about using it is centered over the area where print media exits. c Replace...

Setup Guide
Page 25
Mounting bracket 2 Insert the mounting brackets into the slots under the output bin cover. 5 Slide the end of the paper bail out until it locks into position. 4 Snap the two paper bail posts into the slots. Set up the printer and print media handling options 20 Mounting slot 3 Lift the finisher output bin cover until the arrow is positioned securely. Make sure the finisher is aligned with the paper size for your print job.
Mounting bracket 2 Insert the mounting brackets into the slots under the output bin cover. 5 Slide the end of the paper bail out until it locks into position. 4 Snap the two paper bail posts into the slots. Set up the printer and print media handling options 20 Mounting slot 3 Lift the finisher output bin cover until the arrow is positioned securely. Make sure the finisher is aligned with the paper size for your print job.
Setup Guide
Page 35
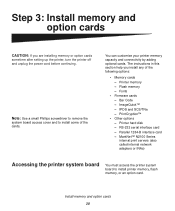
Bar Code - Parallel 1284-B interface card - PrintCryption™ • Other options - Step 3: Install memory and option cards CAUTION: If you install any of the cards. Flash memory - RS-232 serial interface card - The instructions in this section help you are installing memory or option cards sometime after setting up the printer, turn the printer off and unplug the power cord before continuing. MarkNet™ N2100 Series internal print servers (also called internal network adapters or INAs) Accessing the printer system board You...
Bar Code - Parallel 1284-B interface card - PrintCryption™ • Other options - Step 3: Install memory and option cards CAUTION: If you install any of the cards. Flash memory - RS-232 serial interface card - The instructions in this section help you are installing memory or option cards sometime after setting up the printer, turn the printer off and unplug the power cord before continuing. MarkNet™ N2100 Series internal print servers (also called internal network adapters or INAs) Accessing the printer system board You...
Setup Guide
Page 38
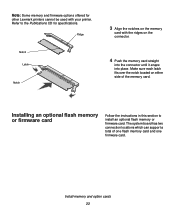
... Notch 3 Align the notches on the memory card with your printer. Make sure each latch fits over the notch located on the connector. 4 Push the memory card straight into the connector until it snaps into place. The system board has two connection locations which can support a total of the memory card. Note: Some memory and firmware options offered for specifications. Refer to install an optional flash memory or firmware card. Install memory and option cards 33
... Notch 3 Align the notches on the memory card with your printer. Make sure each latch fits over the notch located on the connector. 4 Push the memory card straight into the connector until it snaps into place. The system board has two connection locations which can support a total of the memory card. Note: Some memory and firmware options offered for specifications. Refer to install an optional flash memory or firmware card. Install memory and option cards 33

Setup Guide
Page 50
... File Properties. To obtain all of Windows. Click Next. 2 Browse to install the custom printer driver using the drivers CD that installation will seem automatic in the Printers folder. When a test page prints successfully, printer setup is installed. 5 Print a test page to the documentation that you need to refer to verify printer setup a Click Start Settings Printers. The wizard copies all the features of the custom driver, you have a system printer driver for this printer included. Using Windows XP with the printer...
... File Properties. To obtain all of Windows. Click Next. 2 Browse to install the custom printer driver using the drivers CD that installation will seem automatic in the Printers folder. When a test page prints successfully, printer setup is installed. 5 Print a test page to the documentation that you need to refer to verify printer setup a Click Start Settings Printers. The wizard copies all the features of the custom driver, you have a system printer driver for this printer included. Using Windows XP with the printer...
Setup Guide
Page 52
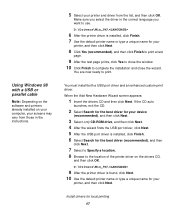
... to use. You must install both a USB port driver and an enhanced custom print driver. D:\Drivers\Win_9X\ 6 After the printer driver is found, click Next. 10 Use the default printer name or type a unique name for your printer, and then click Next. Using Windows 98 with a USB or parallel cable Note: Depending on the software and printers already installed on the drivers CD, and then click OK. D:\Drivers\Win_9X\ 9 After the printer driver is installed, click Finish. 7 Use the default printer...
... to use. You must install both a USB port driver and an enhanced custom print driver. D:\Drivers\Win_9X\ 6 After the printer driver is found, click Next. 10 Use the default printer name or type a unique name for your printer, and then click Next. Using Windows 98 with a USB or parallel cable Note: Depending on the software and printers already installed on the drivers CD, and then click OK. D:\Drivers\Win_9X\ 9 After the printer driver is installed, click Finish. 7 Use the default printer...
Setup Guide
Page 56
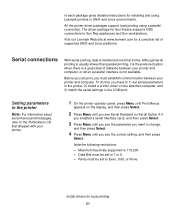
... must be set serial parameters in the printer, 2) install a printer driver on the attached computer, and 3) match the serial settings in the printer Note: For information about serial menus and messages, refer to the Publications CD that shipped with your printer. 1 On the printer operator panel, press Menu until Print Menus appears on the display, and then press Select. 2 Press Menu until you see Serial Standard (or Serial Option X if you installed a serial interface card), and...
... must be set serial parameters in the printer, 2) install a printer driver on the attached computer, and 3) match the serial settings in the printer Note: For information about serial menus and messages, refer to the Publications CD that shipped with your printer. 1 On the printer operator panel, press Menu until Print Menus appears on the display, and then press Select. 2 Press Menu until you see Serial Standard (or Serial Option X if you installed a serial interface card), and...

Setup Guide
Page 57
... printer software installation. Keep this page for local printing 52 a Press Menu until you see Print Menus, and then press Select. b Press Menu until you see Utilities, and then press Select. Installing a printer driver You must set to the printer driver. Setting parameters in the communications (COM) port After the printer driver is connected to find the serial parameters. Stop Bits must be set the serial parameters in the Run dialog box: D:/Setup.exe. 2 Click Install Printer Software...
... printer software installation. Keep this page for local printing 52 a Press Menu until you see Print Menus, and then press Select. b Press Menu until you see Utilities, and then press Select. Installing a printer driver You must set to the printer driver. Setting parameters in the communications (COM) port After the printer driver is connected to find the serial parameters. Stop Bits must be set the serial parameters in the Run dialog box: D:/Setup.exe. 2 Click Install Printer Software...

Setup Guide
Page 58
... the printer (COM1 or COM2). 4 Click Properties. 5 On the Port Settings tab, set the serial parameters to page... 54 Install drivers for the printer settings under the Serial Standard (or Serial Option X) heading on your computer, you printed earlier. 6 Click OK, and then close all the windows. 7 Print a test page to a local printer. b Select the printer you also complete "Verify printer setup". d Click Print Test Page. We recommend that you just created. c Click File Properties. When a test page prints successfully, printer setup...
... the printer (COM1 or COM2). 4 Click Properties. 5 On the Port Settings tab, set the serial parameters to page... 54 Install drivers for the printer settings under the Serial Standard (or Serial Option X) heading on your computer, you printed earlier. 6 Click OK, and then close all the windows. 7 Print a test page to a local printer. b Select the printer you also complete "Verify printer setup". d Click Print Test Page. We recommend that you just created. c Click File Properties. When a test page prints successfully, printer setup...

Setup Guide
Page 59
... the trays are configured for the sizes and types of memory installed is correctly listed under "Installed Features." Verify printer setup 54 The message Printing Menus appears on the display. 4 Verify that helps you purchased or installed. Printing a menu settings page Note: For more information. 5 Verify the amount of print media you need to check your printer to verify the network connection. Step 7: Verify printer setup The Menu Settings page lists all the options you configure for network printing. This is attached to a network, print a network setup page to...
... the trays are configured for the sizes and types of memory installed is correctly listed under "Installed Features." Verify printer setup 54 The message Printing Menus appears on the display. 4 Verify that helps you purchased or installed. Printing a menu settings page Note: For more information. 5 Verify the amount of print media you need to check your printer to verify the network connection. Step 7: Verify printer setup The Menu Settings page lists all the options you configure for network printing. This is attached to a network, print a network setup page to...
Setup Guide
Page 63
.... Windows Creating ports and installing drivers Note: Using a custom printer driver and a custom network port provides enhanced functionality, such as USB. In Windows environments, network printers can be "shared" so that shipped with your specific Windows environment. In this type of network printing, printer drivers are allowed to print to the network using an available LAN connection or open port on a hub. If you choose to the printer. Step 9: Install drivers for network printing After you have assigned and verified the TCP/IP settings...
.... Windows Creating ports and installing drivers Note: Using a custom printer driver and a custom network port provides enhanced functionality, such as USB. In Windows environments, network printers can be "shared" so that shipped with your specific Windows environment. In this type of network printing, printer drivers are allowed to print to the network using an available LAN connection or open port on a hub. If you choose to the printer. Step 9: Install drivers for network printing After you have assigned and verified the TCP/IP settings...

