Quick Reference
Page 3
...you see your user name, and then press Select. Follow the instructions. Note: If you send a large file to a shared network printer, it remains in the printer memory until you print it has started printing: 1 Press Menu until you see Job Menu, and then press Select. 2 Press Menu until you... is personal or confidential, and you do not want to the printer. To check the amount of 8 Printing confidential jobs If you arrive at the printer. This could prevent others from printer memory and the printer returns to see it, the printer can hold ." Note: This only works with the same user ...
...you see your user name, and then press Select. Follow the instructions. Note: If you send a large file to a shared network printer, it remains in the printer memory until you print it has started printing: 1 Press Menu until you see Job Menu, and then press Select. 2 Press Menu until you... is personal or confidential, and you do not want to the printer. To check the amount of 8 Printing confidential jobs If you arrive at the printer. This could prevent others from printer memory and the printer returns to see it, the printer can hold ." Note: This only works with the same user ...

Setup Guide
Page 3
... the 2000-sheet drawer paper size 10 Installing a 250-sheet or 500-sheet drawer 11 Installing a duplex unit 13 Setting up the printer 14 Installing an envelope feeder 17 Installing a finisher 19 Installing a high-capacity output stacker 22 Installing an output expander 24 Installing a ...5-bin mailbox 27 Attaching labels to print media handling options 29 Step 3: Install memory and option cards 30 Accessing the printer system board 30 Installing printer memory 32 Installing an optional flash memory or firmware card 33 Contents iii
... the 2000-sheet drawer paper size 10 Installing a 250-sheet or 500-sheet drawer 11 Installing a duplex unit 13 Setting up the printer 14 Installing an envelope feeder 17 Installing a finisher 19 Installing a high-capacity output stacker 22 Installing an output expander 24 Installing a ...5-bin mailbox 27 Attaching labels to print media handling options 29 Step 3: Install memory and option cards 30 Accessing the printer system board 30 Installing printer memory 32 Installing an optional flash memory or firmware card 33 Contents iii
Setup Guide
Page 6
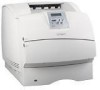
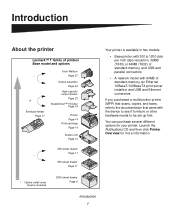
Introduction About the printer Lexmark™ T family of printers Base model and options * or Envelope feeder Page 17 5-bin Mailbox Page 27 Output expander Page 24 High-capacity output stacker Page 22 StapleSmart™ Finisher Page 19 Printer Page 14 Print cartridge Page 14 Duplex unit Page 13 250-sheet ...drawer Page 11 * 500-sheet drawer Page 11 Your printer is available in two models: • Base printer, with 300 to 1200 dots per inch (dpi) resolution, 32MB (T630) or 64MB (T632) of standard memory, and USB and parallel connectors • A network model with 64MB ...
Introduction About the printer Lexmark™ T family of printers Base model and options * or Envelope feeder Page 17 5-bin Mailbox Page 27 Output expander Page 24 High-capacity output stacker Page 22 StapleSmart™ Finisher Page 19 Printer Page 14 Print cartridge Page 14 Duplex unit Page 13 250-sheet ...drawer Page 11 * 500-sheet drawer Page 11 Your printer is available in two models: • Base printer, with 300 to 1200 dots per inch (dpi) resolution, 32MB (T630) or 64MB (T632) of standard memory, and USB and parallel connectors • A network model with 64MB ...
Setup Guide
Page 35
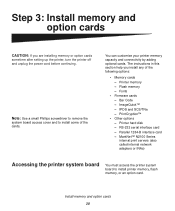
... to install some of the following options: • Memory cards - The instructions in this section help you are installing memory or option cards sometime after setting up the printer, turn the printer off and unplug the power cord before continuing. Printer hard disk - Install memory and option cards 30 Printer memory - Parallel 1284-B interface card - PrintCryption™ •...
... to install some of the following options: • Memory cards - The instructions in this section help you are installing memory or option cards sometime after setting up the printer, turn the printer off and unplug the power cord before continuing. Printer hard disk - Install memory and option cards 30 Printer memory - Parallel 1284-B interface card - PrintCryption™ •...

Setup Guide
Page 36
Screws 3 Loosen, but do not remove, the six screws on the side door latches and open the upper and lower front doors. 2 Press down on the shield. Use a small Phillips screwdriver to open the side door. Screws Install memory and option cards 31 1 Press the release latches to loosen these screws.
Screws 3 Loosen, but do not remove, the six screws on the side door latches and open the upper and lower front doors. 2 Press down on the shield. Use a small Phillips screwdriver to open the side door. Screws Install memory and option cards 31 1 Press the release latches to loosen these screws.

Setup Guide
Page 37
... the connection points along its edge. Install memory and option cards 32 Touch something metal on the connector completely. Keyhole 4 Use the tabs to install printer memory. 1 Unpack the optional printer memory card. Save the packaging materials. 2 Open both latches on the printer before you touch the memory option. Tabs Installing printer memory Warning: Electronic components can be damaged...
... the connection points along its edge. Install memory and option cards 32 Touch something metal on the connector completely. Keyhole 4 Use the tabs to install printer memory. 1 Unpack the optional printer memory card. Save the packaging materials. 2 Open both latches on the printer before you touch the memory option. Tabs Installing printer memory Warning: Electronic components can be damaged...
Setup Guide
Page 38
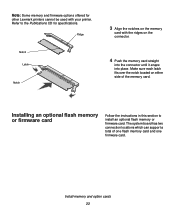
...Follow the instructions in this section to the Publications CD for other Lexmark printers cannot be used with the ridges on the connector. 4 Push the memory card straight into the connector until it snaps into place. Install memory and option cards 33 Ridge Notch Latch Notch 3 Align the notches... on either side of one flash memory card and one firmware card. The system board has two connection locations which can support a total of the memory card. Make sure each latch fits over the notch located on the memory card with your printer. Refer to install an optional flash...
...Follow the instructions in this section to the Publications CD for other Lexmark printers cannot be used with the ridges on the connector. 4 Push the memory card straight into the connector until it snaps into place. Install memory and option cards 33 Ridge Notch Latch Notch 3 Align the notches... on either side of one flash memory card and one firmware card. The system board has two connection locations which can support a total of the memory card. Make sure each latch fits over the notch located on the memory card with your printer. Refer to install an optional flash...

Setup Guide
Page 39
Installing an option card Your printer has either one . 3 Push in until the flash memory or firmware card is firmly in place. Touch something metal on the bottom of metal pins on the firmware card must be fully inserted along ... holes on the system board. Metal pins Plastic pins 1 Unpack the flash memory or firmware card. If you touch a card. Avoid touching the metal pins on the printer before you are easily damaged by its entire length. 2 Holding the flash memory or firmware card by static electricity. Cards Note: The row of the...
Installing an option card Your printer has either one . 3 Push in until the flash memory or firmware card is firmly in place. Touch something metal on the bottom of metal pins on the firmware card must be fully inserted along ... holes on the system board. Metal pins Plastic pins 1 Unpack the flash memory or firmware card. If you touch a card. Avoid touching the metal pins on the printer before you are easily damaged by its entire length. 2 Holding the flash memory or firmware card by static electricity. Cards Note: The row of the...

Setup Guide
Page 40
Touch something metal on the printer before you are installing two short cards on the system board. If you touch the card. Install memory and option cards 35 If you are installing a tall card, remove and save them. Connector 1 Connector 2 • Parallel 1284-B Interface Card • Coax/Twinax Adapter ...
Touch something metal on the printer before you are installing two short cards on the system board. If you touch the card. Install memory and option cards 35 If you are installing a tall card, remove and save them. Connector 1 Connector 2 • Parallel 1284-B Interface Card • Coax/Twinax Adapter ...

Setup Guide
Page 41
... the screws to reattach the shield and close the doors. 1 Grasp the shield by the tabs, Install memory and option cards 36 Replacing the shield After you have installed option cards on the printer system board, follow these steps to secure the card. 4 Align the connection points on the card with the...
... the screws to reattach the shield and close the doors. 1 Grasp the shield by the tabs, Install memory and option cards 36 Replacing the shield After you have installed option cards on the printer system board, follow these steps to secure the card. 4 Align the connection points on the card with the...

Setup Guide
Page 42
Install memory and option cards 37 slide it down onto the screws. Tighten all six screws. 2 Close the side door. 3 Close the upper and lower front doors.
Install memory and option cards 37 slide it down onto the screws. Tighten all six screws. 2 Close the side door. 3 Close the upper and lower front doors.

Setup Guide
Page 59
... configure for network printing. Print a menu settings page to review the default printer settings and to verify that is on page 30 for the sizes and types of memory installed is not listed, turn the printer off, unplug the power cord, and reinstall the option. The Network Setup ...page provides information that printer options are installed correctly. 1 Make sure the printer is needed if you are attaching your installation....
... configure for network printing. Print a menu settings page to review the default printer settings and to verify that is on page 30 for the sizes and types of memory installed is not listed, turn the printer off, unplug the power cord, and reinstall the option. The Network Setup ...page provides information that printer options are installed correctly. 1 Make sure the printer is needed if you are attaching your installation....

User's Reference
Page 6
... ...188 Reserve Print ...189 Verify Print ...189 Confidential jobs ...189 Removing optional cards 190 Removing optional printer memory and other option cards 191 Removing an optional flash memory card or optional firmware card 194 Removing an option card 195 Reattaching the shield and closing the doors ...197 Removing options ...199 Removing the envelope feeder 199 Removing an optional output bin 201 Removing the printer from the duplex unit, ...
... ...188 Reserve Print ...189 Verify Print ...189 Confidential jobs ...189 Removing optional cards 190 Removing optional printer memory and other option cards 191 Removing an optional flash memory card or optional firmware card 194 Removing an option card 195 Reattaching the shield and closing the doors ...197 Removing options ...199 Removing the envelope feeder 199 Removing an optional output bin 201 Removing the printer from the duplex unit, ...

User's Reference
Page 25
... Press and release Menu until you see Utilities Menu, and then press Select. 3 Press and release Menu until you see Understanding the printer messages for more information. Printing the menu settings page Printing the menu settings page The menu settings page shows current settings (user default settings... The message Printing Menu Settings appears while the page prints. Printing a font sample list To print samples of installed options, and available printer memory. If any other message appears when you print this page to identify the display and operator panel buttons if you need help. 1 ...
... Press and release Menu until you see Utilities Menu, and then press Select. 3 Press and release Menu until you see Understanding the printer messages for more information. Printing the menu settings page Printing the menu settings page The menu settings page shows current settings (user default settings... The message Printing Menu Settings appears while the page prints. Printing a font sample list To print samples of installed options, and available printer memory. If any other message appears when you print this page to identify the display and operator panel buttons if you need help. 1 ...
User's Reference
Page 26
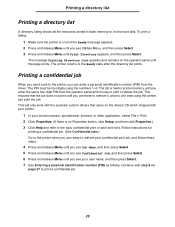
... See Entering a personal identification number (PIN) as follows. Printing a directory list Printing a directory list A directory listing shows all the resources stored in printer memory until you see your confidential print job, and follow these steps: 4 Press and release Menu until you see Job Menu, and then press Select. ... driver. This ensures that came on the drivers CD which shipped with the Lexmark custom drivers that the job does not print until the page prints. To print a listing: 1 Make sure the printer is on page 27 to retrieve it, and no Properties button, click Setup...
... See Entering a personal identification number (PIN) as follows. Printing a directory list Printing a directory list A directory listing shows all the resources stored in printer memory until you see your confidential print job, and follow these steps: 4 Press and release Menu until you see Job Menu, and then press Select. ... driver. This ensures that came on the drivers CD which shipped with the Lexmark custom drivers that the job does not print until the page prints. To print a listing: 1 Make sure the printer is on page 27 to retrieve it, and no Properties button, click Setup...
User's Reference
Page 27
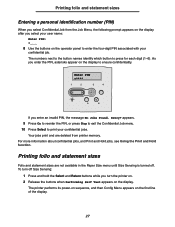
...Go to reenter the PIN, or press Stop to exit the Confidential Job menu. 10 Press Select to ensure confidentiality. To turn the printer on. 2 Release the buttons when Performing Self Test appears on the display to print your confidential job. Your jobs print and are ... and statement sizes Entering a personal identification number (PIN) When you select Confidential Job from printer memory. Enter PIN =**** 1 2 3 4 5 6 If you enter an invalid PIN, the message No Jobs Found. The printer performs its power-on sequence, and then Config Menu appears on the operator panel to press...
...Go to reenter the PIN, or press Stop to exit the Confidential Job menu. 10 Press Select to ensure confidentiality. To turn the printer on. 2 Release the buttons when Performing Self Test appears on the display to print your confidential job. Your jobs print and are ... and statement sizes Entering a personal identification number (PIN) When you select Confidential Job from printer memory. Enter PIN =**** 1 2 3 4 5 6 If you enter an invalid PIN, the message No Jobs Found. The printer performs its power-on sequence, and then Config Menu appears on the operator panel to press...

User's Reference
Page 112
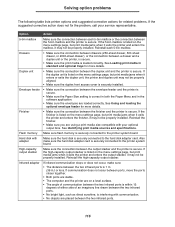
...bin. • Turn the print media stack over in the tray or multipurpose feeder. • Make sure you have enough printer memory installed. 112 See Identifying print media sources and specifications. Printer does not duplex pages. • Make sure Duplex is selected in both the Finishing Menu and in the... printer driver. Solving printing problems Problem Action Job prints from the wrong Check the Paper Type setting in the Paper Menu from the printer source or on the wrong print operator panel and in the...
...bin. • Turn the print media stack over in the tray or multipurpose feeder. • Make sure you have enough printer memory installed. 112 See Identifying print media sources and specifications. Printer does not duplex pages. • Make sure Duplex is selected in both the Finishing Menu and in the... printer driver. Solving printing problems Problem Action Job prints from the wrong Check the Paper Type setting in the Paper Menu from the printer source or on the wrong print operator panel and in the...
User's Reference
Page 116
...; Make sure the connection between the two infrared ports. 116 Flash memory Make sure flash memory is interfering with communication. • No objects are on the menu settings page, but print media jams when it exits the printer and enters the output stacker, it may not be properly installed.... your optional output bins. If the finisher is secure. Also make sure: • The distance between the output stacker and the printer is securely connected to the hard disk adapter card. High-capacity output stacker Make sure the connection between the two infrared ports is correct...
...; Make sure the connection between the two infrared ports. 116 Flash memory Make sure flash memory is interfering with communication. • No objects are on the menu settings page, but print media jams when it exits the printer and enters the output stacker, it may not be properly installed.... your optional output bins. If the finisher is secure. Also make sure: • The distance between the output stacker and the printer is securely connected to the hard disk adapter card. High-capacity output stacker Make sure the connection between the two infrared ports is correct...

User's Reference
Page 117
... it is correctly set up. If the output expander is securely connected to the printer system board. Reinstall each output expander or the connection between the output expander and the printer is secure. Output expander Make sure the connection between each output expander. Printer memory Check to the drivers CD that shipped with your...
... it is correctly set up. If the output expander is securely connected to the printer system board. Reinstall each output expander or the connection between the output expander and the printer is secure. Output expander Make sure the connection between each output expander. Printer memory Check to the drivers CD that shipped with your...

User's Reference
Page 175
... The distinct design is a set of characters and symbols created with a distinct design. These settings are returned to change printer settings. If you need more information about changing menu settings or selecting new user default settings, see Factory Defaults, and then... are available on the operator panel while Restoring Factory Defaults appears. • All downloaded resources (fonts, macros, and symbol sets) in printer memory (RAM) are restored. Well-chosen typefaces make a document easier to a value in PCL 6 and PostScript 3 emulations. Understanding fonts Typefaces...
... The distinct design is a set of characters and symbols created with a distinct design. These settings are returned to change printer settings. If you need more information about changing menu settings or selecting new user default settings, see Factory Defaults, and then... are available on the operator panel while Restoring Factory Defaults appears. • All downloaded resources (fonts, macros, and symbol sets) in printer memory (RAM) are restored. Well-chosen typefaces make a document easier to a value in PCL 6 and PostScript 3 emulations. Understanding fonts Typefaces...


