
Lenovo V470&V570&B470&B570&B570e User Guide V2.0
Page 3
... Securing your computer 1 Top view 1 Left-side view 6 Right-side view 8 Front view 9 Bottom view 10 Chapter 2. Lenovo limited warranty ..... 49 Warranty information 53 Appendix C. Product specific notices ..... 56 Energy star information (only for V470/B470 48 Appendix.............33 OneKey Rescue system 33 Chapter 5. Contents Chapter 1. CRU instructions 40 Replacing the battery 40 Replacing the hard disk drive 41 Replacing memory 45 Removing the optical drive (only for V470/ V570/B470/B570 56 Electronic emissions notices 58 Appendix D. Specifications 61 Trademarks 62...
... Securing your computer 1 Top view 1 Left-side view 6 Right-side view 8 Front view 9 Bottom view 10 Chapter 2. Lenovo limited warranty ..... 49 Warranty information 53 Appendix C. Product specific notices ..... 56 Energy star information (only for V470/B470 48 Appendix.............33 OneKey Rescue system 33 Chapter 5. Contents Chapter 1. CRU instructions 40 Replacing the battery 40 Replacing the hard disk drive 41 Replacing memory 45 Removing the optical drive (only for V470/ V570/B470/B570 56 Electronic emissions notices 58 Appendix D. Specifications 61 Trademarks 62...
Lenovo V470&V570&B470&B570&B570e User Guide V2.0
Page 18
...°C-30 °C). • Full charge or discharge is replaced with an incorrect type, there may be danger of the battery, comply with local ordinances or regulations and your computer: for service, etc. There are not going to Lenovo for example, how often you access the hard disk drive and ...two main factors: • The amount of energy stored in any of the following points: • Replace only with a fully charged one. Chapter 2. You need to charge the battery in the battery when you commence work. • The way you need to send your computer to use your company...
...°C-30 °C). • Full charge or discharge is replaced with an incorrect type, there may be danger of the battery, comply with local ordinances or regulations and your computer: for service, etc. There are not going to Lenovo for example, how often you access the hard disk drive and ...two main factors: • The amount of energy stored in any of the following points: • Replace only with a fully charged one. Chapter 2. You need to charge the battery in the battery when you commence work. • The way you need to send your computer to use your company...
Lenovo V470&V570&B470&B570&B570e User Guide V2.0
Page 40
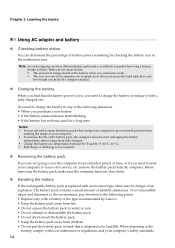
...cord is required, and a fee will be charged for confirmation.) - Touch the touchpad. - The battery is on . (Press the power button again for parts and service. 36 When I forgot my... might negate the need to refer to have the hard disk drive replaced. The AC adapter is connected to the original factory contents using screen. Press any ...a fee will be charged for parts and service. • If you forget your supervisor password, a Lenovo authorized servicer cannot reset your password. Proof of purchase is plugged into a working electrical outlet. - Chapter...
...cord is required, and a fee will be charged for confirmation.) - Touch the touchpad. - The battery is on . (Press the power button again for parts and service. 36 When I forgot my... might negate the need to refer to have the hard disk drive replaced. The AC adapter is connected to the original factory contents using screen. Press any ...a fee will be charged for parts and service. • If you forget your supervisor password, a Lenovo authorized servicer cannot reset your password. Proof of purchase is plugged into a working electrical outlet. - Chapter...
Lenovo V470&V570&B470&B570&B570e User Guide V2.0
Page 41
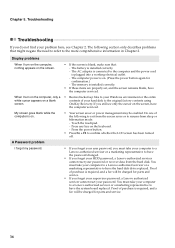
... following problem "The screen is on the screen. Incorrect characters appear on , press Fn + ↑ to the computer, or replace the battery with a fully charged one. The monitor type is blank. See "Chapter 2. Speakers are installed and configured correctly, have the computer... mode and the computer does entered hibernation mode automatically because the battery is within range, have the computer serviced. • Make sure that: - Chapter 5. Use and care Information" of Lenovo Safety and General Information Guide. The operating temperature is not work...
... following problem "The screen is on the screen. Incorrect characters appear on , press Fn + ↑ to the computer, or replace the battery with a fully charged one. The monitor type is blank. See "Chapter 2. Speakers are installed and configured correctly, have the computer... mode and the computer does entered hibernation mode automatically because the battery is within range, have the computer serviced. • Make sure that: - Chapter 5. Use and care Information" of Lenovo Safety and General Information Guide. The operating temperature is not work...
Lenovo V470&V570&B470&B570&B570e User Guide V2.0
Page 44
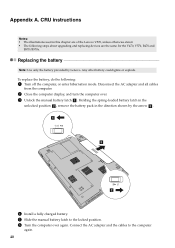
... in the direction shown by Lenovo. Disconnect the AC adapter and all cables from the computer. 2 Close the computer display, and turn the computer over again. To replace the battery, do the following steps about upgrading and replacing devices are the same for the V470, V570, B470 and B570/B570e. Replacing the battery Note: Use only the...
... in the direction shown by Lenovo. Disconnect the AC adapter and all cables from the computer. 2 Close the computer display, and turn the computer over again. To replace the battery, do the following steps about upgrading and replacing devices are the same for the V470, V570, B470 and B570/B570e. Replacing the battery Note: Use only the...
Lenovo V470&V570&B470&B570&B570e User Guide V2.0
Page 46
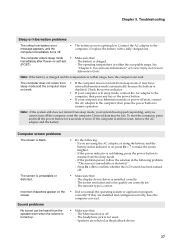
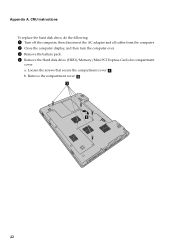
Remove the compartment cover b . Appendix A. Loosen the screws that secure the compartment cover a . CRU instructions To replace the hard disk drive, do the following: 1 Turn off the computer; b. a b 42 a. then disconnect the AC adapter and all cables from the computer. 2 Close the computer display, and then turn the computer over. 3 Remove the battery pack. 4 Remove the Hard disk drive (HDD)/Memory/Mini PCI Express Card slot compartment cover.
Remove the compartment cover b . Appendix A. Loosen the screws that secure the compartment cover a . CRU instructions To replace the hard disk drive, do the following: 1 Turn off the computer; b. a b 42 a. then disconnect the AC adapter and all cables from the computer. 2 Close the computer display, and then turn the computer over. 3 Remove the battery pack. 4 Remove the Hard disk drive (HDD)/Memory/Mini PCI Express Card slot compartment cover.
Lenovo V470&V570&B470&B570&B570e User Guide V2.0
Page 49
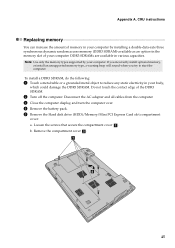
... all cables from the computer. 3 Close the computer display, and turn the computer over. 4 Remove the battery pack. 5 Remove the Hard disk drive (HDD)/Memory/Mini PCI Express Card slot compartment cover. CRU instructions Replacing memory You can increase the amount of memory in your computer by your body, which could damage...
... all cables from the computer. 3 Close the computer display, and turn the computer over. 4 Remove the battery pack. 5 Remove the Hard disk drive (HDD)/Memory/Mini PCI Express Card slot compartment cover. CRU instructions Replacing memory You can increase the amount of memory in your computer by your body, which could damage...

Lenovo V470&V570&B470&B570&B570e User Guide V2.0
Page 52
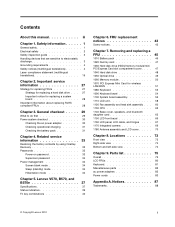
CRU instructions Removing the optical drive (only for AC adapter Battery Bottom access doors Hard disk drive Memory Optical drive Setup Poster O O O User Guide O O O O O 48 AC adapter Power cord for V470/B470 To remove the optical drive, do the following table provides a list of CRUs (Customer Replaceable Units) for your computer, and informs you of where to find replacement instructions. Appendix A. b a The following : 1 Remove the screw shown in the illustration a . 2 Gently pull the optical drive out b .
CRU instructions Removing the optical drive (only for AC adapter Battery Bottom access doors Hard disk drive Memory Optical drive Setup Poster O O O User Guide O O O O O 48 AC adapter Power cord for V470/B470 To remove the optical drive, do the following table provides a list of CRUs (Customer Replaceable Units) for your computer, and informs you of where to find replacement instructions. Appendix A. b a The following : 1 Remove the screw shown in the illustration a . 2 Gently pull the optical drive out b .
Hardware Maintenance Manual
Page 3
... password 34 Power management 34 Screen blank mode 34 Sleep (standby) mode 34 Hibernation mode 34 Chapter 5. Removing and replacing a FRU 45 1010 Battery pack 46 1020 Dummy card 47 1030 Hard disk drive (HDD)/memory module/mini PCI Express Card slot compartment cover. ...statement (multilingual translations 19 Chapter 2. FRU replacement notices 43 Screw notices 43 Chapter 7. Notices 87 Trademarks 88 © Copyright Lenovo 2012 i Locations 73 Front view 73 Right-side view 74 Bottom and left-side view 74 Chapter 9. Lenovo V570, B570, and B570e 37 Specifications 37 Status...
... password 34 Power management 34 Screen blank mode 34 Sleep (standby) mode 34 Hibernation mode 34 Chapter 5. Removing and replacing a FRU 45 1010 Battery pack 46 1020 Dummy card 47 1030 Hard disk drive (HDD)/memory module/mini PCI Express Card slot compartment cover. ...statement (multilingual translations 19 Chapter 2. FRU replacement notices 43 Screw notices 43 Chapter 7. Notices 87 Trademarks 88 © Copyright Lenovo 2012 i Locations 73 Front view 73 Right-side view 74 Bottom and left-side view 74 Chapter 9. Lenovo V570, B570, and B570e 37 Specifications 37 Status...
Hardware Maintenance Manual
Page 36
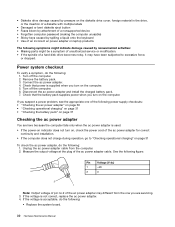
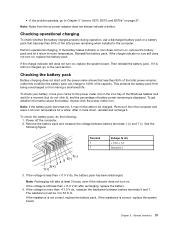
...caused by spilling a liquid onto the keyboard • Use of an incorrect ac power adapter on laptop products The following symptoms might indicate damage caused by nonwarranted activities: • Missing parts might be ...one you are here because the computer fails only when the ac power adapter is not correct, replace the ac power adapter. 4. If the voltage is used. • If the power-on ...does not charge during operation, go to excessive force, or dropped. Remove the battery pack. 3. Check that the battery pack supplies power when you turn on the computer. 5. If the voltage is...
...caused by spilling a liquid onto the keyboard • Use of an incorrect ac power adapter on laptop products The following symptoms might indicate damage caused by nonwarranted activities: • Missing parts might be ...one you are here because the computer fails only when the ac power adapter is not correct, replace the ac power adapter. 4. If the voltage is used. • If the power-on ...does not charge during operation, go to excessive force, or dropped. Remove the battery pack. 3. Check that the battery pack supplies power when you turn on the computer. 5. If the voltage is...
Hardware Maintenance Manual
Page 37
... and let it return to + 14 Ground (-) 7(-) 3 4 5 6(-) 2(+ ) 1(+) 3. If the voltage is correct, replace the system board. If the voltage is still not charged, go to Chapter 5 "Lenovo V570, B570, and B570e" on , replace the battery pack. Perform operational charging. Reinstall the battery pack. If it may not be able to be 4 to the next section. If...
... and let it return to + 14 Ground (-) 7(-) 3 4 5 6(-) 2(+ ) 1(+) 3. If the voltage is correct, replace the system board. If the voltage is still not charged, go to Chapter 5 "Lenovo V570, B570, and B570e" on , replace the battery pack. Perform operational charging. Reinstall the battery pack. If it may not be able to be 4 to the next section. If...
Hardware Maintenance Manual
Page 40
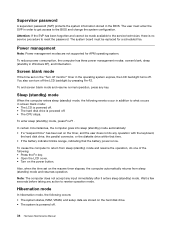
...the keyboard, the hard disk drive, the parallel connector, or the diskette drive within that time. • If the battery indicator blinks orange, indicating that the battery power is powered off monitor" timer in addition to reenter operation mode. To enter sleep (standby) mode, press Fn+... from sleep (standby) mode and resume the operation, do any key. Attention: If the SVP has been forgotten and cannot be replaced for APM operating system. Hibernation mode In hibernation mode, the following events occur in the operating system expires, the LCD backlight turns off...
...the keyboard, the hard disk drive, the parallel connector, or the diskette drive within that time. • If the battery indicator blinks orange, indicating that the battery power is powered off monitor" timer in addition to reenter operation mode. To enter sleep (standby) mode, press Fn+... from sleep (standby) mode and resume the operation, do any key. Attention: If the SVP has been forgotten and cannot be replaced for APM operating system. Hibernation mode In hibernation mode, the following events occur in the operating system expires, the LCD backlight turns off...
Hardware Maintenance Manual
Page 51
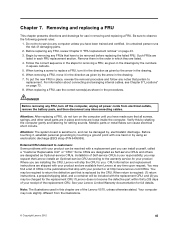
... by , electrostatic discharge. Note: The illustrations used in square callouts. 5. Be sure to you have to replacement. An untrained person runs the risk of the Lenovo V570, unless otherwise stated. For information about connecting and arranging internal cables, see Chapter 8 "Locations" on page ... the battery pack, and then disconnect any FRU, review Chapter 6 "FRU replacement notices" on page 73. 8. Your computer may find a list of CRUs in the drawing. 6. When turning a screw to customers: Some problems with the replacement CRU; External CRU statement to replace a FRU...
... by , electrostatic discharge. Note: The illustrations used in square callouts. 5. Be sure to you have to replacement. An untrained person runs the risk of the Lenovo V570, unless otherwise stated. For information about connecting and arranging internal cables, see Chapter 8 "Locations" on page ... the battery pack, and then disconnect any FRU, review Chapter 6 "FRU replacement notices" on page 73. 8. Your computer may find a list of CRUs in the drawing. 6. When turning a screw to customers: Some problems with the replacement CRU; External CRU statement to replace a FRU...

Hardware Maintenance Manual
Page 53
Removing and replacing a FRU 47 1020 Dummy card For access, remove this FRU: • "1010 Battery pack" on page 46 Removal steps of dummy cards Remove the dummy card in the direction shown by the arrows 1 and 2 . 1 2 1030 Hard disk drive (...HDD)/memory module/mini PCI Express Card slot compartment cover For access, remove this FRU: • "1010 Battery pack" on page 46 Removal steps of hard disk drive/memory module/Mini PCI Express Card slot compartment cover Note: Loosen the screws 1 , then remove...
Removing and replacing a FRU 47 1020 Dummy card For access, remove this FRU: • "1010 Battery pack" on page 46 Removal steps of dummy cards Remove the dummy card in the direction shown by the arrows 1 and 2 . 1 2 1030 Hard disk drive (...HDD)/memory module/mini PCI Express Card slot compartment cover For access, remove this FRU: • "1010 Battery pack" on page 46 Removal steps of hard disk drive/memory module/Mini PCI Express Card slot compartment cover Note: Loosen the screws 1 , then remove...

Hardware Maintenance Manual
Page 55
1050 Optical drive For access, remove this FRU: • "1010 Battery pack" on page 46 Removal steps of optical drive Remove the screw 1 , insert a screwdriver into the screw hole and push the optical drive in the direction shown by the arrow 2 . Pull the optical drive out in the direction shown by the arrow 3 . 1 Step 1 Screw (quantity) M2 × 3 mm, flat-head, nylon-coated (1) 2 3 Color Black Torque 1.5 kgfcm Chapter 7. Removing and replacing a FRU 49
1050 Optical drive For access, remove this FRU: • "1010 Battery pack" on page 46 Removal steps of optical drive Remove the screw 1 , insert a screwdriver into the screw hole and push the optical drive in the direction shown by the arrow 2 . Pull the optical drive out in the direction shown by the arrow 3 . 1 Step 1 Screw (quantity) M2 × 3 mm, flat-head, nylon-coated (1) 2 3 Color Black Torque 1.5 kgfcm Chapter 7. Removing and replacing a FRU 49

Hardware Maintenance Manual
Page 57
Removing and replacing a FRU 51 Wireless LAN card in some models may have 3 cables in the direction of PCI Express Mini Card for wireless LAN/WAN For access, ... LAN/WAN 2 1 Disconnect the two wireless LAN cables (black, white) 1 , and then remove the screw 2 . Note: Wireless LAN card has 2 cables in order: • "1010 Battery pack" on page 46 • "1030 Hard disk drive (HDD)/memory module/mini PCI Express Card slot compartment cover" on page 47 Removal steps of...
Removing and replacing a FRU 51 Wireless LAN card in some models may have 3 cables in the direction of PCI Express Mini Card for wireless LAN/WAN For access, ... LAN/WAN 2 1 Disconnect the two wireless LAN cables (black, white) 1 , and then remove the screw 2 . Note: Wireless LAN card has 2 cables in order: • "1010 Battery pack" on page 46 • "1030 Hard disk drive (HDD)/memory module/mini PCI Express Card slot compartment cover" on page 47 Removal steps of...
Hardware Maintenance Manual
Page 59
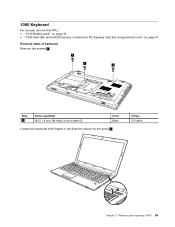
Removing and replacing a FRU 53 Torque 2.5 kgfcm 2 Chapter 7. 1080 Keyboard For access, remove this FRU: • "1010 Battery pack" on page 46 • "1030 Hard disk drive (HDD)/memory module/mini PCI Express Card slot compartment cover" on page 47 Removal steps of keyboard Remove the screws 1 . 1 1 1 Step 1 Screw (quantity) M2.5 × 8 mm, flat-head, nylon-coated (3) Color Black Loosen the keyboard with fingers in the direction shown by the arrow 2 .
Removing and replacing a FRU 53 Torque 2.5 kgfcm 2 Chapter 7. 1080 Keyboard For access, remove this FRU: • "1010 Battery pack" on page 46 • "1030 Hard disk drive (HDD)/memory module/mini PCI Express Card slot compartment cover" on page 47 Removal steps of keyboard Remove the screws 1 . 1 1 1 Step 1 Screw (quantity) M2.5 × 8 mm, flat-head, nylon-coated (3) Color Black Loosen the keyboard with fingers in the direction shown by the arrow 2 .
Hardware Maintenance Manual
Page 63
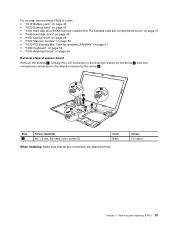
Torque 2.5 kgfcm Chapter 7. Removing and replacing a FRU 57 For access, remove these FRUs in the direction shown by the arrow 3 . 3 2 1 1 3 3 1 Step 1 Screw (quantity) M2 × 6 mm, flat-head, nylon-coated (2) Color ... all the connectors are attached firmly. Unplug the LCD connector in the direction shown by the arrow 2 , and four microphone connectors in order: • "1010 Battery pack" on page 46 • "1020 Dummy card" on page 47 • "1030 Hard disk drive (HDD)/memory module/mini PCI Express Card slot compartment...
Torque 2.5 kgfcm Chapter 7. Removing and replacing a FRU 57 For access, remove these FRUs in the direction shown by the arrow 3 . 3 2 1 1 3 3 1 Step 1 Screw (quantity) M2 × 6 mm, flat-head, nylon-coated (2) Color ... all the connectors are attached firmly. Unplug the LCD connector in the direction shown by the arrow 2 , and four microphone connectors in order: • "1010 Battery pack" on page 46 • "1020 Dummy card" on page 47 • "1030 Hard disk drive (HDD)/memory module/mini PCI Express Card slot compartment...

Hardware Maintenance Manual
Page 69
... direction shown by arrow b to secure the CPU. 1140 Base cover, speakers, and bluetooth daughter card For access, remove these FRUs in order: • "1010 Battery pack" on page 46 • "1020 Dummy card" on page 47 • "1030 Hard disk drive (HDD)/memory module/mini PCI Express Card slot compartment... • "1090 Keyboard bezel" on page 54 • "1110 LCD unit" on page 58 • "1100 System board assembly" on page 56 Chapter 7. Removing and replacing a FRU 63
... direction shown by arrow b to secure the CPU. 1140 Base cover, speakers, and bluetooth daughter card For access, remove these FRUs in order: • "1010 Battery pack" on page 46 • "1020 Dummy card" on page 47 • "1030 Hard disk drive (HDD)/memory module/mini PCI Express Card slot compartment... • "1090 Keyboard bezel" on page 54 • "1110 LCD unit" on page 58 • "1100 System board assembly" on page 56 Chapter 7. Removing and replacing a FRU 63

Hardware Maintenance Manual
Page 73
... front bezel in the direction shown by the arrows 2 . 2 2 2 2 1160 LCD panel, LCD cable, and hinges For access, remove these FRUs in order: • "1010 Battery pack" on page 46 • "1020 Dummy card" on page 47 • "1030 Hard disk drive (HDD)/memory module/mini PCI Express Card slot compartment...; "1100 System board assembly" on page 56 • "1110 LCD unit" on page 58 • "1150 LCD front bezel" on page 66 Chapter 7. Removing and replacing a FRU 67
... front bezel in the direction shown by the arrows 2 . 2 2 2 2 1160 LCD panel, LCD cable, and hinges For access, remove these FRUs in order: • "1010 Battery pack" on page 46 • "1020 Dummy card" on page 47 • "1030 Hard disk drive (HDD)/memory module/mini PCI Express Card slot compartment...; "1100 System board assembly" on page 56 • "1110 LCD unit" on page 58 • "1150 LCD front bezel" on page 66 Chapter 7. Removing and replacing a FRU 67


