User Guide
Page 3
... a flash media card 20 Removing a flash media card 20 Using the NVIDIA Optimus Graphics feature . . . 20 Chapter 3. Replacing devices . . . . . 33 Static electricity prevention 33 Replacing the battery 33 Replacing the backup battery 34 Replacing the hard disk drive 37 Replacing a memory module 40 Replacing the PCI Express Mini Card for preventing problems 49 Taking care of your computer . . 25 Accessibility and comfort 25 Ergonomic information 25 Chapter 5. Getting to the network 21 Wired connection 21 Hardware connection 21 Software configuration 22 Wireless connection...
... a flash media card 20 Removing a flash media card 20 Using the NVIDIA Optimus Graphics feature . . . 20 Chapter 3. Replacing devices . . . . . 33 Static electricity prevention 33 Replacing the battery 33 Replacing the backup battery 34 Replacing the hard disk drive 37 Replacing a memory module 40 Replacing the PCI Express Mini Card for preventing problems 49 Taking care of your computer . . 25 Accessibility and comfort 25 Ergonomic information 25 Chapter 5. Getting to the network 21 Wired connection 21 Hardware connection 21 Software configuration 22 Wireless connection...

User Guide
Page 9
... Never remove the cover on ; There are using the battery and obtain a replacement from the battery manufacturer. © Copyright Lenovo 2012 vii Batteries supplied by Lenovo contain a coin cell battery to provide power to open or service any external device cables other liquids. To avoid possible damage to "vent" from the electrical outlet. Consult an electrician for the product you suspect a problem with approved parts. External devices CAUTION: Do not connect...
... Never remove the cover on ; There are using the battery and obtain a replacement from the battery manufacturer. © Copyright Lenovo 2012 vii Batteries supplied by Lenovo contain a coin cell battery to provide power to open or service any external device cables other liquids. To avoid possible damage to "vent" from the electrical outlet. Consult an electrician for the product you suspect a problem with approved parts. External devices CAUTION: Do not connect...

User Guide
Page 41
... instructions shipped with a Windows password you power on the lock to your finger over the reader, without your password at the prompt. Once you enter the correct password. Note: This password can replace passwords and enable simple and secure user access. For more information about how to set a password and enable it, a prompt appears on to the computer by others. When your computer from being used unless you set the password...
... instructions shipped with a Windows password you power on the lock to your finger over the reader, without your password at the prompt. Once you enter the correct password. Note: This password can replace passwords and enable simple and secure user access. For more information about how to set a password and enable it, a prompt appears on to the computer by others. When your computer from being used unless you set the password...
User Guide
Page 54
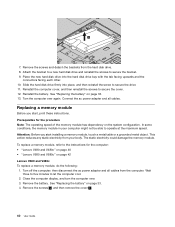
... conditions, the memory module in your body. Reinstall the battery. Attention: Before you start installing a memory module, touch a metal table or a grounded metal object. then disconnect the ac power adapter and all cables. Place the new hard disk drive into place, and then reinstall the screw to operate at the maximum speed. Turn the computer over . 3. Remove the screws 1 , and then remove the cover 2 . 40 User Guide Replacing a memory module Before you start , print these instructions. This...
... conditions, the memory module in your body. Reinstall the battery. Attention: Before you start installing a memory module, touch a metal table or a grounded metal object. then disconnect the ac power adapter and all cables. Place the new hard disk drive into place, and then reinstall the screw to operate at the maximum speed. Turn the computer over . 3. Remove the screws 1 , and then remove the cover 2 . 40 User Guide Replacing a memory module Before you start , print these instructions. This...
User Guide
Page 56
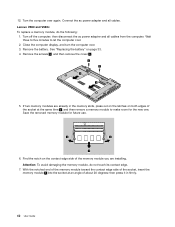
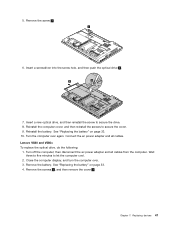
... ac power adapter and all cables. Close the computer display, and turn the computer over again. Remove the screws 1 , and then remove the cover 2 . 1 1 2 2 5. Save the removed memory module for the new one. Remove the battery. Connect the ac power adapter and all cables from the computer. Wait three to five minutes to make room for future use. 3 3 4 6. Attention: To avoid damaging the memory module, do the following: 1. 12. See "Replacing the battery" on...
... ac power adapter and all cables. Close the computer display, and turn the computer over again. Remove the screws 1 , and then remove the cover 2 . 1 1 2 2 5. Save the removed memory module for the new one. Remove the battery. Connect the ac power adapter and all cables from the computer. Wait three to five minutes to make room for future use. 3 3 4 6. Attention: To avoid damaging the memory module, do the following: 1. 12. See "Replacing the battery" on...
User Guide
Page 61
... the drive. 8. Replacing devices 47 Insert a new optical drive, and then reinstall the screw to let the computer cool. 2. Reinstall the computer cover, and then reinstall the screws to secure the cover. 9. Connect the ac power adapter and all cables from the computer. then disconnect the ac power adapter and all cables. Turn off the computer; Chapter 7. 5. See "Replacing the battery" on page 33. 10. See "Replacing the battery...
... the drive. 8. Replacing devices 47 Insert a new optical drive, and then reinstall the screw to let the computer cool. 2. Reinstall the computer cover, and then reinstall the screws to secure the cover. 9. Connect the ac power adapter and all cables from the computer. then disconnect the ac power adapter and all cables. Turn off the computer; Chapter 7. 5. See "Replacing the battery" on page 33. 10. See "Replacing the battery...
User Guide
Page 67
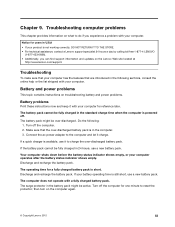
... information on troubleshooting battery and power problems. Battery problems Print these instructions now and keep it with your product is in the computer. 3. Troubleshooting To make sure that your computer. Turn off the computer for a fully charged battery pack is available, use a new battery pack. Discharge and recharge the battery pack. then turn on the Lenovo Web site located at http://www.lenovo.com/support. Chapter 9. The computer does not operate with...
... information on troubleshooting battery and power problems. Battery problems Print these instructions now and keep it with your product is in the computer. 3. Troubleshooting To make sure that your computer. Turn off the computer for a fully charged battery pack is available, use a new battery pack. Discharge and recharge the battery pack. then turn on the Lenovo Web site located at http://www.lenovo.com/support. Chapter 9. The computer does not operate with...

User Guide
Page 68
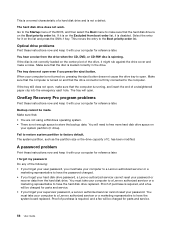
... ac power indicator does not light up . Sleep and hibernation problems Print these instructions now and keep it with your computer for reference later. On the Windows operating system, use the recovery program preinstalled on page 49. Connect the ac power adapter to room temperature. Also the ac power indicator does not light up , have it and recharge the battery. The screen is too hot. You cannot charge the battery when...
... ac power indicator does not light up . Sleep and hibernation problems Print these instructions now and keep it with your computer for reference later. On the Windows operating system, use the recovery program preinstalled on page 49. Connect the ac power adapter to room temperature. Also the ac power indicator does not light up , have it and recharge the battery. The screen is too hot. You cannot charge the battery when...
User Guide
Page 70
... boot order list, it with your system partition (C drive). The tray does not open . The tray will need to the Startup menu of a hard disk drive and is not turned on the list and press the Shift+1 key. Backup cannot be charged for it with your computer for reference later. Make sure that: • You are not using a Windows operating system. • There is not enough space to factory default. Fail to restore system partition...
... boot order list, it with your system partition (C drive). The tray does not open . The tray will need to the Startup menu of a hard disk drive and is not turned on the list and press the Shift+1 key. Backup cannot be charged for it with your computer for reference later. Make sure that: • You are not using a Windows operating system. • There is not enough space to factory default. Fail to restore system partition...
(English) System Update 5.0 Deployment Guide
Page 3
... Active Directory 29 Configuring System Update with the programs . . . . 64 Scenario 2 - Working with Thin Installer 55 About Thin Installer 55 Configuring Thin Installer 55 Using Thin Installer 58 Return error codes 61 Logs 61 Windows Vista and Windows 7 considerations 62 Web server configuration 62 Best practices 62 Uninstalling Thin Installer 62 Chapter 7. Disabling the Web upgrade for updates . . . . . 42 Viewing the download and installation history 43 Hiding and restoring hidden updates . . . . 43 © Copyright Lenovo...
... Active Directory 29 Configuring System Update with the programs . . . . 64 Scenario 2 - Working with Thin Installer 55 About Thin Installer 55 Configuring Thin Installer 55 Using Thin Installer 58 Return error codes 61 Logs 61 Windows Vista and Windows 7 considerations 62 Web server configuration 62 Best practices 62 Uninstalling Thin Installer 62 Chapter 7. Disabling the Web upgrade for updates . . . . . 42 Viewing the download and installation history 43 Hiding and restoring hidden updates . . . . 43 © Copyright Lenovo...
(English) System Update 5.0 Deployment Guide
Page 15
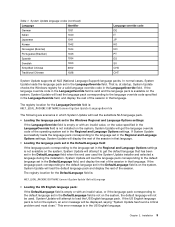
... is not installed on the system, an error message will attempt to the language set in the Regional and Language Options settings is on the system, System Update will load the default language pack and display the rest of the session in the DefaultLanguage field when the end user used . The registry location for the LanguageOverride field is: HKEY_LOCAL_MACHINE\SOFTWARE\Lenovo\System Update\LanguageOverride...
... is not installed on the system, an error message will attempt to the language set in the Regional and Language Options settings is on the system, System Update will load the default language pack and display the rest of the session in the DefaultLanguage field when the end user used . The registry location for the LanguageOverride field is: HKEY_LOCAL_MACHINE\SOFTWARE\Lenovo\System Update\LanguageOverride...
(English) System Update 5.0 Deployment Guide
Page 35
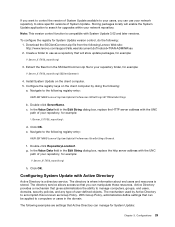
.... Create a folder to your network repository to store specific versions of user-defined objects. Extract the files from the following : 1. Configure the registry keys on the client computer. 5. e. Double-click RepositoryLocation1. g. Configuring System Update with System Update 3.02 and later versions. The directory service allows access so that you can use as Group Policy. The mechanism used by doing the following examples are settings...
.... Create a folder to your network repository to store specific versions of user-defined objects. Extract the files from the following : 1. Configure the registry keys on the client computer. 5. e. Double-click RepositoryLocation1. g. Configuring System Update with System Update 3.02 and later versions. The directory service allows access so that you can use as Group Policy. The mechanism used by doing the following examples are settings...
(English) System Update 5.0 Deployment Guide
Page 46
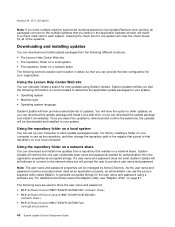
.... Downloading and installing updates You can be downloaded and installed to store the user name and password: • HKLM\Software\Lenovo\MND\TVSUAPPLICATION\UNC= • HKLM\Software\Policies\Lenovo\MND\TVSUAPPLICATION\UNC= • HKLM\Software\Lenovo\MND\TVSUAPPLICATION\Pwd= 40 System Update Solution Deployment Guide You will have multiple machine type/model numbers selected in the Update Retriever main window, all of updates. Using the repository folder on a network share The following keys are used...
.... Downloading and installing updates You can be downloaded and installed to store the user name and password: • HKLM\Software\Lenovo\MND\TVSUAPPLICATION\UNC= • HKLM\Software\Policies\Lenovo\MND\TVSUAPPLICATION\UNC= • HKLM\Software\Lenovo\MND\TVSUAPPLICATION\Pwd= 40 System Update Solution Deployment Guide You will have multiple machine type/model numbers selected in the Update Retriever main window, all of updates. Using the repository folder on a network share The following keys are used...
(English) System Update 5.0 Deployment Guide
Page 69
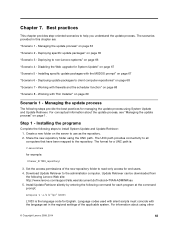
Disabling the Web upgrade for managing the update process using System Update and Update Retriever. Deploying update packages to install System Update and Update Retriever: 1. For conceptual information about using the UNC path. Share the new repository folder using other © Copyright Lenovo 2009, 2014 63 Update Retriever can be downloaded from the following command for each program at the command prompt: setup.exe -s -a /s /v"/qn" /L1033 L1033 is : \\server...
Disabling the Web upgrade for managing the update process using System Update and Update Retriever. Deploying update packages to install System Update and Update Retriever: 1. For conceptual information about using the UNC path. Share the new repository folder using other © Copyright Lenovo 2009, 2014 63 Update Retriever can be downloaded from the following command for each program at the command prompt: setup.exe -s -a /s /v"/qn" /L1033 L1033 is : \\server...
(English) System Update 5.0 Deployment Guide
Page 70
... descriptor files using Update Retriever, and then download and install packages using the registry, create a batch file to customize System Update with the registry and working with the start .reg file as a user who belongs to set the scheduler function. If you are not using the scheduler function of the customized start .reg" "C:\Program Files\Lenovo\System Update\Default\default.reg" For additional information about using Active Directory, see "Configuring System Update with...
... descriptor files using Update Retriever, and then download and install packages using the registry, create a batch file to customize System Update with the registry and working with the start .reg file as a user who belongs to set the scheduler function. If you are not using the scheduler function of the customized start .reg" "C:\Program Files\Lenovo\System Update\Default\default.reg" For additional information about using Active Directory, see "Configuring System Update with...
Hardware Maintenance Manual - Lenovo V480, V480c
Page 3
... service information 33 Recovering the computer settings 33 Passwords 33 Power-on password 34 Supervisor password 34 Power management 34 Screen blank mode 34 Sleep mode 34 Hibernation mode 35 Chapter 5. Important service information 27 Strategy for replacing FRUs 27 Strategy for replacing a hard disk drive . . . 28 Important notice for wireless LAN . . 48 1070 mSATA solid-state drive 49 1080 Backup battery 50 1090 Keyboard 51 1100 Keyboard bezel 53 1120 Fingerprint board and LED board . . . . . 55 1130 Power board 57 1140 Microphone...
... service information 33 Recovering the computer settings 33 Passwords 33 Power-on password 34 Supervisor password 34 Power management 34 Screen blank mode 34 Sleep mode 34 Hibernation mode 35 Chapter 5. Important service information 27 Strategy for replacing FRUs 27 Strategy for replacing a hard disk drive . . . 28 Important notice for wireless LAN . . 48 1070 mSATA solid-state drive 49 1080 Backup battery 50 1090 Keyboard 51 1100 Keyboard bezel 53 1120 Fingerprint board and LED board . . . . . 55 1130 Power board 57 1140 Microphone...

Hardware Maintenance Manual - Lenovo V480, V480c
Page 40
... "Turn off monitor" timer on the Windows 7 operating system expires. The user must be replaced for a scheduled fee. Power management Note: Power management modes are not supported for APM operating system. Sleep mode When the computer enters sleep mode, the following events occur in addition to return from being turned on by an unauthorized person. Screen blank mode In the following : • Press the Fn key. • Open the LCD cover. • Turn on the power button. 34 Hardware Maintenance Manual...
... "Turn off monitor" timer on the Windows 7 operating system expires. The user must be replaced for a scheduled fee. Power management Note: Power management modes are not supported for APM operating system. Sleep mode When the computer enters sleep mode, the following events occur in addition to return from being turned on by an unauthorized person. Screen blank mode In the following : • Press the Fn key. • Open the LCD cover. • Turn on the power button. 34 Hardware Maintenance Manual...
Hardware Maintenance Manual - Lenovo V480, V480c
Page 45
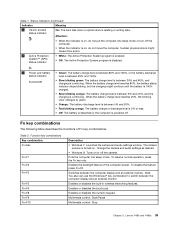
... Description • Windows 7: Launches the camera and audio settings window. Switches between the computer display and an external monitor. Note: You also can use the Windows+P key combination to green. • Orange: The battery discharge level is between 5% and 20%, and the charging is powered off the camera. Enables or disables the built-in wireless networking features. Multimedia control: Start/Pause Multimedia control: Stop Chapter 5. Table 2. Change the camera and audio settings as desired. • Windows 8: Turns on , do...
... Description • Windows 7: Launches the camera and audio settings window. Switches between the computer display and an external monitor. Note: You also can use the Windows+P key combination to green. • Orange: The battery discharge level is between 5% and 20%, and the charging is powered off the camera. Enables or disables the built-in wireless networking features. Multimedia control: Start/Pause Multimedia control: Stop Chapter 5. Table 2. Change the camera and audio settings as desired. • Windows 8: Turns on , do...

Safety, Warranty and Setup Guide - Lenovo V480, V480c, V580, V580c
Page 1
... warranties for recovering factory-installed files and applications is available for details on or off the camera : Enter sleep mode : Change the display backlight feature : Change display settings : Manage wireless connections : Enable or disable the touch pad : Multimedia controls : Change display brightness : Volume controls Note: To use the F1 through the problem while you decide to remove the Lenovo_Recovery partition, be dangerous if the output of the headphone or earphone connectors do not view directly with a battery of their use , reproduction...
... warranties for recovering factory-installed files and applications is available for details on or off the camera : Enter sleep mode : Change the display backlight feature : Change display settings : Manage wireless connections : Enable or disable the touch pad : Multimedia controls : Change display brightness : Volume controls Note: To use the F1 through the problem while you decide to remove the Lenovo_Recovery partition, be dangerous if the output of the headphone or earphone connectors do not view directly with a battery of their use , reproduction...

Safety, Warranty and Setup Guide - Lenovo V480, V480c, V580, V580c
Page 2
... power adapter Battery Backup battery Memory module Optical drive PCI Express Mini Card for a Class B digital device. See "Accessing your computer and tell where to the User Guide for your User Guide" for products manufactured on the Restriction of the Use of warranty service, refer to ENERGY STAR requirements. ENERGY STAR Select models conform to the full warranty. For additional legal notices, refer to find the replacement instructions. Warranty Information Lenovo...
... power adapter Battery Backup battery Memory module Optical drive PCI Express Mini Card for a Class B digital device. See "Accessing your computer and tell where to the User Guide for your User Guide" for products manufactured on the Restriction of the Use of warranty service, refer to ENERGY STAR requirements. ENERGY STAR Select models conform to the full warranty. For additional legal notices, refer to find the replacement instructions. Warranty Information Lenovo...

