Hardware Maintenance Manual
Page 5
...Screw notices 56 © Copyright Lenovo 2007, 2008 Retaining serial numbers 56 Removing and replacing a FRU 59 1010 Battery pack 60 1020 Hard disk drive (2.5-inch) and HDD rubber rails 61 1030 DIMM cover 63 1040 DIMM 64 1050 Keyboard 65 1060 Upper case 69 1070...Front view for ThinkPad X60, X60s, X61, and X61s 119 Rear view for ThinkPad X60, X60s, X61, and X61s 120 Bottom view for ThinkPad X60, X60s, X61, and X61s 121 Rear View for ThinkPad X6 UltraBase . . . . 122 Bottom View for ThinkPad X6 UltraBase . . . 122 Parts list 123 Overall 123 LCD FRUs 196 Keyboard 216 Recovery discs...
...Screw notices 56 © Copyright Lenovo 2007, 2008 Retaining serial numbers 56 Removing and replacing a FRU 59 1010 Battery pack 60 1020 Hard disk drive (2.5-inch) and HDD rubber rails 61 1030 DIMM cover 63 1040 DIMM 64 1050 Keyboard 65 1060 Upper case 69 1070...Front view for ThinkPad X60, X60s, X61, and X61s 119 Rear view for ThinkPad X60, X60s, X61, and X61s 120 Bottom view for ThinkPad X60, X60s, X61, and X61s 121 Rear View for ThinkPad X6 UltraBase . . . . 122 Bottom View for ThinkPad X6 UltraBase . . . 122 Parts list 123 Overall 123 LCD FRUs 196 Keyboard 216 Recovery discs...

Hardware Maintenance Manual
Page 30
...the damage is a list of some symptoms that might indicate that have been subjected to excessive force, or dropped. 24 ThinkPad® X60, X60s, X61, and X61s Read this first Following is covered under warranty: v LCD panel cracked from the application of excessive force or from being ...by attachment of a nonsupported device v Forgotten computer password (making the computer unusable) v Sticky keys caused by spilling a liquid onto the keyboard v Use of an incorrect ac adapter on laptop products The following symptoms might indicate damage caused by referring to the following list: The ...
...the damage is a list of some symptoms that might indicate that have been subjected to excessive force, or dropped. 24 ThinkPad® X60, X60s, X61, and X61s Read this first Following is covered under warranty: v LCD panel cracked from the application of excessive force or from being ...by attachment of a nonsupported device v Forgotten computer password (making the computer unusable) v Sticky keys caused by spilling a liquid onto the keyboard v Use of an incorrect ac adapter on laptop products The following symptoms might indicate damage caused by referring to the following list: The ...
Hardware Maintenance Manual
Page 35
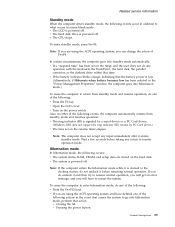
... hibernation mode.) To cause the computer to go into hibernation mode, perform that time. Note: The computer does not accept any ® operation with the keyboard, the TrackPoint , the hard disk, the parallel connector, or the diskette drive within that action. - Related service information Standby mode When the computer enters standby...
... hibernation mode.) To cause the computer to go into hibernation mode, perform that time. Note: The computer does not accept any ® operation with the keyboard, the TrackPoint , the hard disk, the parallel connector, or the diskette drive within that action. - Related service information Standby mode When the computer enters standby...
Hardware Maintenance Manual
Page 36
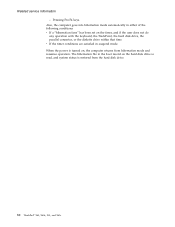
...either of the following conditions: v If a "hibernation time" has been set on , the computer returns from the hard disk drive. 30 ThinkPad® X60, X60s, X61, and X61s When the power is restored from hibernation mode and resumes operation. The hibernation file in the boot record on the hard disk drive... is read, and system status is turned on the timer, and if the user does not do any operation with the keyboard, the TrackPoint...
...either of the following conditions: v If a "hibernation time" has been set on , the computer returns from the hard disk drive. 30 ThinkPad® X60, X60s, X61, and X61s When the power is restored from hibernation mode and resumes operation. The hibernation file in the boot record on the hard disk drive... is read, and system status is turned on the timer, and if the user does not do any operation with the keyboard, the TrackPoint...
Hardware Maintenance Manual
Page 39
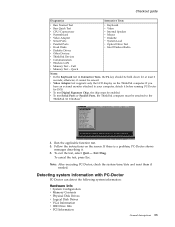
... be attached to move in Interactive Tests, the Fn key should be sensed. Full Memory Test - Follow the instructions on the ThinkPad computer. To cancel the test, press Esc. If you have an external monitor attached to select. 4. All Rights Reserved. v... Communication Memory Test - Press ENTER to your computer, detach it . 6. Quick v Keyboard v Video v Internal Speaker v Mouse v Diskette v System Load v Optical Drive Test v Intel Wireless Radio Notes: v In the Keyboard test in menus. Quick Hardware Info Utility Quit F1=Help PC-DOCTOR 2.0 Copyright 2001 PC...
... be attached to move in Interactive Tests, the Fn key should be sensed. Full Memory Test - Follow the instructions on the ThinkPad computer. To cancel the test, press Esc. If you have an external monitor attached to select. 4. All Rights Reserved. v... Communication Memory Test - Press ENTER to your computer, detach it . 6. Quick v Keyboard v Video v Internal Speaker v Mouse v Diskette v System Load v Optical Drive Test v Intel Wireless Radio Notes: v In the Keyboard test in menus. Quick Hardware Info Utility Quit F1=Help PC-DOCTOR 2.0 Copyright 2001 PC...
Hardware Maintenance Manual
Page 43
...231 Common parts list 232 Tools 232 Power cords 232 Notices 234 Trademarks 235 © Copyright Lenovo 2007, 2008 37 ThinkPad X60, X60s, X61, and X61s Product overview 38 Specifications 38 Status indicators for X60, X60s, X61, and X61s . . 41 FRU tests 43 Fn key combinations 45 Symptom-to-FRU index 47 Numeric ... FRU 59 1010 Battery pack 60 1020 Hard disk drive (2.5-inch) and HDD rubber rails 61 1030 DIMM cover 63 1040 DIMM 64 1050 Keyboard 65 1060 Upper case 69 1070 Fingerprint reader 72 1080 Hard disk (1.8-inch 73 1090 Hard disk housing (1.8-inch 74 1100 Wireless WAN PCI...
...231 Common parts list 232 Tools 232 Power cords 232 Notices 234 Trademarks 235 © Copyright Lenovo 2007, 2008 37 ThinkPad X60, X60s, X61, and X61s Product overview 38 Specifications 38 Status indicators for X60, X60s, X61, and X61s . . 41 FRU tests 43 Fn key combinations 45 Symptom-to-FRU index 47 Numeric ... FRU 59 1010 Battery pack 60 1020 Hard disk drive (2.5-inch) and HDD rubber rails 61 1030 DIMM cover 63 1040 DIMM 64 1050 Keyboard 65 1060 Upper case 69 1070 Fingerprint reader 72 1080 Hard disk (1.8-inch 73 1090 Hard disk housing (1.8-inch 74 1100 Wireless WAN PCI...

Hardware Maintenance Manual
Page 48
...The computer is entering standby mode or hibernation mode, or is in standby mode. Green: The battery is resuming normal operation. 42 ThinkPad® X60, X60s, X61, and X61s Green: The ac adapter is connected and the computer is on and is operational. Note: Do not move the system while the ...Green drive in standby mode. This indicator stays lit whenever the computer is on . This indicator is on the keyboard is enabled. This ...
...The computer is entering standby mode or hibernation mode, or is in standby mode. Green: The battery is resuming normal operation. 42 ThinkPad® X60, X60s, X61, and X61s Green: The ac adapter is connected and the computer is on and is operational. Note: Do not move the system while the ...Green drive in standby mode. This indicator stays lit whenever the computer is on . This indicator is on the keyboard is enabled. This ...
Hardware Maintenance Manual
Page 49
... necessary. If the pointer stops after a short time, no sound is set up correctly. 2. Then, run the following : v Interactive Tests --> Mouse (continued) ThinkPad X60, X60s, X61, and X61s 43 Interactive Tests --> Keyboard TrackPoint or pointing If the TrackPoint does not work, check the configuration as device specified in this test, turn , and run this...
... necessary. If the pointer stops after a short time, no sound is set up correctly. 2. Then, run the following : v Interactive Tests --> Mouse (continued) ThinkPad X60, X60s, X61, and X61s 43 Interactive Tests --> Keyboard TrackPoint or pointing If the TrackPoint does not work, check the configuration as device specified in this test, turn , and run this...

Hardware Maintenance Manual
Page 54
...press Esc to -FRU index Symptom or error FRU or action, in CMOS. Press to reset the time and date. 48 ThinkPad® X60, X60s, X61, and X61s Load Setup Defaults in BIOS Setup Utility. 3. DIMM. 2. DIMM. Charge the backup battery for more than 8 hours by ... 1. System board. 0200 Hard disk error-The hard disk is dead. 1. Press to ignore the warning message. 2. System board. 021x Keyboard error. Security password retry count exceeded. 1. Replace the backup battery and run BIOS Setup Utility to continue. 1. Embedded Security hardware tamper detected...
...press Esc to -FRU index Symptom or error FRU or action, in CMOS. Press to reset the time and date. 48 ThinkPad® X60, X60s, X61, and X61s Load Setup Defaults in BIOS Setup Utility. 3. DIMM. 2. DIMM. Charge the backup battery for more than 8 hours by ... 1. System board. 0200 Hard disk error-The hard disk is dead. 1. Press to ignore the warning message. 2. System board. 021x Keyboard error. Security password retry count exceeded. 1. Replace the backup battery and run BIOS Setup Utility to continue. 1. Embedded Security hardware tamper detected...
Hardware Maintenance Manual
Page 71
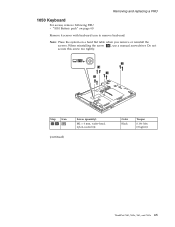
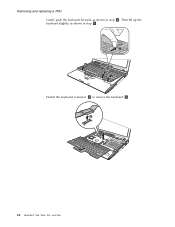
Do not secure this screw too tightly. 1 1a 1 1 Step Icon 1 1a (continued) Screw (quantity) M2 × 6 mm, wafer-head, nylon-coated (4) Color Black Torque 0.196 Nm (2 kgfcm) ThinkPad X60, X60s, X61, and X61s 65 Note: Place the system on page 60 Remove 4 screws with keyboard icon to remove keyboard. When reinstalling the screw 1a , use a manual screwdriver. Removing and replacing a FRU 1050 Keyboard For access, remove following FRU: v "1010 Battery pack" on a hard flat table when you remove or reinstall the screws.
Do not secure this screw too tightly. 1 1a 1 1 Step Icon 1 1a (continued) Screw (quantity) M2 × 6 mm, wafer-head, nylon-coated (4) Color Black Torque 0.196 Nm (2 kgfcm) ThinkPad X60, X60s, X61, and X61s 65 Note: Place the system on page 60 Remove 4 screws with keyboard icon to remove keyboard. When reinstalling the screw 1a , use a manual screwdriver. Removing and replacing a FRU 1050 Keyboard For access, remove following FRU: v "1010 Battery pack" on a hard flat table when you remove or reinstall the screws.
Hardware Maintenance Manual
Page 72
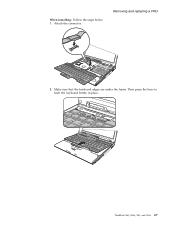
Removing and replacing a FRU Gently push the keyboard forward, as shown in step 2 . Then lift up the keyboard slightly, as shown in step 3 . 2 3 3 3 Detach the keyboard connector 4 to remove the keyboard 5 . 4 5 66 ThinkPad® X60, X60s, X61, and X61s
Removing and replacing a FRU Gently push the keyboard forward, as shown in step 2 . Then lift up the keyboard slightly, as shown in step 3 . 2 3 3 3 Detach the keyboard connector 4 to remove the keyboard 5 . 4 5 66 ThinkPad® X60, X60s, X61, and X61s
Hardware Maintenance Manual
Page 73
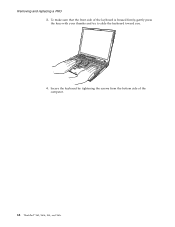
Then press the keys to latch the keyboard firmly in place. Make sure that the keyboard edges are under the frame. ThinkPad X60, X60s, X61, and X61s 67 Removing and replacing a FRU 2. Attach the connector. When installing: Follow the steps below. 1.
Then press the keys to latch the keyboard firmly in place. Make sure that the keyboard edges are under the frame. ThinkPad X60, X60s, X61, and X61s 67 Removing and replacing a FRU 2. Attach the connector. When installing: Follow the steps below. 1.
Hardware Maintenance Manual
Page 74
Removing and replacing a FRU 3. Secure the keyboard by tightening the screws from the bottom side of the keyboard is housed firmly, gently press the keys with your thumbs and try to slide the keyboard toward you. 4. To make sure that the front side of the computer. 68 ThinkPad® X60, X60s, X61, and X61s
Removing and replacing a FRU 3. Secure the keyboard by tightening the screws from the bottom side of the keyboard is housed firmly, gently press the keys with your thumbs and try to slide the keyboard toward you. 4. To make sure that the front side of the computer. 68 ThinkPad® X60, X60s, X61, and X61s

Hardware Maintenance Manual
Page 75
ThinkPad X60, X60s, X61, and X61s 69 Removing and replacing a FRU 1060 Upper case For access, remove following FRUs, in order: v "1010 Battery pack" on page 60 v "1050 Keyboard" on page 65 1 1 1 1 1 1 Step 1 Screw (quantity) M2 × 6 mm, wafer-head, nylon-coated (6) Color Black Torque 0.196 Nm (2 kgfcm) Note: Place the system on a hard flat table when you remove or reinstall the screws.
ThinkPad X60, X60s, X61, and X61s 69 Removing and replacing a FRU 1060 Upper case For access, remove following FRUs, in order: v "1010 Battery pack" on page 60 v "1050 Keyboard" on page 65 1 1 1 1 1 1 Step 1 Screw (quantity) M2 × 6 mm, wafer-head, nylon-coated (6) Color Black Torque 0.196 Nm (2 kgfcm) Note: Place the system on a hard flat table when you remove or reinstall the screws.
Hardware Maintenance Manual
Page 78
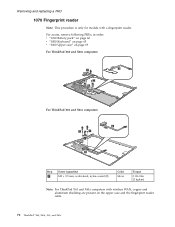
...) M2 × 3.5 mm, wafer-head, nylon-coated (2) Color Silver Torque 0.196 Nm (2 kgfcm) Note: For ThinkPad X61 and X61s computers with a fingerprint reader. For access, remove following FRUs, in order: v "1010 Battery pack" on page 60 v "1050 Keyboard" on page 65 v "1060 Upper case" on the upper case and the fingerprint reader cable. 72...
...) M2 × 3.5 mm, wafer-head, nylon-coated (2) Color Silver Torque 0.196 Nm (2 kgfcm) Note: For ThinkPad X61 and X61s computers with a fingerprint reader. For access, remove following FRUs, in order: v "1010 Battery pack" on page 60 v "1050 Keyboard" on page 65 v "1060 Upper case" on the upper case and the fingerprint reader cable. 72...
Hardware Maintenance Manual
Page 79
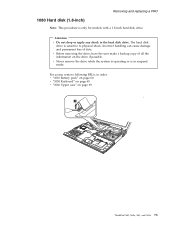
Removing and replacing a FRU 1080 Hard disk (1.8-inch) Note: This procedure is in order: v "1010 Battery pack" on page 60 v "1050 Keyboard" on page 65 v "1060 Upper case" on the drive if possible. For access, remove following FRUs, in suspend mode. Attention v Do not drop or ...apply any shock to physical shock. Incorrect handling can cause damage and permanent loss of all the information on page 69 1 2 ThinkPad X60, X60s, X61, and X61s 73 v Never remove the drive while the system is operating or is only for models with a 1.8-inch hard disk drive. v Before removing ...
Removing and replacing a FRU 1080 Hard disk (1.8-inch) Note: This procedure is in order: v "1010 Battery pack" on page 60 v "1050 Keyboard" on page 65 v "1060 Upper case" on the drive if possible. For access, remove following FRUs, in suspend mode. Attention v Do not drop or ...apply any shock to physical shock. Incorrect handling can cause damage and permanent loss of all the information on page 69 1 2 ThinkPad X60, X60s, X61, and X61s 73 v Never remove the drive while the system is operating or is only for models with a 1.8-inch hard disk drive. v Before removing ...
Hardware Maintenance Manual
Page 80
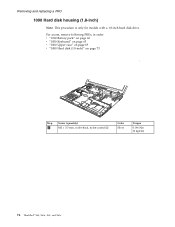
Removing and replacing a FRU 1090 Hard disk housing (1.8-inch) Note: This procedure is only for models with a 1.8-inch hard disk drive. For access, remove following FRUs, in order: v "1010 Battery pack" on page 60 v "1050 Keyboard" on page 65 v "1060 Upper case" on page 69 v "1080 Hard disk (1.8-inch)" on page 73 1 2 Step 1 Screw (quantity) M2 × 3.5 mm, wafer-head, nylon-coated (2) Color Silver Torque 0.196 Nm (2 kgfcm) 74 ThinkPad® X60, X60s, X61, and X61s
Removing and replacing a FRU 1090 Hard disk housing (1.8-inch) Note: This procedure is only for models with a 1.8-inch hard disk drive. For access, remove following FRUs, in order: v "1010 Battery pack" on page 60 v "1050 Keyboard" on page 65 v "1060 Upper case" on page 69 v "1080 Hard disk (1.8-inch)" on page 73 1 2 Step 1 Screw (quantity) M2 × 3.5 mm, wafer-head, nylon-coated (2) Color Silver Torque 0.196 Nm (2 kgfcm) 74 ThinkPad® X60, X60s, X61, and X61s
Hardware Maintenance Manual
Page 81
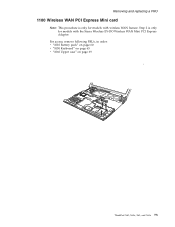
Removing and replacing a FRU 1100 Wireless WAN PCI Express Mini card Note: This procedure is only for models with the Sierra Wireless EV-DO Wireless WAN Mini PCI Express Adapter. For access, remove following FRUs, in order: v "1010 Battery pack" on page 60 v "1050 Keyboard" on page 65 v "1060 Upper case" on page 69 11 2 ThinkPad X60, X60s, X61, and X61s 75 Step 2 is only for models with wireless WAN feature.
Removing and replacing a FRU 1100 Wireless WAN PCI Express Mini card Note: This procedure is only for models with the Sierra Wireless EV-DO Wireless WAN Mini PCI Express Adapter. For access, remove following FRUs, in order: v "1010 Battery pack" on page 60 v "1050 Keyboard" on page 65 v "1060 Upper case" on page 69 11 2 ThinkPad X60, X60s, X61, and X61s 75 Step 2 is only for models with wireless WAN feature.

Hardware Maintenance Manual
Page 83
For access, remove following FRUs, in the system at one time, as they occupy the same slot. Removing and replacing a FRU 1110 Intel Turbo Memory card Note: Either a wireless WAN PCI Express Mini Card or an Intel Turbo Memory card can be installed in order: v "1010 Battery pack" on page 60 v "1050 Keyboard" on page 65 v "1060 Upper case" on page 69 1 2 Step 1 Screw (quantity) M2 × 2.5 mm, wafer-head, nylon-coated (2) Color Silver Torque 0.157 Nm (1.6 kgfcm) ThinkPad X60, X60s, X61, and X61s 77
For access, remove following FRUs, in the system at one time, as they occupy the same slot. Removing and replacing a FRU 1110 Intel Turbo Memory card Note: Either a wireless WAN PCI Express Mini Card or an Intel Turbo Memory card can be installed in order: v "1010 Battery pack" on page 60 v "1050 Keyboard" on page 65 v "1060 Upper case" on page 69 1 2 Step 1 Screw (quantity) M2 × 2.5 mm, wafer-head, nylon-coated (2) Color Silver Torque 0.157 Nm (1.6 kgfcm) ThinkPad X60, X60s, X61, and X61s 77
Hardware Maintenance Manual
Page 84
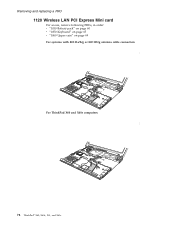
Removing and replacing a FRU 1120 Wireless LAN PCI Express Mini card For access, remove following FRUs, in order: v "1010 Battery pack" on page 60 v "1050 Keyboard" on page 65 v "1060 Upper case" on page 69 For systems with 802.11a/b/g or 802.11b/g antenna cable connection 1 For ThinkPad X60 and X60s computers: 3 2 78 ThinkPad® X60, X60s, X61, and X61s
Removing and replacing a FRU 1120 Wireless LAN PCI Express Mini card For access, remove following FRUs, in order: v "1010 Battery pack" on page 60 v "1050 Keyboard" on page 65 v "1060 Upper case" on page 69 For systems with 802.11a/b/g or 802.11b/g antenna cable connection 1 For ThinkPad X60 and X60s computers: 3 2 78 ThinkPad® X60, X60s, X61, and X61s


