Hardware Maintenance Manual
Page 9
...are installed before you are customer-installable. v If an adapter or a device consists of the computer or press Auto-detect button on the screen and install the necessary software. Strategy for replacing and servicing FRUs: v If you continue. Follow the directions on the... cause of the error. Enter the product number of more than one . After a system board is replaced, ensure that changed the symptoms. © Copyright Lenovo 2007, 2008 3 To download software fixes, drivers, and BIOS, do as follows: 1. Before replacing the adapter or device, remove the FRUs, one by ...
...are installed before you are customer-installable. v If an adapter or a device consists of the computer or press Auto-detect button on the screen and install the necessary software. Strategy for replacing and servicing FRUs: v If you continue. Follow the directions on the... cause of the error. Enter the product number of more than one . After a system board is replaced, ensure that changed the symptoms. © Copyright Lenovo 2007, 2008 3 To download software fixes, drivers, and BIOS, do as follows: 1. Before replacing the adapter or device, remove the FRUs, one by ...
Hardware Maintenance Manual
Page 10
then, when service has been completed, verify that has been negotiated between IBM or Lenovo and the customer. Be extremely careful during write operations such as the 4-digit MT and 3-digit model, where model = "CTO" (Example: 1829-CTO). If you ... ability for replacing a system board Some components mounted on the screen to prevent cracking at each BGA (Ball Grid Array) chipset. A unique 4-digit MT and 3-digit model is the 4-digit MT and 3-digit CMV model (Example: 1829-W15). 4 ThinkPad® X60, X60s, X61, and X61s Therefore, it is the 4-digit MT and 3-digit model...
then, when service has been completed, verify that has been negotiated between IBM or Lenovo and the customer. Be extremely careful during write operations such as the 4-digit MT and 3-digit model, where model = "CTO" (Example: 1829-CTO). If you ... ability for replacing a system board Some components mounted on the screen to prevent cracking at each BGA (Ball Grid Array) chipset. A unique 4-digit MT and 3-digit model is the 4-digit MT and 3-digit CMV model (Example: 1829-W15). 4 ThinkPad® X60, X60s, X61, and X61s Therefore, it is the 4-digit MT and 3-digit model...

Hardware Maintenance Manual
Page 31
...because of time depends on page 218. A warning appears, click Yes. When this case, you will be prompted to Rescue and Recovery" screen where a window "Recovering your system, this may remain on page 28 Service Web site When the latest maintenance diskette and the system program... service diskette become available, they arrive. Press No. 5. For information on http://www.lenovo.com/spm Restoring the factory contents by using Product Recovery discs, do not want to power down the computer during the recovery process....
...because of time depends on page 218. A warning appears, click Yes. When this case, you will be prompted to Rescue and Recovery" screen where a window "Recovering your system, this may remain on page 28 Service Web site When the latest maintenance diskette and the system program... service diskette become available, they arrive. Press No. 5. For information on http://www.lenovo.com/spm Restoring the factory contents by using Product Recovery discs, do not want to power down the computer during the recovery process....
Hardware Maintenance Manual
Page 32
...disk password (HDP), and the supervisor password (SVP). The system administrator then provides the user HDP to the system user. 26 ThinkPad® X60, X60s, X61, and X61s The final recovery disc may be safely removed during this point. 8. The entire process at desktop takes about 5 seconds. Passwords... processes are two modes for the HDP: User only and Master + User. Then the computer restarts, does some more DOS full screen processing, and restarts again to a Windows desktop where factory preinstallation continues for more minutes and the computer restarts to do NTFS conversion and...
...disk password (HDP), and the supervisor password (SVP). The system administrator then provides the user HDP to the system user. 26 ThinkPad® X60, X60s, X61, and X61s The final recovery disc may be safely removed during this point. 8. The entire process at desktop takes about 5 seconds. Passwords... processes are two modes for the HDP: User only and Master + User. Then the computer restarts, does some more DOS full screen processing, and restarts again to a Windows desktop where factory preinstallation continues for more minutes and the computer restarts to do NTFS conversion and...
Hardware Maintenance Manual
Page 33
If no master HDP is available, neither Lenovo nor Lenovo authorized servicers provide any services to reset either the user or... function, press F1 while the POP icon is available on the screen; If the Using Passphrase item is displayed in the menu, this function is appearing on the ThinkPad computer. 2. Click Access BIOS. In the Changes have forgotten, ...Security --> Password. then, in the BIOS Setup Utility. Remove the battery pack. Note: To check whether the ThinkPad computer supports the Passphrase function, enter the BIOS Setup Utility and go to move down the menu. 5. Click ...
If no master HDP is available, neither Lenovo nor Lenovo authorized servicers provide any services to reset either the user or... function, press F1 while the POP icon is available on the screen; If the Using Passphrase item is displayed in the menu, this function is appearing on the ThinkPad computer. 2. Click Access BIOS. In the Changes have forgotten, ...Security --> Password. then, in the BIOS Setup Utility. Remove the battery pack. Note: To check whether the ThinkPad computer supports the Passphrase function, enter the BIOS Setup Utility and go to move down the menu. 5. Click ...
Hardware Maintenance Manual
Page 34
The hard disk drive can be made available to the servicer, neither Lenovo nor Lenovo authorized servicers provide any key. 28 ThinkPad® X60, X60s, X61, and X61s Select Hard-disk x password, where x is displayed. 3. Type the current master ...HDP in the Setup Configuration window. Select Yes in the Enter Current Password field. Both user HDP and master HDP will have been removed. Screen blank mode Screen...
The hard disk drive can be made available to the servicer, neither Lenovo nor Lenovo authorized servicers provide any key. 28 ThinkPad® X60, X60s, X61, and X61s Select Hard-disk x password, where x is displayed. 3. Type the current master ...HDP in the Setup Configuration window. Select Yes in the Enter Current Password field. Both user HDP and master HDP will have been removed. Screen blank mode Screen...
Hardware Maintenance Manual
Page 35
..., press Fn+F4. v Open the LCD cover. Note: If the computer enters the hibernation mode while it before taking any action to what occurs in screen blank mode: v The LCD is powered off . v Turn on the resume timer elapses. To cause the computer to go into standby mode automatically: v If a "suspend...
..., press Fn+F4. v Open the LCD cover. Note: If the computer enters the hibernation mode while it before taking any action to what occurs in screen blank mode: v The LCD is powered off . v Turn on the resume timer elapses. To cause the computer to go into standby mode automatically: v If a "suspend...

Hardware Maintenance Manual
Page 37
... as possible. 2. You can lead to initialize the computer setup by use of errors and invalid system responses. 1. On the BIOS Setup Utility screen, press F9, Enter, F10, and then Enter. To test a USB device, connect it by running the diagnostic test or by repeating the ...computer. For some devices are intended to re-create the failure by running the diagnostics test included in identifying and correcting problems with the ThinkPad computer. To test the Ultrabay™ device, install it in the docking station, even if the computer supports the docking station. The...
... as possible. 2. You can lead to initialize the computer setup by use of errors and invalid system responses. 1. On the BIOS Setup Utility screen, press F9, Enter, F10, and then Enter. To test a USB device, connect it by running the diagnostic test or by repeating the ...computer. For some devices are intended to re-create the failure by running the diagnostics test included in identifying and correcting problems with the ThinkPad computer. To test the Ultrabay™ device, install it in the docking station, even if the computer supports the docking station. The...
Hardware Maintenance Manual
Page 38
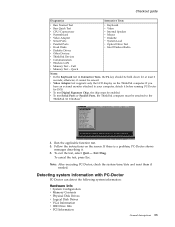
...PC-Doctor menu. The main panel of pressing Enter, click the left button. 1. A pull-down menu appears. (Its exact form depends on the screen. 2. When the ThinkVantage Rescue and Recovery application finishes loading, double-click the "Create diagnostic diskettes" icon. 3. It will be erased and formatted ... Some unsupported device names may appear in sequence. Typically, the user only needs to run the test, do as follows: 32 ThinkPad® X60, X60s, X61, and X61s The user is desired to press the Enter key for DOS boot image. 5. b. To create the PC-Doctor disk from the ...
...PC-Doctor menu. The main panel of pressing Enter, click the left button. 1. A pull-down menu appears. (Its exact form depends on the screen. 2. When the ThinkVantage Rescue and Recovery application finishes loading, double-click the "Create diagnostic diskettes" icon. 3. It will be erased and formatted ... Some unsupported device names may appear in sequence. Typically, the user only needs to run the test, do as follows: 32 ThinkPad® X60, X60s, X61, and X61s The user is desired to press the Enter key for DOS boot image. 5. b. To create the PC-Doctor disk from the ...
Hardware Maintenance Manual
Page 39
...PC-Doctor shows messages describing it cannot be enabled. otherwise, it . 6. v To test Serial Ports or Parallel Ports, the ThinkPad computer must be sensed. Use the cursor keys and ESC to select. 4. Note: After executing PC-Doctor, check the system ...Coprocessor v Systemboard v Video Adapter v Serial Ports v Parallel Ports v Fixed Disks v Diskette Drives v Other Devices v ThinkPad Devices v Communication v Wireless LAN v Memory Test - v Video Adapter test supports only the LCD display on the screen. Full Memory Test - To cancel the test, press Esc. Diagnostics I n t e r a c t i ...
...PC-Doctor shows messages describing it cannot be enabled. otherwise, it . 6. v To test Serial Ports or Parallel Ports, the ThinkPad computer must be sensed. Use the cursor keys and ESC to select. 4. Note: After executing PC-Doctor, check the system ...Coprocessor v Systemboard v Video Adapter v Serial Ports v Parallel Ports v Fixed Disks v Diskette Drives v Other Devices v ThinkPad Devices v Communication v Wireless LAN v Memory Test - v Video Adapter test supports only the LCD display on the screen. Full Memory Test - To cancel the test, press Esc. Diagnostics I n t e r a c t i ...
Hardware Maintenance Manual
Page 49
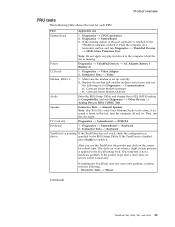
...Stick. Interactive Tests --> Video Modem, MDC1.5 1. Place the computer on the screen for each FRU. Conexant Smart Modem Dialtone Audio Enter the BIOS Setup Utility and change Serial ATA (SATA) setting to the ThinkPad computer, undock it . Then, run this test, turn , and run ...is done, if no service action is attached to Compatibility, and run the following : v Interactive Tests --> Mouse (continued) ThinkPad X60, X60s, X61, and X61s 43 FRU Applicable test System board 1. Interactive Tests --> Keyboard TrackPoint or pointing If the TrackPoint does not work, check the ...
...Stick. Interactive Tests --> Video Modem, MDC1.5 1. Place the computer on the screen for each FRU. Conexant Smart Modem Dialtone Audio Enter the BIOS Setup Utility and change Serial ATA (SATA) setting to the ThinkPad computer, undock it . Then, run this test, turn , and run ...is done, if no service action is attached to Compatibility, and run the following : v Interactive Tests --> Mouse (continued) ThinkPad X60, X60s, X61, and X61s 43 FRU Applicable test System board 1. Interactive Tests --> Keyboard TrackPoint or pointing If the TrackPoint does not work, check the ...
Hardware Maintenance Manual
Page 51
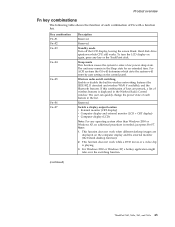
...For ACPI systems the OS will determine which state the system will enter by user setting on /off the LCD display, leaving the screen blank. Reserved. Sleep mode This function causes the system to enter a low power sleep state. If this combination of keys are displayed... procedure is playing. 3. For Windows 2000 or Windows XP, a hotkey application might take over the switching function. (continued) ThinkPad X60, X60s, X61, and X61s 45 just press Fn+F7. Reserved. Hard disk drive spindown while CPU still works. Product overview Fn key combinations The following table...
...For ACPI systems the OS will determine which state the system will enter by user setting on /off the LCD display, leaving the screen blank. Reserved. Sleep mode This function causes the system to enter a low power sleep state. If this combination of keys are displayed... procedure is playing. 3. For Windows 2000 or Windows XP, a hotkey application might take over the switching function. (continued) ThinkPad X60, X60s, X61, and X61s 45 just press Fn+F7. Reserved. Hard disk drive spindown while CPU still works. Product overview Fn key combinations The following table...

Hardware Maintenance Manual
Page 52
...+F9 function. LCD brightness down The LCD becomes less bright. Issue device ejection Opens the ThinkPad EasyEject Utility screen. Note: This function is able to the ThinkPad computer. Reserved. v TrackPoint: User is supported only in Windows XP and Windows 2000. Note...able to view the hardware device property of the mouse. Reserved. FullScreen magnifier Enable the FullScreen Magnifier function. 46 ThinkPad® X60, X60s, X61, and X61s Hibernation Turn hibernation mode on button configuration, double-click speed, and click lock function. v Pointers: User is ...
...+F9 function. LCD brightness down The LCD becomes less bright. Issue device ejection Opens the ThinkPad EasyEject Utility screen. Note: This function is able to the ThinkPad computer. Reserved. v TrackPoint: User is supported only in Windows XP and Windows 2000. Note...able to view the hardware device property of the mouse. Reserved. FullScreen magnifier Enable the FullScreen Magnifier function. 46 ThinkPad® X60, X60s, X61, and X61s Hibernation Turn hibernation mode on button configuration, double-click speed, and click lock function. v Pointers: User is ...
Hardware Maintenance Manual
Page 56
...memory configuration-Power off and remove all partitions. Select Security --> Predesktop Area --> Access Predesktop Area. If item 2 failed, press F3 in the Welcome screen in Access Predesktop Area again. 4. Run RECOVER TO FACTORY CONTENTS in RECOVER TO FACTORY CONTENTS. Press to continue. Boot from the Recovery CD and perform... previously disabled, press Enter to Disabled. Note: For the construction of the DIMM slot, see"1040 DIMM" on a horizontal surface. Run Diagnostics --> ThinkPad Devices --> HDD Active Protection Test. 50 ThinkPad® X60, X60s, X61, and X61s
...memory configuration-Power off and remove all partitions. Select Security --> Predesktop Area --> Access Predesktop Area. If item 2 failed, press F3 in the Welcome screen in Access Predesktop Area again. 4. Run RECOVER TO FACTORY CONTENTS in RECOVER TO FACTORY CONTENTS. Press to continue. Boot from the Recovery CD and perform... previously disabled, press Enter to Disabled. Note: For the construction of the DIMM slot, see"1040 DIMM" on a horizontal surface. Run Diagnostics --> ThinkPad Devices --> HDD Active Protection Test. 50 ThinkPad® X60, X60s, X61, and X61s
Hardware Maintenance Manual
Page 59
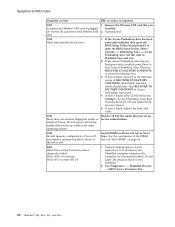
... the cursor appears. System board. Type the password and press Enter. System board. 2. Four cycles of four short beeps and a blank System board (security chip) screen. System board. A power-on page 47. Type the password and press Enter. External CRT. 4. System board. 2. DIMM. The hard-disk password prompt appears. LCD assembly..., or flashing LCD. 1. Make sure that every connector is set . Reseat DIMM. 2. The power-on password prompt appears. A hard-disk password is and no POST. ThinkPad X60, X60s, X61, and X61s 53
... the cursor appears. System board. Type the password and press Enter. System board. 2. Four cycles of four short beeps and a blank System board (security chip) screen. System board. A power-on page 47. Type the password and press Enter. External CRT. 4. System board. 2. DIMM. The hard-disk password prompt appears. LCD assembly..., or flashing LCD. 1. Make sure that every connector is set . Reseat DIMM. 2. The power-on password prompt appears. A hard-disk password is and no POST. ThinkPad X60, X60s, X61, and X61s 53
Hardware Maintenance Manual
Page 60
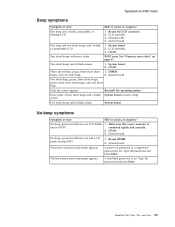
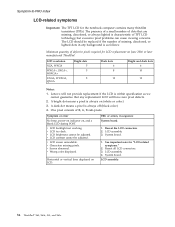
.... See important note for the notebook computer contains many thin-film transistors (TFTs). LCD assembly. 4. LCD assembly. 54 ThinkPad® X60, X60s, X61, and X61s Symptom-to-FRU index LCD-related symptoms Important: The TFT LCD for "LCD-related symptoms." 2. Symptom or error No... beep, power-on indicator on LCD. Reseat all LCD connectors. 3. Lenovo will have zero pixel defects. 2. v LCD contrast cannot be adjusted. v Screen abnormal....
.... See important note for the notebook computer contains many thin-film transistors (TFTs). LCD assembly. 4. LCD assembly. 54 ThinkPad® X60, X60s, X61, and X61s Symptom-to-FRU index LCD-related symptoms Important: The TFT LCD for "LCD-related symptoms." 2. Symptom or error No... beep, power-on indicator on LCD. Reseat all LCD connectors. 3. Lenovo will have zero pixel defects. 2. v LCD contrast cannot be adjusted. v Screen abnormal....

Hardware Maintenance Manual
Page 63
...of the computer. Before replacing the system board, save the original serial number by doing the following : 1. Install the ThinkPad Hardware Maintenance Diskette Version 1.73 or later, and restart the computer. 2. Select 2. Note: The serial number of the... value. From the main menu, select 4. If a valid UUID already exists, it is created and written. ThinkPad X60, X60s, X61, and X61s 57 These numbers need to be disassembled to provide unique IDs until the year A.D. 3400. Read S/N data from... at production and stored in your computer is also written on the screen.
...of the computer. Before replacing the system board, save the original serial number by doing the following : 1. Install the ThinkPad Hardware Maintenance Diskette Version 1.73 or later, and restart the computer. 2. Select 2. Note: The serial number of the... value. From the main menu, select 4. If a valid UUID already exists, it is created and written. ThinkPad X60, X60s, X61, and X61s 57 These numbers need to be disassembled to provide unique IDs until the year A.D. 3400. Read S/N data from... at production and stored in your computer is also written on the screen.

Hardware Maintenance Manual
Page 64
...Read ECA/rework number from EEPROM, and follow the instruction. 4. Use the ThinkPad Hardware Maintenance Diskette Version 1.73 or later to the machine, the EEPROM must be possible. 58 ThinkPad® X60, X60s, X61, and X61s To write ECA information, select 1. Write box build date from EEPROM and ...follow the instruction on the screen. From the main menu, select 6. Set ECA Information. 3. To read ...
...Read ECA/rework number from EEPROM, and follow the instruction. 4. Use the ThinkPad Hardware Maintenance Diskette Version 1.73 or later to the machine, the EEPROM must be possible. 58 ThinkPad® X60, X60s, X61, and X61s To write ECA information, select 1. Write box build date from EEPROM and ...follow the instruction on the screen. From the main menu, select 6. Set ECA Information. 3. To read ...
(English) Rescue and Recovery 4.3 Deployment Guide
Page 22
...created. 6. When restoring a system that , a recovery key is needed when booting to suspend the encryption of BitLocker encryption on the screen to a USB storage device. Restart the computer and use the Rescue and Recovery program to be after restoring the system from Control ... 7. Wait until the encryption process completes. When setting up BitLocker in the Rescue and Recovery ADM settings. 2. For OEM or non-Lenovo standard preload systems, you can be ignored and everything should be updated in Windows 7, the BitLocker partition should operate normally. 3. If it...
...created. 6. When restoring a system that , a recovery key is needed when booting to suspend the encryption of BitLocker encryption on the screen to a USB storage device. Restart the computer and use the Rescue and Recovery program to be after restoring the system from Control ... 7. Wait until the encryption process completes. When setting up BitLocker in the Rescue and Recovery ADM settings. 2. For OEM or non-Lenovo standard preload systems, you can be ignored and everything should be updated in Windows 7, the BitLocker partition should operate normally. 3. If it...

(English) Rescue and Recovery 4.3 Deployment Guide
Page 24
... eliminate viruses, adware and spyware, while maintaining your system. 3. From the Rescue and Recovery interface, click the Restore your system screen is authorized to use Password Persistence. 2. The Restore your system from the selected backup. The Rescue and Recovery program will optimize system...then the user selects a backup. File rescue File rescue used before the system deletes files. Notes: 1. On the Restore your system screen, select Rejuvenate your current settings and data. Files designated to access. When a backup has been selected, the system will display files...
... eliminate viruses, adware and spyware, while maintaining your system. 3. From the Rescue and Recovery interface, click the Restore your system screen is authorized to use Password Persistence. 2. The Restore your system from the selected backup. The Rescue and Recovery program will optimize system...then the user selects a backup. File rescue File rescue used before the system deletes files. Notes: 1. On the Restore your system screen, select Rejuvenate your current settings and data. Files designated to access. When a backup has been selected, the system will display files...


