(English) Rescue and Recovery 4.3 Deployment Guide
Page 76
.... BMGR32 parameters (continued) Parameter Result /CFGfile Apply the configuration file parameters. See "RRCMD command-line interface" on the keyboard to 12. /INFO Display hard disk drive information (checks for 8 free sectors). /INFOP Display hard disk drive information ...based, (default: disk containing environment variable ″SystemDrive″ or ″C:\″ if ″SystemDrive″ is not a Lenovo-branded computer. Patchfilefilename Used for installation program only to install the Master boot record patch. /PRTC Used for installation program only,...
.... BMGR32 parameters (continued) Parameter Result /CFGfile Apply the configuration file parameters. See "RRCMD command-line interface" on the keyboard to 12. /INFO Display hard disk drive information (checks for 8 free sectors). /INFOP Display hard disk drive information ...based, (default: disk containing environment variable ″SystemDrive″ or ″C:\″ if ″SystemDrive″ is not a Lenovo-branded computer. Patchfilefilename Used for installation program only to install the Master boot record patch. /PRTC Used for installation program only,...
(English) Rescue and Recovery 4.5 Deployment Guide
Page 66
...; Original MBR Sector number where the machine's original master boot record is stored. • IBM Flag Value from the data sector (1 if Lenovo-branded system, 0 if not) • Boot Config Displays the installation option used when booting to the service area. 60 Rescue and Recovery ... the Master boot record program /? BMGR32 parameters (continued) Parameter Result /THINK Configure the boot manager to use the blue button on the keyboard to enter the Predesktop Area. /TOC tocvalue Set the BIOS TOC location (16 characters that represent 8 bytes of data). /U0 Show partition...
...; Original MBR Sector number where the machine's original master boot record is stored. • IBM Flag Value from the data sector (1 if Lenovo-branded system, 0 if not) • Boot Config Displays the installation option used when booting to the service area. 60 Rescue and Recovery ... the Master boot record program /? BMGR32 parameters (continued) Parameter Result /THINK Configure the boot manager to use the blue button on the keyboard to enter the Predesktop Area. /TOC tocvalue Set the BIOS TOC location (16 characters that represent 8 bytes of data). /U0 Show partition...
(English) Power Manager Deployment Guide
Page 28
...and users select On from the pull-down menu, the Windows operating system will automatically adjust the setting based on what users do with their keyboard or mouse to keep the computer display on . If this policy is enabled and users select On from the pull-down menu, the ...Windows operating system will automatically adjust the setting based on what users do with their keyboard or mouse to keep the computer display on . Manages how the Windows operating system controls the setting that specifies how long a computer must ...
...and users select On from the pull-down menu, the Windows operating system will automatically adjust the setting based on what users do with their keyboard or mouse to keep the computer display on . If this policy is enabled and users select On from the pull-down menu, the ...Windows operating system will automatically adjust the setting based on what users do with their keyboard or mouse to keep the computer display on . Manages how the Windows operating system controls the setting that specifies how long a computer must ...
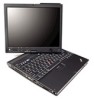
Hardware Maintenance Manual
Page 5
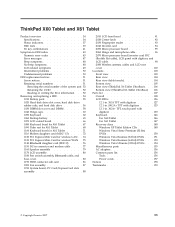
...27 Detecting system information with PC-Doctor . . 29 Power system checkout 30 ThinkPad X60 Tablet and X61 Tablet . . 33 Product overview 34 Specifications 34 Status indicators 37 FRU ... 1040 Hinge caps 60 1050 Keyboard 62 1060 Backup battery 65 1070 LCD extend board 66 1080 Keyboard bezel for X60 Tablet . . . . . 67 1090 Palm rest for X61 Tablet 68 1100 Keyboard bezel for X61 Tablet . . . . ...view 105 Rear view (ThinkPad X6 Tablet UltraBase). . . 106 Bottom view (ThinkPad X6 Tablet UltraBase) 106 Parts list 107 Overall 108 LCD FRUs 126 Keyboard 146 Recovery discs 148 Miscellaneous...
...27 Detecting system information with PC-Doctor . . 29 Power system checkout 30 ThinkPad X60 Tablet and X61 Tablet . . 33 Product overview 34 Specifications 34 Status indicators 37 FRU ... 1040 Hinge caps 60 1050 Keyboard 62 1060 Backup battery 65 1070 LCD extend board 66 1080 Keyboard bezel for X60 Tablet . . . . . 67 1090 Palm rest for X61 Tablet 68 1100 Keyboard bezel for X61 Tablet . . . . ...view 105 Rear view (ThinkPad X6 Tablet UltraBase). . . 106 Bottom view (ThinkPad X6 Tablet UltraBase) 106 Parts list 107 Overall 108 LCD FRUs 126 Keyboard 146 Recovery discs 148 Miscellaneous...

Hardware Maintenance Manual
Page 26
... diskette eject button v Fuses blown by attachment of a nonsupported device v Forgotten computer password (making the computer unusable) v Sticky keys caused by spilling a liquid onto the keyboard v Use of an incorrect ac adapter on laptop products The following symptoms might indicate damage caused by referring to the following list: The following are...
... diskette eject button v Fuses blown by attachment of a nonsupported device v Forgotten computer password (making the computer unusable) v Sticky keys caused by spilling a liquid onto the keyboard v Use of an incorrect ac adapter on laptop products The following symptoms might indicate damage caused by referring to the following list: The following are...
Hardware Maintenance Manual
Page 31
...: The computer does not accept any of Fn+F4. Note: If the computer enters the hibernation mode while it before taking any operation with the keyboard, the TrackPoint® , the hard disk, the parallel connector, or the diskette drive within that the battery power is independent of the following occurs: ... 25 To cause the computer to enter hibernation mode, do not set on the timer, and the user does not do any action to the ThinkPad X6 Tablet UltraBase, do one of the following : v Press the Fn+F12 keys. In certain circumstances, the computer goes into hibernation mode.) Note...
...: The computer does not accept any of Fn+F4. Note: If the computer enters the hibernation mode while it before taking any operation with the keyboard, the TrackPoint® , the hard disk, the parallel connector, or the diskette drive within that the battery power is independent of the following occurs: ... 25 To cause the computer to enter hibernation mode, do not set on the timer, and the user does not do any action to the ThinkPad X6 Tablet UltraBase, do one of the following : v Press the Fn+F12 keys. In certain circumstances, the computer goes into hibernation mode.) Note...
Hardware Maintenance Manual
Page 32
... the hard disk drive is read, and system status is turned on the timer, and if the user does not do any operation with the keyboard, the TrackPoint, the hard disk drive, the parallel connector, or the diskette drive within that action. - The hibernation file in suspend mode.
... the hard disk drive is read, and system status is turned on the timer, and if the user does not do any operation with the keyboard, the TrackPoint, the hard disk drive, the parallel connector, or the diskette drive within that action. - The hibernation file in suspend mode.
Hardware Maintenance Manual
Page 35
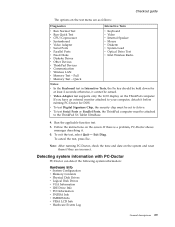
... v Run Normal Test v Run Quick Test v CPU/Coprocessor v Systemboard v Video Adapter v Serial Ports v Parallel Ports v Fixed Disks v Diskette Drives v Other Devices v ThinkPad Devices v Communication v Wireless LAN v Memory Test - Full v Memory Test - v To test Digital Signature Chip, the security chip must be set to Active. If there ...Note: After running PC-Doctor for at least 2 seconds; Checkout guide The options on the test menu are incorrect. Quick v Keyboard v Video v Internal Speaker v Mouse v Diskette v System Load v Optical Drive Test v Intel Wireless Radio Notes: v In the...
... v Run Normal Test v Run Quick Test v CPU/Coprocessor v Systemboard v Video Adapter v Serial Ports v Parallel Ports v Fixed Disks v Diskette Drives v Other Devices v ThinkPad Devices v Communication v Wireless LAN v Memory Test - Full v Memory Test - v To test Digital Signature Chip, the security chip must be set to Active. If there ...Note: After running PC-Doctor for at least 2 seconds; Checkout guide The options on the test menu are incorrect. Quick v Keyboard v Video v Internal Speaker v Mouse v Diskette v System Load v Optical Drive Test v Intel Wireless Radio Notes: v In the...
Hardware Maintenance Manual
Page 39
...processor board/inverter card FFC (flexible flat cable), LCD panel with digitizer 139 Keyboard 146 For X60 Tablet 146 For X61 Tablet 147 Recovery discs 148 Windows XP Tablet Edition CDs . . . .... Common parts list 156 Tools 156 Power cords 157 Notices 158 Trademarks 159 © Copyright Lenovo 2007 33 XGA+ TFT, touch panel with digitizer, and LCD cable 98 2080 Wireless antenna... Rear view 104 Rear view (tablet mode 104 Bottom view 105 Rear view (ThinkPad X6 Tablet UltraBase). . . 106 Bottom view (ThinkPad X6 Tablet UltraBase) 106 Parts list 107 Overall 108 LCD FRUs 126 12.1-in...
...processor board/inverter card FFC (flexible flat cable), LCD panel with digitizer 139 Keyboard 146 For X60 Tablet 146 For X61 Tablet 147 Recovery discs 148 Windows XP Tablet Edition CDs . . . .... Common parts list 156 Tools 156 Power cords 157 Notices 158 Trademarks 159 © Copyright Lenovo 2007 33 XGA+ TFT, touch panel with digitizer, and LCD cable 98 2080 Wireless antenna... Rear view 104 Rear view (tablet mode 104 Bottom view 105 Rear view (ThinkPad X6 Tablet UltraBase). . . 106 Bottom view (ThinkPad X6 Tablet UltraBase) 106 Parts list 107 Overall 108 LCD FRUs 126 12.1-in...
Hardware Maintenance Manual
Page 44
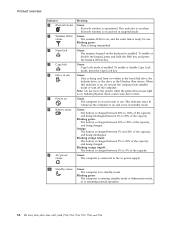
... mode, press the Caps Lock key. Note: Do not move the system while the green drive-in standby mode. Green: The battery is on the keyboard is enabled. Blinking orange (rapid): The battery is being discharged between 0% to 80% of the capacity, and being charged. Green: Caps Lock mode is enabled...
... mode, press the Caps Lock key. Note: Do not move the system while the green drive-in standby mode. Green: The battery is on the keyboard is enabled. Blinking orange (rapid): The battery is being discharged between 0% to 80% of the capacity, and being charged. Green: Caps Lock mode is enabled...
Hardware Maintenance Manual
Page 45
... correctly. 2. Turn on the computer. 3. Press enter. 5. Power Diagnostics --> ThinkPad Devices --> AC Adapter, Battery 1 (Battery 2) LCD unit 1. Interactive Tests --> Video Modem daughter card (MDC-1.5) 1. Keyboard 1. Diagnostics --> Systemboard 3. Note: Do not apply any diskette from the BIOS ... Speaker Interactive Tests --> Internal Speaker Note: (For X61 Tablet only) Once Modem/Audio test is done, no sound is running. Press Enter to the ThinkPad computer, detach it. Diagnostics --> Systemboard --> Keyboard 2. Remove any physical shock to enter the BIOS ...
... correctly. 2. Turn on the computer. 3. Press enter. 5. Power Diagnostics --> ThinkPad Devices --> AC Adapter, Battery 1 (Battery 2) LCD unit 1. Interactive Tests --> Video Modem daughter card (MDC-1.5) 1. Keyboard 1. Diagnostics --> Systemboard 3. Note: Do not apply any diskette from the BIOS ... Speaker Interactive Tests --> Internal Speaker Note: (For X61 Tablet only) Once Modem/Audio test is done, no sound is running. Press Enter to the ThinkPad computer, detach it. Diagnostics --> Systemboard --> Keyboard 2. Remove any physical shock to enter the BIOS ...
Hardware Maintenance Manual
Page 50
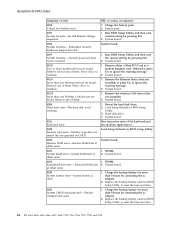
...the wireless LAN device that you installed. 2. Reseat the hard disk drive. 2. Hard disk drive. 4. Run interactive tests of the keyboard and the auxiliary input device. 0220 Monitor type error-Monitor type does not match the one of them. Replace the backup battery and run...press Esc to ignore the warning message. 2. System board. Symptom-to-FRU index Symptom or error FRU or action, in CMOS. System board. 021x Keyboard error. DIMM. Battery pack. 0191 System Security-Invalid Remote Change requested. 1. or press Esc to ignore the warning message. 2. System board. 01C9 ...
...the wireless LAN device that you installed. 2. Reseat the hard disk drive. 2. Hard disk drive. 4. Run interactive tests of the keyboard and the auxiliary input device. 0220 Monitor type error-Monitor type does not match the one of them. Replace the backup battery and run...press Esc to ignore the warning message. 2. System board. Symptom-to-FRU index Symptom or error FRU or action, in CMOS. System board. 021x Keyboard error. DIMM. Battery pack. 0191 System Security-Invalid Remote Change requested. 1. or press Esc to ignore the warning message. 2. System board. 01C9 ...
Hardware Maintenance Manual
Page 68
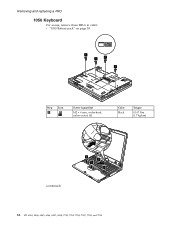
Removing and replacing a FRU 1050 Keyboard For access, remove these FRUs in order: v "1010 Battery pack" on page 55 1 1 1 1 Step 1 Icon Screw (quantity) M2 × 6 mm, wafer-head, nylon-coated (4) Color Black Torque 0.167 Nm (1.7 kgfcm) (continued) 3 3 2 3 62 MT 6363, 6364, 6365, 6366, 6367, 6368, 7762, 7763, 7764, 7767, 7768, and 7769
Removing and replacing a FRU 1050 Keyboard For access, remove these FRUs in order: v "1010 Battery pack" on page 55 1 1 1 1 Step 1 Icon Screw (quantity) M2 × 6 mm, wafer-head, nylon-coated (4) Color Black Torque 0.167 Nm (1.7 kgfcm) (continued) 3 3 2 3 62 MT 6363, 6364, 6365, 6366, 6367, 6368, 7762, 7763, 7764, 7767, 7768, and 7769

Hardware Maintenance Manual
Page 69
Removing and replacing a FRU Lift the keyboard a little in the direction shown by arrow 4 , and then detach the connector 5 . 4 5 ThinkPad X60 Tablet and X61 Tablet 63
Removing and replacing a FRU Lift the keyboard a little in the direction shown by arrow 4 , and then detach the connector 5 . 4 5 ThinkPad X60 Tablet and X61 Tablet 63

Hardware Maintenance Manual
Page 70
Make sure that the front side of the computer. 64 MT 6363, 6364, 6365, 6366, 6367, 6368, 7762, 7763, 7764, 7767, 7768, and 7769 Then press the keys to slide the keyboard toward you. 4. Removing and replacing a FRU When installing: 1. To make sure that the keyboard edges are under the frame as shown in place. 3. Attach the keyboard connector firmly. 2. Secure the keyboard by tightening the screws from the bottom side of the keyboard is housed firmly, gently press the keys with your thumbs and try to latch the keyboard firmly in this figure.
Make sure that the front side of the computer. 64 MT 6363, 6364, 6365, 6366, 6367, 6368, 7762, 7763, 7764, 7767, 7768, and 7769 Then press the keys to slide the keyboard toward you. 4. Removing and replacing a FRU When installing: 1. To make sure that the keyboard edges are under the frame as shown in place. 3. Attach the keyboard connector firmly. 2. Secure the keyboard by tightening the screws from the bottom side of the keyboard is housed firmly, gently press the keys with your thumbs and try to latch the keyboard firmly in this figure.
Hardware Maintenance Manual
Page 71
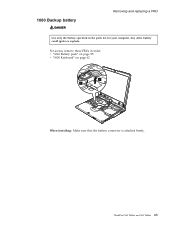
ThinkPad X60 Tablet and X61 Tablet 65 For access, remove these FRUs in the parts list for your computer. Any other battery could ignite or explode. 1060 Backup battery DANGER Removing and replacing a FRU Use only the battery specified in order: v "1010 Battery pack" on page 55 v "1050 Keyboard" on page 62 1 2 When installing: Make sure that the battery connector is attached firmly.
ThinkPad X60 Tablet and X61 Tablet 65 For access, remove these FRUs in the parts list for your computer. Any other battery could ignite or explode. 1060 Backup battery DANGER Removing and replacing a FRU Use only the battery specified in order: v "1010 Battery pack" on page 55 v "1050 Keyboard" on page 62 1 2 When installing: Make sure that the battery connector is attached firmly.
Hardware Maintenance Manual
Page 72
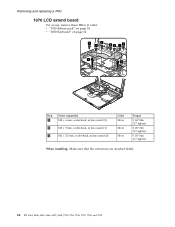
Removing and replacing a FRU 1070 LCD extend board For access, remove these FRUs in order: v "1010 Battery pack" on page 55 v "1050 Keyboard" on page 62 1 2 1 3 3 13 4 4 Step 1 2 3 Screw (quantity) M2 × 6 mm, wafer-head, nylon-coated (3) M2 × 9 mm, wafer-head, nylon-coated (1) M2 × 2.5 mm, wafer-head, nylon-coated (3) Color Silver Silver Silver Torque 0.167 Nm (1.7 kgfcm) 0.167 Nm (1.7 kgfcm) 0.167 Nm (1.7 kgfcm) When installing: Make sure that the connectors are attached firmly. 66 MT 6363, 6364, 6365, 6366, 6367, 6368, 7762, 7763, 7764, 7767, 7768, and 7769
Removing and replacing a FRU 1070 LCD extend board For access, remove these FRUs in order: v "1010 Battery pack" on page 55 v "1050 Keyboard" on page 62 1 2 1 3 3 13 4 4 Step 1 2 3 Screw (quantity) M2 × 6 mm, wafer-head, nylon-coated (3) M2 × 9 mm, wafer-head, nylon-coated (1) M2 × 2.5 mm, wafer-head, nylon-coated (3) Color Silver Silver Silver Torque 0.167 Nm (1.7 kgfcm) 0.167 Nm (1.7 kgfcm) 0.167 Nm (1.7 kgfcm) When installing: Make sure that the connectors are attached firmly. 66 MT 6363, 6364, 6365, 6366, 6367, 6368, 7762, 7763, 7764, 7767, 7768, and 7769
Hardware Maintenance Manual
Page 73
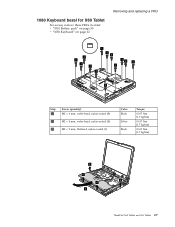
1080 Keyboard bezel for X60 Tablet For access, remove these FRUs in order: v "1010 Battery pack" on page 55 v "1050 Keyboard" on page 62 Removing and replacing a FRU 1 1 1 1 1 2 2 2 2 1 1 1 3 Step 1 2 3 Screw (quantity) M2 × 6 mm, wafer-head, nylon-coated (8) M2 × 4 mm, wafer-head, nylon-coated (4) M2 × 2 mm, flat-head, nylon-coated (1) Color Black Silver Black Torque 0.167 Nm (1.7 kgfcm) 0.167 Nm (1.7 kgfcm) 0.167 Nm (1.7 kgfcm) 5 4 5 4 6 ThinkPad X60 Tablet and X61 Tablet 67
1080 Keyboard bezel for X60 Tablet For access, remove these FRUs in order: v "1010 Battery pack" on page 55 v "1050 Keyboard" on page 62 Removing and replacing a FRU 1 1 1 1 1 2 2 2 2 1 1 1 3 Step 1 2 3 Screw (quantity) M2 × 6 mm, wafer-head, nylon-coated (8) M2 × 4 mm, wafer-head, nylon-coated (4) M2 × 2 mm, flat-head, nylon-coated (1) Color Black Silver Black Torque 0.167 Nm (1.7 kgfcm) 0.167 Nm (1.7 kgfcm) 0.167 Nm (1.7 kgfcm) 5 4 5 4 6 ThinkPad X60 Tablet and X61 Tablet 67
Hardware Maintenance Manual
Page 74
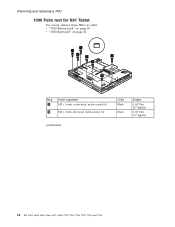
Removing and replacing a FRU 1090 Palm rest for X61 Tablet For access, remove these FRUs in order: v "1010 Battery pack" on page 55 v "1050 Keyboard" on page 62 1 1 1 1 1 1 2 Step 1 2 Screw (quantity) M2 × 6 mm, wafer-head, nylon-coated (6) M2 × 2 mm, flat-head, nylon-coated (1) (continued) Color Black Black Torque 0.167 Nm (1.7 kgfcm) 0.167 Nm (1.7 kgfcm) 68 MT 6363, 6364, 6365, 6366, 6367, 6368, 7762, 7763, 7764, 7767, 7768, and 7769
Removing and replacing a FRU 1090 Palm rest for X61 Tablet For access, remove these FRUs in order: v "1010 Battery pack" on page 55 v "1050 Keyboard" on page 62 1 1 1 1 1 1 2 Step 1 2 Screw (quantity) M2 × 6 mm, wafer-head, nylon-coated (6) M2 × 2 mm, flat-head, nylon-coated (1) (continued) Color Black Black Torque 0.167 Nm (1.7 kgfcm) 0.167 Nm (1.7 kgfcm) 68 MT 6363, 6364, 6365, 6366, 6367, 6368, 7762, 7763, 7764, 7767, 7768, and 7769

Hardware Maintenance Manual
Page 77
Removing and replacing a FRU 1100 Keyboard bezel for X61 Tablet For access, remove these FRUs in order: v "1010 Battery pack" on page 55 v "1050 Keyboard" on page 62 1 2 2 2 2 1 Step 1 2 Screw (quantity) M2 × 6 mm, wafer-head, nylon-coated (2) M2 × 4 mm, wafer-head, nylon-coated (4) Color Black Silver Torque 0.167 Nm (1.7 kgfcm) 0.167 Nm (1.7 kgfcm) 3 3 4 ThinkPad X60 Tablet and X61 Tablet 71
Removing and replacing a FRU 1100 Keyboard bezel for X61 Tablet For access, remove these FRUs in order: v "1010 Battery pack" on page 55 v "1050 Keyboard" on page 62 1 2 2 2 2 1 Step 1 2 Screw (quantity) M2 × 6 mm, wafer-head, nylon-coated (2) M2 × 4 mm, wafer-head, nylon-coated (4) Color Black Silver Torque 0.167 Nm (1.7 kgfcm) 0.167 Nm (1.7 kgfcm) 3 3 4 ThinkPad X60 Tablet and X61 Tablet 71


