User Manual
Page 36
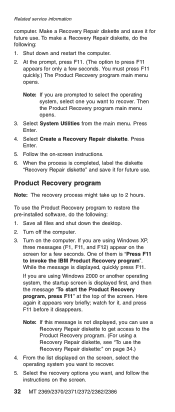
At the prompt, press F11. (The option to press F11 appears for only a few seconds. Follow the on the computer. Turn off the computer. 3. While the message is displayed first, and then the message "To start the Product Recovery program, press F11...Product Recovery program to the Product Recovery program. (For using Windows 2000 or another operating system, the startup screen is displayed, quickly press F11. Turn on -screen instructions. 6. Then the Product Recovery program main menu opens. 3. Related service information computer. To use the Recovery Repair diskette:" on ...
At the prompt, press F11. (The option to press F11 appears for only a few seconds. Follow the on the computer. Turn off the computer. 3. While the message is displayed first, and then the message "To start the Product Recovery program, press F11...Product Recovery program to the Product Recovery program. (For using Windows 2000 or another operating system, the startup screen is displayed, quickly press F11. Turn on -screen instructions. 6. Then the Product Recovery program main menu opens. 3. Related service information computer. To use the Recovery Repair diskette:" on ...

User Manual
Page 38
Insert the Recovery Repair diskette into the drive, and then turn off the computer. 34 MT 2369/2370/2371/2372/2382/2386 Contained within this area is compatible with the ThinkPad computer you are servicing. 1. Note: You might take up copies of the files on the computer. 3. If possible, ...save all the files and shut down and turn on the primary hard disk partition (usually drive C) will be...
Insert the Recovery Repair diskette into the drive, and then turn off the computer. 34 MT 2369/2370/2371/2372/2382/2386 Contained within this area is compatible with the ThinkPad computer you are servicing. 1. Note: You might take up copies of the files on the computer. 3. If possible, ...save all the files and shut down and turn on the primary hard disk partition (usually drive C) will be...
User Manual
Page 39
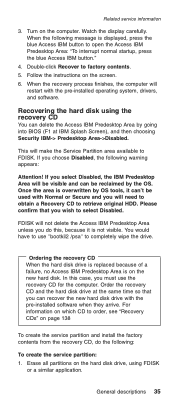
... Access IBM button." 4. Double-click Recover to FDISK. When the recovery process finishes, the computer will make the Service Partition area available to factory contents. 5. Turn on the hard disk drive, using the recovery CD You can be used with the pre-installed software when they arrive.
... Access IBM button." 4. Double-click Recover to FDISK. When the recovery process finishes, the computer will make the Service Partition area available to factory contents. 5. Turn on the hard disk drive, using the recovery CD You can be used with the pre-installed software when they arrive.

User Manual
Page 41
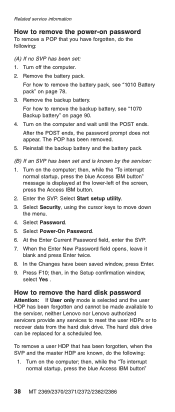
... to get access to the BIOS Setup Utility and make changes to the servicer, there is no master HDP is available, neither Lenovo nor Lenovo authorized servicers provide any ThinkPad computer: the power-on password (POP), the hard disk password (HDP), and the supervisor password (SVP). Attention: If the ... the password. Related service information Passwords As many as three passwords may be needed for it appears on the screen whenever the computer is turned on. The computer does not start until the password is booted. Attention: If the user HDP has been forgotten, check whether a master...
... to get access to the BIOS Setup Utility and make changes to the servicer, there is no master HDP is available, neither Lenovo nor Lenovo authorized servicers provide any ThinkPad computer: the power-on password (POP), the hard disk password (HDP), and the supervisor password (SVP). Attention: If the ... the password. Related service information Passwords As many as three passwords may be needed for it appears on the screen whenever the computer is turned on. The computer does not start until the password is booted. Attention: If the user HDP has been forgotten, check whether a master...
User Manual
Page 42
... known by the servicer: 1. Enter the SVP. Select Power-On Password. 6. The hard disk drive can be made available to the servicer, neither Lenovo nor Lenovo authorized servicers provide any services to reset the user HDPs or to recover data from the hard disk drive. After the POST ends, the password... the hard disk password Attention: If User only mode is selected and the user HDP has been forgotten and cannot be replaced for a scheduled fee. Turn on page 90. 4. In the Changes have forgotten, do the following : (A) If no SVP has been set and is displayed at the lower-left...
... known by the servicer: 1. Enter the SVP. Select Power-On Password. 6. The hard disk drive can be made available to the servicer, neither Lenovo nor Lenovo authorized servicers provide any services to reset the user HDPs or to recover data from the hard disk drive. After the POST ends, the password... the hard disk password Attention: If User only mode is selected and the user HDP has been forgotten and cannot be replaced for a scheduled fee. Turn on page 90. 4. In the Changes have forgotten, do the following : (A) If no SVP has been set and is displayed at the lower-left...

User Manual
Page 43
...Select Yes in Windows 95 and Windows NT. Notes v Screen blank mode is called standby mode in BIOS Setup Utility expires, v The LCD backlight turns off timer" in Windows 95 and Windows NT. A pop-up window opens. 7. Enter the master HDP; then leave the New Password field blank ... supporting the Passphrase function, press F1 while HDP icon is displayed at the lower-left of the hard disk drive. Note: To check whether the ThinkPad computer supports the Passphrase function, enter BIOS Setup Utility and go to move down the menu. 5. Enter SVP. 4. Select Password. 6. Select hard disk...
...Select Yes in Windows 95 and Windows NT. Notes v Screen blank mode is called standby mode in BIOS Setup Utility expires, v The LCD backlight turns off timer" in Windows 95 and Windows NT. A pop-up window opens. 7. Enter the master HDP; then leave the New Password field blank ... supporting the Passphrase function, press F1 while HDP icon is displayed at the lower-left of the hard disk drive. Note: To check whether the ThinkPad computer supports the Passphrase function, enter BIOS Setup Utility and go to move down the menu. 5. Enter SVP. 4. Select Password. 6. Select hard disk...
User Manual
Page 44
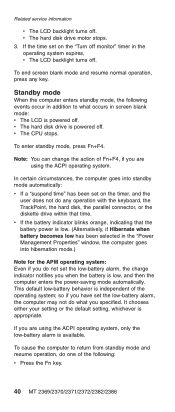
... events occur in addition to return from standby mode and resume operation, do what occurs in the operating system expires, v The LCD backlight turns off . To enter standby mode, press Fn+F4. It chooses either your setting or the default setting, whichever is powered off . Standby...cause the computer to what you when the battery is available. v The hard disk drive motor stops. 3. Related service information v The LCD backlight turns off . Note: You can change the action of the operating system; v If the battery indicator blinks orange, indicating that time. so if you ...
... events occur in addition to return from standby mode and resume operation, do what occurs in the operating system expires, v The LCD backlight turns off . To enter standby mode, press Fn+F4. It chooses either your setting or the default setting, whichever is powered off . Standby...cause the computer to what you when the battery is available. v The hard disk drive motor stops. 3. Related service information v The LCD backlight turns off . Note: You can change the action of the operating system; v If the battery indicator blinks orange, indicating that time. so if you ...
User Manual
Page 45
... it is signaled by a serial device or a PC Card device (Windows 2000 does not support the ring indicator (RI) resume by closing the LCD cover.) v Turn on the power switch. Note: The computer does not accept any of the following events, the computer automatically returns from the docking station before taking...
... it is signaled by a serial device or a PC Card device (Windows 2000 does not support the ring indicator (RI) resume by closing the LCD cover.) v Turn on the power switch. Note: The computer does not accept any of the following events, the computer automatically returns from the docking station before taking...
User Manual
Page 46
... called PC-Doctor). Closing the lid. - v If the timer conditions are intended to Power switch mode [Hibernation], turn off the power switch. The use of non-ThinkPad products, prototype cards, or modified options can detect errors by running the diagnostic test or by running the diagnostics test ... the power button. - You can lead to "Product overview" on the timer, and the user does not do any operation with the ThinkPad computer. v If you are using the APM operating system and have defined one of the following actions as possible. 2. Checkout guide Use the...
... called PC-Doctor). Closing the lid. - v If the timer conditions are intended to Power switch mode [Hibernation], turn off the power switch. The use of non-ThinkPad products, prototype cards, or modified options can detect errors by running the diagnostic test or by running the diagnostics test ... the power button. - You can lead to "Product overview" on the timer, and the user does not do any operation with the ThinkPad computer. v If you are using the APM operating system and have defined one of the following actions as possible. 2. Checkout guide Use the...

User Manual
Page 51
...replace the ac adapter. 4. Perform operational charging. Note: Noise from the computer. 2. Reinstall the battery pack. v If the power-on indicator does not turn on page 53. v If the problem persists, go to ″Checking operational charging.″ To check the ac adapter, do the following: v Replace... following figure: 2 1 (16 - 10 V) Pin Voltage (V dc) 1 +15.5 to +17.0 2 Ground 3. If the battery status indicator or icon does not turn on page 48 Checking the ac adapter You are here because the computer fails only when the ac adapter is used: v If the power problem...
...replace the ac adapter. 4. Perform operational charging. Note: Noise from the computer. 2. Reinstall the battery pack. v If the power-on indicator does not turn on page 53. v If the problem persists, go to ″Checking operational charging.″ To check the ac adapter, do the following: v Replace... following figure: 2 1 (16 - 10 V) Pin Voltage (V dc) 1 +15.5 to +17.0 2 Ground 3. If the battery status indicator or icon does not turn on page 48 Checking the ac adapter You are here because the computer fails only when the ac adapter is used: v If the power problem...

User Manual
Page 52
.... Checking the backup battery Do the following : 1. Note: If the battery pack becomes hot, it at least 3 hours, even if the indicator does not turn on . If the resistance is less than 95% of its capacity. If the resistance is still not charged, go to 100% of the total power...room temperature for a moment (but do the following : 48 MT 2369/2370/2371/2372/2382/2386 Checkout guide If the charge indicator still does not turn on , replace the system board. Then reinstall the battery pack. If it . Checking the battery pack Battery charging does not start until the Power ...
.... Checking the backup battery Do the following : 1. Note: If the battery pack becomes hot, it at least 3 hours, even if the indicator does not turn on . If the resistance is less than 95% of its capacity. If the resistance is still not charged, go to 100% of the total power...room temperature for a moment (but do the following : 48 MT 2369/2370/2371/2372/2382/2386 Checkout guide If the charge indicator still does not turn on , replace the system board. Then reinstall the battery pack. If it . Checking the battery pack Battery charging does not start until the Power ...

User Manual
Page 53
... battery pack (see "Checking the battery pack" on page 78). 4. Power off the computer, and unplug the ac adapter from it. 2. See the following figure. Turn the computer upside down. 3. Checkout guide 1. General descriptions 49 Red (+) Black (-) Wire Voltage (V dc) Red +2.5 to +3.2 Black Ground v If the voltage is not correct, replace...
... battery pack (see "Checking the battery pack" on page 78). 4. Power off the computer, and unplug the ac adapter from it. 2. See the following figure. Turn the computer upside down. 3. Checkout guide 1. General descriptions 49 Red (+) Black (-) Wire Voltage (V dc) Red +2.5 to +3.2 Black Ground v If the voltage is not correct, replace...

User Manual
Page 60
... is in standby mode. Blinking orange: The battery needs to use. When this indicator is on, do not put the computer into standby mode or turn off briefly.) Orange: The battery is being read from or written to the hard disk drive, or the drive in the Ultrabay device. Green: The... computer is on the keyboard is enabled. Green: Data is being charged, but still has enough power to operate. (At regular intervals, the indicator light turns off the computer. 6 Power on 7 Battery status 8 Standby status Note: Do not move the system while the Green drive in use light is on and...
... is in standby mode. Blinking orange: The battery needs to use. When this indicator is on, do not put the computer into standby mode or turn off briefly.) Orange: The battery is being read from or written to the hard disk drive, or the drive in the Ultrabay device. Green: The... computer is on the keyboard is enabled. Green: Data is being charged, but still has enough power to operate. (At regular intervals, the indicator light turns off the computer. 6 Power on 7 Battery status 8 Standby status Note: Do not move the system while the Green drive in use light is on and...
User Manual
Page 61
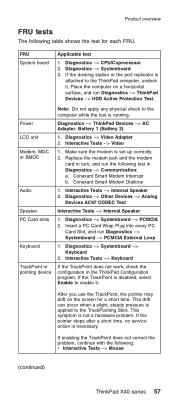
.... Interactive Tests --> Keyboard If the TrackPoint does not work, check the configuration in turn, and run Diagnostics --> ThinkPad Devices --> HDD Active Protection Test. If enabling the TrackPoint does not correct the problem, continue with the following: v Interactive Tests --> Mouse (continued) ThinkPad X40 series 57 FRU System board Applicable test 1. Diagnostics --> Systemboard --> Keyboard 2. Place the...
.... Interactive Tests --> Keyboard If the TrackPoint does not work, check the configuration in turn, and run Diagnostics --> ThinkPad Devices --> HDD Active Protection Test. If enabling the TrackPoint does not correct the problem, continue with the following: v Interactive Tests --> Mouse (continued) ThinkPad X40 series 57 FRU System board Applicable test 1. Diagnostics --> Systemboard --> Keyboard 2. Place the...

User Manual
Page 62
... DIMM to its place, remove the other one of them and run Diagnostics --> Memory Test - Diagnostics --> Other Devices --> CD-ROM/DVD 2. Turn on the computer and check the air turbulence at the louver near the power switch. 2. Diagnostics --> Diskette Drives 2. Interactive Tests --> CD-ROM/... Test 1. Interactive Tests --> Diskette 1. If the test does not detect the error, run the test again. 3. Quick. 2. Run Diagnostics --> ThinkPad Devices --> Fan. 58 MT 2369/2370/2371/2372/2382/2386 Full. 1. If two DIMMs are installed, remove one , and run Diagnostics --> Memory Test -
... DIMM to its place, remove the other one of them and run Diagnostics --> Memory Test - Diagnostics --> Other Devices --> CD-ROM/DVD 2. Turn on the computer and check the air turbulence at the louver near the power switch. 2. Diagnostics --> Diskette Drives 2. Interactive Tests --> CD-ROM/... Test 1. Interactive Tests --> Diskette 1. If the test does not detect the error, run the test again. 3. Quick. 2. Run Diagnostics --> ThinkPad Devices --> Fan. 58 MT 2369/2370/2371/2372/2382/2386 Full. 1. If two DIMMs are installed, remove one , and run Diagnostics --> Memory Test -
User Manual
Page 63
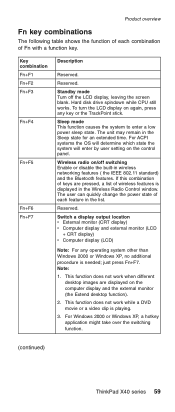
... is needed; The user can quickly change the power state of each combination of Fn with a function key. Note: 1. Standby mode Turn off switching Enable or disable the built-in wireless networking features ( the IEEE 802.11 standard) and the Bluetooth features. Hard disk drive...To turn the LCD display on /off the LCD display, leaving the screen blank. Reserved. Reserved. just press Fn+F7. The unit may remain in the Wireless Radio Control window. For Windows 2000 or Windows XP, a hotkey application might take over the switching function. (continued) ThinkPad X40 series...
... is needed; The user can quickly change the power state of each combination of Fn with a function key. Note: 1. Standby mode Turn off switching Enable or disable the built-in wireless networking features ( the IEEE 802.11 standard) and the Bluetooth features. Hard disk drive...To turn the LCD display on /off the LCD display, leaving the screen blank. Reserved. Reserved. just press Fn+F7. The unit may remain in the Wireless Radio Control window. For Windows 2000 or Windows XP, a hotkey application might take over the switching function. (continued) ThinkPad X40 series...
User Manual
Page 64
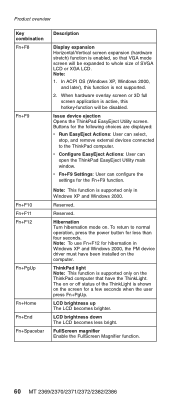
...F9 Settings: User can configure the settings for less than four seconds. Reserved. ThinkPad light Note: This function is active, this function is shown on the ThinkPad computer that VGA mode screen will be expanded to the ThinkPad computer. LCD brightness down The LCD becomes less bright. FullScreen magnifier Enable the ...only on the screen for a few seconds when the user press Fn+PgUp. Buttons for hibernation in Windows XP and Windows 2000. Hibernation Turn hibernation mode on the computer. Product overview Key combination Fn+F8 Fn+F9 Fn+F10 Fn+F11 Fn+F12 Fn+PgUp Fn+Home Fn+...
...F9 Settings: User can configure the settings for less than four seconds. Reserved. ThinkPad light Note: This function is active, this function is shown on the ThinkPad computer that VGA mode screen will be expanded to the ThinkPad computer. LCD brightness down The LCD becomes less bright. FullScreen magnifier Enable the ...only on the screen for a few seconds when the user press Fn+PgUp. Buttons for hibernation in Windows XP and Windows 2000. Hibernation Turn hibernation mode on the computer. Product overview Key combination Fn+F8 Fn+F9 Fn+F10 Fn+F11 Fn+F12 Fn+PgUp Fn+Home Fn+...
User Manual
Page 76
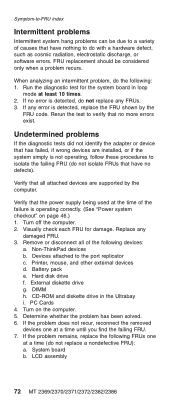
...computer. 5. Remove or disconnect all attached devices are installed, or if the system simply is detected, replace the FRU shown by the computer. Non-ThinkPad devices b. DIMM h. PC Cards 4. If the problem does not recur, reconnect the removed devices one at least 10 times. 2. Undetermined problems If... the diagnostic tests did not identify the adapter or device that has failed, if wrong devices are supported by the FRU code. Turn off the computer. 2. Battery pack e. LCD assembly 72 MT 2369/2370/2371/2372/2382/2386 If any error is not operating, follow these...
...computer. 5. Remove or disconnect all attached devices are installed, or if the system simply is detected, replace the FRU shown by the computer. Non-ThinkPad devices b. DIMM h. PC Cards 4. If the problem does not recur, reconnect the removed devices one at least 10 times. 2. Undetermined problems If... the diagnostic tests did not identify the adapter or device that has failed, if wrong devices are supported by the FRU code. Turn off the computer. 2. Battery pack e. LCD assembly 72 MT 2369/2370/2371/2372/2382/2386 If any error is not operating, follow these...

User Manual
Page 77
... They are harder to removing and replacing parts. v Always use new screws. ThinkPad X40 series 73 v Each one . v Use a torque screwdriver if you service this section carefully before replacing any FRU. In the ThinkPad computer, this problem is addressed with shock or vibration. Do the following characteristics:...page 141) in your tool bag. Screw notices Loose screws can cause a reliability problem. Tighten screws as follows: v Plastic to plastic Turn an additional 90 degrees after the screw head touches the surface of the logic card: 180 degrees more (Cross-section) v Torque driver...
... They are harder to removing and replacing parts. v Always use new screws. ThinkPad X40 series 73 v Each one . v Use a torque screwdriver if you service this section carefully before replacing any FRU. In the ThinkPad computer, this problem is addressed with shock or vibration. Do the following characteristics:...page 141) in your tool bag. Screw notices Loose screws can cause a reliability problem. Tighten screws as follows: v Plastic to plastic Turn an additional 90 degrees after the screw head touches the surface of the logic card: 180 degrees more (Cross-section) v Torque driver...
User Manual
Page 81
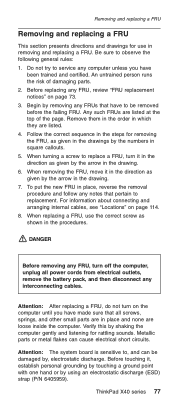
...8. Before touching it, establish personal grounding by touching a ground point with one hand or by , electrostatic discharge. ThinkPad X40 series 77 Begin by the numbers in the procedures. When turning a screw to replacement. Removing and replacing a FRU Removing and replacing a FRU This section presents directions and drawings for...a FRU. When replacing a FRU, use in place, reverse the removal procedure and follow any notes that pertain to replace a FRU, turn it in the direction as given by the arrow in place and none are listed at the top of damaging parts. 2. DANGER Before ...
...8. Before touching it, establish personal grounding by touching a ground point with one hand or by , electrostatic discharge. ThinkPad X40 series 77 Begin by the numbers in the procedures. When turning a screw to replacement. Removing and replacing a FRU Removing and replacing a FRU This section presents directions and drawings for...a FRU. When replacing a FRU, use in place, reverse the removal procedure and follow any notes that pertain to replace a FRU, turn it in the direction as given by the arrow in place and none are listed at the top of damaging parts. 2. DANGER Before ...


