User Manual
Page 8
... PRODUCT ID portion of the machine label is a special bid offering. If you select an incorrect drive, data or programs can be found on the screen to fulfillment, where it is the 4-digit MT and 3-digit CMV model (Example: 1829-W15). The machine label, PC Entitlement Warehouse (PEW), eSupport, and the...
... PRODUCT ID portion of the machine label is a special bid offering. If you select an incorrect drive, data or programs can be found on the screen to fulfillment, where it is the 4-digit MT and 3-digit CMV model (Example: 1829-W15). The machine label, PC Entitlement Warehouse (PEW), eSupport, and the...
User Manual
Page 36
... this message is completed, label the diskette "Recovery Repair diskette" and save it for future use the Recovery Repair diskette:" on the screen, select the operating system you can use a Recovery Repair diskette to get access to recover. 5. From the list displayed on page 34... the process is not displayed, you want to the Product Recovery program. (For using a Recovery Repair diskette, see "To use . Turn on -screen instructions. 6. While the message is "Press F11 to restore the pre-installed software, do the following : 1. Make a Recovery Repair diskette and save...
... this message is completed, label the diskette "Recovery Repair diskette" and save it for future use the Recovery Repair diskette:" on the screen, select the operating system you can use a Recovery Repair diskette to get access to recover. 5. From the list displayed on page 34... the process is not displayed, you want to the Product Recovery program. (For using a Recovery Repair diskette, see "To use . Turn on -screen instructions. 6. While the message is "Press F11 to restore the pre-installed software, do the following : 1. Make a Recovery Repair diskette and save...

User Manual
Page 38
... 2 hours. Follow the on your drive C before you have saved on -screen instructions. Recovering the hard disk to back up to complete the recovery. Contained within this area is compatible with the ThinkPad computer you are servicing has a hidden, protected area for backups. Access IBM ...that is a complete backup of the backup images stored in the protected area. On each of the Windows operating system. Attention: All of ThinkPad computer you are unable to use a diskette drive in the recovery process. Therefore, you are servicing. 1. To recover the hard disk to...
... 2 hours. Follow the on your drive C before you have saved on -screen instructions. Recovering the hard disk to back up to complete the recovery. Contained within this area is compatible with the ThinkPad computer you are servicing has a hidden, protected area for backups. Access IBM ...that is a complete backup of the backup images stored in the protected area. On each of the Windows operating system. Attention: All of ThinkPad computer you are unable to use a diskette drive in the recovery process. Therefore, you are servicing. 1. To recover the hard disk to...
User Manual
Page 39
...case, you do the following: To create the service partition: 1. For information on which CD to order, see "Recovery CDs" on the screen. 6. Double-click Recover to FDISK. Follow the instructions on page 138 To create the service partition and install the factory contents from the recovery... FDISK will make the Service Partition area available to factory contents. 5. Order the recovery CD and the hard disk drive at IBM Splash Screen), and then choosing Security IBM-> Predesktop Area->Disabled. General descriptions 35 Turn on the new hard disk. Ordering the recovery CD When the...
...case, you do the following: To create the service partition: 1. For information on which CD to order, see "Recovery CDs" on the screen. 6. Double-click Recover to FDISK. Follow the instructions on page 138 To create the service partition and install the factory contents from the recovery... FDISK will make the Service Partition area available to factory contents. 5. Order the recovery CD and the hard disk drive at IBM Splash Screen), and then choosing Security IBM-> Predesktop Area->Disabled. General descriptions 35 Turn on the new hard disk. Ordering the recovery CD When the...

User Manual
Page 41
... administrator then provides the user HDP to reset the password. If it has, it can use it appears on the screen whenever the computer is available, neither Lenovo nor Lenovo authorized servicers provide any ThinkPad computer: the power-on password (POP), the hard disk password (HDP), and the supervisor password (SVP). Attention: If the...
... administrator then provides the user HDP to reset the password. If it has, it can use it appears on the screen whenever the computer is available, neither Lenovo nor Lenovo authorized servicers provide any ThinkPad computer: the power-on password (POP), the hard disk password (HDP), and the supervisor password (SVP). Attention: If the...
User Manual
Page 42
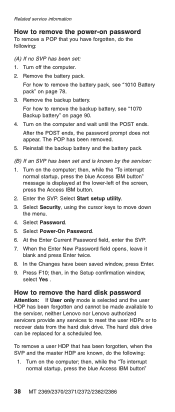
... backup battery and the battery pack. (B) If an SVP has been set : 1. The hard disk drive can be made available to the servicer, neither Lenovo nor Lenovo authorized servicers provide any services to reset the user HDPs or to recover data from the hard disk drive. then, while the "To interrupt normal... be replaced for a scheduled fee. How to remove the hard disk password Attention: If User only mode is displayed at the lower-left of the screen, press the Access IBM button. 2. Remove the battery pack. In the Changes have forgotten, do the following : (A) If no SVP has been set and is...
... backup battery and the battery pack. (B) If an SVP has been set : 1. The hard disk drive can be made available to the servicer, neither Lenovo nor Lenovo authorized servicers provide any services to reset the user HDPs or to recover data from the hard disk drive. then, while the "To interrupt normal... be replaced for a scheduled fee. How to remove the hard disk password Attention: If User only mode is displayed at the lower-left of the screen, press the Access IBM button. 2. Remove the battery pack. In the Changes have forgotten, do the following : (A) If no SVP has been set and is...

User Manual
Page 43
... information message is muted. 2. Select Security, using the cursor keys to Security -> Password. Select Password. 6. Notes v Screen blank mode is available on the ThinkPad computer. 3. If you press Fn+F3, General descriptions 39 Double-click Start setup utility. Select hard disk x password, where...operating system and you press Fn+F3, or the time set on the screen; Enter SVP. 4. v Standby mode is displayed in the Setup Configuration window. Note: To check whether the ThinkPad computer supports the Passphrase function, enter BIOS Setup Utility and go to move...
... information message is muted. 2. Select Security, using the cursor keys to Security -> Password. Select Password. 6. Notes v Screen blank mode is available on the ThinkPad computer. 3. If you press Fn+F3, General descriptions 39 Double-click Start setup utility. Select hard disk x password, where...operating system and you press Fn+F3, or the time set on the screen; Enter SVP. 4. v Standby mode is displayed in the Setup Configuration window. Note: To check whether the ThinkPad computer supports the Passphrase function, enter BIOS Setup Utility and go to move...
User Manual
Page 44
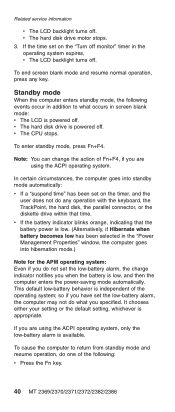
To end screen blank mode and resume normal operation, press any operation with the keyboard, the TrackPoint, the hard disk, the parallel connector, or the diskette drive within ... the "Power Management Properties" window, the computer goes into standby mode automatically: v If a "suspend time" has been set on the "Turn off monitor" timer in screen blank mode: v The LCD is available. v The hard disk drive is low. (Alternatively, if Hibernate when battery becomes low has been selected in addition to...
To end screen blank mode and resume normal operation, press any operation with the keyboard, the TrackPoint, the hard disk, the parallel connector, or the diskette drive within ... the "Power Management Properties" window, the computer goes into standby mode automatically: v If a "suspend time" has been set on the "Turn off monitor" timer in screen blank mode: v The LCD is available. v The hard disk drive is low. (Alternatively, if Hibernate when battery becomes low has been selected in addition to...
User Manual
Page 47
On the BIOS Setup Utility screen, press F9, Enter, F10, and then Enter. To test a USB device, connect it to initialize the computer setup by using PS2.EXE. General descriptions 43 ...
On the BIOS Setup Utility screen, press F9, Enter, F10, and then Enter. To test a USB device, connect it to initialize the computer setup by using PS2.EXE. General descriptions 43 ...
User Manual
Page 49
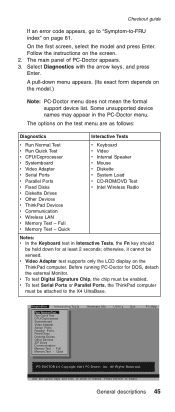
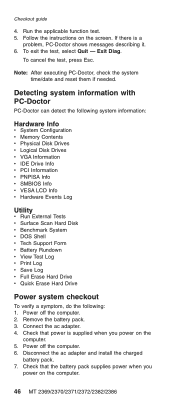
...-to-FRU index" on the screen. 2. A pull-down for DOS, detach the external Monitor. Before running PC-Doctor for at least 2 seconds; Follow the instructions on page 61. The main panel of PC-Doctor appears. 3. Full Memory Test - The options on the ThinkPad computer. v To test Digital...Tests, the Fn key should be attached to select. otherwise, it cannot be enabled. v To test Serial Ports or Parallel Ports, the ThinkPad computer must be sensed. v Video Adapter test supports only the LCD display on the test menu are as follows: Diagnostics Interactive Tests v ...
...-to-FRU index" on the screen. 2. A pull-down for DOS, detach the external Monitor. Before running PC-Doctor for at least 2 seconds; Follow the instructions on page 61. The main panel of PC-Doctor appears. 3. Full Memory Test - The options on the ThinkPad computer. v To test Digital...Tests, the Fn key should be attached to select. otherwise, it cannot be enabled. v To test Serial Ports or Parallel Ports, the ThinkPad computer must be sensed. v Video Adapter test supports only the LCD display on the test menu are as follows: Diagnostics Interactive Tests v ...
User Manual
Page 50
... battery pack. 3. Follow the instructions on the computer. 46 MT 2369/2370/2371/2372/2382/2386 If there is supplied when you power on the screen.
... battery pack. 3. Follow the instructions on the computer. 46 MT 2369/2370/2371/2372/2382/2386 If there is supplied when you power on the screen.
User Manual
Page 61
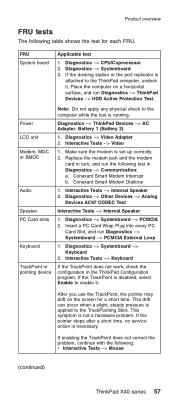
... work, check the configuration in Diagnostics --> Communication: a. Product overview FRU tests The following : v Interactive Tests --> Mouse (continued) ThinkPad X40 series 57 Diagnostics --> Systemboard 3. This drift can occur when a slight, steady pressure is applied to the computer while the test is...--> Systemboard --> PCMCIA External Loop 1. Diagnostics --> CPU/Coprocessor 2. FRU System board Applicable test 1. Place the computer on the screen for each FRU. Power LCD unit Modem, MDC or BMDC Audio Speaker PC Card slots Keyboard TrackPoint or pointing device Note:...
... work, check the configuration in Diagnostics --> Communication: a. Product overview FRU tests The following : v Interactive Tests --> Mouse (continued) ThinkPad X40 series 57 Diagnostics --> Systemboard 3. This drift can occur when a slight, steady pressure is applied to the computer while the test is...--> Systemboard --> PCMCIA External Loop 1. Diagnostics --> CPU/Coprocessor 2. FRU System board Applicable test 1. Place the computer on the screen for each FRU. Power LCD unit Modem, MDC or BMDC Audio Speaker PC Card slots Keyboard TrackPoint or pointing device Note:...
User Manual
Page 63
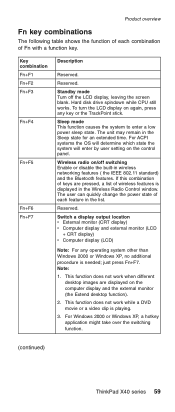
...list of Fn with a function key. The user can quickly change the power state of keys are displayed on /off the LCD display, leaving the screen blank. This function does not work while a DVD movie or a video clip is needed; The unit may remain in the list. Note: 1. ... XP, no additional procedure is playing. 3. For Windows 2000 or Windows XP, a hotkey application might take over the switching function. (continued) ThinkPad X40 series 59 Product overview Fn key combinations The following table shows the function of each feature in the Sleep state for an extended time. Key...
...list of Fn with a function key. The user can quickly change the power state of keys are displayed on /off the LCD display, leaving the screen blank. This function does not work while a DVD movie or a video clip is needed; The unit may remain in the list. Note: 1. ... XP, no additional procedure is playing. 3. For Windows 2000 or Windows XP, a hotkey application might take over the switching function. (continued) ThinkPad X40 series 59 Product overview Fn key combinations The following table shows the function of each feature in the Sleep state for an extended time. Key...
User Manual
Page 64
... Buttons for hibernation in Windows XP and Windows 2000. Issue device ejection Opens the ThinkPad EasyEject Utility screen. ThinkPad light Note: This function is supported only on the ThinkPad computer that VGA mode screen will be expanded to normal operation, press the power button for the Fn+F9 function.... v Fn+F9 Settings: User can open the ThinkPad EasyEject Utility main window. To return to whole ...
... Buttons for hibernation in Windows XP and Windows 2000. Issue device ejection Opens the ThinkPad EasyEject Utility screen. ThinkPad light Note: This function is supported only on the ThinkPad computer that VGA mode screen will be expanded to normal operation, press the power button for the Fn+F9 function.... v Fn+F9 Settings: User can open the ThinkPad EasyEject Utility main window. To return to whole ...

User Manual
Page 71
... Protection Test. Symptom-to open the BIOS Setup Utility. Press to the ThinkPad computer, and place the computer on a horizontal surface. Set this item to the computer. 2. If item 2 failed, press F3 in welcome screen in Access IBM Predesktop Area again. 4. If item 4 failed, replace the...IBM Predesktop Area. Undock docking station or port replicator if it . 5. Run RECOVER TO FACTORY CONTENTS in RECOVER TO FACTORY CONTENTS. ThinkPad X40 series 67 Then run RECOVER TO FACTORY CONTENTS in Access IBM Predesktop Area. 3. Boot from Recovery CD and perform full recovery from...
... Protection Test. Symptom-to open the BIOS Setup Utility. Press to the ThinkPad computer, and place the computer on a horizontal surface. Set this item to the computer. 2. If item 2 failed, press F3 in welcome screen in Access IBM Predesktop Area again. 4. If item 4 failed, replace the...IBM Predesktop Area. Undock docking station or port replicator if it . 5. Run RECOVER TO FACTORY CONTENTS in RECOVER TO FACTORY CONTENTS. ThinkPad X40 series 67 Then run RECOVER TO FACTORY CONTENTS in Access IBM Predesktop Area. 3. Boot from Recovery CD and perform full recovery from...
User Manual
Page 73
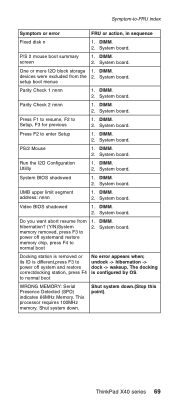
... is removed or its ID is configured by OS. WRONG MEMORY: Serial Presence Detected (SPD) indicates 66MHz Memory. System board. P/S 2 mouse boot summary screen 1. Press F2 to normal boot No error appears when; System board. System board. System board. Parity Check 2 nnnn 1. DIMM. 2. DIMM. 2. System board. System board. DIMM. ThinkPad X40 series 69
... is removed or its ID is configured by OS. WRONG MEMORY: Serial Presence Detected (SPD) indicates 66MHz Memory. System board. P/S 2 mouse boot summary screen 1. Press F2 to normal boot No error appears when; System board. System board. System board. Parity Check 2 nnnn 1. DIMM. 2. DIMM. 2. System board. System board. DIMM. ThinkPad X40 series 69

User Manual
Page 74
...blank, unreadable, or flashing LCD. 1. System board. No beep, power-on indicator on page 61. The power-on password prompt appears. Start the ThinkPad Configuration program and set . Reseat the LCD connector. 2. One long and two short beeps, and a blank or unreadable LCD. 1. Three short ...should. External CRT. 4. DIMM. Type the password and press Enter. Five short beeps and a blank screen. appears. Two short beeps with error codes. Two short beeps and a blank screen. 1. DIMM. 2. Symptom-to-FRU index Beep symptoms Symptom or error FRU or action, in sequence No...
...blank, unreadable, or flashing LCD. 1. System board. No beep, power-on indicator on page 61. The power-on password prompt appears. Start the ThinkPad Configuration program and set . Reseat the LCD connector. 2. One long and two short beeps, and a blank or unreadable LCD. 1. Three short ...should. External CRT. 4. DIMM. Type the password and press Enter. Five short beeps and a blank screen. appears. Two short beeps with error codes. Two short beeps and a blank screen. 1. DIMM. 2. Symptom-to-FRU index Beep symptoms Symptom or error FRU or action, in sequence No...

User Manual
Page 75
... cannot be adjusted. v Characters missing pixels. v Wrong color displayed. LCD assembly. 4. LCD assembly. v LCD too dark. v Screen abnormal. ThinkPad X40 series 71 v LCD contrast cannot be adjusted. Horizontal or vertical lines displayed on , and a blank LCD during POST. Reseat the ...always off (black color.) Symptom or error No beep, power-on indicator on LCD. v LCD backlight not working. v LCD screen unreadable. FRU or action, in any background is characteristic of 9 or more bright and dark dots. System board. 1. Reseat all LCD connectors. 3....
... cannot be adjusted. v Characters missing pixels. v Wrong color displayed. LCD assembly. 4. LCD assembly. v LCD too dark. v Screen abnormal. ThinkPad X40 series 71 v LCD contrast cannot be adjusted. Horizontal or vertical lines displayed on , and a blank LCD during POST. Reseat the ...always off (black color.) Symptom or error No beep, power-on indicator on LCD. v LCD backlight not working. v LCD screen unreadable. FRU or action, in any background is characteristic of 9 or more bright and dark dots. System board. 1. Reseat all LCD connectors. 3....
User Manual
Page 78
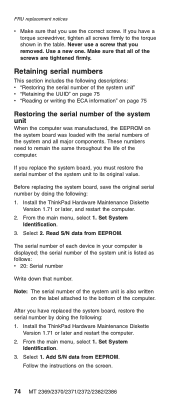
...on page 75 v "Reading or writing the ECA information" on page 75 Restoring the serial number of the system unit is displayed; Install the ThinkPad Hardware Maintenance Diskette Version 1.71 or later, and restart the computer. 2. the serial number of the system unit When the computer was manufactured, ...the EEPROM on the screen. 74 MT 2369/2370/2371/2372/2382/2386 Set System Identification. 3. Use a new one. These numbers need to the bottom of the computer....
...on page 75 v "Reading or writing the ECA information" on page 75 Restoring the serial number of the system unit is displayed; Install the ThinkPad Hardware Maintenance Diskette Version 1.71 or later, and restart the computer. 2. the serial number of the system unit When the computer was manufactured, ...the EEPROM on the screen. 74 MT 2369/2370/2371/2372/2382/2386 Set System Identification. 3. Use a new one. These numbers need to the bottom of the computer....

User Manual
Page 79
...The algorithm that had the ECA applied to a machine. A new UUID is not overwritten. Reading or writing the ECA information Information on the screen. From the main menu, select 6. Read box build date from EEPROM and follow the instruction on Engineering Change Announcements (ECA) are stored in... A.D. 3400. Read ECA/rework number from EEPROM, and follow the instruction. 4. The machine does not need to be updated to update the EEPROM. ThinkPad X40 series 75 From the main menu, select 4. If a valid UUID already exists, it . 1. To check what ECAs have the same number. After...
...The algorithm that had the ECA applied to a machine. A new UUID is not overwritten. Reading or writing the ECA information Information on the screen. From the main menu, select 6. Read box build date from EEPROM and follow the instruction on Engineering Change Announcements (ECA) are stored in... A.D. 3400. Read ECA/rework number from EEPROM, and follow the instruction. 4. The machine does not need to be updated to update the EEPROM. ThinkPad X40 series 75 From the main menu, select 4. If a valid UUID already exists, it . 1. To check what ECAs have the same number. After...


