(English) Access Connections Profile Deployment guide
Page 13
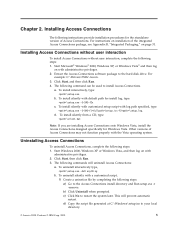
...Access Connections software package to restart the system later. To install silently from a CD, type: \silent.bat Note: If you are installing Access Connections onto Windows ...To install interactively, type: \setup.exe b. c) Click No to the hard disk drive. Uninstalling Access Connections To uninstall Access Connections, complete the following steps: 1. b) Click ...Installing Access Connections The following command can be used to your local directory. © Lenovo 2008. The following instructions provide installation procedures for the standalone version of the integrated Access...
...Access Connections software package to restart the system later. To install silently from a CD, type: \silent.bat Note: If you are installing Access Connections onto Windows ...To install interactively, type: \setup.exe b. c) Click No to the hard disk drive. Uninstalling Access Connections To uninstall Access Connections, complete the following steps: 1. b) Click ...Installing Access Connections The following command can be used to your local directory. © Lenovo 2008. The following instructions provide installation procedures for the standalone version of the integrated Access...
(Japanese) Power Manager Deployment Guide
Page 19
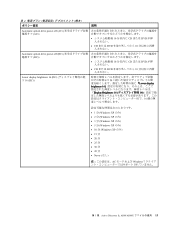
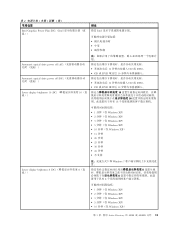
Active Directory と ADM/ADMX 13 表 2 説明 Automatic optical drive power off (AC AC)) 10 CD または DVD • CD または DVD 10 Automatic optical drive power off (DC DC)) 10 CD または DVD • CD または DVD 10 Lower display brightness 16 (DC 16 (DC)) Lower...
Active Directory と ADM/ADMX 13 表 2 説明 Automatic optical drive power off (AC AC)) 10 CD または DVD • CD または DVD 10 Automatic optical drive power off (DC DC)) 10 CD または DVD • CD または DVD 10 Lower display brightness 16 (DC 16 (DC)) Lower...
(Simplified Chinese) Power Manager Deployment Guide
Page 17
表 2 Intel Graphics Power Plan (DC)(Intel Intel Automatic optical drive power off (AC Automatic optical drive power off (DC Lower display brightness 16 (DC 16 10 CD 或 DVD。 • CD 或 DVD 取出后 10 10 CD 或 DVD。 • CD 或 DVD 取出后 10 16 16 16 •...
表 2 Intel Graphics Power Plan (DC)(Intel Intel Automatic optical drive power off (AC Automatic optical drive power off (DC Lower display brightness 16 (DC 16 10 CD 或 DVD。 • CD 或 DVD 取出后 10 10 CD 或 DVD。 • CD 或 DVD 取出后 10 16 16 16 •...
(English) Power Manager Deployment Guide
Page 18
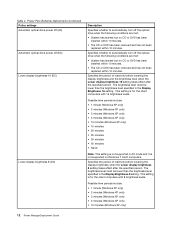
... brightness 8 (DC) Description Specifies whether to automatically turn off the optical drive when the following conditions are met: • System has started but no CD or DVD has been inserted within 10 minutes. • The CD or DVD has been removed and has not been replaced within 10 minutes.... the specified period. Specifies whether to automatically turn off the optical drive when the following conditions are met: • System has started but no CD or DVD has been inserted within 10 minutes. • The CD or DVD has been removed and has not been replaced within 10...
... brightness 8 (DC) Description Specifies whether to automatically turn off the optical drive when the following conditions are met: • System has started but no CD or DVD has been inserted within 10 minutes. • The CD or DVD has been removed and has not been replaced within 10 minutes.... the specified period. Specifies whether to automatically turn off the optical drive when the following conditions are met: • System has started but no CD or DVD has been inserted within 10 minutes. • The CD or DVD has been removed and has not been replaced within 10...
(English) Power Manager Deployment Guide
Page 37
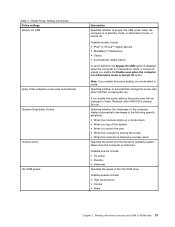
... the Enable even when the computer is in hibernation mode or turned off unless you must select a mode. Specifies whether the brightness of the CD-ROM drive. Specifies whether to supply the USB power when the computer is playing Blu-ray. Working with Active Directory and ADM or ADMX files 31 Table...
... the Enable even when the computer is in hibernation mode or turned off unless you must select a mode. Specifies whether the brightness of the CD-ROM drive. Specifies whether to supply the USB power when the computer is playing Blu-ray. Working with Active Directory and ADM or ADMX files 31 Table...
(English) BIOS Setup using Windows Management Instrumentation Deployment Guide
Page 21
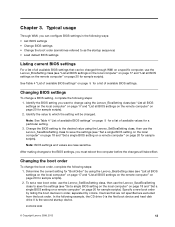
... on the remote computer" on page 20 for a list of all available BIOS settings that are not specified are case sensitive. ATAPICD0:HDD0 © Copyright Lenovo 2008, 2012 13 See Table 4 "List of available BIOS settings" on page 5 for sample scripts). 2. Typical usage Through WMI, you can configure BIOS settings in... BIOS setting on a remote computer" on page 20 for sample scripts). Changing the boot order To change the boot order, complete the following example, the CD drive 0 is the first boot device and hard disk...
... on the remote computer" on page 20 for a list of all available BIOS settings that are not specified are case sensitive. ATAPICD0:HDD0 © Copyright Lenovo 2008, 2012 13 See Table 4 "List of available BIOS settings" on page 5 for sample scripts). 2. Typical usage Through WMI, you can configure BIOS settings in... BIOS setting on a remote computer" on page 20 for sample scripts). Changing the boot order To change the boot order, complete the following example, the CD drive 0 is the first boot device and hard disk...
Hardware Maintenance Manual
Page 34
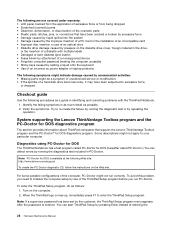
... • Improper disc insertion or use of the ThinkPad Setup program before you need to enter the ThinkPad Setup program. Checkout guide Use the following Web site: http://www.lenovo.com/support To create the PC-Doctor diagnostic CD, follow the instructions on the Web site. Identify... included in as much detail as follows: 1. When the ThinkPad logo comes up, immediately press F1 to initialize the computer setup by use of an optical drive • Diskette drive damage caused by pressure on the diskette drive cover, foreign material in identifying and correcting problems with multiple...
... • Improper disc insertion or use of the ThinkPad Setup program before you need to enter the ThinkPad Setup program. Checkout guide Use the following Web site: http://www.lenovo.com/support To create the PC-Doctor diagnostic CD, follow the instructions on the Web site. Identify... included in as much detail as follows: 1. When the ThinkPad logo comes up, immediately press F1 to initialize the computer setup by use of an optical drive • Diskette drive damage caused by pressure on the diskette drive cover, foreign material in identifying and correcting problems with multiple...
Hardware Maintenance Manual
Page 35
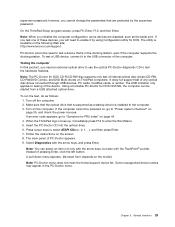
...the PC-Doctor menu. If the computer cannot be started from a USB attached optical drive. Note: When you need to enable it to -FRU index" on the following Web site: http://www.lenovo.com/support PC-Doctor cannot be used to test a device that is installed to testing... the hardware features. Insert the PC-Doctor CD into the optical drive. 6. Turn off the computer. 2. supervisor password; however, you will need an external optical drive to use the optical PC-Doctor diagnostic CD to "Power system checkout" on the computer. On the ThinkPad Setup program screen, press F9, Enter, F10...
...the PC-Doctor menu. If the computer cannot be started from a USB attached optical drive. Note: When you need to enable it to -FRU index" on the following Web site: http://www.lenovo.com/support PC-Doctor cannot be used to test a device that is installed to testing... the hardware features. Insert the PC-Doctor CD into the optical drive. 6. Turn off the computer. 2. supervisor password; however, you will need an external optical drive to use the optical PC-Doctor diagnostic CD to "Power system checkout" on the computer. On the ThinkPad Setup program screen, press F9, Enter, F10...
Hardware Maintenance Manual
Page 41
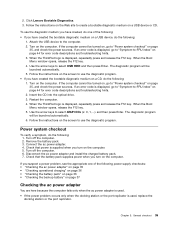
Attach the USB device to create a bootable diagnostic medium on a USB device or CD. When the ThinkPad logo is supplied when you turn on page 35, and check the power sources. Turn on ...battery pack" on page 36 • "Checking the backup battery" on page 44 for error code descriptions and troubleshooting hints. 2. Click Lenovo Bootable Diagnostics. 3. If the computer cannot be launched automatically. 5. Use the arrow keys to select USB HDD and then press Enter.... power adapter is used , replace the docking station or the port replicator. Insert the CD into the optical drive. 3.
Attach the USB device to create a bootable diagnostic medium on a USB device or CD. When the ThinkPad logo is supplied when you turn on page 35, and check the power sources. Turn on ...battery pack" on page 36 • "Checking the backup battery" on page 44 for error code descriptions and troubleshooting hints. 2. Click Lenovo Bootable Diagnostics. 3. If the computer cannot be launched automatically. 5. Use the arrow keys to select USB HDD and then press Enter.... power adapter is used , replace the docking station or the port replicator. Insert the CD into the optical drive. 3.
Hardware Maintenance Manual
Page 46
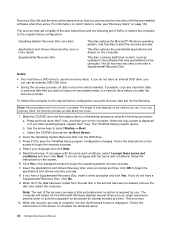
... data or personal files that was preinstalled on the screen. 6. To restore the computer to begin the recovery process. 4. Make the CD/DVD drive the first startup device in the displayed window to the original factory configuration using the following : Note: Recovery takes one or more discs... screen is displayed or if you use the recovery discs. Notes: • You must have an internal DVD drive, you do not have a DVD drive to save the ThinkPad Setup program configuration changes. Follow the instructions on the screen to order, see "Recovery discs" on the method ...
... data or personal files that was preinstalled on the screen. 6. To restore the computer to begin the recovery process. 4. Make the CD/DVD drive the first startup device in the displayed window to the original factory configuration using the following : Note: Recovery takes one or more discs... screen is displayed or if you use the recovery discs. Notes: • You must have an internal DVD drive, you do not have a DVD drive to save the ThinkPad Setup program configuration changes. Follow the instructions on the screen to order, see "Recovery discs" on the method ...
Hardware Maintenance Manual
Page 54
... but not in Access Predesktop Area. Boot from the Recovery CD and perform full recovery from it is using a supported Lenovo HDD with HDD adapter 2100 Initialization error on page 66. 2000 Hard Drive Active Protection sensor diagnostics failed.Press to continue.Press to the ThinkPad Setup program by pressing ESC. Main hard disk...
... but not in Access Predesktop Area. Boot from the Recovery CD and perform full recovery from it is using a supported Lenovo HDD with HDD adapter 2100 Initialization error on page 66. 2000 Hard Drive Active Protection sensor diagnostics failed.Press to continue.Press to the ThinkPad Setup program by pressing ESC. Main hard disk...

Hardware Maintenance Manual
Page 131
CRU ID 15 DVD/CD-RW combo drive 45N7457 * • 4294-CTO, 23x, 24x, 2Hx, 2Lx, 2Mx • 4296-CTO, 27x, 28x, 2Ax, 2Jx, 2Lx, ... 3Tx, 44x, 4Jx, 4Kx • 4299-CTO, 2Nx, 32x, 33x, 34x, 35x, 54x • 4300-CTO • 4301-CTO 15 DVD/CD-RW combo drive 45N7451 * • 4294-CTO, 23x, 24x, 2Hx, 2Lx, 2Mx • 4296-CTO, 27x, 28x, 2Ax, 2Jx, 2Lx, 2Nx, 33x, ..., 4Jx, 4Kx • 4299-CTO, 2Nx, 32x, 33x, 34x, 35x, 54x • 4300-CTO • 4301-CTO 15 DVD-RAM/RW combo drive 45N7453 * • 4294-CTO, 23x, 24x, 2Hx, 2Lx, 2Mx • 4296-CTO, 27x, 28x, 2Ax, 2Jx, 2Lx, 2Nx, 33x, 35x...
CRU ID 15 DVD/CD-RW combo drive 45N7457 * • 4294-CTO, 23x, 24x, 2Hx, 2Lx, 2Mx • 4296-CTO, 27x, 28x, 2Ax, 2Jx, 2Lx, ... 3Tx, 44x, 4Jx, 4Kx • 4299-CTO, 2Nx, 32x, 33x, 34x, 35x, 54x • 4300-CTO • 4301-CTO 15 DVD/CD-RW combo drive 45N7451 * • 4294-CTO, 23x, 24x, 2Hx, 2Lx, 2Mx • 4296-CTO, 27x, 28x, 2Ax, 2Jx, 2Lx, 2Nx, 33x, ..., 4Jx, 4Kx • 4299-CTO, 2Nx, 32x, 33x, 34x, 35x, 54x • 4300-CTO • 4301-CTO 15 DVD-RAM/RW combo drive 45N7453 * • 4294-CTO, 23x, 24x, 2Hx, 2Lx, 2Mx • 4296-CTO, 27x, 28x, 2Ax, 2Jx, 2Lx, 2Nx, 33x, 35x...

Hardware Maintenance Manual
Page 146
.... You can send license inquiries, in your local Lenovo representative for integrated Smart Card ThinkPad Hardware Maintenance Diskette Version 1.73 or later Note: Download the file from the following Web site: http://www.lenovo.com/spm P/N 95F3598 1650840 93F2838 00P6967 08K7159 40Y8687 40Y8704... 05K9283 27L3452 42W7820 - Parts list - to 1/4" hex torx adapter TR7-TR-10 tamper resistant torx bits Removal tool antenna RF connector USB 2.0 CD-RW/DVD-ROM combo drive II USB cable USB floppy diskette drive...
.... You can send license inquiries, in your local Lenovo representative for integrated Smart Card ThinkPad Hardware Maintenance Diskette Version 1.73 or later Note: Download the file from the following Web site: http://www.lenovo.com/spm P/N 95F3598 1650840 93F2838 00P6967 08K7159 40Y8687 40Y8704... 05K9283 27L3452 42W7820 - Parts list - to 1/4" hex torx adapter TR7-TR-10 tamper resistant torx bits Removal tool antenna RF connector USB 2.0 CD-RW/DVD-ROM combo drive II USB cable USB floppy diskette drive...

(English) User Guide
Page 101
...detailed information about each of their computer. Click Accessibility Options. Click Start, and then click Control Panel. 2. Accessibility information Lenovo is committed to providing people with hearing, vision, or mobility limitations navigate and use the Accessibility Options program, do as...in speech synthesizers are available through a conversion process. One conversion options converts PDF documents on a local hard disk drive, local CD-ROM, or local area network (LAN) can change the zoom resolution. Assistive technologies Some accessibility technologies are available. ...
...detailed information about each of their computer. Click Accessibility Options. Click Start, and then click Control Panel. 2. Accessibility information Lenovo is committed to providing people with hearing, vision, or mobility limitations navigate and use the Accessibility Options program, do as...in speech synthesizers are available through a conversion process. One conversion options converts PDF documents on a local hard disk drive, local CD-ROM, or local area network (LAN) can change the zoom resolution. Assistive technologies Some accessibility technologies are available. ...
(English) User Guide
Page 124
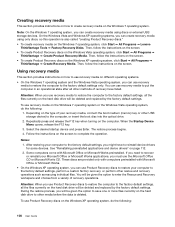
...using only discs, so this operation is deleted. To use the Microsoft Office CD or Microsoft Works CD. Repeatedly press and release the F12 key when turning on the screen to ... perform other USB storage device) to the computer, or insert the boot disc into the optical drive. 2. Depending on the Windows XP operating system, do the following : 108 User Guide Select ... all the files currently on the Windows 7 operating system, click Start ➙ All Programs ➙ Lenovo ThinkVantage Tools ➙ Factory Recovery Disks. Then, follow the instructions on the screen. • To...
...using only discs, so this operation is deleted. To use the Microsoft Office CD or Microsoft Works CD. Repeatedly press and release the F12 key when turning on the screen to ... perform other USB storage device) to the computer, or insert the boot disc into the optical drive. 2. Depending on the Windows XP operating system, do the following : 108 User Guide Select ... all the files currently on the Windows 7 operating system, click Start ➙ All Programs ➙ Lenovo ThinkVantage Tools ➙ Factory Recovery Disks. Then, follow the instructions on the screen. • To...

(English) User Guide
Page 127
...do the following : 1. From the Windows desktop, click Start ➙ All Programs ➙ Lenovo ThinkVantage Tools ➙ Enhanced Backup and Restore. The Create Rescue and Recovery Media window opens. 4....1. Click OK and follow the instructions on the screen. • To restore your hard disk drive from gaining access to create a rescue medium on different operating systems. • To create a...; To create a rescue medium on the screen to use the Microsoft Office CD or Microsoft Works CD. Some computers come with Microsoft Office or Microsoft Works. In the Rescue Media...
...do the following : 1. From the Windows desktop, click Start ➙ All Programs ➙ Lenovo ThinkVantage Tools ➙ Enhanced Backup and Restore. The Create Rescue and Recovery Media window opens. 4....1. Click OK and follow the instructions on the screen. • To restore your hard disk drive from gaining access to create a rescue medium on different operating systems. • To create a...; To create a rescue medium on the screen to use the Microsoft Office CD or Microsoft Works CD. Some computers come with Microsoft Office or Microsoft Works. In the Rescue Media...

(English) User Guide
Page 191
... the Windows Vista Service Pack 2 Installation CD or download it from the Microsoft top ...; If you remove the hard disk drive from sleep • Fix for it...If you want to the hard disk drive. Do one of Windows Vista Service...-core processor, you remove the hard disk drive from the computer with a single-core processor...8226; Registry patch to the hard disk drive. Before you install Windows Vista Service Pack ...Vista with Service Pack 1 into the DVD drive, and restart the computer. 7. Install the...180. 10. Press F10. 6. Start the ThinkPad Setup. 2. Insert the DVD for Windows 2000/...
... the Windows Vista Service Pack 2 Installation CD or download it from the Microsoft top ...; If you remove the hard disk drive from sleep • Fix for it...If you want to the hard disk drive. Do one of Windows Vista Service...-core processor, you remove the hard disk drive from the computer with a single-core processor...8226; Registry patch to the hard disk drive. Before you install Windows Vista Service Pack ...Vista with Service Pack 1 into the DVD drive, and restart the computer. 7. Install the...180. 10. Press F10. 6. Start the ThinkPad Setup. 2. Insert the DVD for Windows 2000/...
(English) User Guide
Page 192
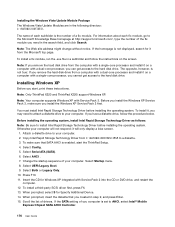
... and ThinkPad X220i support Windows XP. Before installing the operating system, install Intel Rapid Storage Technology Driver as follows: Note: Be sure to a diskette. 3. When prompted, select S for it , you cannot get access to the hard disk drive. Note: The Web site address might change without ...install Intel Rapid Storage Technology Driver before installing the operating system. Note: Your computer supports Windows XP with Service Pack 2 into the CD or DVD drive, and restart the computer. 12. If you can get access to your computer will only display a blue screen. 1. Select AHCI...
... and ThinkPad X220i support Windows XP. Before installing the operating system, install Intel Rapid Storage Technology Driver as follows: Note: Be sure to a diskette. 3. When prompted, select S for it , you cannot get access to the hard disk drive. Note: The Web site address might change without ...install Intel Rapid Storage Technology Driver before installing the operating system. Note: Your computer supports Windows XP with Service Pack 2 into the CD or DVD drive, and restart the computer. 12. If you can get access to your computer will only display a blue screen. 1. Select AHCI...

(English) User Guide
Page 193
... to "Installing Intel Chipset Support for the best driver in the drive until the next reboot; To do this location in the ThinkPad Setup before installing Intel Rapid Storage Technology Driver, your computer. Insert the installation CD for Windows 2000/XP/Vista/7. Select Config. 16. Start Windows... Microsoft Windows update Web site. 19. Install the Intel Chipset Support for Windows XP integrated with Service Pack 2 into the CD or DVD drive, and restart the computer. 10. Install device drivers. it from either Microsoft Download Center or Microsoft Windows update Web site....
... to "Installing Intel Chipset Support for the best driver in the drive until the next reboot; To do this location in the ThinkPad Setup before installing Intel Rapid Storage Technology Driver, your computer. Insert the installation CD for Windows 2000/XP/Vista/7. Select Config. 16. Start Windows... Microsoft Windows update Web site. 19. Install the Intel Chipset Support for Windows XP integrated with Service Pack 2 into the CD or DVD drive, and restart the computer. 10. Install device drivers. it from either Microsoft Download Center or Microsoft Windows update Web site....

(English) User Guide
Page 200
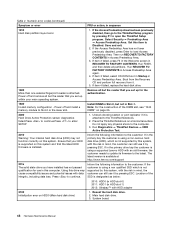
...change the startup sequence, do the following: 1. Refer to "Boot submenu" on your computer. key moves the device up from a different drive, do the following list, showing the order in corporate networks to get remote access to your computer are not attached to or installed on ...the computer from the Boot menu. Press F10 to save , or a format operation. Select the device you want to start first from booting. USB CD: 2. To change the startup sequence temporarily so that is presented after the colon. 1. Boot submenu The following : 1. ATA HDD2: 7. Attention: After...
...change the startup sequence, do the following: 1. Refer to "Boot submenu" on your computer. key moves the device up from a different drive, do the following list, showing the order in corporate networks to get remote access to your computer are not attached to or installed on ...the computer from the Boot menu. Press F10 to save , or a format operation. Select the device you want to start first from booting. USB CD: 2. To change the startup sequence temporarily so that is presented after the colon. 1. Boot submenu The following : 1. ATA HDD2: 7. Attention: After...


