(English) Access Connections Profile Deployment guide
Page 10
... might attempt to connect and the kinds of connections available in range of supported ThinkPad® systems and wireless WLAN and WAN drivers, see the following Web site: http://www.lenovo.com/pc/support/site.wss/document.do?sitestyle= lenovo&lndocid=MIGR-4ZLNJB 2 Access Connections Deployment Guide You can establish a wireless priority list that...
... might attempt to connect and the kinds of connections available in range of supported ThinkPad® systems and wireless WLAN and WAN drivers, see the following Web site: http://www.lenovo.com/pc/support/site.wss/document.do?sitestyle= lenovo&lndocid=MIGR-4ZLNJB 2 Access Connections Deployment Guide You can establish a wireless priority list that...
(English) Access Connections Profile Deployment guide
Page 13
Extract the Access Connections software package to your local directory. © Lenovo 2008. d. To uninstall interactively type, \setup.exe -0x9 anything b. b) Click Uninstall when prompted. d) Copy the script file generated at C:\Windows\setup.iss ... with default path for install log, type: \setup.exe -S-SMS-f2x c. This will uninstall Access Connections: a. Portions © IBM Corp. 2005. 5 For example: C:\Drivers\W2k\Accon. 3. The following steps: a) Go to the Access Connections install directory and Run setup.exe -r -remove. To install silently from a CD, type: \silent....
Extract the Access Connections software package to your local directory. © Lenovo 2008. d. To uninstall interactively type, \setup.exe -0x9 anything b. b) Click Uninstall when prompted. d) Copy the script file generated at C:\Windows\setup.iss ... with default path for install log, type: \setup.exe -S-SMS-f2x c. This will uninstall Access Connections: a. Portions © IBM Corp. 2005. 5 For example: C:\Drivers\W2k\Accon. 3. The following steps: a) Go to the Access Connections install directory and Run setup.exe -r -remove. To install silently from a CD, type: \silent....
(English) Access Connections Profile Deployment guide
Page 29
... and running Access Connections. After restarting the system, Access Connection is C:\Program Files\ThinkPad\ConnectUtilities). 4. Create an Access Connections distribution package (*.loa and *.sig) with Access Connections, Wireless LAN driver/application, Hotkey Fn+F5 utility, and Power Management driver. 3. For © Lenovo 2008. Include the distribution package .loa and .sig files in Chapter 3, "Working...
... and running Access Connections. After restarting the system, Access Connection is C:\Program Files\ThinkPad\ConnectUtilities). 4. Create an Access Connections distribution package (*.loa and *.sig) with Access Connections, Wireless LAN driver/application, Hotkey Fn+F5 utility, and Power Management driver. 3. For © Lenovo 2008. Include the distribution package .loa and .sig files in Chapter 3, "Working...
(English) Access Connections Profile Deployment guide
Page 30
... locked Access Connections profile. 1. Uninstall Access Connections with the same name and passphrase of wireless LAN driver/application, Hotkey Fn+F5 utility, and Power Management driver. 2. To delete locked profiles remotely complete the following command to delete the profile: \qctray.exe/del...settings. 3. Copy the distribution package (*.loa and *.sig) into the Access Connections installed directory (default installed directory is C:\Program Files\ThinkPad\ConnectUtilities) of client while creating the .loa file. 2. The import can be forced by using the following steps: 1. This ...
... locked Access Connections profile. 1. Uninstall Access Connections with the same name and passphrase of wireless LAN driver/application, Hotkey Fn+F5 utility, and Power Management driver. 2. To delete locked profiles remotely complete the following command to delete the profile: \qctray.exe/del...settings. 3. Copy the distribution package (*.loa and *.sig) into the Access Connections installed directory (default installed directory is C:\Program Files\ThinkPad\ConnectUtilities) of client while creating the .loa file. 2. The import can be forced by using the following steps: 1. This ...
(English) Access Connections Profile Deployment guide
Page 39
.... 3. For this integrated package installation, obtain Access Connections version 3.82. sitestyle=lenovo&lndocid=MIGR-4ZLNJB 1. Delete the following package: Access Connections version 3.82 with the Lenovo ThinkPad /L3000 system BIOS. The default directory where modules are extracted is used to ...complete an integrated package installation for your system: http://www.lenovo.com/pc/support/site.wss/document.do ?&lndocid=MIGR-4GXPEG v Wireless LAN drivers Refer to the wireless driver...
.... 3. For this integrated package installation, obtain Access Connections version 3.82. sitestyle=lenovo&lndocid=MIGR-4ZLNJB 1. Delete the following package: Access Connections version 3.82 with the Lenovo ThinkPad /L3000 system BIOS. The default directory where modules are extracted is used to ...complete an integrated package installation for your system: http://www.lenovo.com/pc/support/site.wss/document.do ?&lndocid=MIGR-4GXPEG v Wireless LAN drivers Refer to the wireless driver...

(English) Access Connections Profile Deployment guide
Page 40
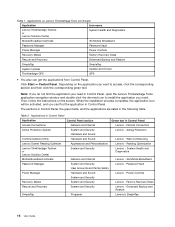
...interactively, type: \setup.exe b. To install silently, all the relevant packages with no restart. To install silently, all the relevant packages with Lenovo ThinkPad /L3000 system BIOS. v OSD is the folder that contains the main Access Connections application files. To install silently, all of installation type: ...\setup.exe /S /H /R c. v WLLANINT is the folder that contains the Intel® Pro/Wireless Driver (11a/b/g and 11b/g). v OSD for Power Management. v IBMPM is the folder that contains the On screen display utilities including the Fn+...
...interactively, type: \setup.exe b. To install silently, all the relevant packages with no restart. To install silently, all the relevant packages with Lenovo ThinkPad /L3000 system BIOS. v OSD is the folder that contains the main Access Connections application files. To install silently, all of installation type: ...\setup.exe /S /H /R c. v WLLANINT is the folder that contains the Intel® Pro/Wireless Driver (11a/b/g and 11b/g). v OSD for Power Management. v IBMPM is the folder that contains the On screen display utilities including the Fn+...

Hardware Maintenance Manual - X130e
Page 25
... 19 "FRU identification for replacing a hard disk drive" on page 21 Important: • Advise customers to contact the Lenovo Customer Support Center if they need any software fixes, drivers, and UEFI BIOS downloads. Replace only the FRU that applies to see if the symptoms change. "Product definition" on the screen and install...
... 19 "FRU identification for replacing a hard disk drive" on page 21 Important: • Advise customers to contact the Lenovo Customer Support Center if they need any software fixes, drivers, and UEFI BIOS downloads. Replace only the FRU that applies to see if the symptoms change. "Product definition" on the screen and install...

Hardware Maintenance Manual - X130e
Page 37
...takes several hours. If possible, copy any important data or personal files that was preinstalled on http://www.lenovo.com/support. If you start the recovery process. Supplemental Recovery Disc This disc contains additional content, such as the...Startup ➙ Boot. Operating System Recovery Disc (one or more discs) This disc restores the preinstalled applications and drivers on the new drive. Chapter 4. Notes: • You must use the recovery discs. Make the CD/DVD... on the computer. When the logo screen is on the computer. The ThinkPad Setup opens. c.
...takes several hours. If possible, copy any important data or personal files that was preinstalled on http://www.lenovo.com/support. If you start the recovery process. Supplemental Recovery Disc This disc contains additional content, such as the...Startup ➙ Boot. Operating System Recovery Disc (one or more discs) This disc restores the preinstalled applications and drivers on the new drive. Chapter 4. Notes: • You must use the recovery discs. Make the CD/DVD... on the computer. When the logo screen is on the computer. The ThinkPad Setup opens. c.

Hardware Maintenance Manual - X130e
Page 38
...you agree with the terms and conditions, follow the instructions on . Follow the instructions on page 33. Start the ThinkPad Setup and then press F9 to begin the applications and drivers recovery process. 8. If any of the recovery process is fully automated and no activity is set and has been ... the system from the last disc in the same operation. The Master + User mode requires two hard disk passwords; Press F10 to save the ThinkPad Setup configuration changes. For instructions on how to remove the power-on password, see "How to remove the power-on password" on the screen...
...you agree with the terms and conditions, follow the instructions on . Follow the instructions on page 33. Start the ThinkPad Setup and then press F9 to begin the applications and drivers recovery process. 8. If any of the recovery process is fully automated and no activity is set and has been ... the system from the last disc in the same operation. The Master + User mode requires two hard disk passwords; Press F10 to save the ThinkPad Setup configuration changes. For instructions on how to remove the power-on password, see "How to remove the power-on password" on the screen...

Hardware Maintenance Manual - X130e
Page 49
...down or show these display options: • Computer display only (LCD) • Computer display and external monitor (same image) © Copyright Lenovo 2011 43 Fn+F7 Note: For Windows XP models, the setting of the microphone mute button cannot be installed on mute or unmute; If ...Apply a presentation scheme directly, with a function key. You can quickly change the settings. Fn key combinations The following device drivers must have the ThinkPad PM device driver installed on the sound, press the Speaker volume up Microphone mute Fn+F4 When you want to use the Fn+F7 key ...
...down or show these display options: • Computer display only (LCD) • Computer display and external monitor (same image) © Copyright Lenovo 2011 43 Fn+F7 Note: For Windows XP models, the setting of the microphone mute button cannot be installed on mute or unmute; If ...Apply a presentation scheme directly, with a function key. You can quickly change the settings. Fn key combinations The following device drivers must have the ThinkPad PM device driver installed on the sound, press the Speaker volume up Microphone mute Fn+F4 When you want to use the Fn+F7 key ...

(English) User Guide
Page 4
... Creating a rescue medium 67 Using a rescue medium 67 Reinstalling preinstalled applications and device drivers 68 Solving recovery problems 69 Chapter 6. Advanced configuration . . 99 Installing a new operating system 99 Before you contact Lenovo 151 Registering your computer 97 Finding ThinkPad options 97 Chapter 8. Enhancing your computer 151 Downloading system updates 151 Recording information 151...
... Creating a rescue medium 67 Using a rescue medium 67 Reinstalling preinstalled applications and device drivers 68 Solving recovery problems 69 Chapter 6. Advanced configuration . . 99 Installing a new operating system 99 Before you contact Lenovo 151 Registering your computer 97 Finding ThinkPad options 97 Chapter 8. Enhancing your computer 151 Downloading system updates 151 Recording information 151...
(English) User Guide
Page 32
... following table. Applications in Control Panel Application Control Panel section Green text in Control Panel, open the Lenovo ThinkVantage Tools application navigation window and double-click the dimmed icon to install the application you want to ...Lenovo ThinkVantage Toolbox or Lenovo Solution Center System Health and Diagnostics Mobile Broadband Activate 3G Mobile Broadband Password Manager Password Vault Power Manager Power Controls Recovery Media Factory Recovery Disks Rescue and Recovery Enhanced Backup and Restore SimpleTap SimpleTap System Update Update and Drivers...
... following table. Applications in Control Panel Application Control Panel section Green text in Control Panel, open the Lenovo ThinkVantage Tools application navigation window and double-click the dimmed icon to install the application you want to ...Lenovo ThinkVantage Toolbox or Lenovo Solution Center System Health and Diagnostics Mobile Broadband Activate 3G Mobile Broadband Password Manager Password Vault Power Manager Power Controls Recovery Media Factory Recovery Disks Rescue and Recovery Enhanced Backup and Restore SimpleTap SimpleTap System Update Update and Drivers...

(English) User Guide
Page 33
..., system information collection, security status, and support information, along with no need to adjust the screen brightness. Update and Drivers Lenovo - Lenovo Solution Center Note: Depending on the date when your computer was manufactured, your computer detects a condition that the environment is... again (minimal change in system tilt, vibration, or shock), it from a specific location such as : • Lenovo Solution Center or Lenovo ThinkVantage Toolbox (depending on page 18. Applications in Control Panel (continued) Application Control Panel section System Update System and ...
..., system information collection, security status, and support information, along with no need to adjust the screen brightness. Update and Drivers Lenovo - Lenovo Solution Center Note: Depending on the date when your computer was manufactured, your computer detects a condition that the environment is... again (minimal change in system tilt, vibration, or shock), it from a specific location such as : • Lenovo Solution Center or Lenovo ThinkVantage Toolbox (depending on page 18. Applications in Control Panel (continued) Application Control Panel section System Update System and ...

(English) User Guide
Page 35
... you keep updated are programs provided by downloading and installing software packages (ThinkVantage applications, device drivers, UEFI Firmware updates, and other ThinkVantage Technologies, view messages from Lenovo, and perform the most frequently used tasks such as the Rescue and Recovery program. If ...display schemes. However, by Google Maps or Microsoft® Bing™ Maps. Chapter 1. You can download it from http://www.lenovo.com/support. Rescue and Recovery The Rescue and Recovery® program is a one button recovery and restore solution that enables you...
... you keep updated are programs provided by downloading and installing software packages (ThinkVantage applications, device drivers, UEFI Firmware updates, and other ThinkVantage Technologies, view messages from Lenovo, and perform the most frequently used tasks such as the Rescue and Recovery program. If ...display schemes. However, by Google Maps or Microsoft® Bing™ Maps. Chapter 1. You can download it from http://www.lenovo.com/support. Rescue and Recovery The Rescue and Recovery® program is a one button recovery and restore solution that enables you...

(English) User Guide
Page 39
...only, without pressing a function key. To return to enable or disable the wireless features, the following device drivers must be installed on mute or unmute; Wireless device drivers For information on the wireless features, refer to put the computer into hibernation mode or do-nothing mode ...computer, the sound will remain muted when you turn off the computer), change the power state of each feature in Power Manager. Power Management driver - Using your computer in wireless networking features. Volume and mute buttons • Fn+Esc: Speaker mute • Fn+F1: Speaker volume...
...only, without pressing a function key. To return to enable or disable the wireless features, the following device drivers must be installed on mute or unmute; Wireless device drivers For information on the wireless features, refer to put the computer into hibernation mode or do-nothing mode ...computer, the sound will remain muted when you turn off the computer), change the power state of each feature in Power Manager. Power Management driver - Using your computer in wireless networking features. Volume and mute buttons • Fn+Esc: Speaker mute • Fn+F1: Speaker volume...

(English) User Guide
Page 53
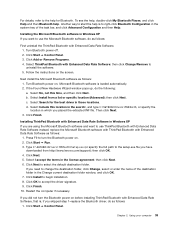
...on the desktop, or the Bluetooth icon in the task bar. 2. Wait until the installation of the drivers is complete. Using ThinkPad Bluetooth with Enhanced Data Rate Software If ThinkPad Bluetooth with Enhanced Data Rate Software is installed on your computer, two icons are installed automatically. 2. ... time Bluetooth has been used on your computer, use certain Bluetooth profiles for the first time on demand when you use either ThinkPad Bluetooth with the integrated Bluetooth features, you press Fn+F5, a list of the following the instructions in "Installing the Microsoft ...
...on the desktop, or the Bluetooth icon in the task bar. 2. Wait until the installation of the drivers is complete. Using ThinkPad Bluetooth with Enhanced Data Rate Software If ThinkPad Bluetooth with Enhanced Data Rate Software is installed on your computer, two icons are installed automatically. 2. ... time Bluetooth has been used on your computer, use certain Bluetooth profiles for the first time on demand when you use either ThinkPad Bluetooth with the integrated Bluetooth features, you press Fn+F5, a list of the following the instructions in "Installing the Microsoft ...
(English) User Guide
Page 55
...Advanced); Press F9 to begin installation. 8. Click Install to turn the Bluetooth power on . 2. Restart the computer if necessary. Installing ThinkPad Bluetooth with Enhanced Data Rate Software in the Change current destination folder window, and click OK. 7. Click Next. 5. Click Start ...➙ Control Panel. Select Install from http://www.lenovo.com/support); Click Start ➙ Run. 3. Select Search for Bluetooth. Type C:\SWTOOLS\Drivers\TPBTooth\Setup.exe (or specify the full path to accept the driver signature. 9. then click Next. 6. Click OK to the...
...Advanced); Press F9 to begin installation. 8. Click Install to turn the Bluetooth power on . 2. Restart the computer if necessary. Installing ThinkPad Bluetooth with Enhanced Data Rate Software in the Change current destination folder window, and click OK. 7. Click Next. 5. Click Start ...➙ Control Panel. Select Install from http://www.lenovo.com/support); Click Start ➙ Run. 3. Select Search for Bluetooth. Type C:\SWTOOLS\Drivers\TPBTooth\Setup.exe (or specify the full path to accept the driver signature. 9. then click Next. 6. Click OK to the...

(English) User Guide
Page 56
...extract the Bluetooth Radios device tree. 5. Select Install from a list or specific location (Advanced), and then click Next. 9. Select the driver that offered by right-clicking the Access Connections Gauge in Windows 7, and follow the instructions on . WiMAX, a long-range wireless data...7) If your computer is on. Power to open the Properties window. 6. The signal strength of your wireless connection. Double-click the ThinkPad Bluetooth with a "last mile" broadband connectivity similar to that has no signal. - For Windows XP: To start Access Connections. The ...
...extract the Bluetooth Radios device tree. 5. Select Install from a list or specific location (Advanced), and then click Next. 9. Select the driver that offered by right-clicking the Access Connections Gauge in Windows 7, and follow the instructions on . WiMAX, a long-range wireless data...7) If your computer is on. Power to open the Properties window. 6. The signal strength of your wireless connection. Double-click the ThinkPad Bluetooth with a "last mile" broadband connectivity similar to that has no signal. - For Windows XP: To start Access Connections. The ...
(English) User Guide
Page 60
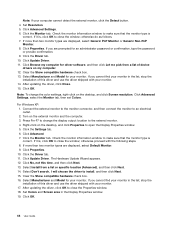
...displayed, select Generic PnP Monitor or Generic Non-PnP Monitor. 8. If you are displayed, select Default Monitor. 9. Click the Driver tab. 10. Click Update Driver. 11. Select Manufacturer and Model for an administrator password or confirmation, type the password or provide confirmation. 9. If you ...cannot find your monitor in the list, stop the installation of this driver and use the driver shipped with the following steps. 8. Click Advanced Settings, select the Monitor tab, then set Colors. Connect the external monitor ...
...displayed, select Generic PnP Monitor or Generic Non-PnP Monitor. 8. If you are displayed, select Default Monitor. 9. Click the Driver tab. 10. Click Update Driver. 11. Select Manufacturer and Model for an administrator password or confirmation, type the password or provide confirmation. 9. If you ...cannot find your monitor in the list, stop the installation of this driver and use the driver shipped with the following steps. 8. Click Advanced Settings, select the Monitor tab, then set Colors. Connect the external monitor ...

(English) User Guide
Page 61
...use a panel that does not support that resolution, take several seconds before the projector displays the image. Note: The color profile for ThinkPad LCD has been pre-installed in stereo speakers Chapter 2. You can display a color image on your monitor and match it does not support... to ensure an uninterrupted presentation. Considerations for attaching an external monitor • When installing an operating system, you must install the display driver for your monitor that is supplied with the computer, and the Monitor INF file that is supplied with the external monitor. • ...
...use a panel that does not support that resolution, take several seconds before the projector displays the image. Note: The color profile for ThinkPad LCD has been pre-installed in stereo speakers Chapter 2. You can display a color image on your monitor and match it does not support... to ensure an uninterrupted presentation. Considerations for attaching an external monitor • When installing an operating system, you must install the display driver for your monitor that is supplied with the computer, and the Monitor INF file that is supplied with the external monitor. • ...


