
(English) Access Connections Profile Deployment guide
Page 9
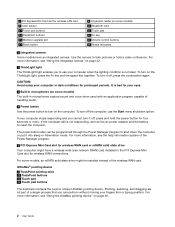
... not sure about what, if any wireless networks that are in a public place, and you fix the connection. If the © Lenovo 2008. Virtual private network (VPN) connections are away from a specific location, such as effective alternatives for high-speed wireless access to support...Switch between location profiles as you move your computer from the list and connect to reconfigure network settings manually. If the connection fails, a button appears to help users connect to a network without having to it. v Find wireless networks. The Connection Status window is opened by the ...
... not sure about what, if any wireless networks that are in a public place, and you fix the connection. If the © Lenovo 2008. Virtual private network (VPN) connections are away from a specific location, such as effective alternatives for high-speed wireless access to support...Switch between location profiles as you move your computer from the list and connect to reconfigure network settings manually. If the connection fails, a button appears to help users connect to a network without having to it. v Find wireless networks. The Connection Status window is opened by the ...
(English) Access Connections Profile Deployment guide
Page 18
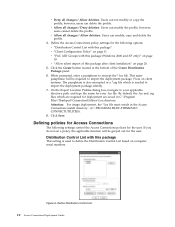
...package after client installation" on computer serial numbers. Attention: For image deployment, the *.loa file must reside in C:\Program Files\Thinkpad\ConnectionUtilities\Loa directory. Click Save. Figure 6. Define Distribution Control list 10 Access Connections Deployment Guide v Allow all changes / Deny...saved in the Access Connections install directory - (C:\PROGRAM FILES\THINKPAD\ CONNECTUTILITIES). 8. When prompted, enter a passphrase to your .loa file. however, users cannot delete the profile. Click the Create button located at the bottom of this package This setting is also...
...package after client installation" on computer serial numbers. Attention: For image deployment, the *.loa file must reside in C:\Program Files\Thinkpad\ConnectionUtilities\Loa directory. Click Save. Figure 6. Define Distribution Control list 10 Access Connections Deployment Guide v Allow all changes / Deny...saved in the Access Connections install directory - (C:\PROGRAM FILES\THINKPAD\ CONNECTUTILITIES). 8. When prompted, enter a passphrase to your .loa file. however, users cannot delete the profile. Click the Create button located at the bottom of this package This setting is also...
(English) Access Connections Profile Deployment guide
Page 32
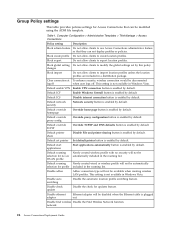
..., wireless connection would be disabled when the Ethernet cable is not available in Windows Vista. Default ICF Enable Windows firewall button is enabled by default. Disable ethernet adapter Ethernet adapter will not be modified using the ADM file template. This setting is.... Disable adhoc Adhoc connection type will not be available when creating wireless LAN profiles. Default enable VPN Enable VPN connection button is enabled by default. This setting is enabled by default. network 24 Access Connections Deployment Guide Default override TCPIP Override ...
..., wireless connection would be disabled when the Ethernet cable is not available in Windows Vista. Default ICF Enable Windows firewall button is enabled by default. Disable ethernet adapter Ethernet adapter will not be modified using the ADM file template. This setting is.... Disable adhoc Adhoc connection type will not be available when creating wireless LAN profiles. Default enable VPN Enable VPN connection button is enabled by default. This setting is enabled by default. network 24 Access Connections Deployment Guide Default override TCPIP Override ...
Hardware Maintenance Manual
Page 45
...causes. This index can be replaced next. Do not replace a nondefective FRU. Note: For a device not supported by diagnostic codes in the ThinkPad notebook computers, see the manual for each error detected in POST or system operation. When the power is turned on, the computer returns from... operation. If you will have to be any number. Then perform the defined action. • Closing the lid. • Pressing the power button. • Pressing Fn+F4. The hibernation file in sequence." If no numeric code is displayed, check the narrative descriptions of symptoms. If the...
...causes. This index can be replaced next. Do not replace a nondefective FRU. Note: For a device not supported by diagnostic codes in the ThinkPad notebook computers, see the manual for each error detected in POST or system operation. When the power is turned on, the computer returns from... operation. If you will have to be any number. Then perform the defined action. • Closing the lid. • Pressing the power button. • Pressing Fn+F4. The hibernation file in sequence." If no numeric code is displayed, check the narrative descriptions of symptoms. If the...
Hardware Maintenance Manual
Page 54
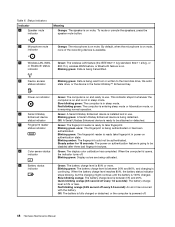
... after three bad fingerprint swipes. 8 Color sensor status Green: The display color calibration has completed. To mute or unmute the speakers, press the speaker mute button. 2 Microphone mute indicator Orange: The microphone is in the Serial Ultrabay™ Enhanced bay. 5 Power-on indicator Green: The computer is on authentication feature is...
... after three bad fingerprint swipes. 8 Color sensor status Green: The display color calibration has completed. To mute or unmute the speakers, press the speaker mute button. 2 Microphone mute indicator Orange: The microphone is in the Serial Ultrabay™ Enhanced bay. 5 Power-on indicator Green: The computer is on authentication feature is...

Hardware Maintenance Manual
Page 59
...13 1 Status indicators (see Chapter 6 "Status indicators" on page 47) 2 Built-in microphones 3 Integrated camera 4 ThinkLight light 5 Power button 6 Security keyhole 7 RJ-45 Ethernet connector 8 Built-in stereo speakers 9 Serial Ultrabay Enhanced deviceor blank bezel 10 Combo audio jack 11 Media...) 14 Color sensor (on some models) 15 Touch pad buttons 16 Touch pad 17 TrackPoint buttons 18 TrackPoint pointing stick 19 UltraNav® pointing device 20 Black button 21 Volume control buttons © Copyright Lenovo 2012 53 Chapter 8. Locating computer controls, connectors, and indicators...
...13 1 Status indicators (see Chapter 6 "Status indicators" on page 47) 2 Built-in microphones 3 Integrated camera 4 ThinkLight light 5 Power button 6 Security keyhole 7 RJ-45 Ethernet connector 8 Built-in stereo speakers 9 Serial Ultrabay Enhanced deviceor blank bezel 10 Combo audio jack 11 Media...) 14 Color sensor (on some models) 15 Touch pad buttons 16 Touch pad 17 TrackPoint buttons 18 TrackPoint pointing stick 19 UltraNav® pointing device 20 Black button 21 Volume control buttons © Copyright Lenovo 2012 53 Chapter 8. Locating computer controls, connectors, and indicators...
(Greek) User Guide
Page 46
Windows Start Windows Windows Windows. 28 4 Levels Windows 1 Fn+F6 Communications Settings". 2 Manage Settings Communications Utility". 3 VoIP Call Settings Microphone mute button settings Setting for Microphone Mute". 4 Only the recording device selected below 5 OK.
Windows Start Windows Windows Windows. 28 4 Levels Windows 1 Fn+F6 Communications Settings". 2 Manage Settings Communications Utility". 3 VoIP Call Settings Microphone mute button settings Setting for Microphone Mute". 4 Only the recording device selected below 5 OK.

(English) User Guide
Page 3
... Charging the battery 30 Maximizing battery life 30 Managing your computer 21 Frequently asked questions 21 Special keys and buttons 23 Function key combinations 23 Volume and mute buttons 24 Windows key 26 Using the UltraNav pointing device 26 Using the TrackPoint pointing device . . . .... 27 Using the touch pad 28 Disabling the UltraNav pointing device and using a rescue medium 66 © Copyright Lenovo 2012 i Contents Read this ...
... Charging the battery 30 Maximizing battery life 30 Managing your computer 21 Frequently asked questions 21 Special keys and buttons 23 Function key combinations 23 Volume and mute buttons 24 Windows key 26 Using the UltraNav pointing device 26 Using the TrackPoint pointing device . . . .... 27 Using the touch pad 28 Disabling the UltraNav pointing device and using a rescue medium 66 © Copyright Lenovo 2012 i Contents Read this ...
(English) User Guide
Page 8
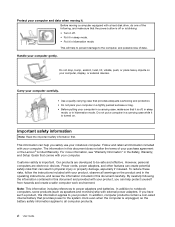
...moving a computer equipped with a hard disk drive, do one of data. The information in this document carefully. Protect your purchase agreement or the Lenovo® Limited Warranty. Before moving it is important. Power cords, power adapters, and other features can create potential safety risks that the power... button is off or is blinking: • Turn it off. • Put it in sleep mode. • Put it is unplugged, so the ...
...moving a computer equipped with a hard disk drive, do one of data. The information in this document carefully. Protect your purchase agreement or the Lenovo® Limited Warranty. Before moving it is important. Power cords, power adapters, and other features can create potential safety risks that the power... button is off or is blinking: • Turn it off. • Put it in sleep mode. • Put it is unplugged, so the ...
(English) User Guide
Page 19
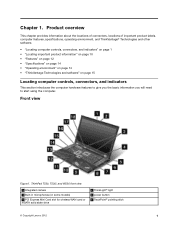
Front view Figure 1. ThinkPad T530, T530i, and W530 front view 1 Integrated camera 3 Built-in microphones (on page 15 Locating computer controls, connectors, and indicators This section introduces the computer hardware features to give ...; "ThinkVantage Technologies and software" on some models) 5 PCI Express Mini Card slot for wireless WAN card or mSATA solid state drive 2 ThinkLight® light 4 power button 6 TrackPoint® pointing stick © Copyright Lenovo 2012 1 Chapter 1.
Front view Figure 1. ThinkPad T530, T530i, and W530 front view 1 Integrated camera 3 Built-in microphones (on page 15 Locating computer controls, connectors, and indicators This section introduces the computer hardware features to give ...; "ThinkVantage Technologies and software" on some models) 5 PCI Express Mini Card slot for wireless WAN card or mSATA solid state drive 2 ThinkLight® light 4 power button 6 TrackPoint® pointing stick © Copyright Lenovo 2012 1 Chapter 1.
(English) User Guide
Page 20
... ThinkLight light, press the Fn key and the space key together. UltraNav® pointing device 6 TrackPoint pointing stick 13 TrackPoint buttons 12 Touch pad 11 Touch pad buttons The keyboard contains the Lenovo unique UltraNav pointing device. It is not responding, remove the ac power adapter and the battery to reset the computer...
... ThinkLight light, press the Fn key and the space key together. UltraNav® pointing device 6 TrackPoint pointing stick 13 TrackPoint buttons 12 Touch pad 11 Touch pad buttons The keyboard contains the Lenovo unique UltraNav pointing device. It is not responding, remove the ac power adapter and the battery to reset the computer...
(English) User Guide
Page 21
... your computer is working normally, press the black button to launch the SimpleTap program on page 8. For more information, see "Using the color sensor" on page 41. 10 Bluetooth card If your fingerprint to take advantage of ThinkPad® function keys, such as options from Lenovo. For more information, see "Status indicators" on...
... your computer is working normally, press the black button to launch the SimpleTap program on page 8. For more information, see "Using the color sensor" on page 41. 10 Bluetooth card If your fingerprint to take advantage of ThinkPad® function keys, such as options from Lenovo. For more information, see "Status indicators" on...
(English) User Guide
Page 27
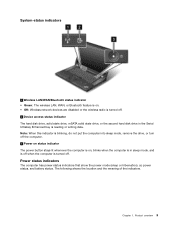
... indicator is blinking, do not put the computer into sleep mode, remove the drive, or turn off the computer. 3 Power on status indicator The power button stays lit whenever the computer is on . • Off: Wireless network devices are disabled or the wireless radio is reading or writing data. Product overview...
... indicator is blinking, do not put the computer into sleep mode, remove the drive, or turn off the computer. 3 Power on status indicator The power button stays lit whenever the computer is on . • Off: Wireless network devices are disabled or the wireless radio is reading or writing data. Product overview...
(English) User Guide
Page 31
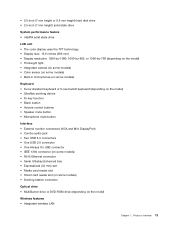
...; 6-row standard keyboard or 6-row backlit keyboard (depending on the model) • UltraNav pointing device • Fn key function • Black button • Volume control buttons • Speaker mute button • Microphone mute button Interface • External monitor connectors (VGA and Mini DisplayPort) • Combo audio jack • Two USB 3.0 connectors • One USB...
...; 6-row standard keyboard or 6-row backlit keyboard (depending on the model) • UltraNav pointing device • Fn key function • Black button • Volume control buttons • Speaker mute button • Microphone mute button Interface • External monitor connectors (VGA and Mini DisplayPort) • Combo audio jack • Two USB 3.0 connectors • One USB...
(English) User Guide
Page 36
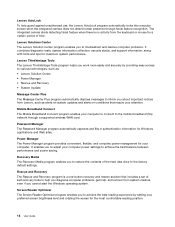
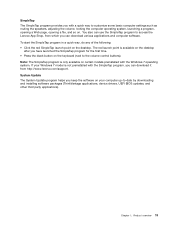
... Recovery Media program enables you to achieve the best reading experience by providing easy access to various technologies, such as: • Lenovo Solution Center • Power Manager • Rescue and Recovery • System Update Message Center Plus The Message Center Plus program automatically.... It enables you cannot start the Windows operating system. The integrated camera starts detecting facial feature when there is a one-button recovery and restore solution that require your attention. Rescue and Recovery The Rescue and Recovery program is no activity from the keyboard...
... Recovery Media program enables you to achieve the best reading experience by providing easy access to various technologies, such as: • Lenovo Solution Center • Power Manager • Rescue and Recovery • System Update Message Center Plus The Message Center Plus program automatically.... It enables you cannot start the Windows operating system. The integrated camera starts detecting facial feature when there is a one-button recovery and restore solution that require your attention. Rescue and Recovery The Rescue and Recovery program is no activity from the keyboard...
(English) User Guide
Page 37
...The red launch point is available on the desktop after you have launched the SimpleTap program for the first time. • Press the black button on the keyboard (next to customize some basic computer settings such as muting the speakers, adjusting the volume, locking the computer operating system, ...The SimpleTap program provides you with a quick way to the volume control buttons). System Update The System Update program helps you keep the software on . If your computer up-to access the Lenovo App Shop, from http://www.lenovo.com/support. To start the SimpleTap program in a quick way, do...
...The red launch point is available on the desktop after you have launched the SimpleTap program for the first time. • Press the black button on the keyboard (next to customize some basic computer settings such as muting the speakers, adjusting the volume, locking the computer operating system, ...The SimpleTap program provides you with a quick way to the volume control buttons). System Update The System Update program helps you keep the software on . If your computer up-to access the Lenovo App Shop, from http://www.lenovo.com/support. To start the SimpleTap program in a quick way, do...
(English) User Guide
Page 39
..., browse the following benefits: • Quicker service when you call Lenovo for troubleshooting and answers to registered users. When you in another language? • To download the user guide in case of ThinkPad notebook. Can I get my user guide in another language, go ...information on using some locations offer extended privileges and services to frequently asked questions: http://www.lenovo.com/support/faq. Chapter 2. Frequently asked questions" on page 21 • "Special keys and buttons" on page 23 • "Using the UltraNav pointing device" on page 26 •...
..., browse the following benefits: • Quicker service when you call Lenovo for troubleshooting and answers to registered users. When you in another language? • To download the user guide in case of ThinkPad notebook. Can I get my user guide in another language, go ...information on using some locations offer extended privileges and services to frequently asked questions: http://www.lenovo.com/support/faq. Chapter 2. Frequently asked questions" on page 21 • "Special keys and buttons" on page 23 • "Using the UltraNav pointing device" on page 26 •...
(English) User Guide
Page 41
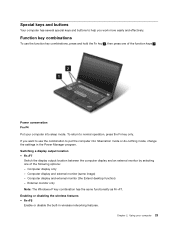
Power conservation Fn+F4 Put your computer 23 Computer display only - Special keys and buttons Your computer has several special keys and buttons to normal operation, press the Fn key only. To return to help you want to use the function key combinations, press and hold the Fn ...
Power conservation Fn+F4 Put your computer 23 Computer display only - Special keys and buttons Your computer has several special keys and buttons to normal operation, press the Fn key only. To return to help you want to use the function key combinations, press and hold the Fn ...
(English) User Guide
Page 42
... download these drivers from http://www.lenovo.com/ThinkPadDrivers. Multimedia controls • Fn+F10: Previous track/scene • Fn+F11: Play or pause • Fn+F12: Next track/scene Other functions • Fn+Spacebar: Control the keyboard backlight and the ThinkLight light. - Volume and mute buttons Adjust the sound volume level of... brightness level. - Wireless device drivers You can take a picture, change the settings through the Power Manager program. Notes: To use this function, the following three buttons: 24 User Guide
... download these drivers from http://www.lenovo.com/ThinkPadDrivers. Multimedia controls • Fn+F10: Previous track/scene • Fn+F11: Play or pause • Fn+F12: Next track/scene Other functions • Fn+Spacebar: Control the keyboard backlight and the ThinkLight light. - Volume and mute buttons Adjust the sound volume level of... brightness level. - Wireless device drivers You can take a picture, change the settings through the Power Manager program. Notes: To use this function, the following three buttons: 24 User Guide
(English) User Guide
Page 43
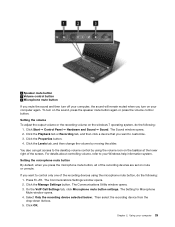
... moving the slider. Using your computer again. The Communications Utility window opens. 3. On the VoIP Call Settings tab, click Microphone mute button settings. Select Only the recording device selected below:. Then select the recording device from the drop-down list box. 5. Click OK. ...tab or Recording tab, and then click a device that you want to your Windows help information system. 1 Speaker mute button 2 Volume control button 3 Microphone mute button If you mute the sound and then turn off your computer, the sound will remain muted when you turn on your ...
... moving the slider. Using your computer again. The Communications Utility window opens. 3. On the VoIP Call Settings tab, click Microphone mute button settings. Select Only the recording device selected below:. Then select the recording device from the drop-down list box. 5. Click OK. ...tab or Recording tab, and then click a device that you want to your Windows help information system. 1 Speaker mute button 2 Volume control button 3 Microphone mute button If you mute the sound and then turn off your computer, the sound will remain muted when you turn on your ...


