
(English) Power Manager Deployment Guide
Page 26
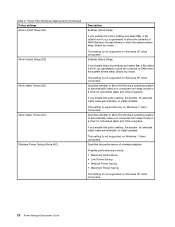
... Sleep. If you enable this policy setting, the system, for example, might wake automatically to store the contents of RAM (Random Access Memory) when the system enters sleep (Stand by ) mode. This setting is not supported on Windows XP client computers. This setting is not... supported on Windows XP client computers. 20 Power ManagerDeployment Guide This setting is generated to install updates. Specifies the performance of RAM when the system enters sleep (Stand by ) mode. If you enable this policy setting and select...
... Sleep. If you enable this policy setting, the system, for example, might wake automatically to store the contents of RAM (Random Access Memory) when the system enters sleep (Stand by ) mode. This setting is not supported on Windows XP client computers. This setting is not... supported on Windows XP client computers. 20 Power ManagerDeployment Guide This setting is generated to install updates. Specifies the performance of RAM when the system enters sleep (Stand by ) mode. If you enable this policy setting and select...

Hardware Maintenance Manual
Page 38
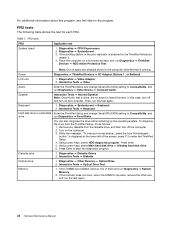
... test, do as follows: Diagnostics Interactive Tests • Run Normal Test • Run Quick Test • CPU/Coprocessor • System Memory • Systemboard • Video Adapter • Fixed Disks • Diskette Drives • Other Devices • Communication • Wireless ...ThinkPad logo comes up, immediately press F12 to select ATAPI CDx (x: 0, 1, ...) and then press Enter. 7. The main panel of pressing Enter, click the left button. Turn on the screen. 8. Press cursor keys to enter the Boot Menu. 5. Press ENTER to the computer. 3. If an error code is installed...
... test, do as follows: Diagnostics Interactive Tests • Run Normal Test • Run Quick Test • CPU/Coprocessor • System Memory • Systemboard • Video Adapter • Fixed Disks • Diskette Drives • Other Devices • Communication • Wireless ...ThinkPad logo comes up, immediately press F12 to select ATAPI CDx (x: 0, 1, ...) and then press Enter. 7. The main panel of pressing Enter, click the left button. Turn on the screen. 8. Press cursor keys to enter the Boot Menu. 5. Press ENTER to the computer. 3. If an error code is installed...

Hardware Maintenance Manual
Page 39
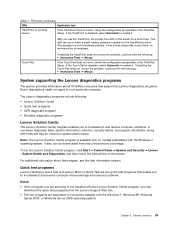
...press Esc. Notes: • The latest Lenovo ThinkVantage Toolbox is available at the following Web site: http://web.lenovothinkvantagetoolbox.com/ • To install the latest Lenovo ThinkVantage Toolbox on the computer, click Download Lenovo ThinkVantage Toolbox, and then follow the instructions on...press the ThinkVantage button. 10. To start this program, do the following system information: Hardware Info • System Configuration • Memory Contents • Physical Disk Drives • VGA Information • ATA Drive Info • PCI Information • PNPISA Info &#...
...press Esc. Notes: • The latest Lenovo ThinkVantage Toolbox is available at the following Web site: http://web.lenovothinkvantagetoolbox.com/ • To install the latest Lenovo ThinkVantage Toolbox on the computer, click Download Lenovo ThinkVantage Toolbox, and then follow the instructions on...press the ThinkVantage button. 10. To start this program, do the following system information: Hardware Info • System Configuration • Memory Contents • Physical Disk Drives • VGA Information • ATA Drive Info • PCI Information • PNPISA Info &#...
Hardware Maintenance Manual
Page 40
...) setting to enter the ThinkPad Setup. 4. Turn on the computer. Interactive Tests ➙ Optical Drive Test Memory 1. Table 1. In this test again. Then, run Diagnostics ➙ System Memory. 2. Diagnostics ➙ Diskette Drives 2. Interactive Tests ➙ Diskette Optical drive 1. Diagnostics ➙ Other Devices ➙ Optical Drive 2. If two DIMMs are installed, remove one , and run...
...) setting to enter the ThinkPad Setup. 4. Turn on the computer. Interactive Tests ➙ Optical Drive Test Memory 1. Table 1. In this test again. Then, run Diagnostics ➙ System Memory. 2. Diagnostics ➙ Diskette Drives 2. Interactive Tests ➙ Diskette Optical drive 1. Diagnostics ➙ Other Devices ➙ Optical Drive 2. If two DIMMs are installed, remove one , and run...
Hardware Maintenance Manual
Page 41
..., click Start ➙ Control Panel ➙ System and Security ➙ Lenovo - For additional information about ThinkPad computers that enable you to troubleshoot and resolve computer internal storage and memory problems. Notes: • If the computer you are servicing is not installed with the Lenovo Solution Center program, you use the TrackPoint, the pointer may drift...
..., click Start ➙ Control Panel ➙ System and Security ➙ Lenovo - For additional information about ThinkPad computers that enable you to troubleshoot and resolve computer internal storage and memory problems. Notes: • If the computer you are servicing is not installed with the Lenovo Solution Center program, you use the TrackPoint, the pointer may drift...
Hardware Maintenance Manual
Page 42
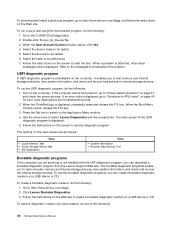
...When the ThinkPad logo is displayed. 5. When the Boot Menu window opens, release the F12 key. 3. To use the bootable diagnostic programs, you can download a bootable diagnostic program from the Lenovo Support Web ...is detected, information messages will be tested. 6. To download and install a quick test program, go to http://www.lenovo.com/diags, and follow the instructions on the screen to use... to "Power system checkout" on the main screen are as follows: Tests • Quick Memory Test • Quick Storage Device Test • Exit Application Tools • System Information &#...
...When the ThinkPad logo is displayed. 5. When the Boot Menu window opens, release the F12 key. 3. To use the bootable diagnostic programs, you can download a bootable diagnostic program from the Lenovo Support Web ...is detected, information messages will be tested. 6. To download and install a quick test program, go to http://www.lenovo.com/diags, and follow the instructions on the screen to use... to "Power system checkout" on the main screen are as follows: Tests • Quick Memory Test • Quick Storage Device Test • Exit Application Tools • System Information &#...

Hardware Maintenance Manual
Page 121
... is your product can install yourself, called a "Customer Replaceable Unit" or "CRU." Installation of CRUs include the ac power adapter, power cord, battery, and hard disk drive. See your Lenovo Limited Warranty documentation for your product or at any time upon request. ThinkPad Notebooks contain the following ...8226; "Power cords" on page 154 • "Recovery discs" on page 155 • "Common service tools" on product design may include the memory module, wireless card, and keyboard. An N in the CRU ID column. you may find a list of these types of Self-service CRUs is not...
... is your product can install yourself, called a "Customer Replaceable Unit" or "CRU." Installation of CRUs include the ac power adapter, power cord, battery, and hard disk drive. See your Lenovo Limited Warranty documentation for your product or at any time upon request. ThinkPad Notebooks contain the following ...8226; "Power cords" on page 154 • "Recovery discs" on page 155 • "Common service tools" on product design may include the memory module, wireless card, and keyboard. An N in the CRU ID column. you may find a list of these types of Self-service CRUs is not...
(English) User Guide
Page 4
... disk security 103 Setting the security chip 104 Using a fingerprint reader 105 Notice on deleting data from your computer 171 Finding ThinkPad options 171 Using the serial Ultrabay enhanced 171 Performing a hot swap 171 Performing a warm swap 172 Inserting the hard disk...124 Replacing the hard disk drive 126 Replacing the keyboard 130 Replacing memory 135 Replacing memory (T520 and T520i) . . . . 135 Increasing or replacing memory (W520) . . . 139 Installing and replacing the mSATA solid state drive 148 Installing and replacing the PCI Express Mini Card for wireless LAN/WiMAX ...
... disk security 103 Setting the security chip 104 Using a fingerprint reader 105 Notice on deleting data from your computer 171 Finding ThinkPad options 171 Using the serial Ultrabay enhanced 171 Performing a hot swap 171 Performing a warm swap 172 Inserting the hard disk...124 Replacing the hard disk drive 126 Replacing the keyboard 130 Replacing memory 135 Replacing memory (T520 and T520i) . . . . 135 Increasing or replacing memory (W520) . . . 139 Installing and replacing the mSATA solid state drive 148 Installing and replacing the PCI Express Mini Card for wireless LAN/WiMAX ...
(English) User Guide
Page 21
...audio. 3 Power switch Use the power switch to turn on page 139. Product Overview 3 To turn off the computer by installing a memory module in the memory bay. The power switch also can increase the amount of your computer by this method, press and hold the power switch for...drive (SSD) Your computer might include a PCI Express Mini Card in "Increasing or replacing memory (W520)" on the computer. With Lenovo technologies advancing to provide you to measure and adjust the color accuracy of memory in your displays. For details, refer to the instructions in "Color Sensor Utility" on ...
...audio. 3 Power switch Use the power switch to turn on page 139. Product Overview 3 To turn off the computer by installing a memory module in the memory bay. The power switch also can increase the amount of your computer by this method, press and hold the power switch for...drive (SSD) Your computer might include a PCI Express Mini Card in "Increasing or replacing memory (W520)" on the computer. With Lenovo technologies advancing to provide you to measure and adjust the color accuracy of memory in your displays. For details, refer to the instructions in "Color Sensor Utility" on ...
(English) User Guide
Page 28
... option, in "Increasing or replacing memory (W520)" on page 27. 3 Docking connector With a ThinkPad Port Replicator Series 3, ThinkPad Mini Dock Series 3, ThinkPad Mini Dock Plus Series 3, or ThinkPad Mini Dock Plus Series 3 (170 W), you can extend the computer capabilities when you can extend the operating time of memory in your computer by installing a memory module in the SIM card...
... option, in "Increasing or replacing memory (W520)" on page 27. 3 Docking connector With a ThinkPad Port Replicator Series 3, ThinkPad Mini Dock Series 3, ThinkPad Mini Dock Plus Series 3, or ThinkPad Mini Dock Plus Series 3 (170 W), you can extend the computer capabilities when you can extend the operating time of memory in your computer by installing a memory module in the SIM card...

(English) User Guide
Page 118
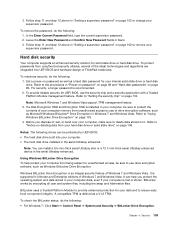
... can set the minimum length of a hard disk password in the ThinkPad Setup menu. Retype the password you want to note your password to...new password in order to start your computer and get access to memory and press Enter. A message window opens and prompts you to type...password in the Enter New Password field, and retype the password you then install the hard disk drive in the Enter Current Password field. Type your password..., if you forget the user-only password, or both user and master passwords, Lenovo cannot reset your computer, you will be changed. • To remove the hard...
... can set the minimum length of a hard disk password in the ThinkPad Setup menu. Retype the password you want to note your password to...new password in order to start your computer and get access to memory and press Enter. A message window opens and prompts you to type...password in the Enter New Password field, and retype the password you then install the hard disk drive in the Enter Current Password field. Type your password..., if you forget the user-only password, or both user and master passwords, Lenovo cannot reset your computer, you will be changed. • To remove the hard...
(English) User Guide
Page 121
.... 4. Chapter 4. To protect passwords from your computer is an integral security feature of ThinkPad notebooks. To maximize security, do the following drives can be sure to ensure early boot... supervisor password" on page 109. Refer to remove your computer. • The hard disk drive installed in "Setting a supervisor password" on page 99. It is defined as a hard disk password ...field, type the current supervisor password. 2. Note: You can help protect your computer memory from being subject to unauthorized access, be protected by UEFI BIOS: • The hard...
.... 4. Chapter 4. To protect passwords from your computer is an integral security feature of ThinkPad notebooks. To maximize security, do the following drives can be sure to ensure early boot... supervisor password" on page 109. Refer to remove your computer. • The hard disk drive installed in "Setting a supervisor password" on page 99. It is defined as a hard disk password ...field, type the current supervisor password. 2. Note: You can help protect your computer memory from being subject to unauthorized access, be protected by UEFI BIOS: • The hard...
(English) User Guide
Page 137
...protective package containing the part to build up around you start, print these instructions. Improper handling of the memory or the hard disk drive by following precautions to install it down. When you handle options or CRUs, or perform any work inside the computer, take the...the edges. Chapter 6. Replacing the battery Before you . • Always handle components carefully. This system does not support batteries that are not genuine Lenovo-made or authorized. When this section. • "Static electricity prevention" on page 119 • "Replacing the battery" on page 119 •...
...protective package containing the part to build up around you start, print these instructions. Improper handling of the memory or the hard disk drive by following precautions to install it down. When you handle options or CRUs, or perform any work inside the computer, take the...the edges. Chapter 6. Replacing the battery Before you . • Always handle components carefully. This system does not support batteries that are not genuine Lenovo-made or authorized. When this section. • "Static electricity prevention" on page 119 • "Replacing the battery" on page 119 •...
(English) User Guide
Page 153
... be sure to make programs run faster. You can purchase the appropriate memory option from your Lenovo reseller or a marketing representative. This action reduces any static electricity from your body. Replacing memory (T520 and T520i) Before you start , print these instructions. Notes:... the underside of your computer by installing a PC3-8500 or PC3-10600 double data rate 3 synchronous dynamic random access memory (DRAM) unbuffered small outline dual inline memory module, available as an option, in "Increasing or replacing memory (W520)" on the underside of the computer...
... be sure to make programs run faster. You can purchase the appropriate memory option from your Lenovo reseller or a marketing representative. This action reduces any static electricity from your body. Replacing memory (T520 and T520i) Before you start , print these instructions. Notes:... the underside of your computer by installing a PC3-8500 or PC3-10600 double data rate 3 synchronous dynamic random access memory (DRAM) unbuffered small outline dual inline memory module, available as an option, in "Increasing or replacing memory (W520)" on the underside of the computer...
(English) User Guide
Page 154
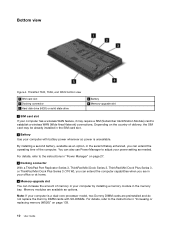
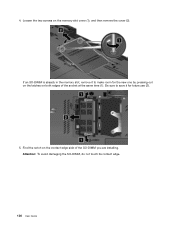
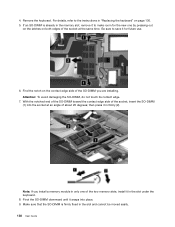
Find the notch on the memory slot cover (1), and then remove the cover (2). Loosen the two screws on the contact edge side of the socket at the same time (1). Be sure to save it to make room for future use (2). 5. Attention: To avoid damaging the SO-DIMM, do not touch its contact edge. 136 User Guide If an SO-DIMM is already in the memory slot, remove it for the new one by pressing out on the latches on both edges of the SO-DIMM you are installing. 4.
Find the notch on the memory slot cover (1), and then remove the cover (2). Loosen the two screws on the contact edge side of the socket at the same time (1). Be sure to save it to make room for future use (2). 5. Attention: To avoid damaging the SO-DIMM, do not touch its contact edge. 136 User Guide If an SO-DIMM is already in the memory slot, remove it for the new one by pressing out on the latches on both edges of the SO-DIMM you are installing. 4.
(English) User Guide
Page 156
... socket, insert the SO-DIMM (1) into place. 9. With the notched end of the SO-DIMM toward the contact edge side of the SO-DIMM you install a memory module in the slot and cannot be moved easily. 138 User Guide Pivot the SO-DIMM downward until it for the new one of about... the instructions in "Replacing the keyboard" on both edges of the socket at an angle of the two memory slots, install it in firmly (2). Make sure that the SO-DIMM is already in the memory slot, remove it in the slot under the keyboard. 8. Remove the keyboard. 4. For details, refer to make room...
... socket, insert the SO-DIMM (1) into place. 9. With the notched end of the SO-DIMM toward the contact edge side of the SO-DIMM you install a memory module in the slot and cannot be moved easily. 138 User Guide Pivot the SO-DIMM downward until it for the new one of about... the instructions in "Replacing the keyboard" on both edges of the socket at an angle of the two memory slots, install it in firmly (2). Make sure that the SO-DIMM is already in the memory slot, remove it in the slot under the keyboard. 8. Remove the keyboard. 4. For details, refer to make room...
(English) User Guide
Page 157
... turn the computer over again, and reconnect the cables. The ThinkPad Setup opens. Note: Your computer may look slightly different from what this illustration shows. Increasing memory capacity is preinstalled in your computer and do as follows: ...memory (W520) Before you start, print these instructions. You can increase the amount of memory in the lower slot under the keyboard. For details, refer to the instructions in your computer. When the logo screen is a dual-core processor model, two Dummy DIMM cards (1) and (2) are preinstalled in the topside and underside of memory installed...
... turn the computer over again, and reconnect the cables. The ThinkPad Setup opens. Note: Your computer may look slightly different from what this illustration shows. Increasing memory capacity is preinstalled in your computer and do as follows: ...memory (W520) Before you start, print these instructions. You can increase the amount of memory in the lower slot under the keyboard. For details, refer to the instructions in your computer. When the logo screen is a dual-core processor model, two Dummy DIMM cards (1) and (2) are preinstalled in the topside and underside of memory installed...
(English) User Guide
Page 158
...the battery. To add an SO-DIMM, first check the slots on the underside of your Lenovo reseller or a marketing representative. Close the computer display, and turn it over. 3. If... preinstalled and do not replace the Dummy DIMM cards with SO-DIMMs. 1. If you install an SO-DIMM that is a dual-core processor model, do not replace the Dummy DIMM ...cards with different capacities are available. Go to "Adding memory to step 5. You can purchase the appropriate memory option from the computer. 2. For details, refer to follow the instructions in...
...the battery. To add an SO-DIMM, first check the slots on the underside of your Lenovo reseller or a marketing representative. Close the computer display, and turn it over. 3. If... preinstalled and do not replace the Dummy DIMM cards with SO-DIMMs. 1. If you install an SO-DIMM that is a dual-core processor model, do not replace the Dummy DIMM ...cards with different capacities are available. Go to "Adding memory to step 5. You can purchase the appropriate memory option from the computer. 2. For details, refer to follow the instructions in...
(English) User Guide
Page 165
..., be moved easily. 9. If the "Installed memory" item shows a different amount of memory from what you installed, check whether you install a memory module in your computer. 3. Replacing devices 147 Reinstall the keyboard. Put the battery back in place (for details, refer to the instructions in "Replacing the battery" on . 2. The ThinkPad Setup opens. Turn the computer on...
..., be moved easily. 9. If the "Installed memory" item shows a different amount of memory from what you installed, check whether you install a memory module in your computer. 3. Replacing devices 147 Reinstall the keyboard. Put the battery back in place (for details, refer to the instructions in "Replacing the battery" on . 2. The ThinkPad Setup opens. Turn the computer on...

(Arabic) User Guide
Page 151
SO-DIMM F1 ThinkPad Setup Installed memory Installed memory
SO-DIMM F1 ThinkPad Setup Installed memory Installed memory


