(English) Access Connections Profile Deployment guide
Page 17
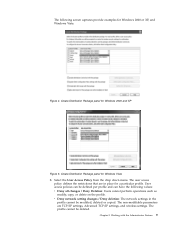
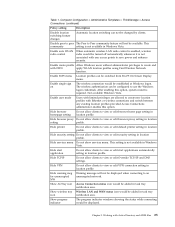
... cannot perform operations such as modify, copy, or delete on the profile. User access policies can be defined per profile and can have the following screen captures provide examples for Windows Vista 3. Create Distribution Package panel for Windows 2000 or XP, and Windows Vista: Figure 4.
... cannot perform operations such as modify, copy, or delete on the profile. User access policies can be defined per profile and can have the following screen captures provide examples for Windows Vista 3. Create Distribution Package panel for Windows 2000 or XP, and Windows Vista: Figure 4.
(English) Access Connections Profile Deployment guide
Page 20
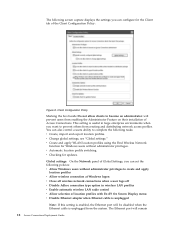
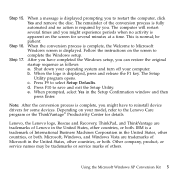
... global settings, see "Global settings." Global settings: On the Network panel of location profiles with Fn+F5 On Screen Display menu v Disable Ethernet adapter when Ethernet cable is unplugged Note: If this setting is enabled, the Ethernet...import and export location profiles. This setting is unplugged from creating and distributing network access profiles. v Automatic location profile switching. The following screen capture displays the settings you can also control a users ability to complete the following policies: v Allow Windows users without administrator privileges. ...
... global settings, see "Global settings." Global settings: On the Network panel of location profiles with Fn+F5 On Screen Display menu v Disable Ethernet adapter when Ethernet cable is unplugged Note: If this setting is enabled, the Ethernet...import and export location profiles. This setting is unplugged from creating and distributing network access profiles. v Automatic location profile switching. The following screen capture displays the settings you can also control a users ability to complete the following policies: v Allow Windows users without administrator privileges. ...
(English) Access Connections Profile Deployment guide
Page 22
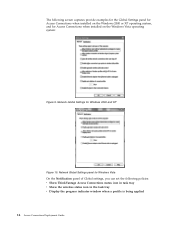
... the Windows Vista operating system: Figure 9. Network Global Settings panel for Windows Vista On the Notification panel of Global settings, you can set the following screen captures provide examples for the Global Settings panel for Access Connections when installed on the Windows 2000 or XP operating system, and for Windows 2000...
... the Windows Vista operating system: Figure 9. Network Global Settings panel for Windows Vista On the Notification panel of Global settings, you can set the following screen captures provide examples for the Global Settings panel for Access Connections when installed on the Windows 2000 or XP operating system, and for Windows 2000...
(English) Access Connections Profile Deployment guide
Page 33
... browser home page setting in location profile. Hide services menu Do not show services menu. The wireless authentication can be switched from Fn+F5 On Screen Display menu. Hide start application Do not allow clients to view or edit start applications automatically setting in location profile. Chapter 5. Enable FnF5 menu Location...
... browser home page setting in location profile. Hide services menu Do not show services menu. The wireless authentication can be switched from Fn+F5 On Screen Display menu. Hide start application Do not allow clients to view or edit start applications automatically setting in location profile. Chapter 5. Enable FnF5 menu Location...

(English) Access Connections Profile Deployment guide
Page 40
..., and Power Management. 5. To install interactively, type: \setup.exe b. v WLANCX2 is required for the Hotkey utilities package and On screen display. v OSD sub-folder from the extracted location and place into the C:\Drivers\W2k\ACCONWLD directory. Copy the following commands will install ...install silently, all of the drivers in the directory, only the drivers required for up-to replace all the relevant packages with Lenovo ThinkPad /L3000 system BIOS. The Software Installer searches your sub directories for your wireless system. To install silently, all the relevant ...
..., and Power Management. 5. To install interactively, type: \setup.exe b. v WLANCX2 is required for the Hotkey utilities package and On screen display. v OSD sub-folder from the extracted location and place into the C:\Drivers\W2k\ACCONWLD directory. Copy the following commands will install ...install silently, all of the drivers in the directory, only the drivers required for up-to replace all the relevant packages with Lenovo ThinkPad /L3000 system BIOS. The Software Installer searches your sub directories for your wireless system. To install silently, all the relevant ...

Microsoft Windows XP Conversion Kit
Page 4
...Vista operating system on your computer model, you can use an external USB DVD drive. Open the Start menu, click All Programs, click ThinkVantage or Lenovo Care, and then click either Create Recovery Media or Create Product Recovery Discs. 3. You should store these discs in case you want to do so.... Follow the instructions on all data on the screen. If you do not have to be deleted, including any 2 Microsoft Windows XP Conversion Kit Start the Windows Vista operating system. 2.
...Vista operating system on your computer model, you can use an external USB DVD drive. Open the Start menu, click All Programs, click ThinkVantage or Lenovo Care, and then click either Create Recovery Media or Create Product Recovery Discs. 3. You should store these discs in case you want to do so.... Follow the instructions on all data on the screen. If you do not have to be deleted, including any 2 Microsoft Windows XP Conversion Kit Start the Windows Vista operating system. 2.

Microsoft Windows XP Conversion Kit
Page 5
... 3 Turn on page 2. Shut down the operating system and turn off your operating system to Microsoft Windows XP, perform the following procedure: a. When the logo screen is displayed, press and release the F1 key. Performing the conversion process Important: Ensure that you want to select Startup from the Boot menu. Use...
... 3 Turn on page 2. Shut down the operating system and turn off your operating system to Microsoft Windows XP, perform the following procedure: a. When the logo screen is displayed, press and release the F1 key. Performing the conversion process Important: Ensure that you want to select Startup from the Boot menu. Use...

Microsoft Windows XP Conversion Kit
Page 6
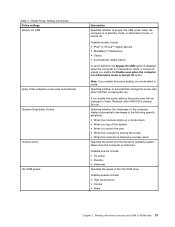
When the Rescue and Recovery workspace opens, click Continue on the screen. Click Continue. A message displays a warning not to power off during this process. Step 10. The first phase of the conversion process begins. When prompted, insert ...
When the Rescue and Recovery workspace opens, click Continue on the screen. Click Continue. A message displays a warning not to power off during this process. Step 10. The first phase of the conversion process begins. When prompted, insert ...
Microsoft Windows XP Conversion Kit
Page 7
...process is fully automated and no activity is displayed. Press F9 to save and exit the Setup Utility. Depending on the screen to reinstall device drivers for details. Other company, product, or service names may be patient. Follow the instructions on your ...some devices. The remainder of International Business Machines Corporation in the United States, other countries, or both . b. d. Lenovo, the Lenovo logo, Rescue and Recovery, ThinkPad, and ThinkVantage are trademarks of Microsoft in the United States, other countries, or both . Press F10 to select Setup...
...process is fully automated and no activity is displayed. Press F9 to save and exit the Setup Utility. Depending on the screen to reinstall device drivers for details. Other company, product, or service names may be patient. Follow the instructions on your ...some devices. The remainder of International Business Machines Corporation in the United States, other countries, or both . b. d. Lenovo, the Lenovo logo, Rescue and Recovery, ThinkPad, and ThinkVantage are trademarks of Microsoft in the United States, other countries, or both . Press F10 to select Setup...

(English) Power Manager Deployment Guide
Page 10
... Finish. 6. Follow the instructions on your computer, match the Power Manager version with your operating system. 5. Make sure that you install Power Manager on the screen to complete installation and restart the computer.
... Finish. 6. Follow the instructions on your computer, match the Power Manager version with your operating system. 5. Make sure that you install Power Manager on the screen to complete installation and restart the computer.
(English) Power Manager Deployment Guide
Page 37
... when the computer is in hibernation mode or turned off unless you switch the user • When the computer is locking the screen • When the computer is displaying a screen saver Specifies the action that the Windows operating system takes when the computer is in hibernation mode, or turned off option. Global...
... when the computer is in hibernation mode or turned off unless you switch the user • When the computer is locking the screen • When the computer is displaying a screen saver Specifies the action that the Windows operating system takes when the computer is in hibernation mode, or turned off option. Global...
Hardware Maintenance Manual
Page 5
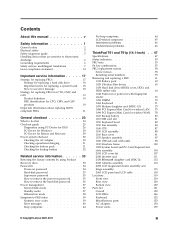
...power-on password . . . . 35 How to remove the hard-disk password . . . . 36 Power management 37 Screen blank mode 37 Standby mode 37 Hibernation mode 38 Symptom-to-FRU index 39 Numeric error codes 39 Error messages 43 Beep symptoms... 44 No-beep symptoms 44 LCD-related symptoms 45 Intermittent problems 46 Undetermined problems 46 ThinkPad T61 and T61p (14.1-inch) . . 47 Specifications 47 Status indicators 50 FRU tests 53 Fn key combinations 55 FRU ... 152 Miscellaneous parts 153 AC adapters 154 Power cords 155 © Copyright Lenovo 2007, 2011 iii
...power-on password . . . . 35 How to remove the hard-disk password . . . . 36 Power management 37 Screen blank mode 37 Standby mode 37 Hibernation mode 38 Symptom-to-FRU index 39 Numeric error codes 39 Error messages 43 Beep symptoms... 44 No-beep symptoms 44 LCD-related symptoms 45 Intermittent problems 46 Undetermined problems 46 ThinkPad T61 and T61p (14.1-inch) . . 47 Specifications 47 Status indicators 50 FRU tests 53 Fn key combinations 55 FRU ... 152 Miscellaneous parts 153 AC adapters 154 Power cords 155 © Copyright Lenovo 2007, 2011 iii
Hardware Maintenance Manual
Page 25
...lenovo.com/support Advise customers to use error message" on page 18 - To download software fixes, drivers, and BIOS, do as follows: 1. "Important notice for CTO, CMV, and GAV products" on page 19 v "Important information about replacing RoHS compliant FRUs" on page 19 - Follow the directions on the screen... fixes, drivers, and BIOS downloads. Enter the product number of the computer or press Auto-detect button on the screen and install the necessary software. Important service information This chapter presents following strategy to prevent unnecessary expense for CTO, CMV...
...lenovo.com/support Advise customers to use error message" on page 18 - To download software fixes, drivers, and BIOS, do as follows: 1. "Important notice for CTO, CMV, and GAV products" on page 19 v "Important information about replacing RoHS compliant FRUs" on page 19 - Follow the directions on the screen... fixes, drivers, and BIOS downloads. Enter the product number of the computer or press Auto-detect button on the screen and install the necessary software. Important service information This chapter presents following strategy to prevent unnecessary expense for CTO, CMV...

Hardware Maintenance Manual
Page 26
... the current configuration settings (using the View Configuration option); This will cause all customer data on the computer you are servicing. 18 ThinkPad T61 and T61p (14.1-inch) Hardware Maintenance Manual Be sure that changed . Attention: The drive startup sequence in the computer you are servicing may ...remove the FRUs, one by one of any excessive force to diagnose failures. Strategy for replacing a system board Some components mounted on the screen to it. Be extremely careful during write operations such as copying, saving, or formatting. If no error code is displayed, see if...
... the current configuration settings (using the View Configuration option); This will cause all customer data on the computer you are servicing. 18 ThinkPad T61 and T61p (14.1-inch) Hardware Maintenance Manual Be sure that changed . Attention: The drive startup sequence in the computer you are servicing may ...remove the FRUs, one by one of any excessive force to diagnose failures. Strategy for replacing a system board Some components mounted on the screen to it. Be extremely careful during write operations such as copying, saving, or formatting. If no error code is displayed, see if...
Hardware Maintenance Manual
Page 34
...follows: 1. This section is entered. For details that is available on the following procedure, you run correctly. On the BIOS Setup Utility screen, press F9, Enter, F10, and then Enter. If you test one of these devices, you initialize the computer configuration, some possible ...such as follows: Note: In the following Web site: http://www.lenovo.com/support PC-Doctor cannot be powered on, go to "Symptom-to "ThinkPad T61 and T61p (14.1-inch)" on page 39. 26 ThinkPad T61 and T61p (14.1-inch) Hardware Maintenance Manual Diagnostics using Configuration utility for DOS....
...follows: 1. This section is entered. For details that is available on the following procedure, you run correctly. On the BIOS Setup Utility screen, press F9, Enter, F10, and then Enter. If you test one of these devices, you initialize the computer configuration, some possible ...such as follows: Note: In the following Web site: http://www.lenovo.com/support PC-Doctor cannot be powered on, go to "Symptom-to "ThinkPad T61 and T61p (14.1-inch)" on page 39. 26 ThinkPad T61 and T61p (14.1-inch) Hardware Maintenance Manual Diagnostics using Configuration utility for DOS....

Hardware Maintenance Manual
Page 35
...Test v Run Quick Test v CPU/Coprocessor v Systemboard v Video Adapter v Serial Ports v Parallel Ports v Fixed Disks v Diskette Drives v Other Devices v ThinkPad Devices v Communication v Wireless LAN v Memory Test - Run the applicable function test. Some unsupported device names may appear in menus. All Rights Reserved. v ...To test Digital Signature Chip, the security chip must be held down menu appears. (Its exact form depends on the screen. 2. Full Memory Test - A pull-down for DOS. General checkout 27 Press ENTER to your computer, detach it cannot be ...
...Test v Run Quick Test v CPU/Coprocessor v Systemboard v Video Adapter v Serial Ports v Parallel Ports v Fixed Disks v Diskette Drives v Other Devices v ThinkPad Devices v Communication v Wireless LAN v Memory Test - Run the applicable function test. Some unsupported device names may appear in menus. All Rights Reserved. v ...To test Digital Signature Chip, the security chip must be held down menu appears. (Its exact form depends on the screen. 2. Full Memory Test - A pull-down for DOS. General checkout 27 Press ENTER to your computer, detach it cannot be ...

Hardware Maintenance Manual
Page 36
Exit Diag. Note: After running PC-Doctor, check the time and date on the screen. 5. To exit the test, select Quit - If there is a problem, PC-Doctor shows messages describing it. 6. To cancel the test, press Esc. Follow the instructions on the system and reset them if they are incorrect. 28 ThinkPad T61 and T61p (14.1-inch) Hardware Maintenance Manual
Exit Diag. Note: After running PC-Doctor, check the time and date on the screen. 5. To exit the test, select Quit - If there is a problem, PC-Doctor shows messages describing it. 6. To cancel the test, press Esc. Follow the instructions on the system and reset them if they are incorrect. 28 ThinkPad T61 and T61p (14.1-inch) Hardware Maintenance Manual

Hardware Maintenance Manual
Page 37
...Print Log v Save Log v Full Erase Hard Drive v Quick Erase Hard Drive PC-Doctor for Rescue and Recovery In some models of ThinkPad computer, the Rescue and Recovery™ workspace enables you troubleshoot and resolve problems related to your computer. Select one of the categories listed below... to display symptoms and solutions: v Check System Health v System and Device Tests v Lenovo Troubleshooting Center v System Reports v Updates and Support PC-Doctor for Windows This product is designed to help you to test the hardware ...
...Print Log v Save Log v Full Erase Hard Drive v Quick Erase Hard Drive PC-Doctor for Rescue and Recovery In some models of ThinkPad computer, the Rescue and Recovery™ workspace enables you troubleshoot and resolve problems related to your computer. Select one of the categories listed below... to display symptoms and solutions: v Check System Health v System and Device Tests v Lenovo Troubleshooting Center v System Reports v Updates and Support PC-Doctor for Windows This product is designed to help you to test the hardware ...
Hardware Maintenance Manual
Page 41
...using Product Recovery discs, do not want to save any files and click Next. When the "Welcome to -FRU index" on http://www.lenovo.com/spm Restoring the factory contents by using Product Recovery discs" v "Passwords" on page 34 v "Power management" on page 37 v ... service information This chapter presents following : Note: Recovery takes several minutes. 2. This will ask you to order, see "Recovery discs" on the screen, but the Predesktop installer begins copying files. "Restore Your System" window appears. The length of 1 into the optical drive, then restart the computer...
...using Product Recovery discs, do not want to save any files and click Next. When the "Welcome to -FRU index" on http://www.lenovo.com/spm Restoring the factory contents by using Product Recovery discs" v "Passwords" on page 34 v "Power management" on page 37 v ... service information This chapter presents following : Note: Recovery takes several minutes. 2. This will ask you to order, see "Recovery discs" on the screen, but the Predesktop installer begins copying files. "Restore Your System" window appears. The length of 1 into the optical drive, then restart the computer...

Hardware Maintenance Manual
Page 42
..., the computer will then be booted. The password must be entered before an operating system can be prompted to the OOBE (Out of the screen. A warning window appears, giving you will be prompted to insert the remaining recovery discs until the password is booted. File processing continues in...: the power-on . Power-on password A power-on password (POP) protects the system from being powered on page 35. 34 ThinkPad T61 and T61p (14.1-inch) Hardware Maintenance Manual Passwords As many as three passwords may also be needed for IBM system setup, with progress measured by a...
..., the computer will then be booted. The password must be entered before an operating system can be prompted to the OOBE (Out of the screen. A warning window appears, giving you will be prompted to insert the remaining recovery discs until the password is booted. File processing continues in...: the power-on . Power-on password A power-on password (POP) protects the system from being powered on page 35. 34 ThinkPad T61 and T61p (14.1-inch) Hardware Maintenance Manual Passwords As many as three passwords may also be needed for IBM system setup, with progress measured by a...


