Hardware Maintenance Manual
Page 3
...Bootable diagnostic programs 31 Power system checkout 32 Checking the ac power adapter 32 Checking operational charging 33 Checking the battery pack 33 Checking the backup battery 34 Chapter 4. Related service information 35 Restoring the factory contents by using Recovery Disc Set 35 Passwords 36 ...Power-on password 36 Hard-disk password 36 Supervisor password 37 How to remove the power-on password . . . 37 © Copyright Lenovo 2012 How ...
...Bootable diagnostic programs 31 Power system checkout 32 Checking the ac power adapter 32 Checking operational charging 33 Checking the battery pack 33 Checking the backup battery 34 Chapter 4. Related service information 35 Restoring the factory contents by using Recovery Disc Set 35 Passwords 36 ...Power-on password 36 Hard-disk password 36 Supervisor password 37 How to remove the power-on password . . . 37 © Copyright Lenovo 2012 How ...
Hardware Maintenance Manual
Page 4
Notices 113 Electronic emission notices 114 Trademarks 114 ii Hardware Maintenance Manual General guidelines 65 Before servicing ThinkPad T530, T530i, and W530 66 1010 Battery pack 66 1020 Serial Ultrabay Enhanced device or blank bezel 67 1030 Memory module slot cover 68 1040 Memory module (... state drive 78 1100 ExpressCard blank bezel or ExpressCard . . 82 1110 Keyboard bezel assembly 83 1120 Bluetooth daughter card 86 1130 Backup battery 87 1140 Smart card, dummy smart card and spacer . 88 1150 Speaker assembly 89 1160 Thermal fan assembly 90 1170 Microprocessor 93 1180...
Notices 113 Electronic emission notices 114 Trademarks 114 ii Hardware Maintenance Manual General guidelines 65 Before servicing ThinkPad T530, T530i, and W530 66 1010 Battery pack 66 1020 Serial Ultrabay Enhanced device or blank bezel 67 1030 Memory module slot cover 68 1040 Memory module (... state drive 78 1100 ExpressCard blank bezel or ExpressCard . . 82 1110 Keyboard bezel assembly 83 1120 Bluetooth daughter card 86 1130 Backup battery 87 1140 Smart card, dummy smart card and spacer . 88 1150 Speaker assembly 89 1160 Thermal fan assembly 90 1170 Microprocessor 93 1180...
Hardware Maintenance Manual
Page 9
... safety of fire or smoke damage. 8. Switch off the computer. Check the power cord for cracked or bulging batteries. 5. c. Check for any obvious non-ThinkPad alterations. do not become a victim yourself. - Handling devices that the power-supply cover fasteners (screws or rivets... these conditions and the safety hazards they present: • Electrical hazards, especially primary power (primary voltage on the Web page http://www.lenovo.com/serviceparts-lookup. Begin the checks with . Checklist: 1. Turn off power. - Disconnect the power cord. 3. A third-wire ground...
... safety of fire or smoke damage. 8. Switch off the computer. Check the power cord for cracked or bulging batteries. 5. c. Check for any obvious non-ThinkPad alterations. do not become a victim yourself. - Handling devices that the power-supply cover fasteners (screws or rivets... these conditions and the safety hazards they present: • Electrical hazards, especially primary power (primary voltage on the Web page http://www.lenovo.com/serviceparts-lookup. Begin the checks with . Checklist: 1. Turn off power. - Disconnect the power cord. 3. A third-wire ground...

Hardware Maintenance Manual
Page 10
... frame ground, ground braid, or green-wire ground. - Proper grounding of the electrical outlet can use coax or connector-outside shells on a double-insulated or battery-operated system, use an ESD common ground or reference point. Use the round ground prong of a grounding system to eliminate static on ac-operated computers...
... frame ground, ground braid, or green-wire ground. - Proper grounding of the electrical outlet can use coax or connector-outside shells on a double-insulated or battery-operated system, use an ESD common ground or reference point. Use the round ground prong of a grounding system to eliminate static on ac-operated computers...
Hardware Maintenance Manual
Page 38
... the instructions on , check the power cord of the ac adapter cable. Turn off the computer. 6. Turn off the computer. 2. When the ThinkPad logo is used , use the diagnostic program. Turn on the computer. Power system checkout To verify a symptom, do the following: 1. If you...Menu window opens, release the F12 key. 5. Disconnect the ac adapter and install the charged battery pack. 7. Use the arrow keys to select ATAPI CDx (x: 0, 1, ...) and then press Enter. When the ThinkPad logo is displayed, go to "Power system checkout" on page 33. Check that power ...
... the instructions on , check the power cord of the ac adapter cable. Turn off the computer. 6. Turn off the computer. 2. When the ThinkPad logo is used , use the diagnostic program. Turn on the computer. Power system checkout To verify a symptom, do the following: 1. If you...Menu window opens, release the F12 key. 5. Disconnect the ac adapter and install the charged battery pack. 7. Use the arrow keys to select ATAPI CDx (x: 0, 1, ...) and then press Enter. When the ThinkPad logo is displayed, go to "Power system checkout" on page 33. Check that power ...
Hardware Maintenance Manual
Page 39
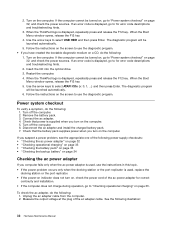
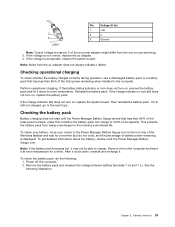
... voltage is not correct, replace the ac adapter. 4. Note: Noise from the one you are servicing. 3. Then reinstall the battery pack. Checking the battery pack Battery charging does not start until the Power Manager Battery Gauge shows that has less than 96% of its capacity. See the following : 1. 3 2 1 (20V) Pin Voltage... adapter does not always indicate a defect. If the voltage is acceptable, replace the system board. Reinstall the battery pack. This protects the battery pack from being overcharged or from the computer and leave it may not be able to the next topic. ...
... voltage is not correct, replace the ac adapter. 4. Note: Noise from the one you are servicing. 3. Then reinstall the battery pack. Checking the battery pack Battery charging does not start until the Power Manager Battery Gauge shows that has less than 96% of its capacity. See the following : 1. 3 2 1 (20V) Pin Voltage... adapter does not always indicate a defect. If the voltage is acceptable, replace the system board. Reinstall the battery pack. This protects the battery pack from being overcharged or from the computer and leave it may not be able to the next topic. ...
Hardware Maintenance Manual
Page 40
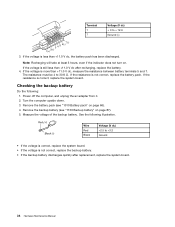
...to 30 K Ω. If the voltage is not correct, replace the backup battery. • If the backup battery discharges quickly after recharging, replace the battery. 4. Checking the backup battery Do the following illustration. Measure the voltage of the backup battery. Wire Red Black Voltage (V dc) +2.5 to +3.2 Ground • If... the voltage is correct, replace the system board. • If the voltage is less than +11.0 V dc, the battery pack has been discharged. Note: Recharging will take at least 3 hours, even if the indicator does not turn on page 87). 5. If ...
...to 30 K Ω. If the voltage is not correct, replace the backup battery. • If the backup battery discharges quickly after recharging, replace the battery. 4. Checking the backup battery Do the following illustration. Measure the voltage of the backup battery. Wire Red Black Voltage (V dc) +2.5 to +3.2 Ground • If... the voltage is correct, replace the system board. • If the voltage is less than +11.0 V dc, the battery pack has been discharged. Note: Recharging will take at least 3 hours, even if the indicator does not turn on page 87). 5. If ...
Hardware Maintenance Manual
Page 43
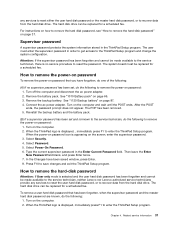
... on the screen, enter the supervisor password. 3. The hard disk drive can be made available to the service technician, neither Lenovo nor Lenovo authorized service technicians provide any services to reset either the user hard disk password or the master hard disk password, or to save... be replaced for a scheduled fee. To remove a user hard disk password that you have been saved window, press Enter. 8. Remove the battery pack. When the ThinkPad logo is appearing on the computer. 2. Then leave the Enter New Password field blank, and press Enter twice. 7. Turn on the computer....
... on the screen, enter the supervisor password. 3. The hard disk drive can be made available to the service technician, neither Lenovo nor Lenovo authorized service technicians provide any services to reset either the user hard disk password or the master hard disk password, or to save... be replaced for a scheduled fee. To remove a user hard disk password that you have been saved window, press Enter. 8. Remove the battery pack. When the ThinkPad logo is appearing on the computer. 2. Then leave the Enter New Password field blank, and press Enter twice. 7. Turn on the computer....
Hardware Maintenance Manual
Page 44
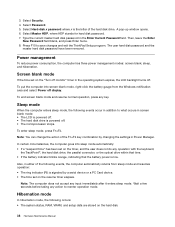
.... Note: You can change the action of the hard disk drive. In certain circumstances, the computer goes into screen blank mode, right-click the battery gauge from sleep mode and resumes operation: • The ring indicator (RI) is the letter of the Fn+F4 key combination by a serial ...a PC Card device. • The time set on the hard disk. 38 Hardware Maintenance Manual Press F10 to save changes and exit the ThinkPad Setup program. The user hard disk password and the master hard disk password have been removed. Power management To reduce power consumption, the computer has...
.... Note: You can change the action of the hard disk drive. In certain circumstances, the computer goes into screen blank mode, right-click the battery gauge from sleep mode and resumes operation: • The ring indicator (RI) is the letter of the Fn+F4 key combination by a serial ...a PC Card device. • The time set on the hard disk. 38 Hardware Maintenance Manual Press F10 to save changes and exit the ThinkPad Setup program. The user hard disk password and the master hard disk password have been removed. Power management To reduce power consumption, the computer has...
Hardware Maintenance Manual
Page 46
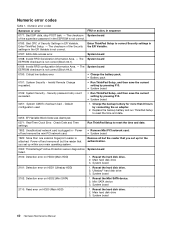
... board of the Security settings in sequence 0177: Bad SVP data, stop POST task. - Invalid Remote Change requested. • Run ThinkPad Setup, and then save the current setting by pressing F10. • System board 0251: System CMOS checksum bad - Security password retry... board EEPROM checksum is not correct (Block #4,5). 0190: Critical low-battery error • Charge the battery pack. • Battery pack 0191: System Security - Default configuration used 1. Replace the backup battery and run ThinkPad Setup to correct Security settings in the EFI Variable. 0187: EAIA ...
... board of the Security settings in sequence 0177: Bad SVP data, stop POST task. - Invalid Remote Change requested. • Run ThinkPad Setup, and then save the current setting by pressing F10. • System board 0251: System CMOS checksum bad - Security password retry... board EEPROM checksum is not correct (Block #4,5). 0190: Critical low-battery error • Charge the battery pack. • Battery pack 0191: System Security - Default configuration used 1. Replace the backup battery and run ThinkPad Setup to correct Security settings in the EFI Variable. 0187: EAIA ...
Hardware Maintenance Manual
Page 47
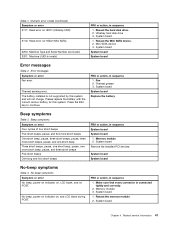
... sure that every connector is invalid. Reseat the hard disk drive. 2. System board 1. Error messages Symptom or error Fan error. The battery installed is not supported by this system. Memory module 3. System board Chapter 4. System board 1. System board Remove the installed PCI devices.... No-beep symptoms Symptom or error No beep, power-on indicator on , and LCD blank during POST. Please replace the battery with the correct Lenovo battery for this system and will not charge. System board System board No-beep symptoms Table 4. Fan 2. Beep symptoms Table 3....
... sure that every connector is invalid. Reseat the hard disk drive. 2. System board 1. Error messages Symptom or error Fan error. The battery installed is not supported by this system. Memory module 3. System board Chapter 4. System board 1. System board Remove the installed PCI devices.... No-beep symptoms Symptom or error No beep, power-on indicator on , and LCD blank during POST. Please replace the battery with the correct Lenovo battery for this system and will not charge. System board System board No-beep symptoms Table 4. Fan 2. Beep symptoms Table 3....
Hardware Maintenance Manual
Page 49
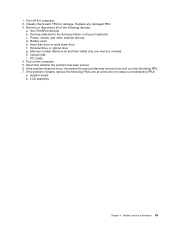
... devices d. Hard disk drive or solid state drive f. Related service information 43 Devices attached to the docking station or the port replicator c. Battery pack e. Turn on the computer. 5. Non-ThinkPad devices b. Optical disk i. Remove or disconnect all and then install only one memory module) h. 1. PC Cards 4. LCD assembly Chapter 4. Turn off the...
... devices d. Hard disk drive or solid state drive f. Related service information 43 Devices attached to the docking station or the port replicator c. Battery pack e. Turn on the computer. 5. Non-ThinkPad devices b. Optical disk i. Remove or disconnect all and then install only one memory module) h. 1. PC Cards 4. LCD assembly Chapter 4. Turn off the...
Hardware Maintenance Manual
Page 54
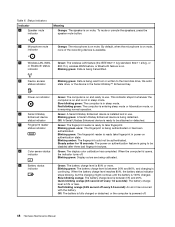
... transmitted. 4 Device access status indicator Blinking green: Data is on . Blinking green once: The fingerprint is being calibrated. 9 Battery status indicator Green: The battery charge level is ready take fingerprint. Blinking green: The fingerprint reader is 80% or more. Steady amber for 15 seconds: The... power-on mute. Blinking green: The battery charge level is going to the hard disk drive, the solid state drive, or the device in sleep mode. Status indicators Indicator 1...
... transmitted. 4 Device access status indicator Blinking green: Data is on . Blinking green once: The fingerprint is being calibrated. 9 Battery status indicator Green: The battery charge level is ready take fingerprint. Blinking green: The fingerprint reader is 80% or more. Steady amber for 15 seconds: The... power-on mute. Blinking green: The battery charge level is going to the hard disk drive, the solid state drive, or the device in sleep mode. Status indicators Indicator 1...
Hardware Maintenance Manual
Page 55
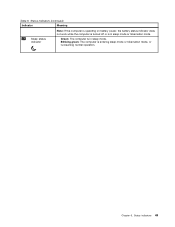
Green: The computer is resuming normal operation. Blinking green: The computer is entering sleep mode or hibernation mode, or is in sleep mode or hibernation mode. Chapter 6. Status indicators (continued) Indicator Meaning 10 Sleep status indicator Note: If the computer is operating on battery power, the battery status indicator does not work while the computer is turned off or is in sleep mode. Status indicators 49 Table 6.
Green: The computer is resuming normal operation. Blinking green: The computer is entering sleep mode or hibernation mode, or is in sleep mode or hibernation mode. Chapter 6. Status indicators (continued) Indicator Meaning 10 Sleep status indicator Note: If the computer is operating on battery power, the battery status indicator does not work while the computer is turned off or is in sleep mode. Status indicators 49 Table 6.
Hardware Maintenance Manual
Page 60
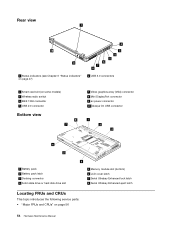
... switch 4 IEEE 1394 connector 5 USB 2.0 connector Bottom view 8 7 7 Video graphics array (VGA) connector 8 Mini DisplayPort connector 9 ac power connector 10 Always On USB connector 1 2 3 6 5 1 Battery pack 2 Battery pack latch 3 Docking connector 4 Solid state drive or hard disk drive slot 4 5 Memory module slot (bottom) 6 LCD cover latch 7 Serial Ultrabay Enhanced lock latch 8 Serial...
... switch 4 IEEE 1394 connector 5 USB 2.0 connector Bottom view 8 7 7 Video graphics array (VGA) connector 8 Mini DisplayPort connector 9 ac power connector 10 Always On USB connector 1 2 3 6 5 1 Battery pack 2 Battery pack latch 3 Docking connector 4 Solid state drive or hard disk drive slot 4 5 Memory module slot (bottom) 6 LCD cover latch 7 Serial Ultrabay Enhanced lock latch 8 Serial...
Hardware Maintenance Manual
Page 61
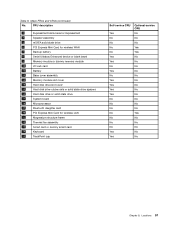
... can find the manual for your product. When return is replaced by no more than two screws. ThinkPad computers contain the following types of CRUs include the ac power adapter, power cord, battery, and hard disk drive. • "LCD FRUs and CRUs" on -screen instructions to find a... • Each FRU is visible. Other self-service CRUs depending on installing the CRU, Lenovo will be found at any time upon request. See your Lenovo Limited Warranty documentation for the replacement CRU if Lenovo does not receive the defective CRU within the computer that are available from...
... can find the manual for your product. When return is replaced by no more than two screws. ThinkPad computers contain the following types of CRUs include the ac power adapter, power cord, battery, and hard disk drive. • "LCD FRUs and CRUs" on -screen instructions to find a... • Each FRU is visible. Other self-service CRUs depending on installing the CRU, Lenovo will be found at any time upon request. See your Lenovo Limited Warranty documentation for the replacement CRU if Lenovo does not receive the defective CRU within the computer that are available from...
Hardware Maintenance Manual
Page 63
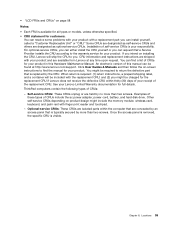
... or ExpressCard 4 Speaker assembly 5 mSATA solid state drive 6 PCI Express Mini Card for wireless WAN 7 Backup battery 8 Serial Ultrabay Enhanced device or blank bezel 9 Memory module or dummy memory module 10 I/O sub card 11 Battery 12 Base cover assembly 13 Memory module slot cover 14 Hard disk drive slot cover 15 Hard...
... or ExpressCard 4 Speaker assembly 5 mSATA solid state drive 6 PCI Express Mini Card for wireless WAN 7 Backup battery 8 Serial Ultrabay Enhanced device or blank bezel 9 Memory module or dummy memory module 10 I/O sub card 11 Battery 12 Base cover assembly 13 Memory module slot cover 14 Hard disk drive slot cover 15 Hard...
Hardware Maintenance Manual
Page 71
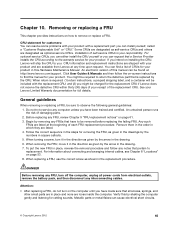
...documentation for removing the FRU, as given in the drawings by the arrow in which they are available from electrical outlets, remove the battery pack, and then disconnect any time upon request. See your product. Do not try to be required to return the defective part.... 4. Removing or replacing a FRU This chapter provides instructions on -screen instructions to you can cause electrical short circuits. © Copyright Lenovo 2012 65 CRU statement for rattling sounds. Some CRUs are designated as self-service CRUs and others are loose inside the computer. CRU information...
...documentation for removing the FRU, as given in the drawings by the arrow in which they are available from electrical outlets, remove the battery pack, and then disconnect any time upon request. See your product. Do not try to be required to return the defective part.... 4. Removing or replacing a FRU This chapter provides instructions on -screen instructions to you can cause electrical short circuits. © Copyright Lenovo 2012 65 CRU statement for rattling sounds. Some CRUs are designated as self-service CRUs and others are loose inside the computer. CRU information...
Hardware Maintenance Manual
Page 72
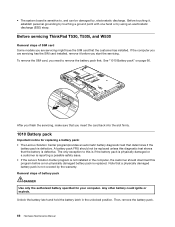
... reporting a possible safety issue. • If the Lenovo Solution Center program is defective. Before servicing ThinkPad T530, T530i, and W530 Removal steps of battery pack DANGER Use only the authorized battery specified for replacing a battery pack: • The Lenovo Solution Center programprovides an automatic battery diagnostic test that a physically damaged battery pack is not covered by , electrostatic discharge. The...
... reporting a possible safety issue. • If the Lenovo Solution Center program is defective. Before servicing ThinkPad T530, T530i, and W530 Removal steps of battery pack DANGER Use only the authorized battery specified for replacing a battery pack: • The Lenovo Solution Center programprovides an automatic battery diagnostic test that a physically damaged battery pack is not covered by , electrostatic discharge. The...
Hardware Maintenance Manual
Page 73
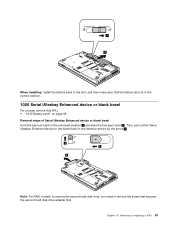
... the direction shown by the arrow 3 . 1 2 3 Note: For RAID models, to remove the second hard disk drive, you need to remove the screw that the battery latch is in the locked position. 1020 Serial Ultrabay Enhanced device or blank bezel For access, remove this FRU: • "1010... Battery pack" on page 66 Removal steps of Serial Ultrabay Enhanced device or blank bezel Hold the bay lock latch in the slot, and then make ...
... the direction shown by the arrow 3 . 1 2 3 Note: For RAID models, to remove the second hard disk drive, you need to remove the screw that the battery latch is in the locked position. 1020 Serial Ultrabay Enhanced device or blank bezel For access, remove this FRU: • "1010... Battery pack" on page 66 Removal steps of Serial Ultrabay Enhanced device or blank bezel Hold the bay lock latch in the slot, and then make ...


