(English) Access Connections Profile Deployment guide
Page 17
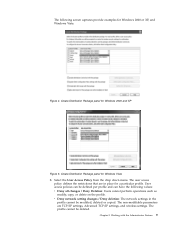
... the drop down menu. The profile cannot be modified, deleted or copied. User access policies can be defined per profile and can have the following screen captures provide examples for Windows 2000 and XP Figure 5.
... the drop down menu. The profile cannot be modified, deleted or copied. User access policies can be defined per profile and can have the following screen captures provide examples for Windows 2000 and XP Figure 5.
(English) Access Connections Profile Deployment guide
Page 20
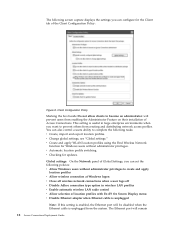
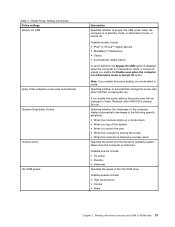
...is useful in wireless LAN profiles v Enable automatic wireless LAN radio control v Allow selection of location profiles with Fn+F5 On Screen Display menu v Disable Ethernet adapter when Ethernet cable is unplugged Note: If this setting is enabled, the Ethernet port will remain... 12 Access Connections Deployment Guide This setting is unplugged from the system. The following screen capture displays the settings you can also control a users ability to complete the following policies: v Allow Windows users without administrator privileges...
...is useful in wireless LAN profiles v Enable automatic wireless LAN radio control v Allow selection of location profiles with Fn+F5 On Screen Display menu v Disable Ethernet adapter when Ethernet cable is unplugged Note: If this setting is enabled, the Ethernet port will remain... 12 Access Connections Deployment Guide This setting is unplugged from the system. The following screen capture displays the settings you can also control a users ability to complete the following policies: v Allow Windows users without administrator privileges...
(English) Access Connections Profile Deployment guide
Page 22
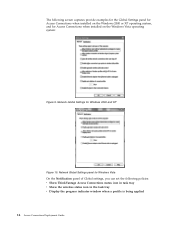
... applied 14 Access Connections Deployment Guide Network Global Settings panel for Windows Vista On the Notification panel of Global settings, you can set the following screen captures provide examples for the Global Settings panel for Access Connections when installed on the Windows 2000 or XP operating system, and for Windows 2000...
... applied 14 Access Connections Deployment Guide Network Global Settings panel for Windows Vista On the Notification panel of Global settings, you can set the following screen captures provide examples for the Global Settings panel for Access Connections when installed on the Windows 2000 or XP operating system, and for Windows 2000...
(English) Access Connections Profile Deployment guide
Page 33
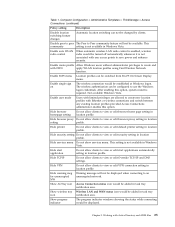
... notification area. Hide TCPIP Do not allow clients to an unencrypted network. Enable FnF5 menu Location profiles can not be switched from Fn+F5 On Screen Display menu. Not available Windows Vista. Show ACTray icon Access Connection status icon would be added in Windows Vista. Table 1. Enable auto WLAN radio control...
... notification area. Hide TCPIP Do not allow clients to an unencrypted network. Enable FnF5 menu Location profiles can not be switched from Fn+F5 On Screen Display menu. Not available Windows Vista. Show ACTray icon Access Connection status icon would be added in Windows Vista. Table 1. Enable auto WLAN radio control...

(English) Access Connections Profile Deployment guide
Page 40
...installation and contains the Software Installer. You do not need to replace all the relevant packages with prompt for Access Connections to interface with Lenovo ThinkPad /L3000 system BIOS. Note: This package is required for system restart at the end type: \setup.exe /S /H /R:2 Directory ... WLLANINT is required to -date versions of the drivers in the directory, only the drivers required for the Hotkey utilities package and On screen display. v All Wireless LAN drivers that contains the main Access Connections application files. v OSD sub-folder from the extracted location and...
...installation and contains the Software Installer. You do not need to replace all the relevant packages with prompt for Access Connections to interface with Lenovo ThinkPad /L3000 system BIOS. Note: This package is required for system restart at the end type: \setup.exe /S /H /R:2 Directory ... WLLANINT is required to -date versions of the drivers in the directory, only the drivers required for the Hotkey utilities package and On screen display. v All Wireless LAN drivers that contains the main Access Connections application files. v OSD sub-folder from the extracted location and...

(English) Power Manager Deployment Guide
Page 10
... system. 5. One is for Windows XP operating systems and the other is for Windows Vista and Windows 7 operating systems might not function correctly on the screen to complete installation and restart the computer. Follow the instructions on Windows XP operating systems, and vice versa. 4 Power ManagerDeployment Guide
... system. 5. One is for Windows XP operating systems and the other is for Windows Vista and Windows 7 operating systems might not function correctly on the screen to complete installation and restart the computer. Follow the instructions on Windows XP operating systems, and vice versa. 4 Power ManagerDeployment Guide
(English) Power Manager Deployment Guide
Page 37
... when the computer is in hibernation mode or turned off unless you switch the user • When the computer is locking the screen • When the computer is displaying a screen saver Specifies the action that the Windows operating system takes when the computer is in hibernation mode, or turned off option. Table...
... when the computer is in hibernation mode or turned off unless you switch the user • When the computer is locking the screen • When the computer is displaying a screen saver Specifies the action that the Windows operating system takes when the computer is in hibernation mode, or turned off option. Table...
Hardware Maintenance Manual
Page 3
... . . 41 How to remove the hard-disk password . . . 42 Power management 42 Screen blank mode 43 Sleep (standby) mode 43 Hibernation mode 43 Symptom-to use error message 24...Intermittent problems 52 Undetermined problems 52 Chapter 5. Removing and replacing a FRU 65 Before servicing ThinkPad T400s, T410s, and T410si 65 1010 Battery pack 66 1020 Serial Ultrabay Slim device or travel bezel...guide 3 Handling devices that are sensitive to do first 27 Checkout guide 28 System supporting the Lenovo ThinkVantage Toolbox program and the PC-Doctor for wireless WAN . . 73 1070 Keyboard 74 ...
... . . 41 How to remove the hard-disk password . . . 42 Power management 42 Screen blank mode 43 Sleep (standby) mode 43 Hibernation mode 43 Symptom-to use error message 24...Intermittent problems 52 Undetermined problems 52 Chapter 5. Removing and replacing a FRU 65 Before servicing ThinkPad T400s, T410s, and T410si 65 1010 Battery pack 66 1020 Serial Ultrabay Slim device or travel bezel...guide 3 Handling devices that are sensitive to do first 27 Checkout guide 28 System supporting the Lenovo ThinkVantage Toolbox program and the PC-Doctor for wireless WAN . . 73 1070 Keyboard 74 ...
Hardware Maintenance Manual
Page 29
.../support/phone • System Disassembly/Reassembly videos that show the FRU removals or replacements for replacing FRUs" on the screen to http://www.lenovo.com/support and click Download Drivers & Software. Then follow the instructions on page 23 - Chapter 2. After a system board is ...both a processor board and a system board. Replace only the FRU that those settings remain in this manual: • "Strategy for the Lenovo® authorized service technicians are available in the following important service information that board, and then replace the other one. • If ...
.../support/phone • System Disassembly/Reassembly videos that show the FRU removals or replacements for replacing FRUs" on the screen to http://www.lenovo.com/support and click Download Drivers & Software. Then follow the instructions on page 23 - Chapter 2. After a system board is ...both a processor board and a system board. Replace only the FRU that those settings remain in this manual: • "Strategy for the Lenovo® authorized service technicians are available in the following important service information that board, and then replace the other one. • If ...

Hardware Maintenance Manual
Page 30
... GAV Product definition Dynamic Configure To Order (CTO) This provides the ability for the computer you are servicing. Be sure that has been negotiated between Lenovo and the customer. Attention: When handling a system board: • Do not drop a system board or apply any excessive force to prevent cracking at each BGA...site.) • The HMM will load these products as copying, saving, or formatting. How to use error message Use the error codes displayed on the screen to the customer. Custom Model Variant (CMV) This is displayed, begin the diagnosis with the first error code.
... GAV Product definition Dynamic Configure To Order (CTO) This provides the ability for the computer you are servicing. Be sure that has been negotiated between Lenovo and the customer. Attention: When handling a system board: • Do not drop a system board or apply any excessive force to prevent cracking at each BGA...site.) • The HMM will load these products as copying, saving, or formatting. How to use error message Use the error codes displayed on the screen to the customer. Custom Model Variant (CMV) This is displayed, begin the diagnosis with the first error code.

Hardware Maintenance Manual
Page 31
... are announced and offered to view the complete list of FRUs at the following : 1. Click Product & Parts Detail and then follow the instructions on the screen to support CTO, CMV, and GAV products. The MTM portion of service parts. An example of key commodities will be displayed. The key commodities will..., do ?lndocid=LOOK-WARNTY Select Warranty lookup. Click the Parts Detail tab to view the list of FRUs, do the following Web site: http://www.lenovo.com/support/site.wss/document.do the following Web site: http://www...
... are announced and offered to view the complete list of FRUs at the following : 1. Click Product & Parts Detail and then follow the instructions on the screen to support CTO, CMV, and GAV products. The MTM portion of service parts. An example of key commodities will be displayed. The key commodities will..., do ?lndocid=LOOK-WARNTY Select Warranty lookup. Click the Parts Detail tab to view the list of FRUs, do the following Web site: http://www.lenovo.com/support/site.wss/document.do the following Web site: http://www...

Hardware Maintenance Manual
Page 35
... Enter, click the left button. Select Diagnostics with the TrackPoint® pointer. The utility is available on the following Web site: http://www.lenovo.com/support. Turn off the computer. 2. If an error code appears, go to select ATAPI CDx (x: 0, 1, ...) and then press Enter..., do as follows: 1. On the BIOS Setup Utility screen, press F9, Enter, F10, and then Enter. A pull-down menu appears. (Its exact form depends on the screen. 8. however, you run PC-Doctor . When the ThinkPad logo comes up , immediately press F1 to initialize the computer...
... Enter, click the left button. Select Diagnostics with the TrackPoint® pointer. The utility is available on the following Web site: http://www.lenovo.com/support. Turn off the computer. 2. If an error code appears, go to select ATAPI CDx (x: 0, 1, ...) and then press Enter..., do as follows: 1. On the BIOS Setup Utility screen, press F9, Enter, F10, and then Enter. A pull-down menu appears. (Its exact form depends on the screen. 8. however, you run PC-Doctor . When the ThinkPad logo comes up , immediately press F1 to initialize the computer...

Hardware Maintenance Manual
Page 36
...; Run Quick Test • CPU/Coprocessor • System board • Video Adapter • Fixed Disks • Diskette Drives • Other Devices • ThinkPad Devices • Communication • Wireless LAN • Advanced Memory Tests • Keyboard • Video • Internal Speaker • Mouse • Diskette &#...Use the cursor keys and ESC to select. Note: After running PC-Doctor for at least 2 seconds; The options on the screen. Run the applicable function test. 11. To cancel the test, press Esc. Detecting system information with PC-Doctor PC-Doctor can ...
...; Run Quick Test • CPU/Coprocessor • System board • Video Adapter • Fixed Disks • Diskette Drives • Other Devices • ThinkPad Devices • Communication • Wireless LAN • Advanced Memory Tests • Keyboard • Video • Internal Speaker • Mouse • Diskette &#...Use the cursor keys and ESC to select. Note: After running PC-Doctor for at least 2 seconds; The options on the screen. Run the applicable function test. 11. To cancel the test, press Esc. Detecting system information with PC-Doctor PC-Doctor can ...

Hardware Maintenance Manual
Page 37
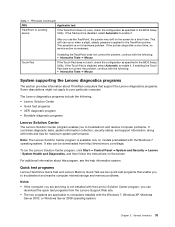
...It enables you to view symptoms of the following Web site: http://www.lenovo.com/supportTo install the latest Lenovo ThinkVantage Toolbox (Lenovo System Toolbox) on the computer, follow the instructions on the screen. System Health and Diagnostics. To run this program, see the Help for... them, and includes automatic notification when action is available at the following : • Click Start ➙ All Programs ➙ Lenovo ThinkVantage Tools ➙ System Health...
...It enables you to view symptoms of the following Web site: http://www.lenovo.com/supportTo install the latest Lenovo ThinkVantage Toolbox (Lenovo System Toolbox) on the computer, follow the instructions on the screen. System Health and Diagnostics. To run this program, see the Help for... them, and includes automatic notification when action is available at the following : • Click Start ➙ All Programs ➙ Lenovo ThinkVantage Tools ➙ System Health...
Hardware Maintenance Manual
Page 38
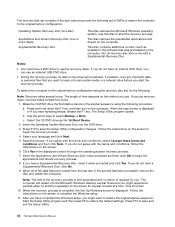
...are installed, remove one , and run Diagnostics ➙ Advanced Memory Tests. 2. Diagnostics ➙ Systemboard 3. Turn on the Rescue and Recovery main screen. Press enter. 5. Diagnostics ➙ Systemboard 2. To diagnose the drive from the diskette drive, and then turn on a horizontal surface, and run... You can also diagnose the drive without starting up the operating system. Press Enter to Compatibility, drive and run Diagnostics ➙ ThinkPad Devices ➙ HDD Active Protection Test Note: Do not apply any diskette from the BIOS Setup Utility, do as follows: 1....
...are installed, remove one , and run Diagnostics ➙ Advanced Memory Tests. 2. Diagnostics ➙ Systemboard 3. Turn on the Rescue and Recovery main screen. Press enter. 5. Diagnostics ➙ Systemboard 2. To diagnose the drive from the diskette drive, and then turn on a horizontal surface, and run... You can also diagnose the drive without starting up the operating system. Press Enter to Compatibility, drive and run Diagnostics ➙ ThinkPad Devices ➙ HDD Active Protection Test Note: Do not apply any diskette from the BIOS Setup Utility, do as follows: 1....
Hardware Maintenance Manual
Page 39
... short time. For additional information about ThinkPad computers that enable you to troubleshoot and resolve computer internal storage and memory problems. Notes: • If the computer you are two quick test programs that support the Lenovo diagnostics programs. Some descriptions might not ... action is not a hardware problem. To run the Lenovo Solution Center program, click Start ➙ Control Panel ➙ System and Security ➙ Lenovo - General checkout 33 If the Trackpoint is available only on the screen for maximum system performance. After you use the TrackPoint...
... short time. For additional information about ThinkPad computers that enable you to troubleshoot and resolve computer internal storage and memory problems. Notes: • If the computer you are two quick test programs that support the Lenovo diagnostics programs. Some descriptions might not ... action is not a hardware problem. To run the Lenovo Solution Center program, click Start ➙ Control Panel ➙ System and Security ➙ Lenovo - General checkout 33 If the Trackpoint is available only on the screen for maximum system performance. After you use the TrackPoint...

Hardware Maintenance Manual
Page 40
...FRU index" on the computer. When a problem is preinstalled on page 44 for error code descriptions and troubleshooting hints. 2. When the ThinkPad logo is displayed. 5. Click Lenovo Bootable Diagnostics. 3. To use the diagnostic program. Go to the Application Menu window. 4. Go to be tested. 5. Select the device... F12 key. If the computer cannot be tested. 6. Follow the instructions on the Web site to "Power system checkout" on the screen to use the bootable diagnostic programs, you to troubleshoot the problem. Follow the instructions on page 35, and check the power sources. ...
...FRU index" on the computer. When a problem is preinstalled on page 44 for error code descriptions and troubleshooting hints. 2. When the ThinkPad logo is displayed. 5. Click Lenovo Bootable Diagnostics. 3. To use the diagnostic program. Go to the Application Menu window. 4. Go to be tested. 5. Select the device... F12 key. If the computer cannot be tested. 6. Follow the instructions on the Web site to "Power system checkout" on the screen to use the bootable diagnostic programs, you to troubleshoot the problem. Follow the instructions on page 35, and check the power sources. ...

Hardware Maintenance Manual
Page 41
..."Power system checkout" on page 44 for correct continuity and installation. The diagnostic program will be launched automatically. 5. Follow the instructions on the screen to -FRU index" on page 35, and check the power sources. General checkout 35 Use the arrow keys to select ATAPI CDx (x: 0, ...1, ...) and then press Enter. When the ThinkPad logo is displayed, repeatedly press and release the F12 key. Turn off the computer. 6. If the computer cannot be turned on a USB device...
..."Power system checkout" on page 44 for correct continuity and installation. The diagnostic program will be launched automatically. 5. Follow the instructions on the screen to -FRU index" on page 35, and check the power sources. General checkout 35 Use the arrow keys to select ATAPI CDx (x: 0, ...1, ...) and then press Enter. When the ThinkPad logo is displayed, repeatedly press and release the F12 key. Turn off the computer. 6. If the computer cannot be turned on a USB device...

Hardware Maintenance Manual
Page 45
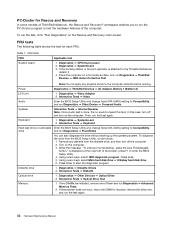
... several minutes at a time. Follow the instructions on the screen to order, see "Recovery discs" on which discs to complete the Windows setup. For information on page 143. © Copyright Lenovo 2009, 2012 39 Select your language and click Next. 3. Remove the disc and then click Yes....SSD) is required by using Recovery Disc Set" on page 39 • "Passwords" on page 41 • "Power management" on http://www.lenovo.com/support. Insert the Product Recovery Disc when prompted and click OK. 6. The length of a failure, no product recovery program is on the method...
... several minutes at a time. Follow the instructions on the screen to order, see "Recovery discs" on which discs to complete the Windows setup. For information on page 143. © Copyright Lenovo 2009, 2012 39 Select your language and click Next. 3. Remove the disc and then click Yes....SSD) is required by using Recovery Disc Set" on page 39 • "Passwords" on page 41 • "Power management" on http://www.lenovo.com/support. Insert the Product Recovery Disc when prompted and click OK. 6. The length of a failure, no product recovery program is on the method...
Hardware Maintenance Manual
Page 46
... prompted and then click OK to begin the operating system recovery process. 7. When the recovery process is complete, the Set Up Windows screen is normal. 10. Operating System Recovery Disc (one disc) Applications and Drivers Recovery Disc (one or more discs) Supplemental Recovery Disc... restores the preinstalled applications and drivers on the computer. If you might want to start the recovery process. When the logo screen is apparent on the screen for several minutes at least five hours. 1. This disc contains additional content, such as the 1st Boot Device. 2. The...
... prompted and then click OK to begin the operating system recovery process. 7. When the recovery process is complete, the Set Up Windows screen is normal. 10. Operating System Recovery Disc (one disc) Applications and Drivers Recovery Disc (one or more discs) Supplemental Recovery Disc... restores the preinstalled applications and drivers on the computer. If you might want to start the recovery process. When the logo screen is apparent on the screen for several minutes at least five hours. 1. This disc contains additional content, such as the 1st Boot Device. 2. The...


