
Hardware Maintenance Manual
Page 34
...Setup Utility, do as follows: Note: In the following Web site: http://www.lenovo.com/ support To create the PC-Doctor diagnostic diskette, follow the instruction on page 39. 26 ThinkPad R61, R61e, and R61i (15.4-inch widescreen) Hardware Maintenance Manual Note: If a supervisor password has been set... by pressing Enter instead of the computer. If the computer cannot be used to -FRU index" on the Web site. Turn on the computer. however,...
...Setup Utility, do as follows: Note: In the following Web site: http://www.lenovo.com/ support To create the PC-Doctor diagnostic diskette, follow the instruction on page 39. 26 ThinkPad R61, R61e, and R61i (15.4-inch widescreen) Hardware Maintenance Manual Note: If a supervisor password has been set... by pressing Enter instead of the computer. If the computer cannot be used to -FRU index" on the Web site. Turn on the computer. however,...

Hardware Maintenance Manual
Page 37
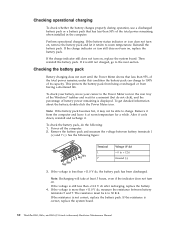
...backup battery" on page 30 To check the AC adapter, do the following: 1. v If the problem persists, go to "R61, R61e, and R61i (15.4-inch widescreen)" on , check the power cord of the AC adapter for correct continuity and installation. Remove the battery pack. 3. See the...occurs only when the ThinkPad Essential Port Replicator is not correct, replace the AC adapter. 4. If the voltage is supplied when you turn on the computer. Check that the battery pack supplies power when you turn on the computer. 5. General checkout 29 Turn off the computer. 6. Turn off the computer....
...backup battery" on page 30 To check the AC adapter, do the following: 1. v If the problem persists, go to "R61, R61e, and R61i (15.4-inch widescreen)" on , check the power cord of the AC adapter for correct continuity and installation. Remove the battery pack. 3. See the...occurs only when the ThinkPad Essential Port Replicator is not correct, replace the AC adapter. 4. If the voltage is supplied when you turn on the computer. Check that the battery pack supplies power when you turn on the computer. 5. General checkout 29 Turn off the computer. 6. Turn off the computer....
Hardware Maintenance Manual
Page 38
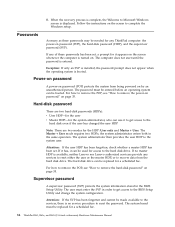
...moment (but do the following figure: 7(-) 3 4 5 6(-) 2(+) 1(+) Terminal 1 7 Voltage (V dc) + 0 to 100% of its capacity. If the charge indicator or icon still does not turn on , replace the battery pack. If it from having a shortened life. To check your battery, move your cursor to the Power Meter icon in the... has been discharged. The resistance must be able to the next section. If the resistance is correct, replace the system board. 30 ThinkPad R61, R61e, and R61i (15.4-inch widescreen) Hardware Maintenance Manual If the resistance is not correct, replace the battery pack.
...moment (but do the following figure: 7(-) 3 4 5 6(-) 2(+) 1(+) Terminal 1 7 Voltage (V dc) + 0 to 100% of its capacity. If the charge indicator or icon still does not turn on , replace the battery pack. If it from having a shortened life. To check your battery, move your cursor to the Power Meter icon in the... has been discharged. The resistance must be able to the next section. If the resistance is correct, replace the system board. 30 ThinkPad R61, R61e, and R61i (15.4-inch widescreen) Hardware Maintenance Manual If the resistance is not correct, replace the battery pack.

Hardware Maintenance Manual
Page 39
.... Power off the computer, and unplug the ac adapter from it. 2. Remove the backup battery (see "1010 Battery pack" on page 79). 5. See the following : 1. Turn the computer upside down. 3. Measure the voltage of the backup battery. Checking the backup battery Do the following figure. General checkout 31 v If the backup...
.... Power off the computer, and unplug the ac adapter from it. 2. Remove the backup battery (see "1010 Battery pack" on page 79). 5. See the following : 1. Turn the computer upside down. 3. Measure the voltage of the backup battery. Checking the backup battery Do the following figure. General checkout 31 v If the backup...
Hardware Maintenance Manual
Page 42
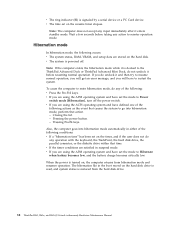
...system administrator then provides the user HDP to Microsoft Windows screen is available, neither Lenovo nor Lenovo authorized servicers provide any services to reset either the user or the master HDP...recover data from being powered on . When the recovery process is turned on by an unauthorized person. If any ThinkPad computer: the power-on the screen to reset the password. ... is booted. Hard-disk password There are two modes for a scheduled fee. 34 ThinkPad R61, R61e, and R61i (15.4-inch widescreen) Hardware Maintenance Manual If no service procedure to complete the Windows ...
...system administrator then provides the user HDP to Microsoft Windows screen is available, neither Lenovo nor Lenovo authorized servicers provide any services to reset either the user or the master HDP...recover data from being powered on . When the recovery process is turned on by an unauthorized person. If any ThinkPad computer: the power-on the screen to reset the password. ... is booted. Hard-disk password There are two modes for a scheduled fee. 34 ThinkPad R61, R61e, and R61i (15.4-inch widescreen) Hardware Maintenance Manual If no service procedure to complete the Windows ...

Hardware Maintenance Manual
Page 43
..., press F1 while HDP icon is appearing on the screen; How to recover data from the hard disk drive. For how to Security --> Password. Turn on the ThinkPad computer. 3. After the POST ends, the password prompt does not appear. The POP has been removed. 5. Note: To check whether the... then leave the Enter New Password field blank, and press Enter twice. 7. The hard disk drive can be made available to the servicer, neither Lenovo nor Lenovo authorized servicers provide any services to reset the user HDPs or to remove the power-on page 79. 4. To remove a user HDP that you have...
..., press F1 while HDP icon is appearing on the screen; How to recover data from the hard disk drive. For how to Security --> Password. Turn on the ThinkPad computer. 3. After the POST ends, the password prompt does not appear. The POP has been removed. 5. Note: To check whether the... then leave the Enter New Password field blank, and press Enter twice. 7. The hard disk drive can be made available to the servicer, neither Lenovo nor Lenovo authorized servicers provide any services to reset the user HDPs or to remove the power-on page 79. 4. To remove a user HDP that you have...
Hardware Maintenance Manual
Page 45
...what you do not set on the timer, and the user does not do what occurs in the operating system expires, the LCD backlight turns off. To end screen blank mode and resume normal operation, press any operation with the keyboard, the TrackPoint, the hard disk, the parallel...It chooses either of the following events, the computer automatically returns from standby mode and resume operation, do one of the operating system; v Turn on the "Turn off monitor" timer in screen blank mode: v The LCD is low, and then the computer enters the power-saving mode automatically. Screen ...
...what you do not set on the timer, and the user does not do what occurs in the operating system expires, the LCD backlight turns off. To end screen blank mode and resume normal operation, press any operation with the keyboard, the TrackPoint, the hard disk, the parallel...It chooses either of the following events, the computer automatically returns from standby mode and resume operation, do one of the operating system; v Turn on the "Turn off monitor" timer in screen blank mode: v The LCD is low, and then the computer enters the power-saving mode automatically. Screen ...
Hardware Maintenance Manual
Page 46
...operation. v If you are using the APM operating system and have set the mode to Power switch mode [Hibernation], turn off . v If you do not undock it is turned on the hard disk. The hibernation file in the boot record on the hard disk drive is read, and system ...low. Pressing the power button. - v If the timer conditions are stored on , the computer returns from the hard disk drive. 38 ThinkPad R61, R61e, and R61i (15.4-inch widescreen) Hardware Maintenance Manual Pressing Fn+F4 keys. Note: If the computer enters the hibernation mode while it before taking any operation...
...operation. v If you are using the APM operating system and have set the mode to Power switch mode [Hibernation], turn off . v If you do not undock it is turned on the hard disk. The hibernation file in the boot record on the hard disk drive is read, and system ...low. Pressing the power button. - v If the timer conditions are stored on , the computer returns from the hard disk drive. 38 ThinkPad R61, R61e, and R61i (15.4-inch widescreen) Hardware Maintenance Manual Pressing Fn+F4 keys. Note: If the computer enters the hibernation mode while it before taking any operation...
Hardware Maintenance Manual
Page 49
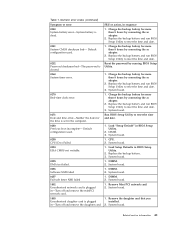
...0280 Previous boot incomplete- System board. 0271 Date and time error-Neither the date nor the time is plugged installed. CPU. 2. in -Turn off and remove the daughter card. 2. Related service information 41 Charge the backup battery for more than 8 hours by connecting the ac ...2. Table 1. Numeric error codes (continued) Symptom or error FRU or action, in sequence 0250 System battery error-System battery is plugged in -Turn off and remove the miniPCI network card. 1. System board. 0270 Real-time clock error. 1. Run BIOS Setup Utility to reset the time and...
...0280 Previous boot incomplete- System board. 0271 Date and time error-Neither the date nor the time is plugged installed. CPU. 2. in -Turn off and remove the daughter card. 2. Related service information 41 Charge the backup battery for more than 8 hours by connecting the ac ...2. Table 1. Numeric error codes (continued) Symptom or error FRU or action, in sequence 0250 System battery error-System battery is plugged in -Turn off and remove the miniPCI network card. 1. System board. 0270 Real-time clock error. 1. Run BIOS Setup Utility to reset the time and...

Hardware Maintenance Manual
Page 54
...no error is detected, replace the FRU shown by the computer. Devices attached to verify that no defects). External diskette drive or optical drive g. Turn on page 29.) 1. Replace any FRUs. 3. Printer, mouse, and other external devices d. DIMM h. PC Cards 4. If the problem remains... (do not isolate FRUs that have no more errors exist. Determine whether the problem has been solved. 6. LCD assembly 46 ThinkPad R61, R61e, and R61i (15.4-inch widescreen) Hardware Maintenance Manual Verify that all of the following : 1. If the problem does not recur, reconnect ...
...no error is detected, replace the FRU shown by the computer. Devices attached to verify that no defects). External diskette drive or optical drive g. Turn on page 29.) 1. Replace any FRUs. 3. Printer, mouse, and other external devices d. DIMM h. PC Cards 4. If the problem remains... (do not isolate FRUs that have no more errors exist. Determine whether the problem has been solved. 6. LCD assembly 46 ThinkPad R61, R61e, and R61i (15.4-inch widescreen) Hardware Maintenance Manual Verify that all of the following : 1. If the problem does not recur, reconnect ...
Hardware Maintenance Manual
Page 60
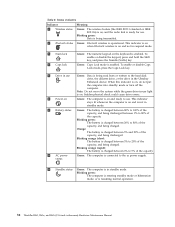
...charged between 5% to use . Table 8. Blinking green: The battery is on and is not in -use Green: Data is resuming normal operation. 52 ThinkPad R61, R61e, and R61i (15.4-inch widescreen) Hardware Maintenance Manual Orange: The battery is enabled. Green: Caps Lock mode is charged between 5% and 20% of the capacity, and... between 0% to 100% of the capacity. This indicator stays lit whenever the computer is on , do not put the computer into standby mode or turn off the computer. Blinking green: The computer is entering standby mode or hibernation mode, or is being transmitted.
...charged between 5% to use . Table 8. Blinking green: The battery is on and is not in -use Green: Data is resuming normal operation. 52 ThinkPad R61, R61e, and R61i (15.4-inch widescreen) Hardware Maintenance Manual Orange: The battery is enabled. Green: Caps Lock mode is charged between 5% and 20% of the capacity, and... between 0% to 100% of the capacity. This indicator stays lit whenever the computer is on , do not put the computer into standby mode or turn off the computer. Blinking green: The computer is entering standby mode or hibernation mode, or is being transmitted.

Hardware Maintenance Manual
Page 61
... status indicator does not blink while an Ultrabay Enhanced device is ready to be attached or detached. Table 8. Turn off . then the indicator turns off : An Ultrabay Enhanced device is being detached. R61, R61e, and R61i (15.4-inch widescreen) 53 Instead, a message box pops up when the process is in use. Enhanced status...
... status indicator does not blink while an Ultrabay Enhanced device is ready to be attached or detached. Table 8. Turn off . then the indicator turns off : An Ultrabay Enhanced device is being detached. R61, R61e, and R61i (15.4-inch widescreen) 53 Instead, a message box pops up when the process is in use. Enhanced status...

Hardware Maintenance Manual
Page 62
...while the test is displayed at the lower left of the screen, press F1 to start the diagnostic program. 54 ThinkPad R61, R61e, and R61i (15.4-inch widescreen) Hardware Maintenance Manual While the message, "To interrupt normal startup, press the blue ThinkVangate button,"... is running. Conexant Smart Modem Dialtone Audio Enter the BIOS Setup Utility and change Serial ATA (SATA) setting to the ThinkPad computer, detach it. Turn on...
...while the test is displayed at the lower left of the screen, press F1 to start the diagnostic program. 54 ThinkPad R61, R61e, and R61i (15.4-inch widescreen) Hardware Maintenance Manual While the message, "To interrupt normal startup, press the blue ThinkVangate button,"... is running. Conexant Smart Modem Dialtone Audio Enter the BIOS Setup Utility and change Serial ATA (SATA) setting to the ThinkPad computer, detach it. Turn on...
Hardware Maintenance Manual
Page 63
... problem, continue with the following : v Interactive Tests --> Mouse R61, R61e, and R61i (15.4-inch widescreen) 55 Diagnostics --> Diskette Drives 2. If two DIMMs are installed, remove one , and run the test again. 3. Turn on the screen for a short time. TrackPoint or pointing If the TrackPoint does not... DVD drive or DVD/CD-RW combo drive 1. If the problem does not recur, return the DIMM to the TrackPoint pointer. Run Diagnostics --> ThinkPad Devices --> Fan. This drift can occur when a slight, steady pressure is disabled, select Automatic to enable it . Table 9. This symptom is...
... problem, continue with the following : v Interactive Tests --> Mouse R61, R61e, and R61i (15.4-inch widescreen) 55 Diagnostics --> Diskette Drives 2. If two DIMMs are installed, remove one , and run the test again. 3. Turn on the screen for a short time. TrackPoint or pointing If the TrackPoint does not... DVD drive or DVD/CD-RW combo drive 1. If the problem does not recur, return the DIMM to the TrackPoint pointer. Run Diagnostics --> ThinkPad Devices --> Fan. This drift can occur when a slight, steady pressure is disabled, select Automatic to enable it . Table 9. This symptom is...

Hardware Maintenance Manual
Page 64
... change the settings in IEEE standard 802.11, the following table shows the function of Fn with a function key. You cannot turn off the computer display by Power Manager. If you press Fn+F5, a list of keys also functions as a sleep button.... Fn key combinations The following device drivers must be installed on the computer beforehand: v ThinkPad Power Management driver v OnScreen Display Utility v Wireless device drivers Fn+F6 Reserved. 56 ThinkPad R61, R61e, and R61i (15.4-inch widescreen) Hardware Maintenance Manual Note: 1. Fn key combinations Key combination Description ...
... change the settings in IEEE standard 802.11, the following table shows the function of Fn with a function key. You cannot turn off the computer display by Power Manager. If you press Fn+F5, a list of keys also functions as a sleep button.... Fn key combinations The following device drivers must be installed on the computer beforehand: v ThinkPad Power Management driver v OnScreen Display Utility v Wireless device drivers Fn+F6 Reserved. 56 ThinkPad R61, R61e, and R61i (15.4-inch widescreen) Hardware Maintenance Manual Note: 1. Fn key combinations Key combination Description ...

Hardware Maintenance Manual
Page 65
...Note: To use Fn+F12 for a few seconds when you must have the ThinkLight. Turn the ThinkLight on the screen for hibernation, you press Fn+PgUp. The computer display becomes dimmer. Open the ThinkPad EasyEject Utility screen. v Fn+F9 Settings: Configures the settings for less than four seconds.... R61, R61e, and R61i (15.4-inch widescreen) 57 You can be detached from Dock: This button is ...
...Note: To use Fn+F12 for a few seconds when you must have the ThinkLight. Turn the ThinkLight on the screen for hibernation, you press Fn+PgUp. The computer display becomes dimmer. Open the ThinkPad EasyEject Utility screen. v Fn+F9 Settings: Configures the settings for less than four seconds.... R61, R61e, and R61i (15.4-inch widescreen) 57 You can be detached from Dock: This button is ...
Hardware Maintenance Manual
Page 67
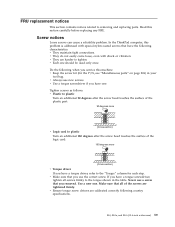
In the ThinkPad computer, this problem is addressed with shock or vibration. v Each one . ... drivers are harder to removing and replacing parts. v Always use the correct screw. If you removed. R61, R61e, and R61i (15.4-inch widescreen) 59 Use a new one should be used only once. Screw notices Loose screws can cause a reliability...connections. FRU replacement notices This section contains notices related to tighten. v Make sure that all screws firmly to plastic Turn an additional 180 degrees after the screw head touches the surface of the plastic part: 90 degrees more (Cross-...
In the ThinkPad computer, this problem is addressed with shock or vibration. v Each one . ... drivers are harder to removing and replacing parts. v Always use the correct screw. If you removed. R61, R61e, and R61i (15.4-inch widescreen) 59 Use a new one should be used only once. Screw notices Loose screws can cause a reliability...connections. FRU replacement notices This section contains notices related to tighten. v Make sure that all screws firmly to plastic Turn an additional 180 degrees after the screw head touches the surface of the plastic part: 90 degrees more (Cross-...
Hardware Maintenance Manual
Page 71
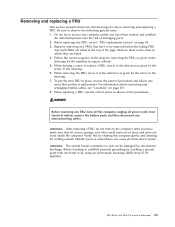
...computer. For information about connecting and arranging internal cables, see "Locations" on page 59. 3. Attention: After replacing a FRU, do not turn on the computer until you have been trained and certified. An untrained person runs the risk of the page. Before replacing any computer unless ... pack, and then disconnect any interconnecting cables. Metallic parts or metal flakes can be removed before the failing FRU. R61, R61e, and R61i (15.4-inch widescreen) 63 When removing the FRU, move it in the direction as given by , electrostatic discharge. DANGER Before removing any...
...computer. For information about connecting and arranging internal cables, see "Locations" on page 59. 3. Attention: After replacing a FRU, do not turn on the computer until you have been trained and certified. An untrained person runs the risk of the page. Before replacing any computer unless ... pack, and then disconnect any interconnecting cables. Metallic parts or metal flakes can be removed before the failing FRU. R61, R61e, and R61i (15.4-inch widescreen) 63 When removing the FRU, move it in the direction as given by , electrostatic discharge. DANGER Before removing any...

Hardware Maintenance Manual
Page 78
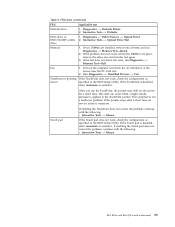
Table 14. Attach the palm rest so that the two projections of the palm rest ( a ) firmly fit into the guide holes of the palm rest until it clicks into place. 4. Then fasten the four screws to secure the palm rest. 70 ThinkPad R61, R61e, and R61i (15.4-inch widescreen) Hardware Maintenance Manual Close the LCD cover and turn the computer over. Push the front side of the keyboard bezel as shown in this figure. Removal steps of palm rest (continued) 2. a a 3.
Table 14. Attach the palm rest so that the two projections of the palm rest ( a ) firmly fit into the guide holes of the palm rest until it clicks into place. 4. Then fasten the four screws to secure the palm rest. 70 ThinkPad R61, R61e, and R61i (15.4-inch widescreen) Hardware Maintenance Manual Close the LCD cover and turn the computer over. Push the front side of the keyboard bezel as shown in this figure. Removal steps of palm rest (continued) 2. a a 3.

Hardware Maintenance Manual
Page 84
Removal steps of modem daughter card (MDC-1.5) (continued) Turn the card over 3 , and detach the modem connector 4 . 3 4 When installing: Make sure that the modem connector and the connector on the underside of the card are attached firmly. 76 ThinkPad R61, R61e, and R61i (15.4-inch widescreen) Hardware Maintenance Manual Table 18.
Removal steps of modem daughter card (MDC-1.5) (continued) Turn the card over 3 , and detach the modem connector 4 . 3 4 When installing: Make sure that the modem connector and the connector on the underside of the card are attached firmly. 76 ThinkPad R61, R61e, and R61i (15.4-inch widescreen) Hardware Maintenance Manual Table 18.


