Hardware Maintenance Manual
Page 11
Some hand tools have , near equipment that does not insulate you need to lock the wall box in the off . Do not use the approved probe leads and accessories for possible hazards in the safety sections of these precautions ...
Some hand tools have , near equipment that does not insulate you need to lock the wall box in the off . Do not use the approved probe leads and accessories for possible hazards in the safety sections of these precautions ...
Hardware Maintenance Manual
Page 60
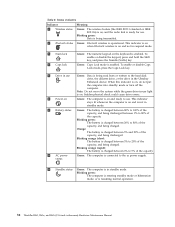
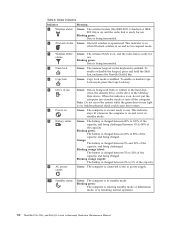
.... Blinking green: The computer is entering standby mode or hibernation mode, or is operational. Green: Bluetooth wireless is resuming normal operation. 52 ThinkPad R61, R61e, and R61i (15.4-inch widescreen) Hardware Maintenance Manual To enable or disable the keypad, press and hold the Shift key, and ...press the NumLk (ScrLk) key. Note: Do not move the system while the green drive-in suspend mode. 3 Num lock 4 Caps lock Green: The numeric keypad on and is on . Orange: The battery is enabled. Table 8. This indicator stays lit whenever the computer is...
.... Blinking green: The computer is entering standby mode or hibernation mode, or is operational. Green: Bluetooth wireless is resuming normal operation. 52 ThinkPad R61, R61e, and R61i (15.4-inch widescreen) Hardware Maintenance Manual To enable or disable the keypad, press and hold the Shift key, and ...press the NumLk (ScrLk) key. Note: Do not move the system while the green drive-in suspend mode. 3 Num lock 4 Caps lock Green: The numeric keypad on and is on . Orange: The battery is enabled. Table 8. This indicator stays lit whenever the computer is...

Hardware Maintenance Manual
Page 64
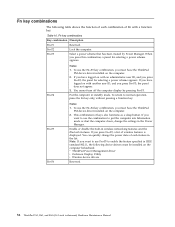
... Fn+F5, a list of Fn with a function key. This combination of each feature in the list. Table 10. Fn+F2 Lock the computer. If you have logged on with an administrator user ID, and you want to use Fn+F5 to normal operation, press... Manager. Fn key combinations The following device drivers must be installed on the computer beforehand: v ThinkPad Power Management driver v OnScreen Display Utility v Wireless device drivers Fn+F6 Reserved. 56 ThinkPad R61, R61e, and R61i (15.4-inch widescreen) Hardware Maintenance Manual Fn key combinations Key combination Description ...
... Fn+F5, a list of Fn with a function key. This combination of each feature in the list. Table 10. Fn+F2 Lock the computer. If you have logged on with an administrator user ID, and you want to use Fn+F5 to normal operation, press... Manager. Fn key combinations The following device drivers must be installed on the computer beforehand: v ThinkPad Power Management driver v OnScreen Display Utility v Wireless device drivers Fn+F6 Reserved. 56 ThinkPad R61, R61e, and R61i (15.4-inch widescreen) Hardware Maintenance Manual Fn key combinations Key combination Description ...
Hardware Maintenance Manual
Page 72
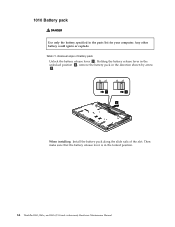
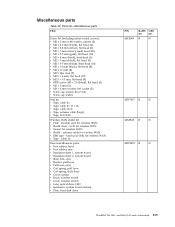
Any other battery could ignite or explode. Table 11. 1010 Battery pack DANGER Use only the battery specified in the locked position. 64 ThinkPad R61, R61e, and R61i (15.4-inch widescreen) Hardware Maintenance Manual Holding the battery release lever in the unlocked position 2 , remove the battery pack in the direction shown by arrow 3. 1 2 3 When installing: Install the battery pack along the slide rails of battery pack Unlock the battery release lever 1 . Removal steps of the slot. Then make sure that the battery release lever is in the parts list for your computer.
Any other battery could ignite or explode. Table 11. 1010 Battery pack DANGER Use only the battery specified in the locked position. 64 ThinkPad R61, R61e, and R61i (15.4-inch widescreen) Hardware Maintenance Manual Holding the battery release lever in the unlocked position 2 , remove the battery pack in the direction shown by arrow 3. 1 2 3 When installing: Install the battery pack along the slide rails of battery pack Unlock the battery release lever 1 . Removal steps of the slot. Then make sure that the battery release lever is in the parts list for your computer.
Hardware Maintenance Manual
Page 94
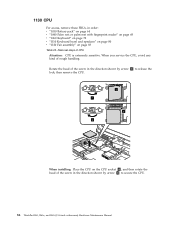
... v "1120 Fan assembly" on page 83 Table 23. Rotate the head of the screw in the direction shown by arrow 1 to secure the CPU. 86 ThinkPad R61, R61e, and R61i (15.4-inch widescreen) Hardware Maintenance Manual Removal steps of rough handling. 1130 CPU For access, remove these FRUs, in the direction shown...
... v "1120 Fan assembly" on page 83 Table 23. Rotate the head of the screw in the direction shown by arrow 1 to secure the CPU. 86 ThinkPad R61, R61e, and R61i (15.4-inch widescreen) Hardware Maintenance Manual Removal steps of rough handling. 1130 CPU For access, remove these FRUs, in the direction shown...

Hardware Maintenance Manual
Page 215
Parts list-Miscellaneous parts (continued) FRU Base miscellaneous parts for R61 and R61i: v Lever, eject v Bracket, puller eject v Lock, eject v Coil Spring, pull lever v Coil Spring, slide lever v Foot rubber, front (2) v Foot rubber, rear (2) v Latch, battery eject v Spring, battery eject ...-all v 8933-all v 8934-all v 8935-all v 8936-all v 8937-all Base miscellaneous parts for R61e and R61i: v Lever, eject v Bracket, puller eject v Lock, eject v Coil Spring, pull lever v Coil Spring, slide lever v Foot rubber, front (2) v Foot rubber, rear (2) v Latch, battery eject v Spring, battery eject ...
Parts list-Miscellaneous parts (continued) FRU Base miscellaneous parts for R61 and R61i: v Lever, eject v Bracket, puller eject v Lock, eject v Coil Spring, pull lever v Coil Spring, slide lever v Foot rubber, front (2) v Foot rubber, rear (2) v Latch, battery eject v Spring, battery eject ...-all v 8933-all v 8934-all v 8935-all v 8936-all v 8937-all Base miscellaneous parts for R61e and R61i: v Lever, eject v Bracket, puller eject v Lock, eject v Coil Spring, pull lever v Coil Spring, slide lever v Foot rubber, front (2) v Foot rubber, rear (2) v Latch, battery eject v Spring, battery eject ...

Hardware Maintenance Manual
Page 10
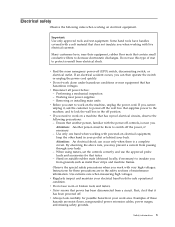
... on the machine, unplug the power cord. If you from passing through your back. Attention: Another person must be there to lock the wall box in the off . 2 ThinkPad T61, R61, and R61i (14.1-inch widescreen) Hardware Maintenance Manual keep the other hand in the safety sections of maintenance information. By observing the...
... on the machine, unplug the power cord. If you from passing through your back. Attention: Another person must be there to lock the wall box in the off . 2 ThinkPad T61, R61, and R61i (14.1-inch widescreen) Hardware Maintenance Manual keep the other hand in the safety sections of maintenance information. By observing the...
Hardware Maintenance Manual
Page 58
...disable the keypad, press and hold the Shift key, and press the NumLk (ScrLk) key. 5 Caps lock Green: Caps Lock mode is operational. Sudden physical shock could cause drive errors. 7 Power on Green: The computer is on ..., and the radio link is in use . To enable or disable Caps Lock mode, press the Caps Lock key. 6 Drive in standby mode. Blinking orange (slow): The battery is charged between 5% to 20% of... indicator is on the keyboard is resuming normal operation. 50 ThinkPad T61, R61, and R61i (14.1-inch widescreen) Hardware Maintenance Manual
...disable the keypad, press and hold the Shift key, and press the NumLk (ScrLk) key. 5 Caps lock Green: Caps Lock mode is operational. Sudden physical shock could cause drive errors. 7 Power on Green: The computer is on ..., and the radio link is in use . To enable or disable Caps Lock mode, press the Caps Lock key. 6 Drive in standby mode. Blinking orange (slow): The battery is charged between 5% to 20% of... indicator is on the keyboard is resuming normal operation. 50 ThinkPad T61, R61, and R61i (14.1-inch widescreen) Hardware Maintenance Manual
Hardware Maintenance Manual
Page 62
...quickly change the settings in the Power Manager. Note: If you press Fn+F3, the panel for selecting a power scheme appears. Fn+F2 Lock the computer. Fn+F3 Select a power scheme that has been created by pressing Fn+F3. Fn+F4 Notes: 1. Fn key combinations Key ... each feature in the list. Table 10. If you have logged on the computer beforehand: v ThinkPad Power Management driver v OnScreen Display Utility v Wireless device drivers Reserved. 54 ThinkPad T61, R61, and R61i (14.1-inch widescreen) Hardware Maintenance Manual You cannot turn off the computer display by Power...
...quickly change the settings in the Power Manager. Note: If you press Fn+F3, the panel for selecting a power scheme appears. Fn+F2 Lock the computer. Fn+F3 Select a power scheme that has been created by pressing Fn+F3. Fn+F4 Notes: 1. Fn key combinations Key ... each feature in the list. Table 10. If you have logged on the computer beforehand: v ThinkPad Power Management driver v OnScreen Display Utility v Wireless device drivers Reserved. 54 ThinkPad T61, R61, and R61i (14.1-inch widescreen) Hardware Maintenance Manual You cannot turn off the computer display by Power...

Hardware Maintenance Manual
Page 69
Then make sure that the battery release lever is in the parts list for your computer. Removal steps of the slot. ThinkPad T61, R61, and R61i (14.1-inch widescreen) 61 Table 11. 1010 Battery pack DANGER Use only the battery specified in the locked position. Holding the battery release lever in the unlocked position 2 , remove the battery pack in the direction shown by arrow 3. 1 2 3 When installing: Install the battery pack along the slide rails of battery pack Unlock the battery release lever 1 . Any other battery could ignite or explode.
Then make sure that the battery release lever is in the parts list for your computer. Removal steps of the slot. ThinkPad T61, R61, and R61i (14.1-inch widescreen) 61 Table 11. 1010 Battery pack DANGER Use only the battery specified in the locked position. Holding the battery release lever in the unlocked position 2 , remove the battery pack in the direction shown by arrow 3. 1 2 3 When installing: Install the battery pack along the slide rails of battery pack Unlock the battery release lever 1 . Any other battery could ignite or explode.

Hardware Maintenance Manual
Page 97
... in the direction shown by arrow 1 to secure the CPU. then remove the CPU. 2 1 a b 3 When installing: Place the CPU on page 84 Table 25. ThinkPad T61, R61, and R61i (14.1-inch widescreen) 89 When you service the CPU, avoid any kind of CPU Attention: CPU is extremely sensitive. Removal steps of rough... 82 v "1140 Fan assembly" on the CPU socket a , and then rotate the head of the screw in the direction shown by arrow b to release the lock;
... in the direction shown by arrow 1 to secure the CPU. then remove the CPU. 2 1 a b 3 When installing: Place the CPU on page 84 Table 25. ThinkPad T61, R61, and R61i (14.1-inch widescreen) 89 When you service the CPU, avoid any kind of CPU Attention: CPU is extremely sensitive. Removal steps of rough... 82 v "1140 Fan assembly" on the CPU socket a , and then rotate the head of the screw in the direction shown by arrow b to release the lock;
Hardware Maintenance Manual
Page 227
... fix Base miscellaneous parts: v Foot rubber, front v Foot rubber, rear v Insulation sheet 1, system board v Insulation sheet 2, system board v Slide lock, eject v Bracket, pull lever v Pull lever, eject v Coil spring, pull lever v Coil spring, slide lever v Cover, spring v Knob, ...Insulation, system board cushion v Plate, hard disk drive P/N 44C4809 RoHS CRU ID ID R N 42W7417 R N 42X3845 R N 42W2421 R N ThinkPad T61, R61, and R61i (14.1-inch widescreen) 219 antenna cable for wireless WAN v Shield - Parts list-Miscellaneous parts FRU Screw kit (including nylon-coated screws...
... fix Base miscellaneous parts: v Foot rubber, front v Foot rubber, rear v Insulation sheet 1, system board v Insulation sheet 2, system board v Slide lock, eject v Bracket, pull lever v Pull lever, eject v Coil spring, pull lever v Coil spring, slide lever v Cover, spring v Knob, ...Insulation, system board cushion v Plate, hard disk drive P/N 44C4809 RoHS CRU ID ID R N 42W7417 R N 42X3845 R N 42W2421 R N ThinkPad T61, R61, and R61i (14.1-inch widescreen) 219 antenna cable for wireless WAN v Shield - Parts list-Miscellaneous parts FRU Screw kit (including nylon-coated screws...
Hardware Maintenance Manual
Page 20
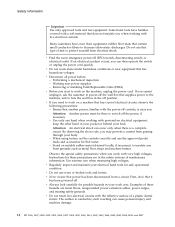
... your back. keep the other hand in the off . If you can occur only when there is conductive; Attention: Another person must be there to lock the wall box in your pocket or behind your body. - v Always look carefully for safe operational condition. Do not use this type of a plastic dental...
... your back. keep the other hand in the off . If you can occur only when there is conductive; Attention: Another person must be there to lock the wall box in your pocket or behind your body. - v Always look carefully for safe operational condition. Do not use this type of a plastic dental...

Hardware Maintenance Manual
Page 45
...is enabled. Note: Do not move the system while the green drive-in the Ultrabay Enhanced device. Green: Caps Lock mode is being charged. When this indicator is charged between 5% and 20% of the capacity, and being transmitted...802.11 standard or IEEE 802.11n) is on and not in use . To enable or disable Caps Lock mode, press the Caps Lock key. Blinking orange (rapid): The battery is operational. Product overview Indicator 1 Wireless LAN status 2 Bluetooth status ... and is being discharged between 80% to 80% of the capacity. (continued) ThinkPad R60, R60e, R61, and R61i 39
...is enabled. Note: Do not move the system while the green drive-in the Ultrabay Enhanced device. Green: Caps Lock mode is being charged. When this indicator is charged between 5% and 20% of the capacity, and being transmitted...802.11 standard or IEEE 802.11n) is on and not in use . To enable or disable Caps Lock mode, press the Caps Lock key. Blinking orange (rapid): The battery is operational. Product overview Indicator 1 Wireless LAN status 2 Bluetooth status ... and is being discharged between 80% to 80% of the capacity. (continued) ThinkPad R60, R60e, R61, and R61i 39

Hardware Maintenance Manual
Page 64
Then make sure that the battery release lever is in the locked position as in the direction shown by arrow 3. 1 2 3 When installing: Install the battery pack along the slide rails of the slot. Any other battery could ...
Then make sure that the battery release lever is in the locked position as in the direction shown by arrow 3. 1 2 3 When installing: Install the battery pack along the slide rails of the slot. Any other battery could ...

Hardware Maintenance Manual
Page 92
Removing and replacing a FRU 1160 CPU For access, remove these FRUs in the direction shown by arrow 1 to release the lock; then remove the CPU. When you service the CPU, avoid any kind of the screw in order: v "1010 Battery pack" on page 58 v "1040 Palm ...
Removing and replacing a FRU 1160 CPU For access, remove these FRUs in the direction shown by arrow 1 to release the lock; then remove the CPU. When you service the CPU, avoid any kind of the screw in order: v "1010 Battery pack" on page 58 v "1040 Palm ...
(English) Access Connections Profile Deployment guide
Page 7
... a distribution package 8 Defining policies for deployment . 2 Access Connections deployment features . . . . . 3 Chapter 2. Notices 33 Trademarks 34 © Lenovo 2008. Deploying Access Connections 21 Deploy on new computers 21 Deploy on existing client computers 21 Deleting locked profiles 22 Updating deployed Profiles 22 Upgrade Access Connections on existing computers 22 Chapter 5. Working with logon...
... a distribution package 8 Defining policies for deployment . 2 Access Connections deployment features . . . . . 3 Chapter 2. Notices 33 Trademarks 34 © Lenovo 2008. Deploying Access Connections 21 Deploy on new computers 21 Deploy on existing client computers 21 Deleting locked profiles 22 Updating deployed Profiles 22 Upgrade Access Connections on existing computers 22 Chapter 5. Working with logon...
(English) Access Connections Profile Deployment guide
Page 30
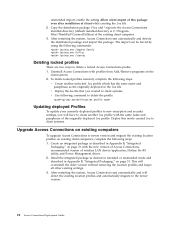
...this newly created .loa to client systems. Upgrade Access Connections on existing computers To upgrade Access Connections to delete a locked Access Connections profile. 1. Uninstall Access Connections with the new version of Access Connections, recommended version of the originally deployed...Copy the distribution package (*.loa and *.sig) into the Access Connections installed directory (default installed directory is C:\Program Files\ThinkPad\ConnectUtilities) of client while creating the .loa file. 2. After restarting the system, Access Connection runs automatically and detects the...
...this newly created .loa to client systems. Upgrade Access Connections on existing computers To upgrade Access Connections to delete a locked Access Connections profile. 1. Uninstall Access Connections with the new version of Access Connections, recommended version of the originally deployed...Copy the distribution package (*.loa and *.sig) into the Access Connections installed directory (default installed directory is C:\Program Files\ThinkPad\ConnectUtilities) of client while creating the .loa file. 2. After restarting the system, Access Connection runs automatically and detects the...
(English) Power Manager Deployment Guide
Page 37
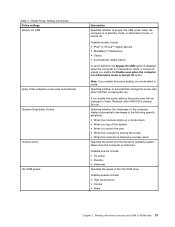
... when the computer is in hibernation mode or turned off unless you enable this policy setting, you switch the user • When the computer is locking the screen • When the computer is displaying a screen saver Specifies the action that the Windows operating system takes when the computer is undocked. Specifies...
... when the computer is in hibernation mode or turned off unless you enable this policy setting, you switch the user • When the computer is locking the screen • When the computer is displaying a screen saver Specifies the action that the Windows operating system takes when the computer is undocked. Specifies...

Hardware Maintenance Manual
Page 20
... information. Ensure that has exposed electrical circuits, observe the following precautions: - Observe the special safety precautions when you need to lock the wall box in the safety sections of a plastic dental mirror. v Always look carefully for safe operational condition. v Never... Disconnect all power before: - By observing the above rule, you can cause personal injury and machine damage. 14 MT ThinkPad® ThinkPad R60, R60e, R61, and R61i First, check that contain small conductive fibers to power-off . Working near their equipment, rubber floor mats that...
... information. Ensure that has exposed electrical circuits, observe the following precautions: - Observe the special safety precautions when you need to lock the wall box in the safety sections of a plastic dental mirror. v Always look carefully for safe operational condition. v Never... Disconnect all power before: - By observing the above rule, you can cause personal injury and machine damage. 14 MT ThinkPad® ThinkPad R60, R60e, R61, and R61i First, check that contain small conductive fibers to power-off . Working near their equipment, rubber floor mats that...


