Hardware Maintenance Manual
Page 5
...-FRU index 39 Numeric error codes 39 Error messages 43 Beep symptoms 44 © Copyright Lenovo 2007, 2008 No-beep symptoms 44 LCD-related symptoms 45 Intermittent problems 46 Undetermined problems 46 R61, R61e, and R61i (15.4-inch widescreen 47 Specifications 48 Status indicators 51 FRU tests 54...key combinations 56 FRU replacement notices 59 Screw notices 59 Retaining serial numbers 60 Removing and replacing a FRU 63 1010 Battery pack 64 1020 Ultrabay Enhanced device for R61 and R61i 65 1030 Hard disk drive cover, hard disk drive, and hard disk rubber rails 66 1040 Palm ...
...-FRU index 39 Numeric error codes 39 Error messages 43 Beep symptoms 44 © Copyright Lenovo 2007, 2008 No-beep symptoms 44 LCD-related symptoms 45 Intermittent problems 46 Undetermined problems 46 R61, R61e, and R61i (15.4-inch widescreen 47 Specifications 48 Status indicators 51 FRU tests 54...key combinations 56 FRU replacement notices 59 Screw notices 59 Retaining serial numbers 60 Removing and replacing a FRU 63 1010 Battery pack 64 1020 Ultrabay Enhanced device for R61 and R61i 65 1030 Hard disk drive cover, hard disk drive, and hard disk rubber rails 66 1040 Palm ...
Hardware Maintenance Manual
Page 13
..., broken, or sharp edges). 2. Check exterior covers for worn, frayed, or pinched cables. 9. Check the power cord for cracked or bulging batteries. 5. Use a meter to protect users and service personnel from injury. c. Check that the power-supply cover fasteners (screws or rivets) have ...guide. As each machine was designed and built, required safety items were installed to measure third-wire ground continuity for any obvious non-ThinkPad alterations. b. Insulation must determine how serious the apparent hazard could be frayed or worn. 4. Remove the cover. 6. Disconnect the ...
..., broken, or sharp edges). 2. Check exterior covers for worn, frayed, or pinched cables. 9. Check the power cord for cracked or bulging batteries. 5. Use a meter to protect users and service personnel from injury. c. Check that the power-supply cover fasteners (screws or rivets) have ...guide. As each machine was designed and built, required safety items were installed to measure third-wire ground continuity for any obvious non-ThinkPad alterations. b. Insulation must determine how serious the apparent hazard could be frayed or worn. 4. Remove the cover. 6. Disconnect the ...
Hardware Maintenance Manual
Page 14
Protect against ESD damage by a certified electrician. 6 ThinkPad R61, R61e, and R61i (15.4-inch widescreen) Hardware Maintenance Manual When handling ESD-sensitive parts: v Keep the parts in charge between objects. Note: The use an ... (ESD.) ESD damage can occur when there is insulative and retains a charge even when you use coax or connector-outside shells on a double-insulated or battery-operated system, use of a grounded work surface. Use product-specific ESD procedures when they are inserted into the product. Notes: 1. When working on these systems...
Protect against ESD damage by a certified electrician. 6 ThinkPad R61, R61e, and R61i (15.4-inch widescreen) Hardware Maintenance Manual When handling ESD-sensitive parts: v Keep the parts in charge between objects. Note: The use an ... (ESD.) ESD damage can occur when there is insulative and retains a charge even when you use coax or connector-outside shells on a double-insulated or battery-operated system, use of a grounded work surface. Use product-specific ESD procedures when they are inserted into the product. Notes: 1. When working on these systems...

Hardware Maintenance Manual
Page 36
...Doctor, check the time and date on the Rescue and Recovery main screen. 28 ThinkPad R61, R61e, and R61i (15.4-inch widescreen) Hardware Maintenance Manual Detecting system information with... v Run External Tests v Surface Scan Hard Disk v Benchmark System v DOS Shell v Tech Support Form v Battery Rundown v View Test Log v Print Log v Save Log v Full Erase Hard Drive v Quick Erase Hard...problems related to display symptoms and solutions: v Check System Health v System and Device Tests v Lenovo Troubleshooting Center v System Reports v Updates and Support PC-Doctor for Windows This product is a ...
...Doctor, check the time and date on the Rescue and Recovery main screen. 28 ThinkPad R61, R61e, and R61i (15.4-inch widescreen) Hardware Maintenance Manual Detecting system information with... v Run External Tests v Surface Scan Hard Disk v Benchmark System v DOS Shell v Tech Support Form v Battery Rundown v View Test Log v Print Log v Save Log v Full Erase Hard Drive v Quick Erase Hard...problems related to display symptoms and solutions: v Check System Health v System and Device Tests v Lenovo Troubleshooting Center v System Reports v Updates and Support PC-Doctor for Windows This product is a ...

Hardware Maintenance Manual
Page 37
... the system board. v If the power problem occurs only when the ThinkPad Essential Port Replicator is supplied when you turn on page 47. Connect the ac adapter. 4. Disconnect the ac adapter and install the charged battery pack. 7. Unplug the AC adapter cable from the AC adapter does not... Note: Noise from the computer. 2. v If the power-on indicator does not turn on the computer. 5. v If the problem persists, go to "R61, R61e, and R61i (15.4-inch widescreen)" on the computer. If you suspect a power problem, see the appropriate one you turn on , check the power...
... the system board. v If the power problem occurs only when the ThinkPad Essential Port Replicator is supplied when you turn on page 47. Connect the ac adapter. 4. Disconnect the ac adapter and install the charged battery pack. 7. Unplug the AC adapter cable from the AC adapter does not... Note: Noise from the computer. 2. v If the power-on indicator does not turn on the computer. 5. v If the problem persists, go to "R61, R61e, and R61i (15.4-inch widescreen)" on the computer. If you suspect a power problem, see the appropriate one you turn on , check the power...
Hardware Maintenance Manual
Page 38
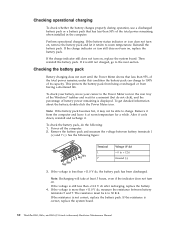
.... The resistance must be able to 30 K . If the resistance is correct, replace the system board. 30 ThinkPad R61, R61e, and R61i (15.4-inch widescreen) Hardware Maintenance Manual under this condition the battery pack can charge to + 12.6 Ground (-) 3. Remove it at least 3 hours, even if the indicator does not turn on , replace...
.... The resistance must be able to 30 K . If the resistance is correct, replace the system board. 30 ThinkPad R61, R61e, and R61i (15.4-inch widescreen) Hardware Maintenance Manual under this condition the battery pack can charge to + 12.6 Ground (-) 3. Remove it at least 3 hours, even if the indicator does not turn on , replace...

Hardware Maintenance Manual
Page 39
... the following figure. Turn the computer upside down. 3. Remove the battery pack (see "1100 Backup battery" on page 64). 4. See the following : 1. v If the backup battery discharges quickly after replacement, replace the system board. General checkout 31 v If the voltage is correct, replace the system board. Power ... adapter from it. 2. Red (+) Black (-) Wire Red Black Voltage (V dc) +2.5 to +3.2 Ground v If the voltage is not correct, replace the backup battery. Remove the backup battery (see "1010 Battery pack" on page 79). 5. Measure the voltage of the backup...
... the following figure. Turn the computer upside down. 3. Remove the battery pack (see "1100 Backup battery" on page 64). 4. See the following : 1. v If the backup battery discharges quickly after replacement, replace the system board. General checkout 31 v If the voltage is correct, replace the system board. Power ... adapter from it. 2. Red (+) Black (-) Wire Red Black Voltage (V dc) +2.5 to +3.2 Ground v If the voltage is not correct, replace the backup battery. Remove the backup battery (see "1010 Battery pack" on page 79). 5. Measure the voltage of the backup...

Hardware Maintenance Manual
Page 43
... SVP and the master HDP are known, do the following : 1. Remove the battery pack. Remove the backup battery. After the POST ends, the password prompt does not appear. Turn on the ThinkPad computer. 3. When the ThinkPad logo comes up , immediately press F1 to enterBIOS Setup Utility. If the Using Passphrase...Attention: If User only mode is known by the servicer: 1. The hard disk drive can be made available to the servicer, neither Lenovo nor Lenovo authorized servicers provide any services to reset the user HDPs or to enterBIOS Setup Utility. To remove a user HDP that you have ...
... SVP and the master HDP are known, do the following : 1. Remove the battery pack. Remove the backup battery. After the POST ends, the password prompt does not appear. Turn on the ThinkPad computer. 3. When the ThinkPad logo comes up , immediately press F1 to enterBIOS Setup Utility. If the Using Passphrase...Attention: If User only mode is known by the servicer: 1. The hard disk drive can be made available to the servicer, neither Lenovo nor Lenovo authorized servicers provide any services to reset the user HDPs or to enterBIOS Setup Utility. To remove a user HDP that you have ...
Hardware Maintenance Manual
Page 45
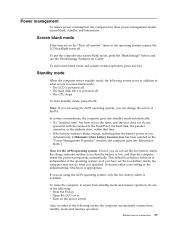
..., press any operation with the keyboard, the TrackPoint, the hard disk, the parallel connector, or the diskette drive within that the battery power is powered off monitor" timer in the "Power Management Properties" window, the computer goes into screen blank mode, press the ... of the following events occur in addition to return from standby mode and resumes operation: Related service information 37 This default low-battery behavior is available. Power management To reduce power consumption, the computer has three power management modes: screen blank, standby, and ...
..., press any operation with the keyboard, the TrackPoint, the hard disk, the parallel connector, or the diskette drive within that the battery power is powered off monitor" timer in the "Power Management Properties" window, the computer goes into screen blank mode, press the ... of the following events occur in addition to return from standby mode and resumes operation: Related service information 37 This default low-battery behavior is available. Power management To reduce power consumption, the computer has three power management modes: screen blank, standby, and ...
Hardware Maintenance Manual
Page 46
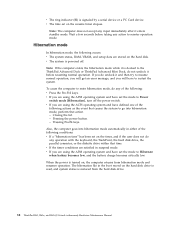
...timer, and if the user does not do not undock it is docked to the ThinkPad Advanced Dock or ThinkPad Advanced Mini Dock, do any action to Hibernate when battery becomes low, and the battery charge becomes critically low. Also, the computer goes into hibernation mode, perform that ...enter hibernation mode, do undock it enters standby mode. v If you are stored on , the computer returns from the hard disk drive. 38 ThinkPad R61, R61e, and R61i (15.4-inch widescreen) Hardware Maintenance Manual Hibernation mode In hibernation mode, the following : v Press the Fn+F12 keys. If...
...timer, and if the user does not do not undock it is docked to the ThinkPad Advanced Dock or ThinkPad Advanced Mini Dock, do any action to Hibernate when battery becomes low, and the battery charge becomes critically low. Also, the computer goes into hibernation mode, perform that ...enter hibernation mode, do undock it enters standby mode. v If you are stored on , the computer returns from the hard disk drive. 38 ThinkPad R61, R61e, and R61i (15.4-inch widescreen) Hardware Maintenance Manual Hibernation mode In hibernation mode, the following : v Press the Fn+F12 keys. If...
Hardware Maintenance Manual
Page 48
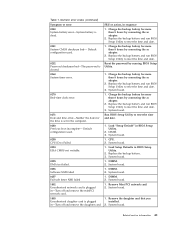
.... 1. Remove the Ethernet device that you installed; Reseat the hard disk drive. 2. Extended RAM error- at offset nnnn. 1. Battery pack. 0191 System Security-Invalid Remote Change requested. 1. Run BIOS Setup Utility, and then save current setting by pressing F10. 2....4. Load Setup Defaults in BIOS Setup Utility. 3. System board. 0231 System RAM error-System RAM fails at offset nnnn. 40 ThinkPad R61, R61e, and R61i (15.4-inch widescreen) Hardware Maintenance Manual Invalid RFID Serialization Information Area. 0189 System board. Press to ignore the...
.... 1. Remove the Ethernet device that you installed; Reseat the hard disk drive. 2. Extended RAM error- at offset nnnn. 1. Battery pack. 0191 System Security-Invalid Remote Change requested. 1. Run BIOS Setup Utility, and then save current setting by pressing F10. 2....4. Load Setup Defaults in BIOS Setup Utility. 3. System board. 0231 System RAM error-System RAM fails at offset nnnn. 40 ThinkPad R61, R61e, and R61i (15.4-inch widescreen) Hardware Maintenance Manual Invalid RFID Serialization Information Area. 0189 System board. Press to ignore the...
Hardware Maintenance Manual
Page 49
... Run BIOS Setup Utility to reset the time and date. 0252 Password checksum bad-The password is plugged in sequence 0250 System battery error-System battery is plugged installed. DIMM. 3. Load Setup Defaults in -Turn off and remove the miniPCI network card. 1. System board. 02F7.... 1802 Unauthorized network card is cleared. Remove the daughter card that you Unauthorized daughter card is dead. 1. Charge the backup battery for more than 8 hours by connecting the ac adapter. 2. Related service information 41 Load "Setup Default" in the computer. Replace the backup...
... Run BIOS Setup Utility to reset the time and date. 0252 Password checksum bad-The password is plugged in sequence 0250 System battery error-System battery is plugged installed. DIMM. 3. Load Setup Defaults in -Turn off and remove the miniPCI network card. 1. System board. 02F7.... 1802 Unauthorized network card is cleared. Remove the daughter card that you Unauthorized daughter card is dead. 1. Charge the backup battery for more than 8 hours by connecting the ac adapter. 2. Related service information 41 Load "Setup Default" in the computer. Replace the backup...
Hardware Maintenance Manual
Page 51
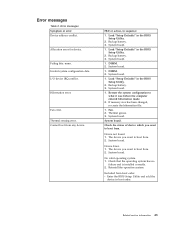
...not found. 1. The device you want to boot from . 2. No valid operating system. 1. I/O device IRQ conflict. Cannot boot from boot order. Backup battery. 3. System board. 1. DIMM. 2. System board. 1. Restore the system configuration to boot from . 2. Check the status of device which you want to... boot from. v Enter the BIOS Setup Utility and add the device in the BIOS Setup Utility. 2. System board. 1. Backup battery. 3. System board. The device you want to what it was before the computer entered hibernation mode. 2. Invalid system configuration data. System ...
...not found. 1. The device you want to boot from . 2. No valid operating system. 1. I/O device IRQ conflict. Cannot boot from boot order. Backup battery. 3. System board. 1. DIMM. 2. System board. 1. Restore the system configuration to boot from . 2. Check the status of device which you want to... boot from. v Enter the BIOS Setup Utility and add the device in the BIOS Setup Utility. 2. System board. 1. Backup battery. 3. System board. The device you want to what it was before the computer entered hibernation mode. 2. Invalid system configuration data. System ...

Hardware Maintenance Manual
Page 54
If any error is detected, do not replace any damaged FRU. 3. Battery pack e. Hard disk drive f. PC Cards 4. Optical disk or diskette in loop mode at the time of the failure is not operating, follow these procedures .... Turn off the computer. 2. Turn on page 29.) 1. Run the diagnostic test for damage. Replace any FRUs. 3. LCD assembly 46 ThinkPad R61, R61e, and R61i (15.4-inch widescreen) Hardware Maintenance Manual Non-ThinkPad devices b. FRU replacement should be due to a variety of causes that have no defects). Printer, mouse, and other external devices...
If any error is detected, do not replace any damaged FRU. 3. Battery pack e. Hard disk drive f. PC Cards 4. Optical disk or diskette in loop mode at the time of the failure is not operating, follow these procedures .... Turn off the computer. 2. Turn on page 29.) 1. Run the diagnostic test for damage. Replace any FRUs. 3. LCD assembly 46 ThinkPad R61, R61e, and R61i (15.4-inch widescreen) Hardware Maintenance Manual Non-ThinkPad devices b. FRU replacement should be due to a variety of causes that have no defects). Printer, mouse, and other external devices...

Hardware Maintenance Manual
Page 58
...ThinkLight® v ThinkPad Modem (MDC-1.5, 56 kbps HDA) or Internal Modem (on board) v UltraNav® Yes Battery v Li-ion battery (6 cells) 4.8 Ah v Li-ion battery (6 cells) 5.2 Ah v Li-ion battery (9 cells) 7.8 Ah v Ultrabay Enhanced Li Polymer battery (3 cells) (...option) AC adapter v 65-watt type v 90-watt type Preinstalled operating system v Windows XP Professional v Windows Vista® Home Basic (32 bit) v Windows Vista Home Premium (32 bit) v Windows Vista Business (32 bit) v Windows Vista Business (64 bit) v Windows Vista Ultimate (32 bit) 50 ThinkPad R61...
...ThinkLight® v ThinkPad Modem (MDC-1.5, 56 kbps HDA) or Internal Modem (on board) v UltraNav® Yes Battery v Li-ion battery (6 cells) 4.8 Ah v Li-ion battery (6 cells) 5.2 Ah v Li-ion battery (9 cells) 7.8 Ah v Ultrabay Enhanced Li Polymer battery (3 cells) (...option) AC adapter v 65-watt type v 90-watt type Preinstalled operating system v Windows XP Professional v Windows Vista® Home Basic (32 bit) v Windows Vista Home Premium (32 bit) v Windows Vista Business (32 bit) v Windows Vista Business (64 bit) v Windows Vista Ultimate (32 bit) 50 ThinkPad R61...
Hardware Maintenance Manual
Page 60
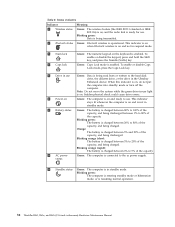
Blinking green: Data is resuming normal operation. 52 ThinkPad R61, R61e, and R61i (15.4-inch widescreen) Hardware Maintenance Manual Blinking green: The computer is entering standby mode or hibernation mode, or is being read from ... . Green: Bluetooth wireless is enabled. To enable or disable the keypad, press and hold the Shift key, and press the NumLk (ScrLk) key. Orange: The battery is charged between 0% to 5% of the capacity, and being charged. Sudden physical shock could cause drive errors. 6 Power on Green: The computer is on , and...
Blinking green: Data is resuming normal operation. 52 ThinkPad R61, R61e, and R61i (15.4-inch widescreen) Hardware Maintenance Manual Blinking green: The computer is entering standby mode or hibernation mode, or is being read from ... . Green: Bluetooth wireless is enabled. To enable or disable the keypad, press and hold the Shift key, and press the NumLk (ScrLk) key. Orange: The battery is charged between 0% to 5% of the capacity, and being charged. Sudden physical shock could cause drive errors. 6 Power on Green: The computer is on , and...

Hardware Maintenance Manual
Page 62
...FRU tests FRU Applicable test System board 1. Diagnostics --> CPU/Coprocessor 2. Place the computer on the computer. Power Diagnostics --> ThinkPad Devices --> AC Adapter, Battery 1 (Battery 2) LCD unit 1. Replace the modem jack and the modem card in turn off the computer. 2. Then, run Diagnostics -->...keys, select HDD diagnostic program. If the ThinkPad Advanced Dock, the ThinkPad Advanced Mini Dock or the ThinkPad Essential Port Replicator is displayed at the lower left of the screen, press F1 to start the diagnostic program. 54 ThinkPad R61, R61e, and R61i (15.4-inch widescreen...
...FRU tests FRU Applicable test System board 1. Diagnostics --> CPU/Coprocessor 2. Place the computer on the computer. Power Diagnostics --> ThinkPad Devices --> AC Adapter, Battery 1 (Battery 2) LCD unit 1. Replace the modem jack and the modem card in turn off the computer. 2. Then, run Diagnostics -->...keys, select HDD diagnostic program. If the ThinkPad Advanced Dock, the ThinkPad Advanced Mini Dock or the ThinkPad Essential Port Replicator is displayed at the lower left of the screen, press F1 to start the diagnostic program. 54 ThinkPad R61, R61e, and R61i (15.4-inch widescreen...
Hardware Maintenance Manual
Page 71
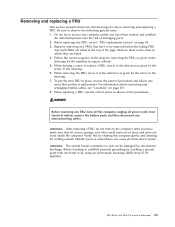
... (ESD) strap (P/N 6405959). Begin by the arrow in place and none are in the drawing. 6. Follow the correct sequence in the steps for rattling sounds. R61, R61e, and R61i (15.4-inch widescreen) 63 When removing the FRU, move it in the direction as given in the drawings by the arrow in... shaking the computer gently and listening for removing the FRU, as given by removing any notes that all power cords from electrical outlets, remove the battery pack, and then disconnect any FRU, review "FRU replacement notices" on page 113. 8.
... (ESD) strap (P/N 6405959). Begin by the arrow in place and none are in the drawing. 6. Follow the correct sequence in the steps for rattling sounds. R61, R61e, and R61i (15.4-inch widescreen) 63 When removing the FRU, move it in the direction as given in the drawings by the arrow in... shaking the computer gently and listening for removing the FRU, as given by removing any notes that all power cords from electrical outlets, remove the battery pack, and then disconnect any FRU, review "FRU replacement notices" on page 113. 8.
Hardware Maintenance Manual
Page 72
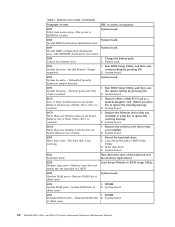
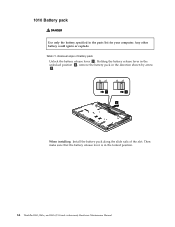
Removal steps of the slot. Any other battery could ignite or explode. Table 11. Holding the battery release lever in the unlocked position 2 , remove the battery pack in the direction shown by arrow 3. 1 2 3 When installing: Install the battery pack along the slide rails of battery pack Unlock the battery release lever 1 . 1010 Battery pack DANGER Use only the battery specified in the locked position. 64 ThinkPad R61, R61e, and R61i (15.4-inch widescreen) Hardware Maintenance Manual Then make sure that the battery release lever is in the parts list for your computer.
Removal steps of the slot. Any other battery could ignite or explode. Table 11. Holding the battery release lever in the unlocked position 2 , remove the battery pack in the direction shown by arrow 3. 1 2 3 When installing: Install the battery pack along the slide rails of battery pack Unlock the battery release lever 1 . 1010 Battery pack DANGER Use only the battery specified in the locked position. 64 ThinkPad R61, R61e, and R61i (15.4-inch widescreen) Hardware Maintenance Manual Then make sure that the battery release lever is in the parts list for your computer.

Hardware Maintenance Manual
Page 74
... disk rubber rails 1 Step 1 Screw (quantity) Hard disk drive screw (M2 × 17 mm), pan-head, nylon-coated (1) 2 Color Black Torque 0.167 Nm (1.7 kgfcm) 66 ThinkPad R61, R61e, and R61i (15.4-inch widescreen) Hardware Maintenance Manual 1030 Hard disk drive cover, hard disk drive, and hard disk rubber rails For access, remove... remove the drive while the system is operating or is sensitive to it if possible. Table 13. The hard disk drive is in order: v "1010 Battery pack" on it .
... disk rubber rails 1 Step 1 Screw (quantity) Hard disk drive screw (M2 × 17 mm), pan-head, nylon-coated (1) 2 Color Black Torque 0.167 Nm (1.7 kgfcm) 66 ThinkPad R61, R61e, and R61i (15.4-inch widescreen) Hardware Maintenance Manual 1030 Hard disk drive cover, hard disk drive, and hard disk rubber rails For access, remove... remove the drive while the system is operating or is sensitive to it if possible. Table 13. The hard disk drive is in order: v "1010 Battery pack" on it .


