

Hardware Maintenance Manual
Page 7
Use this manual along with the advanced diagnostic tests to troubleshoot problems. The manual is intended for ThinkPad® R60, R60e, R61, and R61i (MT 0656, 0657, 0658, 0659, 9455, 9456, 9457, 9458, 9459, 9460, 9461, 9462, 9463, 9464, 8942...tests to review the safety information under "Safety notices: multilingual translations" on page 7, "Safety information" on page 13, and "Laser compliance statement" on page 17. © Copyright Lenovo 2007 1 v The product-specific section includes service, reference, and product-specific parts information. Before servicing a ThinkPad product, ...
Use this manual along with the advanced diagnostic tests to troubleshoot problems. The manual is intended for ThinkPad® R60, R60e, R61, and R61i (MT 0656, 0657, 0658, 0659, 9455, 9456, 9457, 9458, 9459, 9460, 9461, 9462, 9463, 9464, 8942...tests to review the safety information under "Safety notices: multilingual translations" on page 7, "Safety information" on page 13, and "Laser compliance statement" on page 17. © Copyright Lenovo 2007 1 v The product-specific section includes service, reference, and product-specific parts information. Before servicing a ThinkPad product, ...

Hardware Maintenance Manual
Page 63
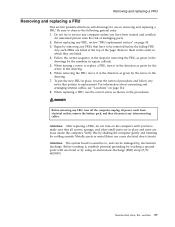
...cables, see "Locations" on the computer until you have made sure that pertain to service any computer unless you have been trained and certified. ThinkPad R60, R60e, R61, and R61i 57 An untrained person runs the risk of the page. When removing the FRU, move it , establish personal grounding... as given by the numbers in square callouts. 5. To put the new FRU in place, reverse the removal procedure and follow any FRU, review "FRU replacement notices" on page 54. 3. Metallic parts or metal flakes can be removed before the failing FRU. Verify this by shaking the...
...cables, see "Locations" on the computer until you have made sure that pertain to service any computer unless you have been trained and certified. ThinkPad R60, R60e, R61, and R61i 57 An untrained person runs the risk of the page. When removing the FRU, move it , establish personal grounding... as given by the numbers in square callouts. 5. To put the new FRU in place, reverse the removal procedure and follow any FRU, review "FRU replacement notices" on page 54. 3. Metallic parts or metal flakes can be removed before the failing FRU. Verify this by shaking the...
Hardware Maintenance Manual
Page 7
...ThinkPad® R60, R60e, R61, and R61i (MT 0656, 0657, 0658, 0659, 9455, 9456, 9457, 9458, 9459, 9444, 9445, 9460, 9461, 9462, 9463, 9464, 9446, 9447, 8942, 8943, 8944, 8945, 8947, 8948, and 8949) products. Use this manual along with the advanced diagnostic tests to review...page 13, and "Laser compliance statement" on page 17. © Copyright Lenovo 2007 1 About this manual This manual contains service and reference information for trained service personnel who are familiar with ThinkPad products. v The product-specific section includes service, reference, and product-specific ...
...ThinkPad® R60, R60e, R61, and R61i (MT 0656, 0657, 0658, 0659, 9455, 9456, 9457, 9458, 9459, 9444, 9445, 9460, 9461, 9462, 9463, 9464, 9446, 9447, 8942, 8943, 8944, 8945, 8947, 8948, and 8949) products. Use this manual along with the advanced diagnostic tests to review...page 13, and "Laser compliance statement" on page 17. © Copyright Lenovo 2007 1 About this manual This manual contains service and reference information for trained service personnel who are familiar with ThinkPad products. v The product-specific section includes service, reference, and product-specific ...
Hardware Maintenance Manual
Page 63
Remove them in the order in which they are loose inside the computer. ThinkPad R60, R60e, R61, and R61i 57 Do not try to replace a FRU, turn it in the direction as given by the numbers in square callouts. 5. Follow ... any notes that have to , and can cause electrical short circuits. Begin by the arrow in place, reverse the removal procedure and follow any FRU, review "FRU replacement notices" on page 54. 3. To put the new FRU in the drawing. 7. When removing the FRU, move it , establish personal grounding by touching...
Remove them in the order in which they are loose inside the computer. ThinkPad R60, R60e, R61, and R61i 57 Do not try to replace a FRU, turn it in the direction as given by the numbers in square callouts. 5. Follow ... any notes that have to , and can cause electrical short circuits. Begin by the arrow in place, reverse the removal procedure and follow any FRU, review "FRU replacement notices" on page 54. 3. To put the new FRU in the drawing. 7. When removing the FRU, move it , establish personal grounding by touching...

