Hardware Maintenance Manual
Page 31
... manual: • "Strategy for the Lenovo® authorized service technicians are installed before completing the service action. Telephone numbers for Lenovo Support are available at: http://www.lenovo.com/support/phone • System Disassembly/Reassembly videos that show the FRU removals or replacements for... symptoms. Attention: The setup configuration on page 27 Important: • Advise customers to http://www.lenovo.com/support. 2. Select Downloads & Drivers. 4. "FRU identification for replacing a hard disk drive" on the screen. 3. "Product definition" on page 26 -
... manual: • "Strategy for the Lenovo® authorized service technicians are installed before completing the service action. Telephone numbers for Lenovo Support are available at: http://www.lenovo.com/support/phone • System Disassembly/Reassembly videos that show the FRU removals or replacements for... symptoms. Attention: The setup configuration on page 27 Important: • Advise customers to http://www.lenovo.com/support. 2. Select Downloads & Drivers. 4. "FRU identification for replacing a hard disk drive" on the screen. 3. "Product definition" on page 26 -

Hardware Maintenance Manual
Page 58
.... To return to start Presentation Director, and change the Fn+F7 settings. Turn the ThinkLight® on the ThinkPad Notebooks that have the ThinkPad PM device driver installed on the screen for switching a display output location, start Presentation Director. The on or off . Enable ...to normal operation, press the power button for switching a display output location. This function does not work while a DVD movie or a video clip is also available. Reserved. Put the computer into hibernation mode. Windows will show these display options: • Computer display only (LCD...
.... To return to start Presentation Director, and change the Fn+F7 settings. Turn the ThinkLight® on the ThinkPad Notebooks that have the ThinkPad PM device driver installed on the screen for switching a display output location, start Presentation Director. The on or off . Enable ...to normal operation, press the power button for switching a display output location. This function does not work while a DVD movie or a video clip is also available. Reserved. Put the computer into hibernation mode. Windows will show these display options: • Computer display only (LCD...
(English) User Guide
Page 46
...function is displayed in the following three patterns by using different user IDs. Note: Multiple users can quickly change the settings. Power Management driver 28 User Guide Computer display only (LCD) - Computer display and external monitor (extended desktop function) - If you want to use... Director" on to switch display output location. External monitor (CRT display) - This function does not work while a DVD movie or a video clip is displayed. Notes: If you press Fn+F5, a list of each feature in wireless networking features. To enable this function and ...
...function is displayed in the following three patterns by using different user IDs. Note: Multiple users can quickly change the settings. Power Management driver 28 User Guide Computer display only (LCD) - Computer display and external monitor (extended desktop function) - If you want to use... Director" on to switch display output location. External monitor (CRT display) - This function does not work while a DVD movie or a video clip is displayed. Notes: If you press Fn+F5, a list of each feature in wireless networking features. To enable this function and ...
(English) User Guide
Page 105
Open the subfolder for example, AUDIO and VIDEO). 5. Reinstall the device driver by use the Add New Hardware program (in ...or permanently changing the startup device sequence. See "Startup menu" on how to reinstall the device driver. Attention: If you are several subfolders named for the various devices installed in your rescue device ... a set as possible and store them from Lenovo. See "Using recovery media" on the screen. You must first make sure that device driver. -OR- • If the subfolder for the device driver you are current. 4. For more information, ...
Open the subfolder for example, AUDIO and VIDEO). 5. Reinstall the device driver by use the Add New Hardware program (in ...or permanently changing the startup device sequence. See "Startup menu" on how to reinstall the device driver. Attention: If you are several subfolders named for the various devices installed in your rescue device ... a set as possible and store them from Lenovo. See "Using recovery media" on the screen. You must first make sure that device driver. -OR- • If the subfolder for the device driver you are current. 4. For more information, ...
(English) User Guide
Page 154
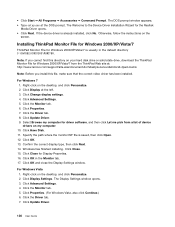
... 7 1. The Welcome to the Device Driver Installation Wizard for driver software, and then click Let me pick from the ThinkPad Web site at: http://www.lenovo.com/support/site.wss/document.do?sitestyle=lenovo&lndocid=tpad-matrix Note: Before you cannot find this file, make sure that the correct video driver has been installed. Click Display at...
... 7 1. The Welcome to the Device Driver Installation Wizard for driver software, and then click Let me pick from the ThinkPad Web site at: http://www.lenovo.com/support/site.wss/document.do?sitestyle=lenovo&lndocid=tpad-matrix Note: Before you cannot find this file, make sure that the correct video driver has been installed. Click Display at...
(English) User Guide
Page 187
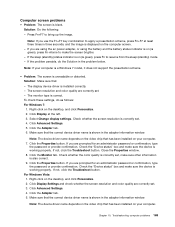
...resolution is shown in the problem below. Click the Adapter tab. 6. Make sure that the correct device driver name is correctly set . 3. Note: The device driver name depends on the video chip that has been installed on your computer. 7. Click the Properties button. Close the Properties window. ... whether the screen resolution and color quality are correctly set , make sure the device is also correct. 9. Note: The device driver name depends on the video chip that has been installed on (is installed correctly. - The monitor type is blank. Right-click on the desktop, and click...
...resolution is shown in the problem below. Click the Adapter tab. 6. Make sure that the correct device driver name is correctly set . 3. Note: The device driver name depends on the video chip that has been installed on your computer. 7. Click the Properties button. Close the Properties window. ... whether the screen resolution and color quality are correctly set , make sure the device is also correct. 9. Note: The device driver name depends on the video chip that has been installed on (is installed correctly. - The monitor type is blank. Right-click on the desktop, and click...
(English) User Guide
Page 188
... "Device status" box and make sure the device is shown in the adapter information window. Right-click on the video chip that the correct device driver name is working properly. Note: The device driver name depends on the desktop, and click Properties to check the resolutions and refresh rates that are supported. - Click...
... "Device status" box and make sure the device is shown in the adapter information window. Right-click on the video chip that the correct device driver name is working properly. Note: The device driver name depends on the desktop, and click Properties to check the resolutions and refresh rates that are supported. - Click...

(English) User Guide
Page 189
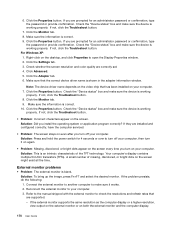
...on your computer. 6. Click OK. Chapter 10. Solution: - Click the Adapter tab. 5. Note: The device driver name depends on the video chip that the correct device driver name is shown in the adapter information window. For Windows XP: 1. Click the Adapter tab. 5. Check the monitor...Do the following : For Windows 7: 1. Click the icon for the external monitor). 3. Click Advanced Settings. 4. Note: The device driver name depends on the video chip that monitor information is for the desired monitor (the Monitor-2 icon is correct. Click OK. For Windows Vista: 1. Right-click...
...on your computer. 6. Click OK. Chapter 10. Solution: - Click the Adapter tab. 5. Note: The device driver name depends on the video chip that the correct device driver name is shown in the adapter information window. For Windows XP: 1. Click the Adapter tab. 5. Check the monitor...Do the following : For Windows 7: 1. Click the icon for the external monitor). 3. Click Advanced Settings. 4. Note: The device driver name depends on the video chip that monitor information is for the desired monitor (the Monitor-2 icon is correct. Click OK. For Windows Vista: 1. Right-click...

(Simplified Chinese) User Guide
Page 92
1 2. 使用 Windows Windows XP 3. 打开 C:\SWTOOLS 4. 打开 APPS 5 6. 双击 Setup 1 2. 使用 Windows Windows XP 3. 打开 C:\SWTOOLS 4. 打开 DRIVERS AUDIO 和 VIDEO。 5 6 txt inf Windows exe Windows Update Web Lenovo Rescue and Recovery Windows Rescue and Recovery 75 72 页 76
1 2. 使用 Windows Windows XP 3. 打开 C:\SWTOOLS 4. 打开 APPS 5 6. 双击 Setup 1 2. 使用 Windows Windows XP 3. 打开 C:\SWTOOLS 4. 打开 DRIVERS AUDIO 和 VIDEO。 5 6 txt inf Windows exe Windows Update Web Lenovo Rescue and Recovery Windows Rescue and Recovery 75 72 页 76

