
(English) Power Manager Deployment Guide
Page 28
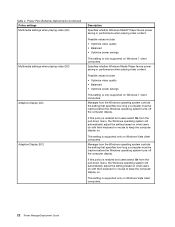
...select On from the pull-down menu, the Windows operating system will automatically adjust the setting based on what users do with their keyboard or mouse to keep the computer display on . Manages how the Windows operating system controls the setting that specifies how long a ...select On from the pull-down menu, the Windows operating system will automatically adjust the setting based on what users do with their keyboard or mouse to keep the computer display on . This setting is only supported on Windows Vista client computers. 22 Power ManagerDeployment Guide ...
...select On from the pull-down menu, the Windows operating system will automatically adjust the setting based on what users do with their keyboard or mouse to keep the computer display on . Manages how the Windows operating system controls the setting that specifies how long a ...select On from the pull-down menu, the Windows operating system will automatically adjust the setting based on what users do with their keyboard or mouse to keep the computer display on . This setting is only supported on Windows Vista client computers. 22 Power ManagerDeployment Guide ...
(Simplified Chinese) Lenovo AutoLock Deployment Guide
Page 12
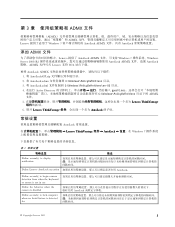
...22312;运行 Active Directory gpedit.msc C:\Windows\PolicyDefinitions ADMX 文件。 5 Lenovo ThinkVantage 6. 展开 Lenovo ThinkVantage AutoLock 常规设置 AutoLock Lenovo ThinkVantage 组件 ➙ AutoLock Windows 7 表 1 策略设...;置 描述 Define second(s) to display notification Define Lenovo AutoLock execution AutoLock。 Define second(s) to begin camera detection from when the keyboard or mouse is not in use Define the behavior when the ...
...22312;运行 Active Directory gpedit.msc C:\Windows\PolicyDefinitions ADMX 文件。 5 Lenovo ThinkVantage 6. 展开 Lenovo ThinkVantage AutoLock 常规设置 AutoLock Lenovo ThinkVantage 组件 ➙ AutoLock Windows 7 表 1 策略设...;置 描述 Define second(s) to display notification Define Lenovo AutoLock execution AutoLock。 Define second(s) to begin camera detection from when the keyboard or mouse is not in use Define the behavior when the ...

(Japanese) Lenovo AutoLock Deployment Guide
Page 13
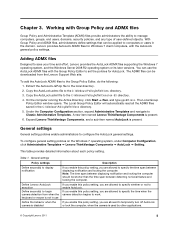
表 1 Define second(s) to display notification 説明 Define Lenovo AutoLock execution Define second(s) to begin camera detection from when the keyboard or mouse is not in use AutoLock Define the behavior when the camera is disabled AutoLock Define second(s) to lock computer when no facial feature is detected for Turn off the automatic lock function 2 while a second display is connected AutoLock Display notification before the computer automatically locks 6 Lenovo AutoLock
表 1 Define second(s) to display notification 説明 Define Lenovo AutoLock execution Define second(s) to begin camera detection from when the keyboard or mouse is not in use AutoLock Define the behavior when the camera is disabled AutoLock Define second(s) to lock computer when no facial feature is detected for Turn off the automatic lock function 2 while a second display is connected AutoLock Display notification before the computer automatically locks 6 Lenovo AutoLock
(English) Lenovo AutoLock Deployment Guide
Page 13
... or its later versions. Note: The time span between displaying notification and locking the computer should be downloaded from when the keyboard or mouse is not in use the AutoLock ADMX files with the Group Policy Editor to set the policies for Windows 7 ...section, expand Administrative Templates and navigate to the C:\Windows\PolicyDefinitions\en-US directory. 4. To add the AutoLock ADMX files to work. Expand Lenovo ThinkVantage Components, and a sub-item named AutoLock is present. 6. Table 1. Working with the AutoLock general policy settings. The Local Group Policy...
... or its later versions. Note: The time span between displaying notification and locking the computer should be downloaded from when the keyboard or mouse is not in use the AutoLock ADMX files with the Group Policy Editor to set the policies for Windows 7 ...section, expand Administrative Templates and navigate to the C:\Windows\PolicyDefinitions\en-US directory. 4. To add the AutoLock ADMX files to work. Expand Lenovo ThinkVantage Components, and a sub-item named AutoLock is present. 6. Table 1. Working with the AutoLock general policy settings. The Local Group Policy...
Hardware Maintenance Manual
Page 4
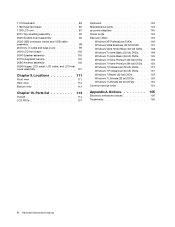
1170 Keyboard 83 1180 Keyboard bezel 85 1190 LCD unit 87 2010 Top shielding assembly 90 2020 System board assembly 92 2030 USB connector board and USB cable assembly 98 ... 2080 Antenna assembly 105 2090 Hinges, LCD panel, LCD cable, and LCD rear cover assembly 107 Chapter 9. Parts list 113 Overall 114 LCD FRUs 137 Keyboard 142 Miscellaneous parts 143 ac power adapters 145 Power cords 145 Recovery discs 146 Windows XP Professional DVDs 146 Windows Vista Business (32 bit) DVDs...
1170 Keyboard 83 1180 Keyboard bezel 85 1190 LCD unit 87 2010 Top shielding assembly 90 2020 System board assembly 92 2030 USB connector board and USB cable assembly 98 ... 2080 Antenna assembly 105 2090 Hinges, LCD panel, LCD cable, and LCD rear cover assembly 107 Chapter 9. Parts list 113 Overall 114 LCD FRUs 137 Keyboard 142 Miscellaneous parts 143 ac power adapters 145 Power cords 145 Recovery discs 146 Windows XP Professional DVDs 146 Windows Vista Business (32 bit) DVDs...
Hardware Maintenance Manual
Page 36
.... 2. Identify the failing symptoms in PC-Doctor. When the ThinkPad logo comes up, immediately press F1 to re-create the failure by spilling a liquid onto the keyboard • Use of the BIOS Setup Utility before you cannot change the parameters that support the Lenovo ThinkVantage Toolbox program and the PC-Doctor® for...
.... 2. Identify the failing symptoms in PC-Doctor. When the ThinkPad logo comes up, immediately press F1 to re-create the failure by spilling a liquid onto the keyboard • Use of the BIOS Setup Utility before you cannot change the parameters that support the Lenovo ThinkVantage Toolbox program and the PC-Doctor® for...
Hardware Maintenance Manual
Page 38
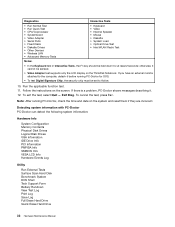
...8226; Video Adapter • Serial Ports • Fixed Disks • Diskette Drives • Other Devices • Wireless LAN • Advanced Memory Tests • Keyboard • Video • Internal Speaker • Mouse • Diskette • System Load • Optical Drive Test • Intel WLAN Radio Test Notes: ...8226; To test Digital Signature Chip, the security chip must be sensed. • Video Adapter test supports only the LCD display on the ThinkPad Notebook. otherwise, it cannot be set to the computer, detach it . 12. If there is a problem, PC-Doctor shows messages ...
...8226; Video Adapter • Serial Ports • Fixed Disks • Diskette Drives • Other Devices • Wireless LAN • Advanced Memory Tests • Keyboard • Video • Internal Speaker • Mouse • Diskette • System Load • Optical Drive Test • Intel WLAN Radio Test Notes: ...8226; To test Digital Signature Chip, the security chip must be sensed. • Video Adapter test supports only the LCD display on the ThinkPad Notebook. otherwise, it cannot be set to the computer, detach it . 12. If there is a problem, PC-Doctor shows messages ...
Hardware Maintenance Manual
Page 39
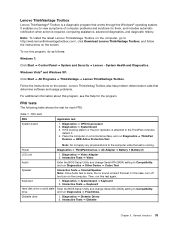
... 3. Place the computer on the computer. In this program, see the Help for each FRU. Keyboard 1. Diagnostics ➙ Diskette Drives 2. Note: To install the latest Lenovo ThinkVantage Toolbox on the computer, go to view symptoms of computer problems and solutions for them, and... when action is required, computing assistance, advanced diagnostics, and diagnostic history. To run Diagnostics ➙ ThinkPad Devices ➙ HDD Active Protection Test. Lenovo ThinkVantag Toolbox also has problem determination aids that works through the Windows® operating system. FRU tests FRU...
... 3. Place the computer on the computer. In this program, see the Help for each FRU. Keyboard 1. Diagnostics ➙ Diskette Drives 2. Note: To install the latest Lenovo ThinkVantage Toolbox on the computer, go to view symptoms of computer problems and solutions for them, and... when action is required, computing assistance, advanced diagnostics, and diagnostic history. To run Diagnostics ➙ ThinkPad Devices ➙ HDD Active Protection Test. Lenovo ThinkVantag Toolbox also has problem determination aids that works through the Windows® operating system. FRU tests FRU...
Hardware Maintenance Manual
Page 48
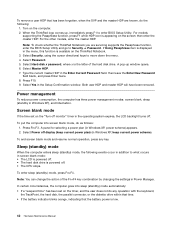
...disk drive is powered off display (keep current power scheme). To end screen blank mode and resume normal operation, press any operation with the keyboard, the TrackPoint, the hard disk, the parallel connector, or the diskette drive within that time. • If the battery indicator blinks orange...Power off . • The CPU stops. Select Hard-disk x password, where x is appearing on the computer. 2. Note: To check whether the ThinkPad Notebook you are known, do as follows: 1. Type the current master HDP in Windows XP, keep current power plan) (in the Enter Current Password field...
...disk drive is powered off display (keep current power scheme). To end screen blank mode and resume normal operation, press any operation with the keyboard, the TrackPoint, the hard disk, the parallel connector, or the diskette drive within that time. • If the battery indicator blinks orange...Power off . • The CPU stops. Select Hard-disk x password, where x is appearing on the computer. 2. Note: To check whether the ThinkPad Notebook you are known, do as follows: 1. Type the current master HDP in Windows XP, keep current power plan) (in the Enter Current Password field...
Hardware Maintenance Manual
Page 49
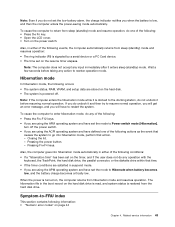
To cause the computer to enter hibernation mode, do any operation with the keyboard, the TrackPoint, the hard disk drive, the parallel connector, or the diskette drive within that time. • If the timer conditions are using the APM ...
To cause the computer to enter hibernation mode, do any operation with the keyboard, the TrackPoint, the hard disk drive, the parallel connector, or the diskette drive within that time. • If the timer conditions are using the APM ...
Hardware Maintenance Manual
Page 50
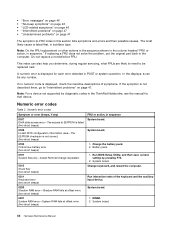
... or error (beeps, if any number. Charge the battery pack. 2. Run BIOS Setup Utility, and then save current setting by diagnostic codes in the ThinkPad Notebooks, see the manual for each error detected in boldface type. DIMM. 2. Do not replace a nondefective FRU. Numeric error codes Table 2. Note:...on page 47. The most likely cause is displayed for that device. If no numeric code is displayed, check the narrative descriptions of the keyboard and the auxiliary input device. 0230 Shadow RAM error-Shadow RAM fails at offset nnnn. (two short beeps) System board. 0231 System RAM...
... or error (beeps, if any number. Charge the battery pack. 2. Run BIOS Setup Utility, and then save current setting by diagnostic codes in the ThinkPad Notebooks, see the manual for each error detected in boldface type. DIMM. 2. Do not replace a nondefective FRU. Numeric error codes Table 2. Note:...on page 47. The most likely cause is displayed for that device. If no numeric code is displayed, check the narrative descriptions of the keyboard and the auxiliary input device. 0230 Shadow RAM error-Shadow RAM fails at offset nnnn. (two short beeps) System board. 0231 System RAM...
Hardware Maintenance Manual
Page 83
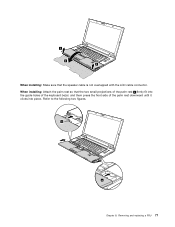
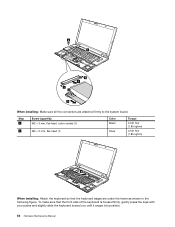
Refer to the following two figures. 3 4 3 When installing: Make sure that the two small projections of the palm rest a firmly fit into the guide holes of the keyboard bezel, and them press the front side of the palm rest downward until it clicks into place. When installing: Attach the palm rest so that the speaker cable is not overlapped with the LCD cable connector. Removing and replacing a FRU 77 a a Chapter 8.
Refer to the following two figures. 3 4 3 When installing: Make sure that the two small projections of the palm rest a firmly fit into the guide holes of the keyboard bezel, and them press the front side of the palm rest downward until it clicks into place. When installing: Attach the palm rest so that the speaker cable is not overlapped with the LCD cable connector. Removing and replacing a FRU 77 a a Chapter 8.
Hardware Maintenance Manual
Page 89
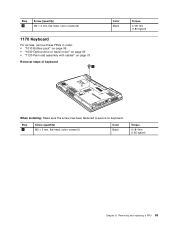
Step 2 Screw (quantity) M2 × 3 mm, flat-head, nylon-coated (2) 1170 Keyboard For access, remove these FRUs in order: • "1010 Battery pack" on page 59 • "1030 Optical drive or travel cover" on page 62 • "1120 Palm rest assembly with cables" on page 75 Removal steps of keyboard 1 Color Black Torque 0.181 Nm (1.85 kgfcm) When installing: Make sure the screw has been fastened to secure to keyboard. Removing and replacing a FRU 83 Step 1 Screw (quantity) M2 × 5 mm, flat-head, nylon-coated (1) Color Black Torque 0.181 Nm (1.85 kgfcm) Chapter 8.
Step 2 Screw (quantity) M2 × 3 mm, flat-head, nylon-coated (2) 1170 Keyboard For access, remove these FRUs in order: • "1010 Battery pack" on page 59 • "1030 Optical drive or travel cover" on page 62 • "1120 Palm rest assembly with cables" on page 75 Removal steps of keyboard 1 Color Black Torque 0.181 Nm (1.85 kgfcm) When installing: Make sure the screw has been fastened to secure to keyboard. Removing and replacing a FRU 83 Step 1 Screw (quantity) M2 × 5 mm, flat-head, nylon-coated (1) Color Black Torque 0.181 Nm (1.85 kgfcm) Chapter 8.
Hardware Maintenance Manual
Page 90
To make sure that the keyboard edges are attached firmly to the system board. 6 7 2 4 2 3 5 When installing: Make sure all the connectors are under the frame as shown in the following figure. ..., flat-head, nylon-coated (1) M2 × 2 mm, flat-head (1) Color Black Silver Torque 0.181 Nm (1.85 kgfcm) 0.181 Nm (1.85 kgfcm) 8 When installing: Attach the keyboard so that the front side of the keyboard is housed firmly, gently press the keys with your palms and slightly slide the...
To make sure that the keyboard edges are attached firmly to the system board. 6 7 2 4 2 3 5 When installing: Make sure all the connectors are under the frame as shown in the following figure. ..., flat-head, nylon-coated (1) M2 × 2 mm, flat-head (1) Color Black Silver Torque 0.181 Nm (1.85 kgfcm) 0.181 Nm (1.85 kgfcm) 8 When installing: Attach the keyboard so that the front side of the keyboard is housed firmly, gently press the keys with your palms and slightly slide the...

Hardware Maintenance Manual
Page 91
1180 Keyboard bezel For access, remove these FRUs in order: • "1010 Battery pack" on page 59 • "1030 Optical drive or travel cover" on page 62 &#... page 75 • "1130 PCI Express Mini Card for wireless LAN" on page 78 • "1170 Keyboard" on page 83 Removal steps of keyboard bezel Note: Steps 2a and 3a are only for ThinkPad L520 models. For ThinkPad L420 and L421 models, skip steps 2a and 3a . 3 3 1 2 2 2a 2a 2 1 3a 3 Chapter 8. Removing and replacing a FRU...
1180 Keyboard bezel For access, remove these FRUs in order: • "1010 Battery pack" on page 59 • "1030 Optical drive or travel cover" on page 62 &#... page 75 • "1130 PCI Express Mini Card for wireless LAN" on page 78 • "1170 Keyboard" on page 83 Removal steps of keyboard bezel Note: Steps 2a and 3a are only for ThinkPad L520 models. For ThinkPad L420 and L421 models, skip steps 2a and 3a . 3 3 1 2 2 2a 2a 2 1 3a 3 Chapter 8. Removing and replacing a FRU...
Hardware Maintenance Manual
Page 93
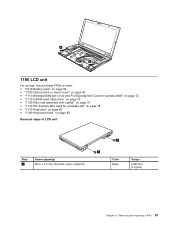
...; "1120 Palm rest assembly with cables" on page 75 • "1130 PCI Express Mini Card for wireless LAN" on page 78 • "1170 Keyboard" on page 83 • "1180 Keyboard bezel" on page 85 Removal steps of LCD unit Step 1 Screw (quantity) M2.5 × 6.5 mm, flat-head, nylon-coated (2) 1 1 Color Black Torque...
...; "1120 Palm rest assembly with cables" on page 75 • "1130 PCI Express Mini Card for wireless LAN" on page 78 • "1170 Keyboard" on page 83 • "1180 Keyboard bezel" on page 85 Removal steps of LCD unit Step 1 Screw (quantity) M2.5 × 6.5 mm, flat-head, nylon-coated (2) 1 1 Color Black Torque...

Hardware Maintenance Manual
Page 97
... 78 • "1170 Keyboard" on page 83 • "1180 Keyboard bezel" on page 85 • "1190 LCD unit" on page 87 Removal steps of top shielding assembly For ThinkPad L520 models: 1 22 1 2 1 2 2 3 Step 1 2 Screw (quantity) M2 × 3 mm, flat-headd, nylon-coated (3) M2 × 5 mm, flat-head, nylon-coated (5) For ThinkPad L420 and L421 models...
... 78 • "1170 Keyboard" on page 83 • "1180 Keyboard bezel" on page 85 • "1190 LCD unit" on page 87 Removal steps of top shielding assembly For ThinkPad L520 models: 1 22 1 2 1 2 2 3 Step 1 2 Screw (quantity) M2 × 3 mm, flat-headd, nylon-coated (3) M2 × 5 mm, flat-head, nylon-coated (5) For ThinkPad L420 and L421 models...

Hardware Maintenance Manual
Page 99
... on page 81 • "1170 Keyboard" on page 83 • "1180 Keyboard bezel" on page 85 • "1190 LCD unit" on page 87 • "2010 Top shielding assembly" on page 90 Location of major sensitive components on the system board in ThinkPad L420, L421, and L520 models The following...page 75 • "1130 PCI Express Mini Card for discrete models) d Platform Controller Hub (PCH) For ThinkPad L420 and L421 models with an integrated thermal module (top side view): a For ThinkPad L420 and L421 models with an integrated thermal module (bottom side view): Chapter 8. • "1020 ExpressCard blank ...
... on page 81 • "1170 Keyboard" on page 83 • "1180 Keyboard bezel" on page 85 • "1190 LCD unit" on page 87 • "2010 Top shielding assembly" on page 90 Location of major sensitive components on the system board in ThinkPad L420, L421, and L520 models The following...page 75 • "1130 PCI Express Mini Card for discrete models) d Platform Controller Hub (PCH) For ThinkPad L420 and L421 models with an integrated thermal module (top side view): a For ThinkPad L420 and L421 models with an integrated thermal module (bottom side view): Chapter 8. • "1020 ExpressCard blank ...
Hardware Maintenance Manual
Page 104
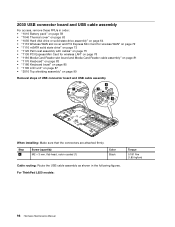
2030 USB connector board and USB cable assembly For access, remove these FRUs in the following figures. For ThinkPad L520 models: Torque 0.181 Nm (1.85 kgfcm) 98 Hardware Maintenance Manual Step 2 Screw (quantity) M2 × 3 mm, flat-head, nylon-coated (1) Color Black Cable routing: ... wireless LAN" on page 78 • "1160 Media Card Reader slot board and Media Card Reader cable assembly" on page 81 • "1170 Keyboard" on page 83 • "1180 Keyboard bezel" on page 85 • "1190 LCD unit" on page 87 • "2010 Top shielding assembly" on page 90 Removal steps of...
2030 USB connector board and USB cable assembly For access, remove these FRUs in the following figures. For ThinkPad L520 models: Torque 0.181 Nm (1.85 kgfcm) 98 Hardware Maintenance Manual Step 2 Screw (quantity) M2 × 3 mm, flat-head, nylon-coated (1) Color Black Cable routing: ... wireless LAN" on page 78 • "1160 Media Card Reader slot board and Media Card Reader cable assembly" on page 81 • "1170 Keyboard" on page 83 • "1180 Keyboard bezel" on page 85 • "1190 LCD unit" on page 87 • "2010 Top shielding assembly" on page 90 Removal steps of...
Hardware Maintenance Manual
Page 105
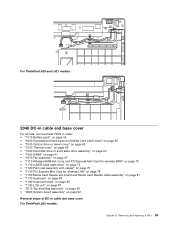
For ThinkPad L420 and L421 models: 2040 DC-in cable and base cover For access, remove these FRUs in order: • "1010 Battery pack" on page 59 • "... wireless LAN" on page 78 • "1160 Media Card Reader slot board and Media Card Reader cable assembly" on page 81 • "1170 Keyboard" on page 83 • "1180 Keyboard bezel" on page 85 • "1190 LCD unit" on page 87 • "2010 Top shielding assembly" on page 90 • "2020 System...
For ThinkPad L420 and L421 models: 2040 DC-in cable and base cover For access, remove these FRUs in order: • "1010 Battery pack" on page 59 • "... wireless LAN" on page 78 • "1160 Media Card Reader slot board and Media Card Reader cable assembly" on page 81 • "1170 Keyboard" on page 83 • "1180 Keyboard bezel" on page 85 • "1190 LCD unit" on page 87 • "2010 Top shielding assembly" on page 90 • "2020 System...


