
(English) User Guide
Page 3
... asked questions 19 Special keys and buttons 20 ThinkPad Edge E430, E430c, and E435 special keys 21 ThinkPad Edge E530, E530c, and E535 special keys 23 Using the UltraNav pointing device 25 Using the TrackPoint pointing device . . . . 26 Using the touch pad 27 Disabling the UltraNav pointing device and ... battery life 29 Managing the battery power 30 Power-saving modes 30 Handling the battery 31 © Copyright Lenovo 2012 Connecting to ThinkVantage programs . . . 16 Chapter 2. Contents Read this first v Important safety information vi Conditions that require immediate ...
... asked questions 19 Special keys and buttons 20 ThinkPad Edge E430, E430c, and E435 special keys 21 ThinkPad Edge E530, E530c, and E535 special keys 23 Using the UltraNav pointing device 25 Using the TrackPoint pointing device . . . . 26 Using the touch pad 27 Disabling the UltraNav pointing device and ... battery life 29 Managing the battery power 30 Power-saving modes 30 Handling the battery 31 © Copyright Lenovo 2012 Connecting to ThinkVantage programs . . . 16 Chapter 2. Contents Read this first v Important safety information vi Conditions that require immediate ...
(English) User Guide
Page 20
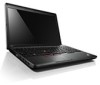
... rest functions as a system status indicator. UltraNav® pointing device 3 TrackPoint pointing stick 7 TrackPoint buttons 8 Touch pad The keyboard contains the Lenovo unique UltraNav pointing device. For more . Your computer has several status indicators. The fingerprint authentication technology enables you... about the supported cards, see "Using the UltraNav pointing device" on page 25. 4 System status indicator (illuminated ThinkPad logo) The illuminated ThinkPad logo on page 41. 6 Fingerprint reader Some models have a fingerprint reader. Pointing, selecting, and dragging are all...
... rest functions as a system status indicator. UltraNav® pointing device 3 TrackPoint pointing stick 7 TrackPoint buttons 8 Touch pad The keyboard contains the Lenovo unique UltraNav pointing device. For more . Your computer has several status indicators. The fingerprint authentication technology enables you... about the supported cards, see "Using the UltraNav pointing device" on page 25. 4 System status indicator (illuminated ThinkPad logo) The illuminated ThinkPad logo on page 41. 6 Fingerprint reader Some models have a fingerprint reader. Pointing, selecting, and dragging are all...

(English) User Guide
Page 21
...you can be used with an application program capable of a single process that can perform without moving your fingers from a typing position. ThinkPad Edge E530, E530c, and E535 front view 1 Built-in microphones capture sound and voice when used to quickly input numbers. Chapter 1. For more...camera, refer to take pictures or hold a video conference. UltraNav pointing device 3 TrackPoint pointing stick 8 TrackPoint buttons 9 Touch pad The keyboard contains the Lenovo unique UltraNav pointing device. ThinkPad Edge E530, E530c, and E535 front view Figure 2. Product overview 3
...you can be used with an application program capable of a single process that can perform without moving your fingers from a typing position. ThinkPad Edge E530, E530c, and E535 front view 1 Built-in microphones capture sound and voice when used to quickly input numbers. Chapter 1. For more...camera, refer to take pictures or hold a video conference. UltraNav pointing device 3 TrackPoint pointing stick 8 TrackPoint buttons 9 Touch pad The keyboard contains the Lenovo unique UltraNav pointing device. ThinkPad Edge E530, E530c, and E535 front view Figure 2. Product overview 3

(English) User Guide
Page 31
For E530, E530c, and E535 models: 15.6 inches (396.2 mm) • Resolution: - Depth: 234 mm (9.21 inches) - Height: 28.6 ... • Integrated camera (on some models) • Built-in microphones Keyboard • 6-row keyboard • UltraNav pointing device (TrackPoint and multi-touch touch pad) • Fn key • Numeric keypad (on some models) Interface • External monitor connectors (VGA connector and HDMI connector) •...Width: 339 mm (13.35 inches) - - LCD: Up to 1366x768 or 1600x900, depending on the model • For E530, E530c, and E535 models: Chapter 1.
For E530, E530c, and E535 models: 15.6 inches (396.2 mm) • Resolution: - Depth: 234 mm (9.21 inches) - Height: 28.6 ... • Integrated camera (on some models) • Built-in microphones Keyboard • 6-row keyboard • UltraNav pointing device (TrackPoint and multi-touch touch pad) • Fn key • Numeric keypad (on some models) Interface • External monitor connectors (VGA connector and HDMI connector) •...Width: 339 mm (13.35 inches) - - LCD: Up to 1366x768 or 1600x900, depending on the model • For E530, E530c, and E535 models: Chapter 1.

(English) User Guide
Page 43
...extended functions with other keys, refer to input numbers quickly. This setting enables the use of all basic and extended functions with the touch pad while limiting the use of the TrackPoint pointing device to scrolling and Magnifying Glass functions. • Set the TrackPoint pointing device as... same function as the ScrLK key. 3 Windows key Press this numeric keypad to the help information system of the TrackPoint pointing device and the touch pad. • Set the TrackPoint pointing device as the main pointing device, and disable the TrackPoint pointing device. Fn + P: Has the...
...extended functions with other keys, refer to input numbers quickly. This setting enables the use of all basic and extended functions with the touch pad while limiting the use of the TrackPoint pointing device to scrolling and Magnifying Glass functions. • Set the TrackPoint pointing device as... same function as the ScrLK key. 3 Windows key Press this numeric keypad to the help information system of the TrackPoint pointing device and the touch pad. • Set the TrackPoint pointing device as the main pointing device, and disable the TrackPoint pointing device. Fn + P: Has the...

(English) User Guide
Page 45
...drawing. Note: Your computer keyboard might look slightly different from your computer 27 Using the multi-touch touch pad The touch pad of your computer supports multi-touch with the default cap. Using the touch pad The touch pad is a pad 1 below the TrackPoint buttons at the bottom of the TrackPoint pointing ... browsing the Internet or reading or editing a document. Using your old keyboard and use it as follows: Chapter 2. Customizing the touch pad To customize the touch pad, do as shown in which you can replace it on the end of the keyboard. You can keep the cap from...
...drawing. Note: Your computer keyboard might look slightly different from your computer 27 Using the multi-touch touch pad The touch pad of your computer supports multi-touch with the default cap. Using the touch pad The touch pad is a pad 1 below the TrackPoint buttons at the bottom of the TrackPoint pointing ... browsing the Internet or reading or editing a document. Using your old keyboard and use it as follows: Chapter 2. Customizing the touch pad To customize the touch pad, do as shown in which you can replace it on the end of the keyboard. You can keep the cap from...
(English) User Guide
Page 46
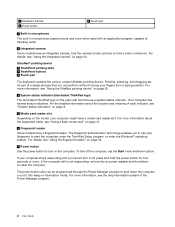
... power will determine how long you can enable the display of the UltraNav pointing device by allowing you use the external mouse simultaneously with ThinkPad batteries. The rate at different rates. There are two main factors: • How much energy is difficult to predict how long a... battery when you begin to work wherever you depend on page 28. The more time unplugged with the TrackPoint pointing device and the touch pad. With ThinkPad batteries, you need to an electrical outlet. In the Mouse Properties window, click the UltraNav tab. 3. Power management When you will...
... power will determine how long you can enable the display of the UltraNav pointing device by allowing you use the external mouse simultaneously with ThinkPad batteries. The rate at different rates. There are two main factors: • How much energy is difficult to predict how long a... battery when you begin to work wherever you depend on page 28. The more time unplugged with the TrackPoint pointing device and the touch pad. With ThinkPad batteries, you need to an electrical outlet. In the Mouse Properties window, click the UltraNav tab. 3. Power management When you will...

(English) User Guide
Page 57
Select Extend these displays in digital microphone Your computer also has an audio chip that they touch. Enabling the Extend desktop function To enable the Extend desktop function, do the following : 1. Set the resolution for the secondary display. 6. Note: You ... Colors. Press F6, then select Extend. Click Advanced Settings, select the Monitor tab, then set the monitors in any relative position, but the icons must touch each monitor, do the following : 1. Note: To change the resolution for the primary display, the computer display). 3. then connect the monitor to apply ...
Select Extend these displays in digital microphone Your computer also has an audio chip that they touch. Enabling the Extend desktop function To enable the Extend desktop function, do the following : 1. Set the resolution for the secondary display. 6. Note: You ... Colors. Press F6, then select Extend. Click Advanced Settings, select the Monitor tab, then set the monitors in any relative position, but the icons must touch each monitor, do the following : 1. Note: To change the resolution for the primary display, the computer display). 3. then connect the monitor to apply ...
(English) User Guide
Page 59
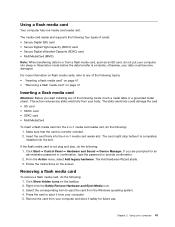
... menu, select Add legacy hardware. If you start installing any static electricity from a flash media card, such as an SD card, do the following cards, touch a metal table or a grounded metal object. Remove the card from the Windows operating system. 4. The card might stop before the data transfer is correctly oriented...
... menu, select Add legacy hardware. If you start installing any static electricity from a flash media card, such as an SD card, do the following cards, touch a metal table or a grounded metal object. Remove the card from the Windows operating system. 4. The card might stop before the data transfer is correctly oriented...
(English) User Guide
Page 62
The visual display screens of ThinkPad notebook computers are designed to meet the highest standards and to provide you with your computer, the more important it is committed to providing people with a soft touch without pounding the keys. If you modify and expand your computer... setting, be possible to observe the best ergonomic practices when you want. Many ThinkPad product solutions are easy to see the screen clearly. Some of these options: http://www.lenovo.com/accessories/services/index.html. Type with disabilities greater access to information and technology...
The visual display screens of ThinkPad notebook computers are designed to meet the highest standards and to provide you with your computer, the more important it is committed to providing people with a soft touch without pounding the keys. If you modify and expand your computer... setting, be possible to observe the best ergonomic practices when you want. Many ThinkPad product solutions are easy to see the screen clearly. Some of these options: http://www.lenovo.com/accessories/services/index.html. Type with disabilities greater access to information and technology...
(English) User Guide
Page 72
... state drive, using the software for initializing it seems to be lost. Notice on your computer, some of bad faith might read the data by Lenovo, bring the hard disk drive or solid state drive back to the factory default settings. The data on deleting data from the hard disk drive... • The surface of the reader is dirty or stained. • The surface of the reader with your fingernail or anything hard. • Using or touching the reader with a dirty finger. Handing your computer over your computer. You 54 User Guide • Scraping the surface of the reader is wet. •...
... state drive, using the software for initializing it seems to be lost. Notice on your computer, some of bad faith might read the data by Lenovo, bring the hard disk drive or solid state drive back to the factory default settings. The data on deleting data from the hard disk drive... • The surface of the reader is dirty or stained. • The surface of the reader with your fingernail or anything hard. • Using or touching the reader with a dirty finger. Handing your computer over your computer. You 54 User Guide • Scraping the surface of the reader is wet. •...

(English) User Guide
Page 81
... direct you to avoid static-electricity damage: • Limit your movement. When this specific system and manufactured by the edges. Never touch exposed circuitry. • Prevent others from the static-protective packaging and install the part without setting it down. Improper ... components carefully. This system supports only batteries specially designed for this is installed, the system will not charge. © Copyright Lenovo 2012 63 The system does not support unauthorized batteries or batteries designed for another system is not possible, place the static-protective ...
... direct you to avoid static-electricity damage: • Limit your movement. When this specific system and manufactured by the edges. Never touch exposed circuitry. • Prevent others from the static-protective packaging and install the part without setting it down. Improper ... components carefully. This system supports only batteries specially designed for this is installed, the system will not charge. © Copyright Lenovo 2012 63 The system does not support unauthorized batteries or batteries designed for another system is not possible, place the static-protective ...

(English) User Guide
Page 84
... metal contact facing upward and going into the slot until you upgrade it or have it to the cover of the drive. • Do not touch the connector. • Before removing the hard disk drive, make a backup copy of data. Incorrect handling can cause damage and permanent loss of all cables...
... metal contact facing upward and going into the slot until you upgrade it or have it to the cover of the drive. • Do not touch the connector. • Before removing the hard disk drive, make a backup copy of data. Incorrect handling can cause damage and permanent loss of all cables...

(English) User Guide
Page 91
... the wall. To avoid shock hazard, disconnect the cables before opening the cover of this slot. Attention: Before you start installing a PCI Express Mini Card, touch a metal table or a grounded metal object. See "Replacing the battery" on page 63. The static electricity could damage the card. Remove the battery. Replacing a PCI...
... the wall. To avoid shock hazard, disconnect the cables before opening the cover of this slot. Attention: Before you start installing a PCI Express Mini Card, touch a metal table or a grounded metal object. See "Replacing the battery" on page 63. The static electricity could damage the card. Remove the battery. Replacing a PCI...

(English) User Guide
Page 94
... connect the cable to let the computer cool. 2. This action reduces any static electricity from the computer. Attention: Before you start installing a wireless WAN card, touch a metal table or a grounded metal object. then disconnect the ac power adapter and all cables from your computer is hazardous. Prerequisites for wireless WAN connection...
... connect the cable to let the computer cool. 2. This action reduces any static electricity from the computer. Attention: Before you start installing a wireless WAN card, touch a metal table or a grounded metal object. then disconnect the ac power adapter and all cables from your computer is hazardous. Prerequisites for wireless WAN connection...

(English) User Guide
Page 99
... module Before you start , print these instructions. When replacing a memory module, be able to make programs run faster. Attention: Before you start installing a memory module, touch a metal table or a grounded metal object. This action reduces any static electricity from your computer might not be sure to follow the precautions. 10. The...
... module Before you start , print these instructions. When replacing a memory module, be able to make programs run faster. Attention: Before you start installing a memory module, touch a metal table or a grounded metal object. This action reduces any static electricity from your computer might not be sure to follow the precautions. 10. The...

(English) User Guide
Page 100
... the screws 1 , and then remove the cover 2 . 5. Attention: To avoid damaging the memory module, do not touch its contact edge. 82 User Guide Save the removed memory module for the new one. Find the notch on page 63. 4. then disconnect... and all cables from the computer. See "Replacing the battery" on the contact edge side of the memory module you are already in the memory slots, press out on the latches on both... edges of the socket at the same time 1 , and then remove a memory module 2 to let...
... the screws 1 , and then remove the cover 2 . 5. Attention: To avoid damaging the memory module, do not touch its contact edge. 82 User Guide Save the removed memory module for the new one. Find the notch on page 63. 4. then disconnect... and all cables from the computer. See "Replacing the battery" on the contact edge side of the memory module you are already in the memory slots, press out on the latches on both... edges of the socket at the same time 1 , and then remove a memory module 2 to let...
(English) User Guide
Page 131
...and enjoyment out of a computer malfunction. Handle storage media and drives properly • If your computer comes with an optical drive, do not touch the surface of a disc or the lens on the device. • Turn off attached devices, and disconnect cords and cables. • ...significant electrostatic charge. Even though this might damage the computer hinge. • Do not turn off your computer if you work environments, you touch the keyboard or other parts of the computer, or through your computer • Avoid placing any objects (including paper) between the display and...
...and enjoyment out of a computer malfunction. Handle storage media and drives properly • If your computer comes with an optical drive, do not touch the surface of a disc or the lens on the device. • Turn off attached devices, and disconnect cords and cables. • ...significant electrostatic charge. Even though this might damage the computer hinge. • Do not turn off your computer if you work environments, you touch the keyboard or other parts of the computer, or through your computer • Avoid placing any objects (including paper) between the display and...
(English) User Guide
Page 132
...the surface of the reader with your fingernail or anything hard. • Using or touching the reader with Lenovo at http://www.lenovo.com/register. Register your computer • Register your ThinkPad computer with a dirty finger. This action reduces any excess liquid drip. 114 User ... often fails to modify your computer • Only an authorized ThinkPad repair technician should disassemble and repair your passwords. This action reduces any of the reader is complete; Registering your computer also enables Lenovo to notify you if it , and you install any static electricity...
...the surface of the reader with your fingernail or anything hard. • Using or touching the reader with Lenovo at http://www.lenovo.com/register. Register your computer • Register your ThinkPad computer with a dirty finger. This action reduces any excess liquid drip. 114 User ... often fails to modify your computer • Only an authorized ThinkPad repair technician should disassemble and repair your passwords. This action reduces any of the reader is complete; Registering your computer also enables Lenovo to notify you if it , and you install any static electricity...
(English) User Guide
Page 141
... required. - Press any key to test the computer with your computer. Solution: If you still hear the beeps, have the computer serviced. Touch the TrackPoint pointing device or the touch pad, or press a key to resume from sleep or hibernation. The system board has a problem. Memory module problems Print these items are...
... required. - Press any key to test the computer with your computer. Solution: If you still hear the beeps, have the computer serviced. Touch the TrackPoint pointing device or the touch pad, or press a key to resume from sleep or hibernation. The system board has a problem. Memory module problems Print these items are...


