(Japanese) Power Manager Deployment Guide
Page 50
terms of validity - 『Peak power scheduler - time 表 6. Power Agenda Idle Timer Smart Shut Down 44 Power Manager 説明 Windows XP の場合) - 『Power Plan Windows Vista/7 Power Scheme Windows XP の場合) - 『Time Windows Vista/7 Windows XP の場合) - 『Idle Timer - 『Time - 『Time - 『ThinkPad LCD Brightness (ThinkPad LCD - 『External monitor brightness Windows Vista/7 のみ) - 『Time - 『Peak power scheduler -
terms of validity - 『Peak power scheduler - time 表 6. Power Agenda Idle Timer Smart Shut Down 44 Power Manager 説明 Windows XP の場合) - 『Power Plan Windows Vista/7 Power Scheme Windows XP の場合) - 『Time Windows Vista/7 Windows XP の場合) - 『Idle Timer - 『Time - 『Time - 『ThinkPad LCD Brightness (ThinkPad LCD - 『External monitor brightness Windows Vista/7 のみ) - 『Time - 『Peak power scheduler -
(Japanese) Power Manager Deployment Guide
Page 51
Active Directory と ADM/ADMX 45 表 6. Power Agenda Power Plan (Scheme ThinkPad LCD Brightness 16 (ThinkPad LCD 輝度 16) 説明 『Action Windows Vista/7 Windows XP 42 6『Power Agenda Action 注: 1 1 32 文字、2 16 2 Action Windows ...
Active Directory と ADM/ADMX 45 表 6. Power Agenda Power Plan (Scheme ThinkPad LCD Brightness 16 (ThinkPad LCD 輝度 16) 説明 『Action Windows Vista/7 Windows XP 42 6『Power Agenda Action 注: 1 1 32 文字、2 16 2 Action Windows ...
(Japanese) Power Manager Deployment Guide
Page 52
Power Agenda ThinkPad LCD Brightness 8 (ThinkPad LCD 輝度 8) External monitor brightness 説明 8 0 から 7)。 『Action Change monitor brightness 42 6『Power Agenda Action Action Change monitor brightness 42 6&#...
Power Agenda ThinkPad LCD Brightness 8 (ThinkPad LCD 輝度 8) External monitor brightness 説明 8 0 から 7)。 『Action Change monitor brightness 42 6『Power Agenda Action Action Change monitor brightness 42 6&#...
(English) Power Manager Deployment Guide
Page 47
Peak power scheduler - Notes: 1. Working with Active Directory and ADM or ADMX files 41 Idle Timer policy setting - ThinkPad LCD Brightness policy setting - External monitor brightness policy setting (Windows Vista/7 only) - Peak power scheduler - If you enable this policy setting, you enable this policy setting ...
Peak power scheduler - Notes: 1. Working with Active Directory and ADM or ADMX files 41 Idle Timer policy setting - ThinkPad LCD Brightness policy setting - External monitor brightness policy setting (Windows Vista/7 only) - Peak power scheduler - If you enable this policy setting, you enable this policy setting ...

(English) Power Manager Deployment Guide
Page 48
... monitor brightness increases when you select a higher brightness level. The monitor brightness increases when you select a higher brightness level. Power Agenda* (continued) Policy settings ThinkPad LCD Brightness 16 ThinkPad LCD Brightness 8 External monitor brightness 42 Power ManagerDeployment Guide Description Power Plan (For Windows Vista/7) or Switch to Change monitor brightness, users cannot use this...
... monitor brightness increases when you select a higher brightness level. The monitor brightness increases when you select a higher brightness level. Power Agenda* (continued) Policy settings ThinkPad LCD Brightness 16 ThinkPad LCD Brightness 8 External monitor brightness 42 Power ManagerDeployment Guide Description Power Plan (For Windows Vista/7) or Switch to Change monitor brightness, users cannot use this...

Harware Maintenance Manual
Page 3
... 23 Checkout guide 24 Diagnostics using Recovery Disc Set 33 Passwords 34 Power-on password 34 Hard-disk password 34 Supervisor password 35 © Copyright Lenovo 2009, 2012 How to remove the power-on password . . . 35 How to remove the hard-disk password . . . 35 Power management 36... 36 Sleep mode 36 Hibernation mode 36 Symptom-to-FRU index 37 Numeric error codes 37 Error messages 39 No-beep symptoms 39 LCD-related symptoms 40 Intermittent problems 40 Undetermined problems 41 Chapter 5. FRU replacement notices 47 Screw notices 47 Retaining serial numbers 48 Restoring ...
... 23 Checkout guide 24 Diagnostics using Recovery Disc Set 33 Passwords 34 Power-on password 34 Hard-disk password 34 Supervisor password 35 © Copyright Lenovo 2009, 2012 How to remove the power-on password . . . 35 How to remove the hard-disk password . . . 35 Power management 36... 36 Sleep mode 36 Hibernation mode 36 Symptom-to-FRU index 37 Numeric error codes 37 Error messages 39 No-beep symptoms 39 LCD-related symptoms 40 Intermittent problems 40 Undetermined problems 41 Chapter 5. FRU replacement notices 47 Screw notices 47 Retaining serial numbers 48 Restoring ...

Harware Maintenance Manual
Page 4
... Chapter 10. Notices 117 Trademarks 118 ii Hardware Maintenance Manual 2030 LCD panel and LCD cable 84 2040 Hinge kit 86 2050 Wireless LAN antenna assembly, wireless WAN antenna assembly, and LCD rear cover assembly 87 Chapter 9. Parts list 93 Overall 94 LCD FRUs 102 Keyboard 105 AC adapters 106 Miscellaneous parts 107 Power...
... Chapter 10. Notices 117 Trademarks 118 ii Hardware Maintenance Manual 2030 LCD panel and LCD cable 84 2040 Hinge kit 86 2050 Wireless LAN antenna assembly, wireless WAN antenna assembly, and LCD rear cover assembly 87 Chapter 9. Parts list 93 Overall 94 LCD FRUs 102 Keyboard 105 AC adapters 106 Miscellaneous parts 107 Power...

Harware Maintenance Manual
Page 27
...of FRUs at the following Web site: http://support.lenovo.com • To view the key commodities, do ?lndocid=LOOK-WARNTY Select Warranty lookup. Using eSupport For key commodities (examples - hard disk drive, system board, microprocessor, LCD, and memory) • eSupport can be accessed ...the instructions on the screen to view the complete list of key commodities are hard disk drives, system boards, microprocessors, Liquid Crystal Displays (LCDs), and memory. • Remember, all CTO and CMV products are PEW, eSupport, and the HMM. Important service information 21 Click Products ...
...of FRUs at the following Web site: http://support.lenovo.com • To view the key commodities, do ?lndocid=LOOK-WARNTY Select Warranty lookup. Using eSupport For key commodities (examples - hard disk drive, system board, microprocessor, LCD, and memory) • eSupport can be accessed ...the instructions on the screen to view the complete list of key commodities are hard disk drives, system boards, microprocessors, Liquid Crystal Displays (LCDs), and memory. • Remember, all CTO and CMV products are PEW, eSupport, and the HMM. Important service information 21 Click Products ...

Harware Maintenance Manual
Page 30
...included in the drive, or the insertion of a diskette with the ThinkPad Notebook. Note: If a supervisor password has been set by repeating the operation. Checkout guide Use the following Web site: http://support.lenovo.com To create the PC-Doctor diagnostic CD, follow the instructions ... whether the damage is covered under the warranty by referring to the following list: The following are not covered under warranty: • LCD panel cracked from the application of excessive force or from being dropped • Scratched (cosmetic) parts • Distortion, deformation, or discoloration...
...included in the drive, or the insertion of a diskette with the ThinkPad Notebook. Note: If a supervisor password has been set by repeating the operation. Checkout guide Use the following Web site: http://support.lenovo.com To create the PC-Doctor diagnostic CD, follow the instructions ... whether the damage is covered under the warranty by referring to the following list: The following are not covered under warranty: • LCD panel cracked from the application of excessive force or from being dropped • Scratched (cosmetic) parts • Distortion, deformation, or discoloration...

Harware Maintenance Manual
Page 32
... • In the Keyboard test in Interactive Tests, the Fn key should be sensed. • Video Adapter test supports only the LCD display on the ThinkPad Notebook. If there is a problem, PC-Doctor shows messages describing it before running PC-Doctor, check the time and date on the... • Logical Disk Drives • VGA Information • IDE Drive Info • PCI Information • PNPISA Info • SMBIOS Info • VESA LCD Info • Hardware Events Log Utility • Run External Tests • Surface Scan Hard Disk • Benchmark System • DOS Shell • Tech ...
... • In the Keyboard test in Interactive Tests, the Fn key should be sensed. • Video Adapter test supports only the LCD display on the ThinkPad Notebook. If there is a problem, PC-Doctor shows messages describing it before running PC-Doctor, check the time and date on the... • Logical Disk Drives • VGA Information • IDE Drive Info • PCI Information • PNPISA Info • SMBIOS Info • VESA LCD Info • Hardware Events Log Utility • Run External Tests • Surface Scan Hard Disk • Benchmark System • DOS Shell • Tech ...

Harware Maintenance Manual
Page 35
... Interactive Tests ➙ Diskette Chapter 3. Diagnostics ➙ Systemboard Power Diagnostics ➙ ThinkPadDevices ➙ AC Adapter, Battery 1 (Battery2) LCD unit 1. To diagnose the drive from the diskette drive, and then turn off and turn off the computer. 2. Remove any diskette from...diagnostic program that determine software and usage problems. For additional information about this test again. Diskette drive 1. Lenovo ThinkVantage Toolbox Lenovo ThinkVantage® Toolbox is displayed at the lower left of computer problems and solutions for them, and ...
... Interactive Tests ➙ Diskette Chapter 3. Diagnostics ➙ Systemboard Power Diagnostics ➙ ThinkPadDevices ➙ AC Adapter, Battery 1 (Battery2) LCD unit 1. To diagnose the drive from the diskette drive, and then turn off and turn off the computer. 2. Remove any diskette from...diagnostic program that determine software and usage problems. For additional information about this test again. Diskette drive 1. Lenovo ThinkVantage Toolbox Lenovo ThinkVantage® Toolbox is displayed at the lower left of computer problems and solutions for them, and ...
Harware Maintenance Manual
Page 42
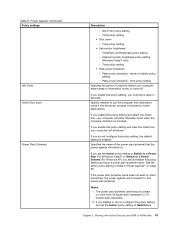
...mode To put the computer into screen blank mode, do as follows: 1. Select Power off . • The hard disk drive is appearing on the ThinkPad Notebook. 3. Click Start. 2. Hibernation mode By using the cursor directional keys to Security ➙ Password. Click the triangle mark on the right side of.... Select Master HDP. 7. To enter sleep mode, do as follows: 1. Select Password. 5. Type the current master HDP in screen blank mode: • The LCD is powered off display. To enter hibernation mode, do as follows: 1. When the ThinkPad logo comes up window opens. 6.
...mode To put the computer into screen blank mode, do as follows: 1. Select Power off . • The hard disk drive is appearing on the ThinkPad Notebook. 3. Click Start. 2. Hibernation mode By using the cursor directional keys to Security ➙ Password. Click the triangle mark on the right side of.... Select Master HDP. 7. To enter sleep mode, do as follows: 1. Select Password. 5. Type the current master HDP in screen blank mode: • The LCD is powered off display. To enter hibernation mode, do as follows: 1. When the ThinkPad logo comes up window opens. 6.

Harware Maintenance Manual
Page 43
...is displayed for that device Numeric error codes Table 2. Run BIOS Setup Utility, and then save current setting by diagnostic codes in the ThinkPad Notebooks, see the manual for each error detected in POST or system operation. Related service information 37 If replacing a FRU does not ...information: • "Numeric error codes" on page 37 • "Error messages" on page 39 • "No-beep symptoms" on page 39 • "LCD-related symptoms" on page 40 • "Intermittent problems" on page 40 • "Undetermined problems" on page 40. A numeric error is not described there,...
...is displayed for that device Numeric error codes Table 2. Run BIOS Setup Utility, and then save current setting by diagnostic codes in the ThinkPad Notebooks, see the manual for each error detected in POST or system operation. Related service information 37 If replacing a FRU does not ...information: • "Numeric error codes" on page 37 • "Error messages" on page 39 • "No-beep symptoms" on page 39 • "LCD-related symptoms" on page 40 • "Intermittent problems" on page 40 • "Undetermined problems" on page 40. A numeric error is not described there,...

Harware Maintenance Manual
Page 45
... the computer. 1. Install memory card. Press F1 to load the default setting. No-beep symptoms Symptom or error No beep, power-on indicator on , and LCD blank during POST. DIMM. 3. FRU or action, in -Power off and remove the miniPCI network card. (two short beeps) 1804 Unauthorized WAN card is connected... action, in sequence 1. System board. Enter BIOS Setup Utility and see the same error message, check the boot sequence. 3. No beep, power-on indicator on , LCD blank, and no failure and is properly identified.
... the computer. 1. Install memory card. Press F1 to load the default setting. No-beep symptoms Symptom or error No beep, power-on indicator on , and LCD blank during POST. DIMM. 3. FRU or action, in -Power off and remove the miniPCI network card. (two short beeps) 1804 Unauthorized WAN card is connected... action, in sequence 1. System board. Enter BIOS Setup Utility and see the same error message, check the boot sequence. 3. No beep, power-on indicator on , LCD blank, and no failure and is properly identified.

Harware Maintenance Manual
Page 46
... password or a supervisor password is set . Reseat the LCD connectors. 2. Reseat all ThinkPad Notebooks purchased on 1 January, 2008 or later. • Lenovo will not provide replacement if the LCD is detected, do not replace any FRUs. 3. Run the diagnostic test for "LCD-related symptoms." 2. However, if the LCD has three or more errors exist. 40 Hardware...
... password or a supervisor password is set . Reseat the LCD connectors. 2. Reseat all ThinkPad Notebooks purchased on 1 January, 2008 or later. • Lenovo will not provide replacement if the LCD is detected, do not replace any FRUs. 3. Run the diagnostic test for "LCD-related symptoms." 2. However, if the LCD has three or more errors exist. 40 Hardware...

Harware Maintenance Manual
Page 47
...does not recur, reconnect the removed devices one at the time of the following FRUs one at a time until you find the failing FRU. 7. LCD assembly Chapter 4. Visually check each FRU for damage. Printer, mouse, and other external devices c. Determine whether the problem has been solved. 6. ...that all of the failure is not operating, follow these procedures to isolate the failing FRU (do not replace a nondefective FRU): a. Non-ThinkPad devices b. Undetermined problems If the diagnostic tests did not identify the adapter or device that has failed, if wrong devices are supported by the...
...does not recur, reconnect the removed devices one at the time of the following FRUs one at a time until you find the failing FRU. 7. LCD assembly Chapter 4. Visually check each FRU for damage. Printer, mouse, and other external devices c. Determine whether the problem has been solved. 6. ...that all of the failure is not operating, follow these procedures to isolate the failing FRU (do not replace a nondefective FRU): a. Non-ThinkPad devices b. Undetermined problems If the diagnostic tests did not identify the adapter or device that has failed, if wrong devices are supported by the...
Harware Maintenance Manual
Page 51
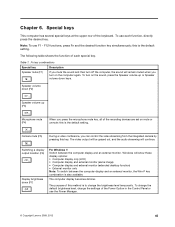
...a video conference, you mute the sound and then turn off the computer, the sound will show these display options: • Computer display only (LCD) • Computer display and external monitor (same image) • Computer display and external monitor (extended desktop function) • External monitor only .... The following table shows the function of the Power Option in the Control Panel or use the Power Manager. © Copyright Lenovo 2009, 2012 45 Fn key combinations Special key Description Speaker mute (F1) If you can control the video streaming from the integrated...
...a video conference, you mute the sound and then turn off the computer, the sound will show these display options: • Computer display only (LCD) • Computer display and external monitor (same image) • Computer display and external monitor (extended desktop function) • External monitor only .... The following table shows the function of the Power Option in the Control Panel or use the Power Manager. © Copyright Lenovo 2009, 2012 45 Fn key combinations Special key Description Speaker mute (F1) If you can control the video streaming from the integrated...

Harware Maintenance Manual
Page 83
Cable routing: Make sure that the connectors are attached firmly and you route the cables as shown in this figure. 1140 LCD unit For access, remove these FRUs in order: • "1010 Battery pack" on page 52 • "1020 Bottom slot cover" on page 52 • "1040 ...
Cable routing: Make sure that the connectors are attached firmly and you route the cables as shown in this figure. 1140 LCD unit For access, remove these FRUs in order: • "1010 Battery pack" on page 52 • "1020 Bottom slot cover" on page 52 • "1040 ...

Harware Maintenance Manual
Page 84
Removal steps of LCD unit 2 2 1 1 1 1 1 2 2 Step 2 Screw (quantity) M2.5 × 5 mm, flat-head, nylon-coated (4) Color Black Torque 0.392Nm (4 kgfcm) 78 Hardware Maintenance Manual
Removal steps of LCD unit 2 2 1 1 1 1 1 2 2 Step 2 Screw (quantity) M2.5 × 5 mm, flat-head, nylon-coated (4) Color Black Torque 0.392Nm (4 kgfcm) 78 Hardware Maintenance Manual
Harware Maintenance Manual
Page 86
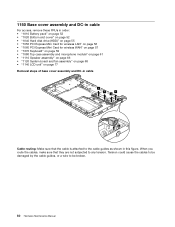
... and microphone module" on page 61 • "1110 Speaker assembly" on page 66 • "1120 System board and fan assembly" on page 68 • "1140 LCD unit" on page 77 Removal steps of base cover assembly and DC-in this figure.
... and microphone module" on page 61 • "1110 Speaker assembly" on page 66 • "1120 System board and fan assembly" on page 68 • "1140 LCD unit" on page 77 Removal steps of base cover assembly and DC-in this figure.


