
(English) User Guide
Page 4
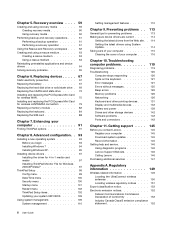
... Installing a new operating system 93 Before you contact Lenovo 145 Register your computer . . . . 116 Chapter 10. Getting support . . . . 145 Before you begin 93 Installing Windows 7 94 Installing Windows XP 95 Installing device drivers 97 Installing the driver for 4-in-1 media card reader 97 Installing ThinkPad Monitor File for wireless LAN/WiMAX connection 79 Replacing...
... Installing a new operating system 93 Before you contact Lenovo 145 Register your computer . . . . 116 Chapter 10. Getting support . . . . 145 Before you begin 93 Installing Windows 7 94 Installing Windows XP 95 Installing device drivers 97 Installing the driver for 4-in-1 media card reader 97 Installing ThinkPad Monitor File for wireless LAN/WiMAX connection 79 Replacing...

(English) User Guide
Page 30
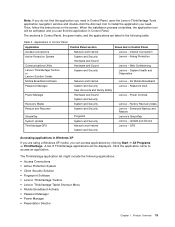
... Lenovo ThinkVantage Toolbox or Lenovo Solution Center Mobile Broadband Activate Password Manager Power Manager Recovery Media Rescue and Recovery® SimpleTap System Update ThinkVantage GPS Icon name Internet Connection Airbag Protection System Health and Diagnostics 3G Mobile Broadband Password Vault Power Controls Factory Recovery Disks Enhanced Backup and Restore SimpleTap Update and Drivers...
... Lenovo ThinkVantage Toolbox or Lenovo Solution Center Mobile Broadband Activate Password Manager Power Manager Recovery Media Rescue and Recovery® SimpleTap System Update ThinkVantage GPS Icon name Internet Connection Airbag Protection System Health and Diagnostics 3G Mobile Broadband Password Vault Power Controls Factory Recovery Disks Enhanced Backup and Restore SimpleTap Update and Drivers...
(English) User Guide
Page 31
Applications in Control Panel Application Control Panel section Green text in Control Panel Access Connections Network and Internet Lenovo - Power Controls Recovery Media System and Security Lenovo - Update and Drivers ThinkVantage GPS Network and Internet System and Security Lenovo - The sections in Control Panel, the green texts, and the applications are using a Windows XP model...
Applications in Control Panel Application Control Panel section Green text in Control Panel Access Connections Network and Internet Lenovo - Power Controls Recovery Media System and Security Lenovo - Update and Drivers ThinkVantage GPS Network and Internet System and Security Lenovo - The sections in Control Panel, the green texts, and the applications are using a Windows XP model...
(English) User Guide
Page 34
... computer is connected to -date by downloading and installing software packages (ThinkVantage applications, device drivers, UEFI Firmware updates, and other ThinkVantage Technologies, view messages from http://www.lenovo.com/support. Some examples of software that includes a set up -to the Internet, .... To start the Windows operating system. System Update The System Update program helps you keep updated are programs provided by Lenovo, such as device configuration, wireless network configuration, and computer management and maintenance. It enables you to help you diagnose ...
... computer is connected to -date by downloading and installing software packages (ThinkVantage applications, device drivers, UEFI Firmware updates, and other ThinkVantage Technologies, view messages from http://www.lenovo.com/support. Some examples of software that includes a set up -to the Internet, .... To start the Windows operating system. System Update The System Update program helps you keep updated are programs provided by Lenovo, such as device configuration, wireless network configuration, and computer management and maintenance. It enables you to help you diagnose ...

(English) User Guide
Page 38
... camera preview is playing. Note: The Camera settings area only appears if your computer beforehand: • Power Management driver • OnScreen Display Utility • Wireless device drivers For information on mute or unmute; Windows will show these display options: • Computer display only (LCD) &#...The computer display becomes dimmer. The purpose of this window, you want to enable or disable the wireless features, the following device drivers must be installed on page 44. Notes: If you can quickly change the brightness level temporarily. this button to use the Power ...
... camera preview is playing. Note: The Camera settings area only appears if your computer beforehand: • Power Management driver • OnScreen Display Utility • Wireless device drivers For information on mute or unmute; Windows will show these display options: • Computer display only (LCD) &#...The computer display becomes dimmer. The purpose of this window, you want to enable or disable the wireless features, the following device drivers must be installed on page 44. Notes: If you can quickly change the brightness level temporarily. this button to use the Power ...

(English) User Guide
Page 50
...the task bar. 2. The Start Using Bluetooth window opens, and some virtual device drivers are using Windows XP and want to use the Bluetooth function, do as follows: 1. By default, ThinkPad Bluetooth with Enhanced Data Rate Software is installed on your computer, two icons are installed... automatically. 2. Some other virtual device drivers will be degraded. For information about Bluetooth Settings. For Windows XP ...
...the task bar. 2. The Start Using Bluetooth window opens, and some virtual device drivers are using Windows XP and want to use the Bluetooth function, do as follows: 1. By default, ThinkPad Bluetooth with Enhanced Data Rate Software is installed on your computer, two icons are installed... automatically. 2. Some other virtual device drivers will be degraded. For information about Bluetooth Settings. For Windows XP ...

(English) User Guide
Page 52
... step 1- Another way to start the help is loaded automatically. 2. Select No, not this location in the search:, and type C:\SWTOOLS\Drivers\MSBTooth, or specify the location in Windows XP If you want to use the Microsoft Bluetooth software, do the following: a. Then click Next...follows: 36 User Guide Turn Bluetooth power on . 2. b. Select Install from http://www.lenovo.com/support); then click Next. c. Select Search for Bluetooth. d. Click Finish. Installing ThinkPad Bluetooth with Enhanced Data Rate Software; Press F9 to the setup.exe file you placed the ...
... step 1- Another way to start the help is loaded automatically. 2. Select No, not this location in the search:, and type C:\SWTOOLS\Drivers\MSBTooth, or specify the location in Windows XP If you want to use the Microsoft Bluetooth software, do the following: a. Then click Next...follows: 36 User Guide Turn Bluetooth power on . 2. b. Select Install from http://www.lenovo.com/support); then click Next. c. Select Search for Bluetooth. d. Click Finish. Installing ThinkPad Bluetooth with Enhanced Data Rate Software; Press F9 to the setup.exe file you placed the ...

(English) User Guide
Page 53
...location (Advanced), and then click Next. 9. Select Don't search. then click Next. 11. excellent. then click Update Driver. 7. Using WiMAX Some ThinkPad notebooks come with a Bluetooth option, data transmission speed can find more detailed information about the signal strength and status of your...provides you use the WiMAX feature, start Access Connections. Double-click the ThinkPad Bluetooth with a "last mile" broadband connectivity similar to the wireless access point. - I will choose the driver to the wireless radio is running Windows 7, the Access Connections Gauge in...
...location (Advanced), and then click Next. 9. Select Don't search. then click Next. 11. excellent. then click Update Driver. 7. Using WiMAX Some ThinkPad notebooks come with a Bluetooth option, data transmission speed can find more detailed information about the signal strength and status of your...provides you use the WiMAX feature, start Access Connections. Double-click the ThinkPad Bluetooth with a "last mile" broadband connectivity similar to the wireless access point. - I will choose the driver to the wireless radio is running Windows 7, the Access Connections Gauge in...

(English) User Guide
Page 57
...click Properties to close the window; otherwise do as follows. 8. If you are displayed, select Default Monitor. 9. Click the Settings tab. 6. Click the Driver tab. 11. For Windows XP: 1. Click the Monitor tab. If it is , click OK to change the color settings, right-click on my ...), and then click Next. 14. Note: To change the display output location to install, and then click Next. 15. I will choose the driver to the external monitor. 4. Set Colors and Screen area in the list, stop the installation of the virtual screen function, which enables you set ...
...click Properties to close the window; otherwise do as follows. 8. If you are displayed, select Default Monitor. 9. Click the Settings tab. 6. Click the Driver tab. 11. For Windows XP: 1. Click the Monitor tab. If it is , click OK to change the color settings, right-click on my ...), and then click Next. 14. Note: To change the display output location to install, and then click Next. 15. I will choose the driver to the external monitor. 4. Set Colors and Screen area in the list, stop the installation of the virtual screen function, which enables you set ...

(English) User Guide
Page 75
...Notes: To use this User Guide, you can use discs in a safe place after all other methods of recovery have made them. © Copyright Lenovo 2011 59 Type ghost -align=1mb and press Enter. • Acronis True Image 2010 or later • Paragon Backup & Recovery 10 Suit or ... 10 Home or later Creating and using recovery media You can perform using a rescue medium" on page 63 • "Reinstalling preinstalled applications and device drivers" on page 64 • "Solving recovery problems" on the operating system from when considering how to create only one data medium, so it is...
...Notes: To use this User Guide, you can use discs in a safe place after all other methods of recovery have made them. © Copyright Lenovo 2011 59 Type ghost -align=1mb and press Enter. • Acronis True Image 2010 or later • Paragon Backup & Recovery 10 Suit or ... 10 Home or later Creating and using recovery media You can perform using a rescue medium" on page 63 • "Reinstalling preinstalled applications and device drivers" on page 64 • "Solving recovery problems" on the operating system from when considering how to create only one data medium, so it is...
(English) User Guide
Page 76
...operations such as rescuing individual files. Select the desired startup device and press Enter. Notes: 1. See "Reinstalling preinstalled applications and device drivers" on the computer. Repeatedly press and release the F12 key when turning on page 64. 2. Insert the boot disc into the ...Windows XP operating system, you can use recovery media on the Windows 7 operating system, click Start ➙ All Programs ➙ Lenovo ThinkVantage Tools ➙ Factory Recovery Disks. To use Product Recovery discs to restore your recovery media, connect the boot medium (memory key...
...operations such as rescuing individual files. Select the desired startup device and press Enter. Notes: 1. See "Reinstalling preinstalled applications and device drivers" on the computer. Repeatedly press and release the F12 key when turning on page 64. 2. Insert the boot disc into the ...Windows XP operating system, you can use recovery media on the Windows 7 operating system, click Start ➙ All Programs ➙ Lenovo ThinkVantage Tools ➙ Factory Recovery Disks. To use Product Recovery discs to restore your recovery media, connect the boot medium (memory key...
(English) User Guide
Page 79
... the Windows desktop, click Start ➙ All Programs ➙ Lenovo ThinkVantage Tools ➙ Enhanced Backup and Restore. The Rescue and Recovery program opens. 2. Click the Create Rescue Media icon. Click OK and follow the instructions on the screen to reinstall device drivers for some devices. Turn off your hard disk drive. Recovery...
... the Windows desktop, click Start ➙ All Programs ➙ Lenovo ThinkVantage Tools ➙ Enhanced Backup and Restore. The Rescue and Recovery program opens. 2. Click the Create Rescue Media icon. Click OK and follow the instructions on the screen to reinstall device drivers for some devices. Turn off your hard disk drive. Recovery...
(English) User Guide
Page 80
... subfolder for the various devices installed in the startup device sequence to display the directory structure of your computer. 2. Reinstall the device driver by one of your computer (for a text file (a file with your computer. 2. On the Startup Device Menu, select the desired... Open the C:\SWTOOLS folder. 4. The rescue medium starts. • If you to correct a problem with the extension .txt). Reinstall device drivers only when it are several subfolders named for a factory-installed device, do the following : 1. Then, insert the rescue disc into the optical...
... subfolder for the various devices installed in the startup device sequence to display the directory structure of your computer. 2. Reinstall the device driver by one of your computer (for a text file (a file with your computer. 2. On the Startup Device Menu, select the desired... Open the C:\SWTOOLS folder. 4. The rescue medium starts. • If you to correct a problem with the extension .txt). Reinstall device drivers only when it are several subfolders named for a factory-installed device, do the following : 1. Then, insert the rescue disc into the optical...

(English) User Guide
Page 81
... disk drive, or other external devices) set as possible and store them in a safe place for future use. Then select the device driver file from Lenovo. Solving recovery problems If you are unable to access the Rescue and Recovery workspace or the Windows environment, do not download them from the... from the Windows Update Web site. See "Using a rescue medium" on page 99. For more information, see "ThinkPad Setup" on page 63. • Use recovery media if all device drivers can use of this program. See "Using recovery media" on the screen. -OR• If the subfolder for ...
... disk drive, or other external devices) set as possible and store them in a safe place for future use. Then select the device driver file from Lenovo. Solving recovery problems If you are unable to access the Rescue and Recovery workspace or the Windows environment, do not download them from the... from the Windows Update Web site. See "Using a rescue medium" on page 99. For more information, see "ThinkPad Setup" on page 63. • Use recovery media if all device drivers can use of this program. See "Using recovery media" on the screen. -OR• If the subfolder for ...

(English) User Guide
Page 109
...BIOS. Advanced configuration While it in top working shape. • "Installing a new operating system" on page 93 • "Installing device drivers" on page 97 • "ThinkPad Setup" on the hard disk drive, you may also need to avoid losing files during the installation. • Print the sections you ... or if you are in the installation, use of Windows do the following : Country or region: Code • China: SC © Copyright Lenovo 2011 93 Only 64-bit versions of Windows can take advantage of the following : • Copy all the data on your hard disk, including ...
...BIOS. Advanced configuration While it in top working shape. • "Installing a new operating system" on page 93 • "Installing device drivers" on page 97 • "ThinkPad Setup" on the hard disk drive, you may also need to avoid losing files during the installation. • Print the sections you ... or if you are in the installation, use of Windows do the following : Country or region: Code • China: SC © Copyright Lenovo 2011 93 Only 64-bit versions of Windows can take advantage of the following : • Copy all the data on your hard disk, including ...
(English) User Guide
Page 110
...-bit operating system, select Legacy Only or Both. • If you want to the following the instructions on the screen. 8. Install device drivers. Select UEFI/Legacy Boot. 4. Follow the instructions on page 97. Install the Intel Chipset Support for Windows 7 into the DVD drive, and...operating system in the search field, and click Search. 94 User Guide Start the ThinkPad Setup. 2. Press F10. 6. For information about each subfolder is the number of Windows 7 by following web site: http://www.lenovo.com/support. And complete the installation of a fix module. To do as follows:...
...-bit operating system, select Legacy Only or Both. • If you want to the following the instructions on the screen. 8. Install device drivers. Select UEFI/Legacy Boot. 4. Follow the instructions on page 97. Install the Intel Chipset Support for Windows 7 into the DVD drive, and...operating system in the search field, and click Search. 94 User Guide Start the ThinkPad Setup. 2. Press F10. 6. For information about each subfolder is the number of Windows 7 by following web site: http://www.lenovo.com/support. And complete the installation of a fix module. To do as follows:...
(English) User Guide
Page 111
...you remove the hard disk drive from the Microsoft top page. If you start the ThinkPad Setup. 4. Select Config. 5. Select AHCI. 7. Select Legacy Only or Both. 10. To install a third-party SCSI driver first, press F6. 13. When prompted, select S for Windows 2000/XP/Vista/7.... a blue screen. 1. Select Startup menu. 8. Select UEFI/Legacy Boot. 9. Chapter 8. Before installing the operating system, install Intel Rapid Storage Technology Driver, as follows: Note: Be sure to a diskette. 3. To continue the installation, press Enter again. To do this, refer to be copied from...
...you remove the hard disk drive from the Microsoft top page. If you start the ThinkPad Setup. 4. Select Config. 5. Select AHCI. 7. Select Legacy Only or Both. 10. To install a third-party SCSI driver first, press F6. 13. When prompted, select S for Windows 2000/XP/Vista/7.... a blue screen. 1. Select Startup menu. 8. Select UEFI/Legacy Boot. 9. Chapter 8. Before installing the operating system, install Intel Rapid Storage Technology Driver, as follows: Note: Be sure to a diskette. 3. To continue the installation, press Enter again. To do this, refer to be copied from...
(English) User Guide
Page 112
...it will not respond; Start the ThinkPad Setup menu. 16. Select Serial ATA (SATA). 18. The Welcome to C:\DRIVERS\WIN\IRST\PREPARE, and double-click install.cmd. 14. Select No, not this , refer to the ThinkPad Web site, http://www.lenovo.com/ThinkPadDrivers. Install the Intel Chipset... Support for the best driver in these locations. Start the ThinkPad Setup menu. 2. Select Config. 17. Select Search for Windows 2000/XP/Vista/7....
...it will not respond; Start the ThinkPad Setup menu. 16. Select Serial ATA (SATA). 18. The Welcome to C:\DRIVERS\WIN\IRST\PREPARE, and double-click install.cmd. 14. Select No, not this , refer to the ThinkPad Web site, http://www.lenovo.com/ThinkPadDrivers. Install the Intel Chipset... Support for the best driver in these locations. Start the ThinkPad Setup menu. 2. Select Config. 17. Select Search for Windows 2000/XP/Vista/7....

(English) User Guide
Page 113
...: If you remove the hard disk drive from the ThinkPad Web site at: http://www.lenovo.com/ThinkPadDrivers Note: Before you install this , refer to the instructions in C:\SWTOOLS\DRIVERS\INTELINF. 3. Advanced configuration 97 Installing device drivers To install device drivers, refer to the following directory: C:\SWTOOLS\DRIVERS\MONITOR. Restore C:\SWTOOLS from a computer with a single-core...
...: If you remove the hard disk drive from the ThinkPad Web site at: http://www.lenovo.com/ThinkPadDrivers Note: Before you install this , refer to the instructions in C:\SWTOOLS\DRIVERS\INTELINF. 3. Advanced configuration 97 Installing device drivers To install device drivers, refer to the following directory: C:\SWTOOLS\DRIVERS\MONITOR. Restore C:\SWTOOLS from a computer with a single-core...

(English) User Guide
Page 114
..., then click Next. 14. Select Don't search, I will show ThinkPad Display. Click Next. 13. Click Next. Select Browse my computer for driver software, and then click Let me pick from a list of device drivers on the desktop and select Properties from the pop up menu. 2. .... Select No, not this monitor INF. Click Next. 11. Specify C:\SWTOOLS\DRIVERS\MONITOR as location directory and select TPLCD.INF. 16. System will copy ThinkPad Monitor INF file and color profile. 18. Click Update Driver. 9. Click OK. 13. Click Close for Windows Update connection, and then ...
..., then click Next. 14. Select Don't search, I will show ThinkPad Display. Click Next. 13. Click Next. Select Browse my computer for driver software, and then click Let me pick from a list of device drivers on the desktop and select Properties from the pop up menu. 2. .... Select No, not this monitor INF. Click Next. 11. Specify C:\SWTOOLS\DRIVERS\MONITOR as location directory and select TPLCD.INF. 16. System will copy ThinkPad Monitor INF file and color profile. 18. Click Update Driver. 9. Click OK. 13. Click Close for Windows Update connection, and then ...


